2003 SSANGYONG MUSSO instrument cluster
[x] Cancel search: instrument clusterPage 889 of 1574
5A-30 AUTOMATIC TRANSMISSION
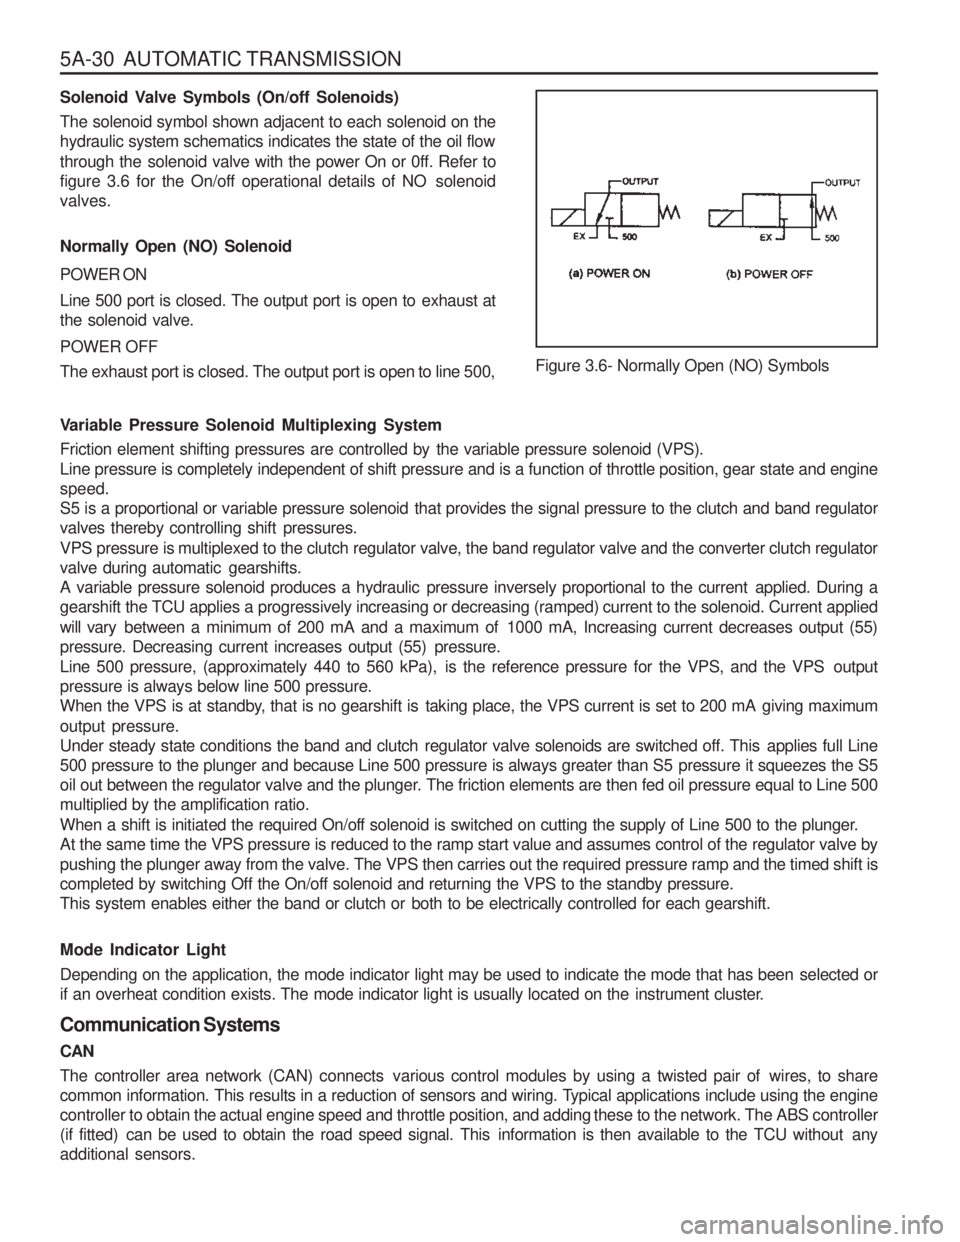
Solenoid Valve Symbols (On/off Solenoids)
The solenoid symbol shown adjacent to each solenoid on the
hydraulic system schematics indicates the state of the oil flow
through the solenoid valve with the power On or 0ff. Refer to
figure 3.6 for the On/off operational details of NO solenoidvalves. Normally Open (NO) Solenoid POWER ON
Line 500 port is closed. The output port is open to exhaust at the solenoid valve. POWER OFF
The exhaust port is closed. The output port is open to line 500,Figure 3.6- Normally Open (NO) Symbols
Variable Pressure Solenoid Multiplexing System
Friction element shifting pressures are controlled by the variable pressure solenoid (VPS).
Line pressure is completely independent of shift pressure and is a function of throttle position, gear state and enginespeed.
S5 is a proportional or variable pressure solenoid that provides the signal pressure to the clutch and band regulator
valves thereby controlling shift pressures.
VPS pressure is multiplexed to the clutch regulator valve, the band regulator valve and the converter clutch regulator
valve during automatic gearshifts.
A variable pressure solenoid produces a hydraulic pressure inversely proportional to the current applied. During a
gearshift the TCU applies a progressively increasing or decreasing (ramped) current to the solenoid. Current applied will vary between a minimum of 200 mA and a maximum of 1000 mA, Increasing current decreases output (55)
pressure. Decreasing current increases output (55) pressure.
Line 500 pressure, (approximately 440 to 560 kPa), is the reference pressure for the VPS, and the VPS outputpressure is always below line 500 pressure.
When the VPS is at standby, that is no gearshift is taking place, the VPS current is set to 200 mA giving maximum output pressure.
Under steady state conditions the band and clutch regulator valve solenoids are switched off. This applies full Line
500 pressure to the plunger and because Line 500 pressure is always greater than S5 pressure it squeezes the S5
oil out between the regulator valve and the plunger. The friction elements are then fed oil pressure equal to Line 500multiplied by the amplification ratio.
When a shift is initiated the required On/off solenoid is switched on cutting the supply of Line 500 to the plunger.
At the same time the VPS pressure is reduced to the ramp start value and assumes control of the regulator valve by
pushing the plunger away from the valve. The VPS then carries out the required pressure ramp and the timed shift is
completed by switching Off the On/off solenoid and returning the VPS to the standby pressure.
This system enables either the band or clutch or both to be electrically controlled for each gearshift. Mode Indicator Light
Depending on the application, the mode indicator light may be used to indicate the mode that has been selected or
if an overheat condition exists. The mode indicator light is usually located on the instrument cluster. Communication Systems CAN
The controller area network (CAN) connects various control modules by using a twisted pair of wires, to share
common information. This results in a reduction of sensors and wiring. Typical applications include using the engine
controller to obtain the actual engine speed and throttle position, and adding these to the network. The ABS controller
(if fitted) can be used to obtain the road speed signal. This information is then available to the TCU without anyadditional sensors.
Page 919 of 1574
5A-60 AUTOMATIC TRANSMISSIONDIAGNOSIS
DIAGNOSTIC SYSTEM Recommended T est Equipment and Procedure
The test equipment is designed to be used with the control modules in all vehicles. The components used in the transmission application are: � Multi Function Tester, and
� Appropriate vehicle for testing.
Multi Function Tester (MFT)
The MFT is programmed with the special vehicle diagnostic software that allows selection of the unit under test.
The program allows the proper communication to the Transmission Control Unit (TCU).
It then requests information from the user via a menu system to select the required set up.
Examples are viewing codes, clearing error codes, and real-time operation. Set up and operation instructions are detailed in the user manual.
This equipment can be used by trained personnel such as technicians and mechanics to diagnose electronic and
wiring problems relating to the vehicle transmission. Information that is available includes engine and road (shaft)
speed, transmission oil temperature, throttle position, solenoid/gear status and gear lever position. Current andstored faults detected by the electronics are also available.
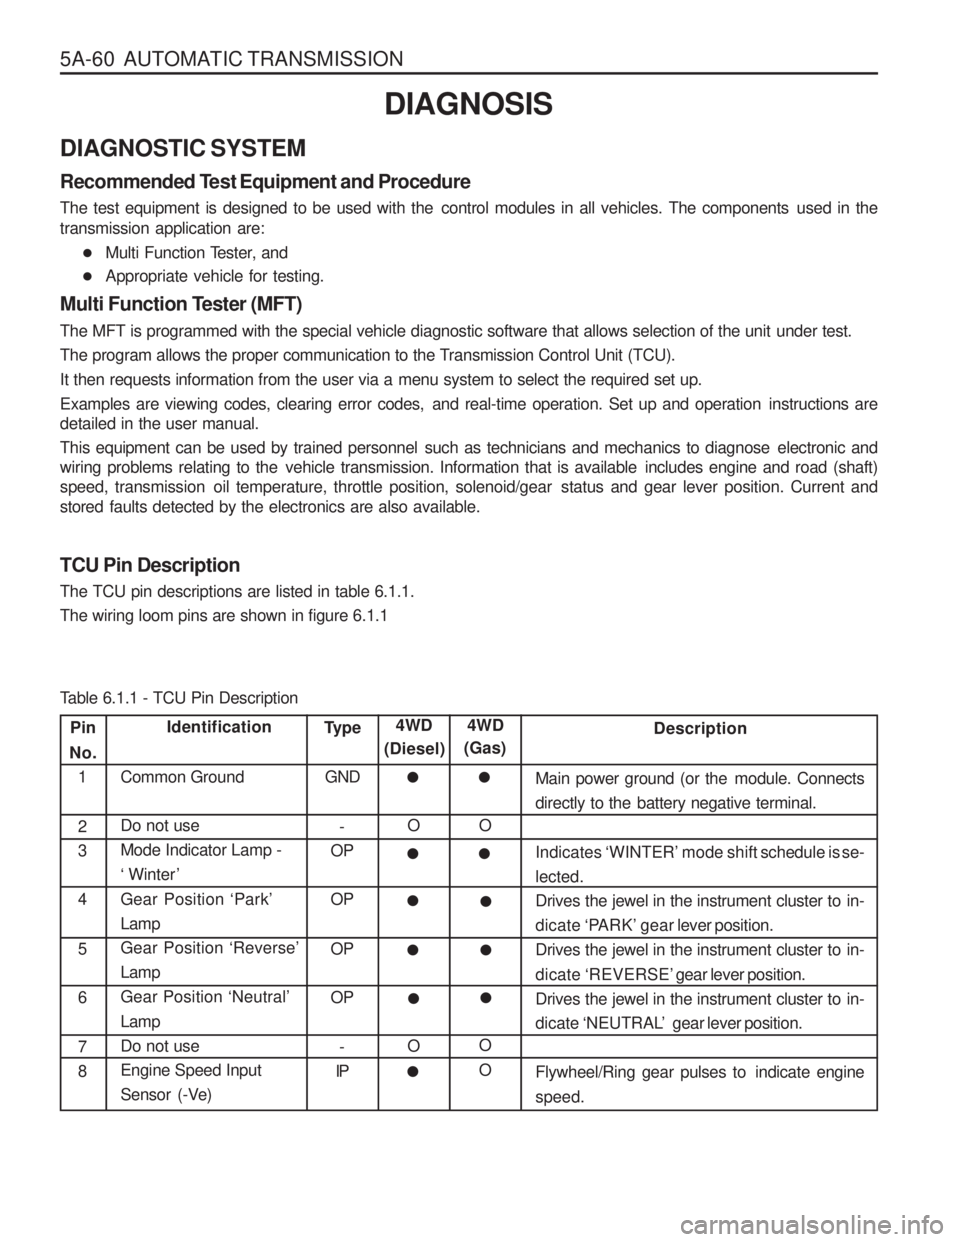
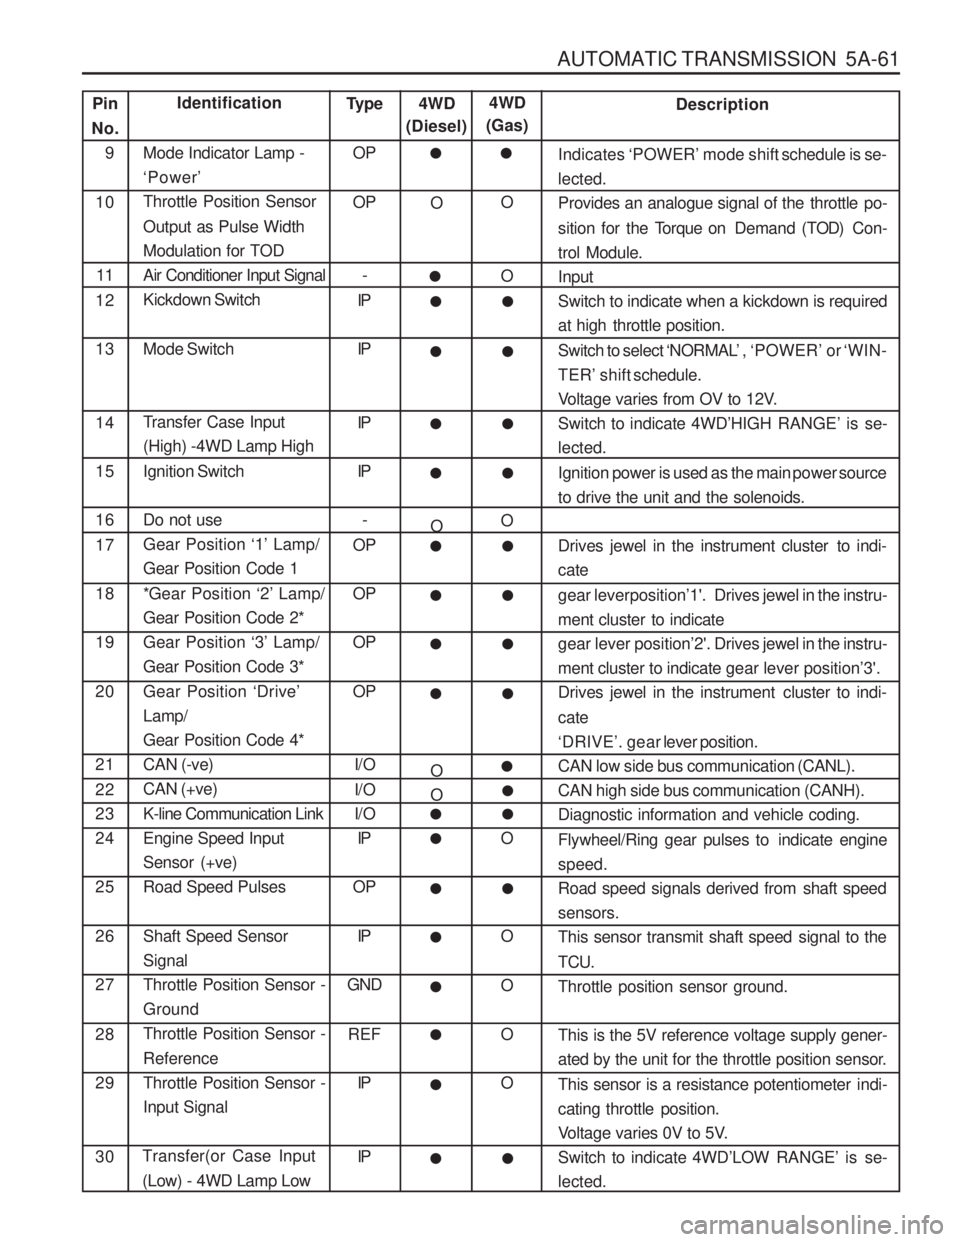
TCU Pin Description The TCU pin descriptions are listed in table 6.1.1. The wiring loom pins are shown in figure 6.1.1
Pin
No. 1 2 3 4 5 6 7 8Identification
Common Ground Do not use Mode Indicator Lamp -‘ Winter ’
Gear Position ‘Park ’
LampGear Position ‘Reverse ’
LampGear Position ‘Neutral ’
LampDo not useEngine Speed Input
Sensor (-Ve) Type
GND -
OP OP OP OP
-
IP Description
Main power ground (or the module. Connects
directly to the battery negative terminal. Indicates ‘WINTER ’ mode shift schedule is se-
lected.
Drives the jewel in the instrument cluster to in-dicate ‘PARK ’ gear lever position.
Drives the jewel in the instrument cluster to in- dicate ‘REVERSE ’ gear lever position.
Drives the jewel in the instrument cluster to in- dicate ‘NEUTRAL ’ gear lever position.
Flywheel/Ring gear pulses to indicate engine speed.
4WD
(Diesel)
O O
�
�
�
�
� 4WD
(Gas)
O O O
�
�
�
�
�
�
Table 6.1.1 - TCU Pin Description
Page 920 of 1574
AUTOMATIC TRANSMISSION 5A-61
Pin
No. 9 10
11
12 13 14 1516 17 1819 20 21 22 2324 25 26 27 28 29 30Identification
Mode Indicator Lamp - ‘ Power ’
Throttle Position Sensor Output as Pulse Width Modulation for TODAir Conditioner Input SignalKickdown Switch Mode Switch
Transfer Case Input (High) -4WD Lamp High Ignition Switch Do not use Gear Position ‘1’ Lamp/
Gear Position Code 1
*Gear Position ‘2’ Lamp/
Gear Position Code 2* Gear Position ‘3’ Lamp/
Gear Position Code 3* Gear Position ‘Drive ’
Lamp/ Gear Position Code 4*CAN (-ve)CAN (+ve) K-line Communication Link Engine Speed InputSensor (+ve)Road Speed Pulses Shaft Speed Sensor SignalThrottle Position Sensor -GroundThrottle Position Sensor - Reference Throttle Position Sensor -Input Signal
Transfer(or Case Input
(Low) - 4WD Lamp Low Type
OP OP
-
IP IP IP IP
-
OPOPOP OP
I/O
I/O
I/O IP
OP
IP
GND
REF IP IP Description
Indicates ‘POWER ’ mode shift schedule is se-
lected.
Provides an analogue signal of the throttle po- sition for the T orque on Demand (T OD) Con-
trol Module. Input
Switch to indicate when a kickdown is required
at high throttle position. Switch to select ‘NORMAL ’, ‘POWER ’ or ‘WIN-
TER ’ shift schedule.
Voltage varies from OV to 12V. Switch to indicate 4WD ’HIGH RANGE ’ is se-
lected.
Ignition power is used as the main power source
to drive the unit and the solenoids.
Drives jewel in the instrument cluster to indi- cate gear leverposition ’1'. Drives jewel in the instru-
ment cluster to indicate gear lever position ’2'. Drives jewel in the instru-
ment cluster to indicate gear lever position’3'.
Drives jewel in the instrument cluster to indi- cate ‘ DRIVE ’. gear lever position.
CAN low side bus communication (CANL).
CAN high side bus communication (CANH).
Diagnostic information and vehicle coding.
Flywheel/Ring gear pulses to indicate engine speed.
Road speed signals derived from shaft speedsensors.
This sensor transmit shaft speed signal to the TCU. Throttle position sensor ground. This is the 5V reference voltage supply gener-
ated by the unit for the throttle position sensor.
This sensor is a resistance potentiometer indi-
cating throttle position.
Voltage varies 0V to 5V.Switch to indicate 4WD ’LOW RANGE ’ is se-
lected.
4WD
(Diesel)
O O O O
�
�
�
4WD
(Gas)
O O O O O O OO
�
�
�
��
��
��
��
��
��
��
��
�
��
�
�
�
�
��
�
Page 1250 of 1574
SECTION 9E
INSTRUMENTATION/DRIVER INFORMATION
Caution: Disconnect the negative battery cable before removing or installing any electrical unit or when a tool or equipment could easily come in contact with exposed electrical terminals. Disconnecting this cable will help prevent personal injury and damage to the vehicle. The ignition must also be in LOCK unless otherwisenoted.TABLE OF CONTENTS
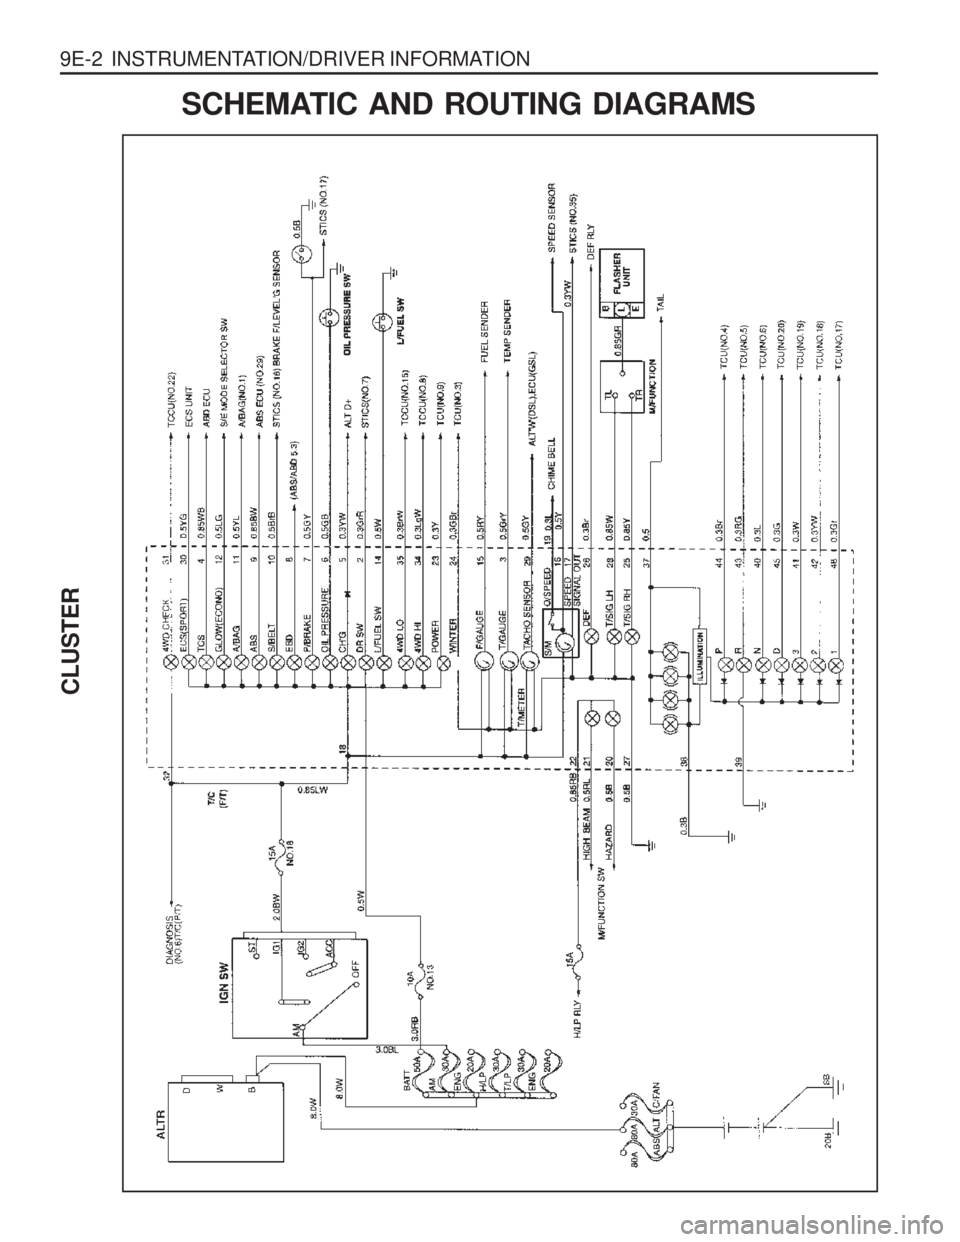
Schematic and Routing Diagrams . . . . . . . . 9E-2 Cluster . . . . . . . . . . . . . . . . . . . . . . . . . . . . . . 9E-2
Component Locator . . . . . . . . . . . . . . . . . . . 9E-3 Combination Meter . . . . . . . . . . . . . . . . . . . . . 9E-3 Maintenance and Repair . . . . . . . . . . . . . . . 9E-4
On-Vehicle Service . . . . . . . . . . . . . . . . . . . . . .
9E-4
Combination Meter . . . . . . . . . . . . . . . . . . . . . 9E-4
Page 1251 of 1574
9E-2 INSTRUMENTATION/DRIVER INFORMATION
CLUSTER
SCHEMATIC AND ROUTING DIAGRAMS