Page 703 of 1574
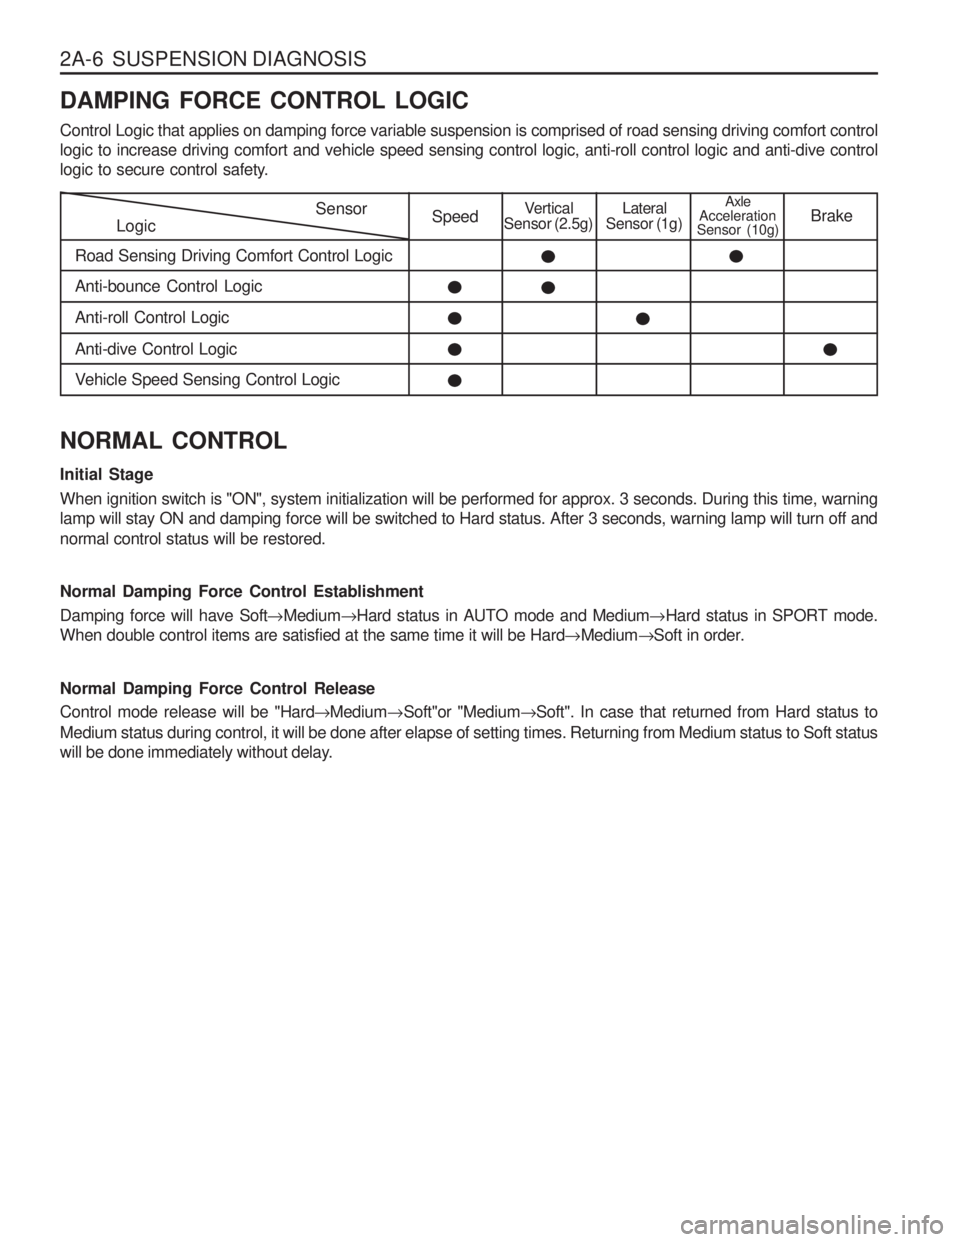
2A-6 SUSPENSION DIAGNOSIS DAMPING FORCE CONTROL LOGIC Control Logic that applies on damping force variable suspension is comprised of road sensing driving comfort control logic to increase driving comfort and vehicle speed sensing control logic, anti-roll control logic and anti-dive control
logic to secure control safety.
LogicSensor
Road Sensing Driving Comfort Control LogicSpeedVertical
Sensor (2.5g)Lateral
Sensor (1g)Axle
Acceleration
Sensor (10g) Brake
Anti-bounce Control Logic Anti-roll Control LogicAnti-dive Control Logic
Vehicle Speed Sensing Control Logic
NORMAL CONTROL Initial Stage When ignition switch is "ON", system initialization will be performed for approx. 3 seconds. During this time, warning lamp will stay ON and damping force will be switched to Hard status. After 3 seconds, warning lamp will turn off and normal control status will be restored. Normal Damping Force Control Establishment Damping force will have Soft �Medium �Hard status in AUTO mode and Medium �Hard status in SPORT mode.
When double control items are satisfied at the same time it will be Hard �Medium �Soft in order.
Normal Damping Force Control Release Control mode release will be "Hard �Medium �Soft"or "Medium �Soft". In case that returned from Hard status to
Medium status during control, it will be done after elapse of setting times. Returning from Medium status to Soft status
will be done immediately without delay.
Page 704 of 1574
SUSPENSION DIAGNOSIS 2A-7
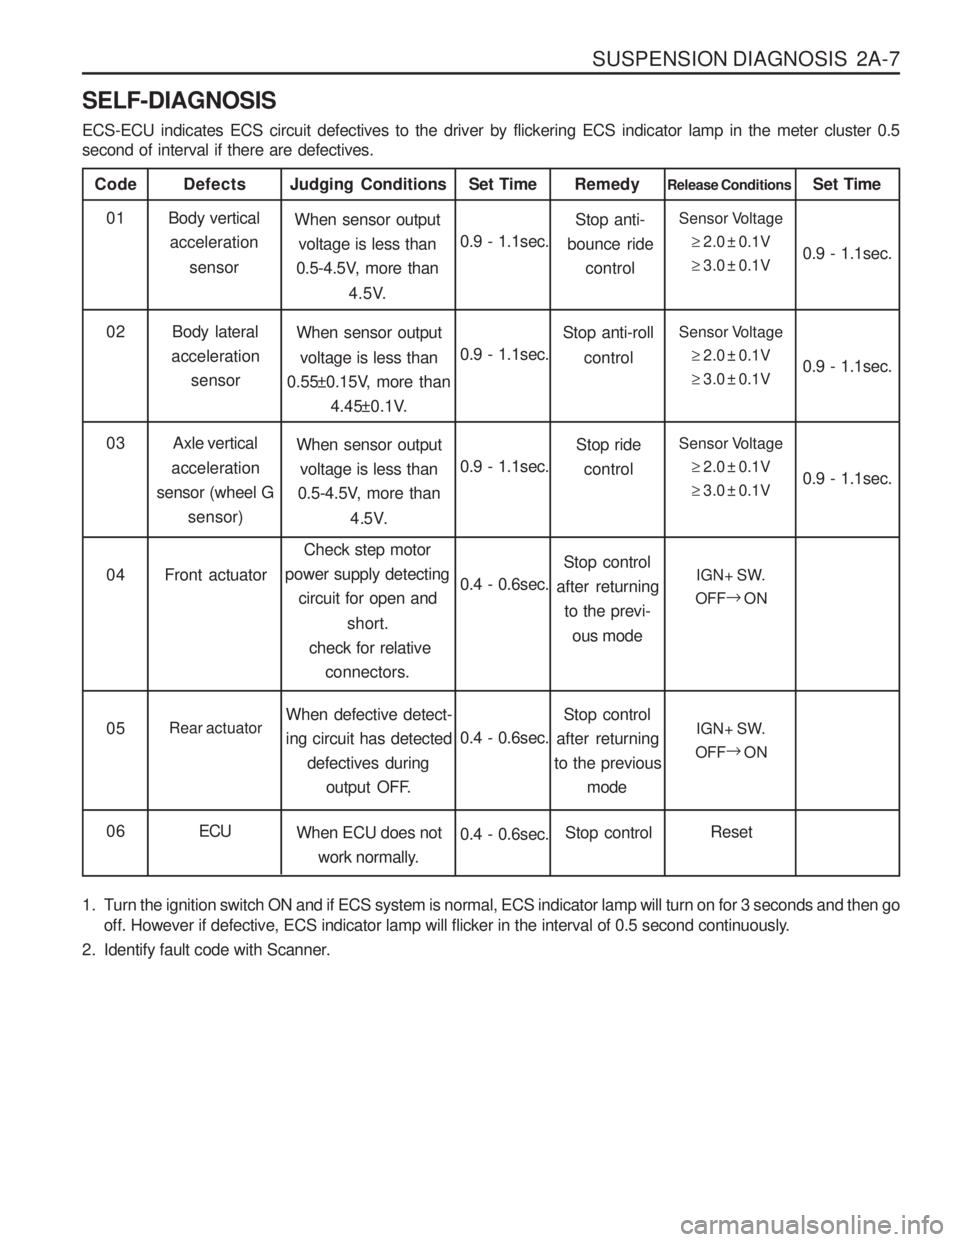
SELF-DIAGNOSIS ECS-ECU indicates ECS circuit defectives to the driver by flickering ECS indicator lamp in the meter cluster 0.5 second of interval if there are defectives.
Code
Body verticalacceleration
sensor
Defects
When sensor outputvoltage is less than
0.5-4.5V, more than
4.5V.
Judging Conditions01
0.9 - 1.1sec.Set TimeSensor Voltage
�2.0 ± 0.1V
� 3.0 ± 0.1V
Release Conditions
0.9 - 1.1sec.
Set Time
Body lateral
acceleration sensor When sensor output
voltage is less than
0.55±0.15V, more than
4.45±0.1V.
02
0.9 - 1.1sec.Sensor Voltage
�2.0 ± 0.1V
� 3.0 ± 0.1V 0.9 - 1.1sec.
Stop anti-
bounce ride
control
Remedy
Stop anti-roll control
Axle vertical
acceleration
sensor (wheel G sensor) When sensor output
voltage is less than
0.5-4.5V, more than
4.5V.
03
0.9 - 1.1sec.Sensor Voltage
�2.0 ± 0.1V
� 3.0 ± 0.1V 0.9 - 1.1sec.
Stop ride
control
Front actuator Check step motor
power supply detecting
circuit for open and
short.
check for relative connectors.
04
0.4 - 0.6sec.IGN+ SW.
OFF �
ON
Stop control
after returning to the previ-
ous mode
Rear actuator When defective detect- ing circuit has detected
defectives during
output OFF.
05
0.4 - 0.6sec.IGN+ SW.
OFF �
ON
Stop control
after returning
to the previous
mode
ECU When ECU does not
work normally.
06
0.4 - 0.6sec.Reset
Stop control
1. Turn the ignition switch ON and if ECS system is normal, ECS indicator lamp will turn on for 3 seconds and then go off. However if defective, ECS indicator lamp will flicker in the interval of 0.5 second continuously.
2. Identify fault code with Scanner.
Page 710 of 1574
SUSPENSION DIAGNOSIS 2A-13
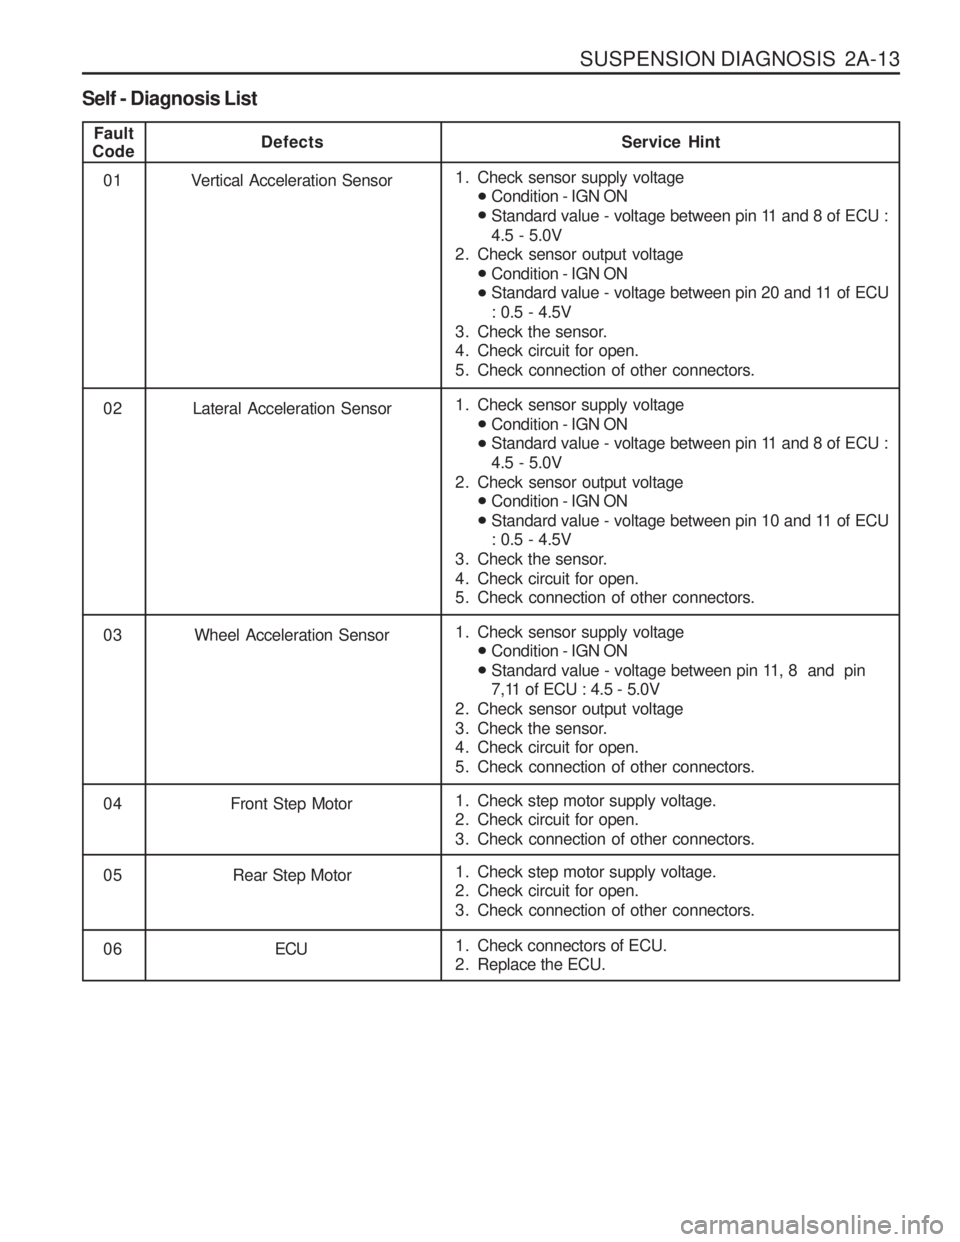
Self - Diagnosis List
Fault
CodeDefects Service Hint
01 Vertical Acceleration Sensor
02 Lateral Acceleration Sensor
03 Wheel Acceleration Sensor
04
05 Rear Step Motor
0 6 ECU Front Step Motor 1. Check sensor supply voltage
�Condition - IGN ON
� Standard value - voltage between pin 11 and 8 of ECU : 4.5 - 5.0V
2. Check sensor output voltage �Condition - IGN ON
� Standard value - voltage between pin 20 and 11 of ECU: 0.5 - 4.5V
3. Check the sensor.
4. Check circuit for open.
5. Check connection of other connectors.
1. Check sensor supply voltage �Condition - IGN ON
� Standard value - voltage between pin 11 and 8 of ECU : 4.5 - 5.0V
2. Check sensor output voltage �Condition - IGN ON
� Standard value - voltage between pin 10 and 11 of ECU : 0.5 - 4.5V
3. Check the sensor.
4. Check circuit for open.
5. Check connection of other connectors.
1. Check step motor supply voltage.
2. Check circuit for open.
3. Check connection of other connectors.
1. Check step motor supply voltage.
2. Check circuit for open.
3. Check connection of other connectors.
1. Check connectors of ECU.
2. Replace the ECU.
1. Check sensor supply voltage
�Condition - IGN ON
� Standard value - voltage between pin 11, 8 and pin
7,11 of ECU : 4.5 - 5.0V
2. Check sensor output voltage
3. Check the sensor.
4. Check circuit for open.
5. Check connection of other connectors.
Page 720 of 1574
SECTION 2C
FRONT SUSPENSION
TABLE OF CONTENTSSPECIFICATIONS
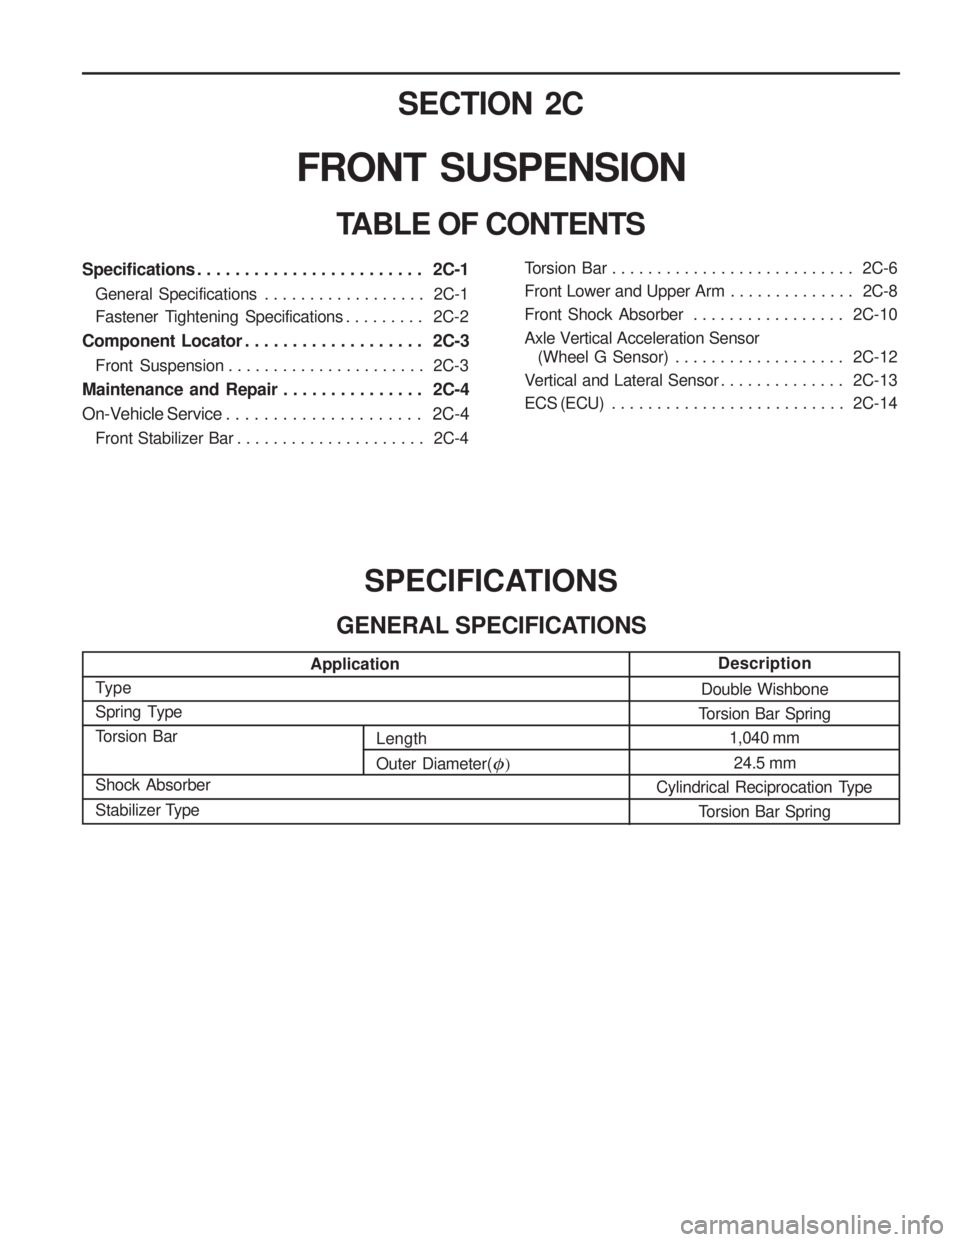
GENERAL SPECIFICATIONS
Type
Spring Type
Torsion Bar Shock Absorber
Stabilizer Type
Double Wishbone
Torsion Bar Spring 1,040 mm
24.5 mm
Cylindrical Reciprocation Type
Torsion Bar Spring
Specifications . . . . . . . . . . . . . . . . . . . . . . . . 2C-1General Specifications . . . . . . . . . . . . . . . . . . 2C-1
Fastener Tightening Specifications . . . . . . . . . 2C-2
Component Locator . . . . . . . . . . . . . . . . . . . 2C-3
Front Suspension . . . . . . . . . . . . . . . . . . . . . . 2C-3
Maintenance and Repair . . . . . . . . . . . . . . . 2C-4
On-Vehicle Service . . . . . . . . . . . . . . . . . . . . . 2C-4
Front Stabilizer Bar . . . . . . . . . . . . . . . . . . . . . 2C-4
Application Description
Torsion Bar . . . . . . . . . . . . . . . . . . . . . . . . . . . 2C-6
Front Lower and Upper Arm . . . . . . . . . . . . . . 2C-8
Front Shock Absorber . . . . . . . . . . . . . . . . .
2C-10
Axle Vertical Acceleration Sensor (Wheel G Sensor) . . . . . . . . . . . . . . . . . . . 2C-12
Vertical and Lateral Sensor . . . . . . . . . . . . . . 2C-13
ECS (ECU) . . . . . . . . . . . . . . . . . . . . . . . . . . 2C-14
Length Outer Diameter(
�)
Page 733 of 1574
2C-14 FRONT SUSPENSION ECS (ECU)1 Electronically Controlled Suspension (ECU)
2 Connector
3 Bolts (2 pieces)
Removal & Installation Procedure
1. Disconnect each connectors from the console box and remove the console box.
2. Disconnect ECU connector.
3. Unscrew 10mm x 2 bolts and remove ECS (ECU).
4. Installation should follow the removal procedure in the reverse order.
4 Parking Brake Lever
5 Over Voltage Protection Relay
Page 830 of 1574
FrontRear
Front Rear
SECTION 4F
ANTILOCK BRAKE SYSTEM
TABLE OF CONTENTS
Caution: Disconnect the negative battery cable before removing or installing any electrical unit or when a tool or equipment could easily come in contact with exposed electrical terminals. Disconnecting thiscable will help prevent personal injury and damage to the vehicle. The ignition must also be in LOCKunless otherwise noted.
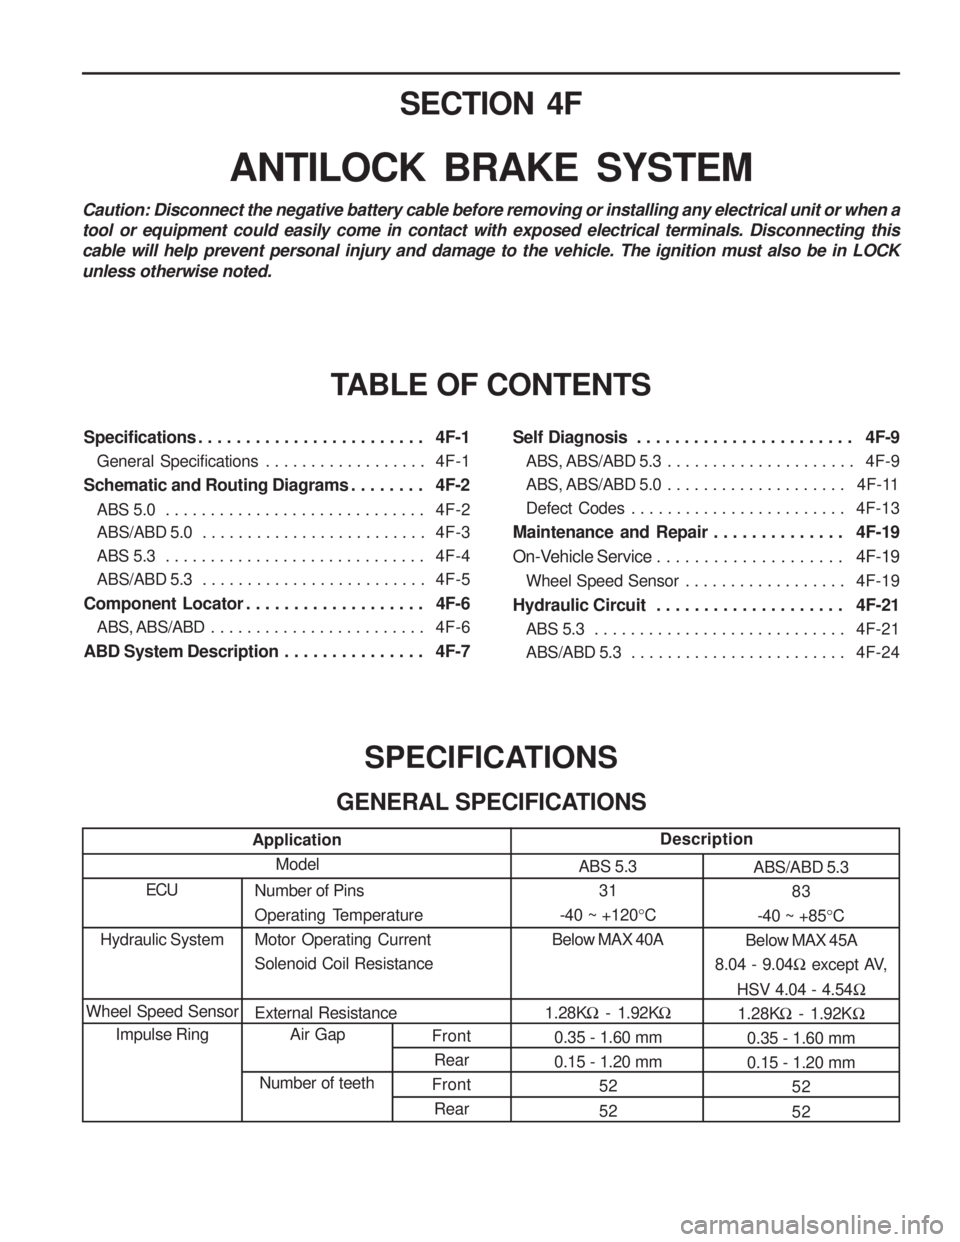
SPECIFICATIONS
GENERAL SPECIFICATIONS
Application Model
ECUNumber of Pins
Operating TemperatureMotor Operating CurrentSolenoid Coil Resistance External Resistance Air Gap
Number of teeth Description
ABS 5.3 31
-40 ~ +120 °C
Below MAX 40A
1.28K � - 1.92K �
0.35 - 1.60 mm 0.15 - 1.20 mm 52 52 ABS/ABD 5.3
83
-40 ~ +85 °C
Below MAX 45A
8.04 - 9.04 � except AV,
HSV 4.04 - 4.54 �
1.28K � - 1.92K �
0.35 - 1.60 mm 0.15 - 1.20 mm
52 52
Hydraulic System
Wheel Speed Sensor Impulse Ring
Specifications . . . . . . . . . . . . . . . . . . . . . . . . 4F-1
General Specifications . . . . . . . . . . . . . . . . . . 4F-1
Schematic and Routing Diagrams . . . . . . . . 4F-2 ABS 5.0 . . . . . . . . . . . . . . . . . . . . . . . . . . . . . 4F-2
ABS/ABD 5.0 . . . . . . . . . . . . . . . . . . . . . . . . . 4F-3
ABS 5.3 . . . . . . . . . . . . . . . . . . . . . . . . . . . . . 4F-4
ABS/ABD 5.3 . . . . . . . . . . . . . . . . . . . . . . . . . 4F-5
Component Locator . . . . . . . . . . . . . . . . . . . 4F-6 ABS, ABS/ABD . . . . . . . . . . . . . . . . . . . . . . . . 4F-6
ABD System Description . . . . . . . . . . . . . . . 4F-7 Self Diagnosis . . . . . . . . . . . . . . . . . . . . . . . 4F-9
ABS, ABS/ABD 5.3 . . . . . . . . . . . . . . . . . . . . . 4F-9
ABS, ABS/ABD 5.0 . . . . . . . . . . . . . . . . . . . . 4F-11
Defect Codes . . . . . . . . . . . . . . . . . . . . . . . . 4F-13
Maintenance and Repair . . . . . . . . . . . . . . 4F-19
On-Vehicle Service . . . . . . . . . . . . . . . . . . . . 4F-19
Wheel Speed Sensor . . . . . . . . . . . . . . . . . . 4F-19
Hydraulic Circuit . . . . . . . . . . . . . . . . . . . . 4F-21 ABS 5.3 . . . . . . . . . . . . . . . . . . . . . . . . . . . . 4F-21
ABS/ABD 5.3 . . . . . . . . . . . . . . . . . . . . . . . . 4F-24
Page 835 of 1574
4F-6 ANTILOCK BRAKE SYSTEM
ABS,ABS/ABD
COMPONENT LOCATOR
1 ABS Hydraulic Unit
2 ABS/ABD Hydraulic Unit
3 Diagnosis Socket
4 Front Wheel Speed Sensor
5 Front Impulse Ring 6 Rear Wheel Speed Sensor
7 Rear Impulse Ring
8 ABS Warning Indicator Light
9 TCS Indicator Light
1 0 ABS/ABD ECU
Page 838 of 1574
ANTILOCK BRAKE SYSTEM 4F-9
SELF DIAGNOSIS ABS, ABS/ABD 5.3 Initialization
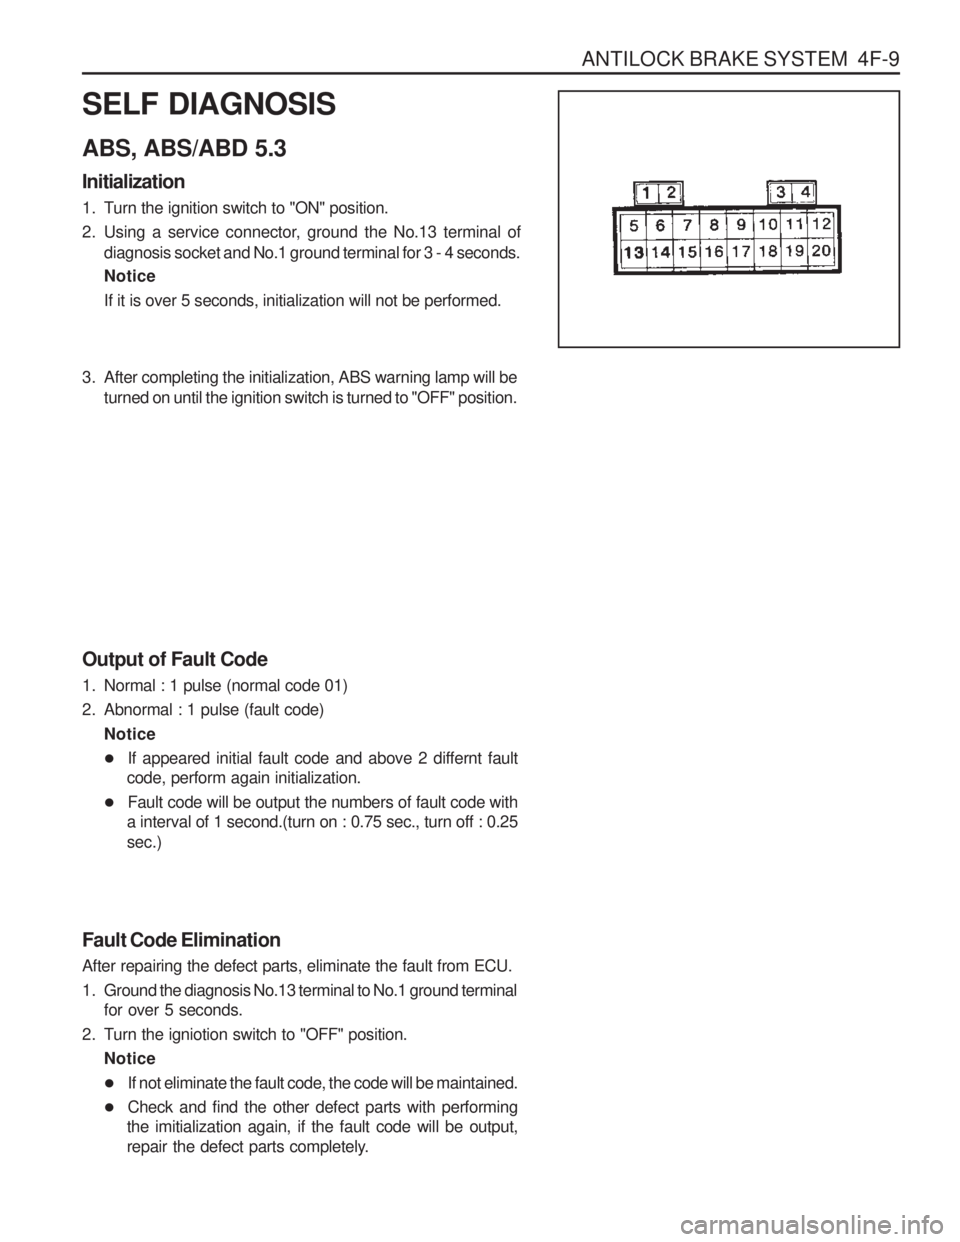
1. Turn the ignition switch to "ON" position.
2. Using a service connector, ground the No.13 terminal ofdiagnosis socket and No.1 ground terminal for 3 - 4 seconds. Notice If it is over 5 seconds, initialization will not be performed.
3. After completing the initialization, ABS warning lamp will beturned on until the ignition switch is turned to "OFF" position.
Output of Fault Code
1. Normal : 1 pulse (normal code 01)
2. Abnormal : 1 pulse (fault code) Notice
� If appeared initial fault code and above 2 differnt fault
code, perform again initialization.
� Fault code will be output the numbers of fault code with
a interval of 1 second.(turn on : 0.75 sec., turn off : 0.25 sec.)
Fault Code Elimination After repairing the defect parts, eliminate the fault from ECU.
1. Ground the diagnosis No.13 terminal to No.1 ground terminal for over 5 seconds.
2. Turn the igniotion switch to "OFF" position. Notice
� If not eliminate the fault code, the code will be maintained.
� Check and find the other defect parts with performing
the imitialization again, if the fault code will be output,
repair the defect parts completely.