Page 1055 of 1574

TRANSFER CASE (PART TIME 4408) 5D1-3
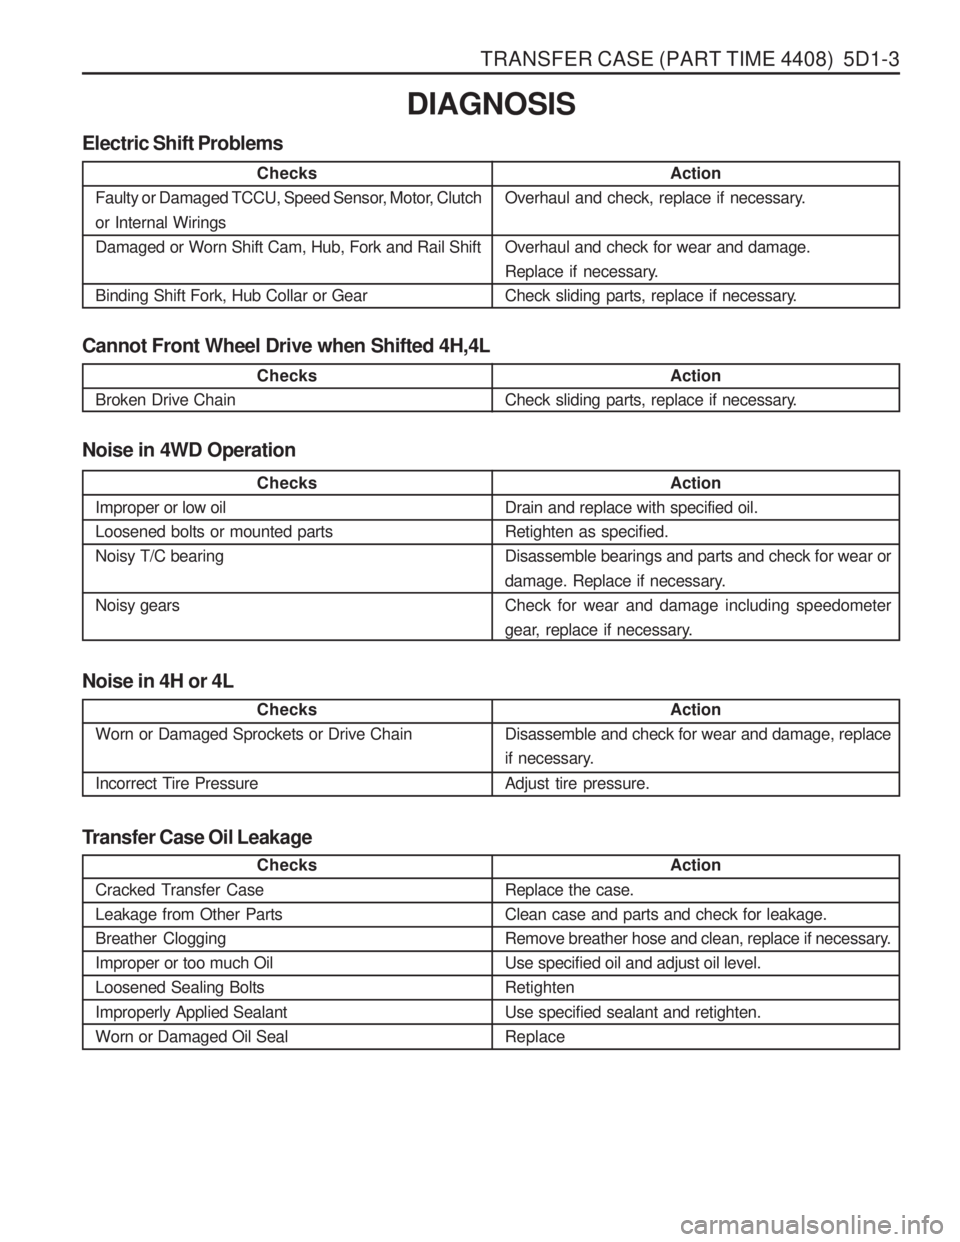
Cannot Front Wheel Drive when Shifted 4H,4LDIAGNOSIS
Electric Shift Problems
Action
Overhaul and check, replace if necessary. Overhaul and check for wear and damage.
Replace if necessary.
Check sliding parts, replace if necessary.
Checks
Faulty or Damaged TCCU, Speed Sensor, Motor, Clutch or Internal Wirings Damaged or Worn Shift Cam, Hub, Fork and Rail Shift Binding Shift Fork, Hub Collar or Gear
Checks
Broken Drive Chain Action
Check sliding parts, replace if necessary.
Noise in 4WD Operation
Checks
Improper or low oil Loosened bolts or mounted partsNoisy T/C bearing Noisy gears Action
Drain and replace with specified oil. Retighten as specified.Disassemble bearings and parts and check for wear or
damage. Replace if necessary. Check for wear and damage including speedometer
gear, replace if necessary.
Noise in 4H or 4L
Checks
Worn or Damaged Sprockets or Drive Chain
Incorrect Tire Pressure Action
Disassemble and check for wear and damage, replace
if necessary. Adjust tire pressure.
Transfer Case Oil Leakage
Action
Replace the case. Clean case and parts and check for leakage.
Remove breather hose and clean, replace if necessary.Use specified oil and adjust oil level.Retighten Use specified sealant and retighten. Replace
Checks
Cracked Transfer CaseLeakage from Other PartsBreather CloggingImproper or too much OilLoosened Sealing Bolts Improperly Applied Sealant Worn or Damaged Oil Seal
Page 1064 of 1574
5D1-12 TRANSFER CASE (PART TIME 4408)
Removal & Installation Procedure
1. Disconnect the negative terminal from the battery.
2. Lift up the vehicle and fix it safely.
3. Remove the drain plug and drain the oil.Reinstall the drain plug.
* If planar damper is installed, unscrew 4 bolts and remove the planar damper.
Installation Notice
Tightening Torque 19 - 30 Nm
4. Remove the breather hose.
5. Disconnect the speedometer cable connector and other cable connectors and wiring harnesses.
6. Support the transfer case with jack and remove the front and rear propeller shafts from the transfer case. Installation Notice
Front
Rear 81 - 89 Nm 70 - 80 NmTightening Torque
Page 1124 of 1574

TRANSFER CASE (TOD) 5D2-35
Removal & Installation Procedure1. Disconnect (-) cable from battery.
2. Lift on vehicle and make sure on safety. NoticeBe careful for catalytic converter due to high temperature after driving or engine running.
3. Prepare a vessel to drain transfer case and manual transmission oil.
4. Release drain plug and drain transfer case and manual transmission oil. If planar damper is installed, unscrew 4 bolts and remove
the planar damper. NoticeOil drain should be along with whole transfer case
disassembly and assembly.
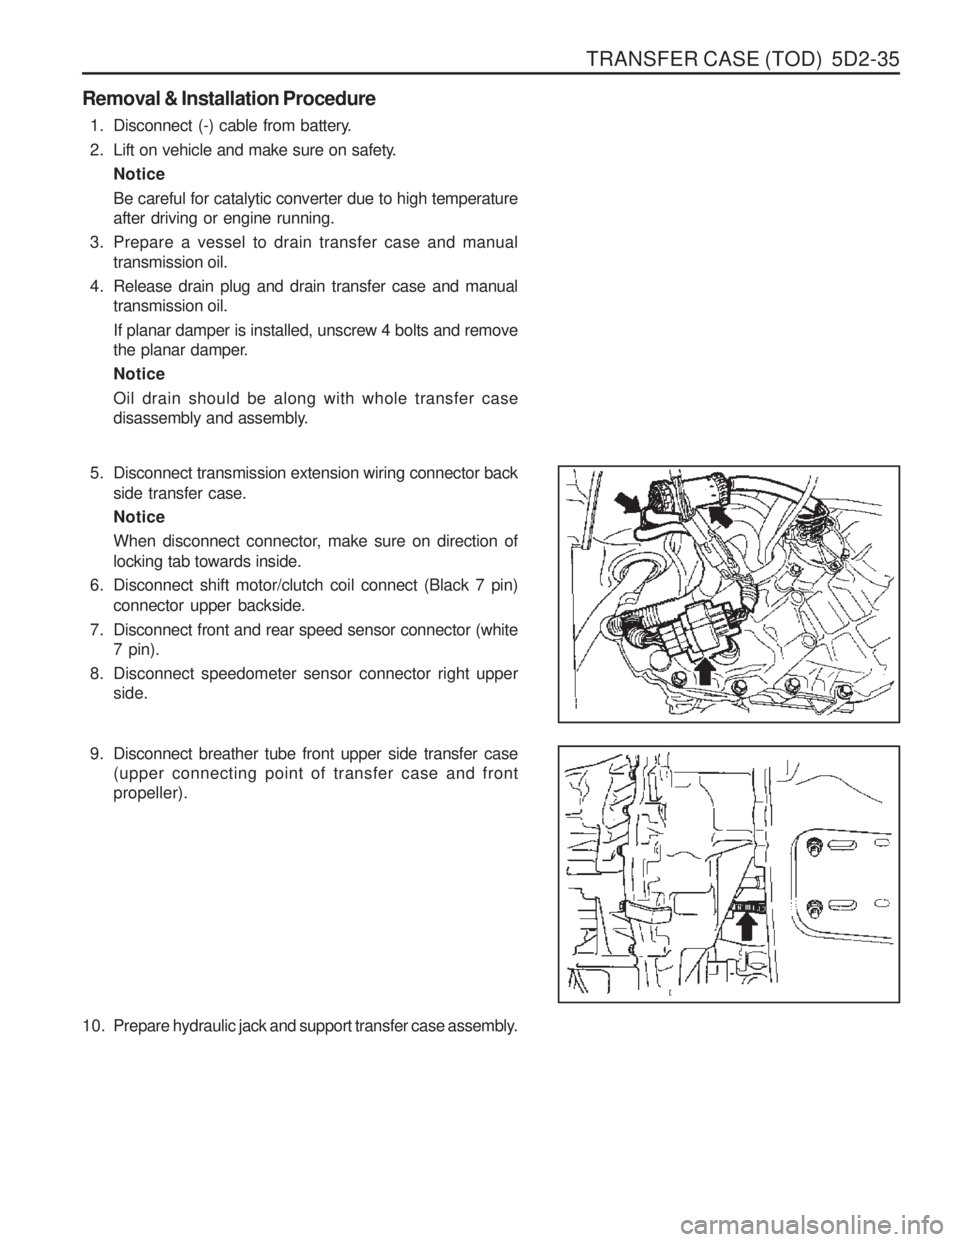
5. Disconnect transmission extension wiring connector back
side transfer case. Notice
When disconnect connector, make sure on direction of locking tab towards inside.
6. Disconnect shift motor/clutch coil connect (Black 7 pin) connector upper backside.
7. Disconnect front and rear speed sensor connector (white 7 pin).
8. Disconnect speedometer sensor connector right upper side.
9. Disconnect breather tube front upper side transfer case (upper connecting point of transfer case and front propeller).
10. Prepare hydraulic jack and support transfer case assembly.
Page 1150 of 1574
6A-8 POWER STEERING SYSTEM
Tightening Torque 35 - 45 Nm
Removal & Installation Procedure
1. Remove the cotter pin and nut and separate the steering
gear box tie rod from the steering knuckle arm using the
puller. Installation Notice
2. Remove the bolt and separate the lower sha from the steering gear box. Installation Notice
Tightening Torque 30 - 40 Nm
3. Remove the oil pipe from the steering gear box and drain the oil. Installation Notice
4. Remove the clamp bolts and remove the steering gear box assembly. Installation Notice
Tightening Torque 12 - 18 Nm
Notice
� Be careful not to damage the rubber(1).
� When installing tighten the bolt (3) with the rubber
(2)being inserted to the hole of clamp.
5. Bleed the air from system.
6. Check the toe-in.
Tightening Torque 70 - 90 Nm
Tighten the bolt toward threadless side of lower shaft coupling.
Page 1298 of 1574
9Q-4 ROOF
Removal & Installation Procedure
1. Disconnect the connector and remove the sun roof moduleassembly.
2. Disconnect the front and rear drain hose.
3. Unscrew the sun roof mounting bracket bolts(arrows) and remove the inner sliding and sun roof assembly