Page 139 of 1574
M162 ENGINE MECHANICAL 1B1-103
OIL DIPSTICK GUIDE TUBE
1 Oil Dipstick Level Gauge
2 Oil Dipstick Guide Tube
Removal & Installation Procedure
1. Pull out the oil dipstick level gauge (1).
2. Remove the bolt (4) in the upper intake manifold and remove the oil dipstick guide tube. Installation Notice
3. Install new O-ring to the dipstick guide tube.
4. Installation should follow the removal procedure in the reverse order.
5. Check for leaks by starting the engine. 3 O-ring
4 Bolt (M6 x 12, 1 piece)
........................... 9-11 Nm
Tightening Torque 9 - 11 Nm
Page 252 of 1574

1B2-100 M161 ENGINE MECHANICAL9. Fill up engine oil through the engine oil filler opening.
10. Check for oil leaks at normal engine temperature after starting the engine.
11. Stop the engine and wait 5 minutes. Check the oil level and fill up as specified if necessary.
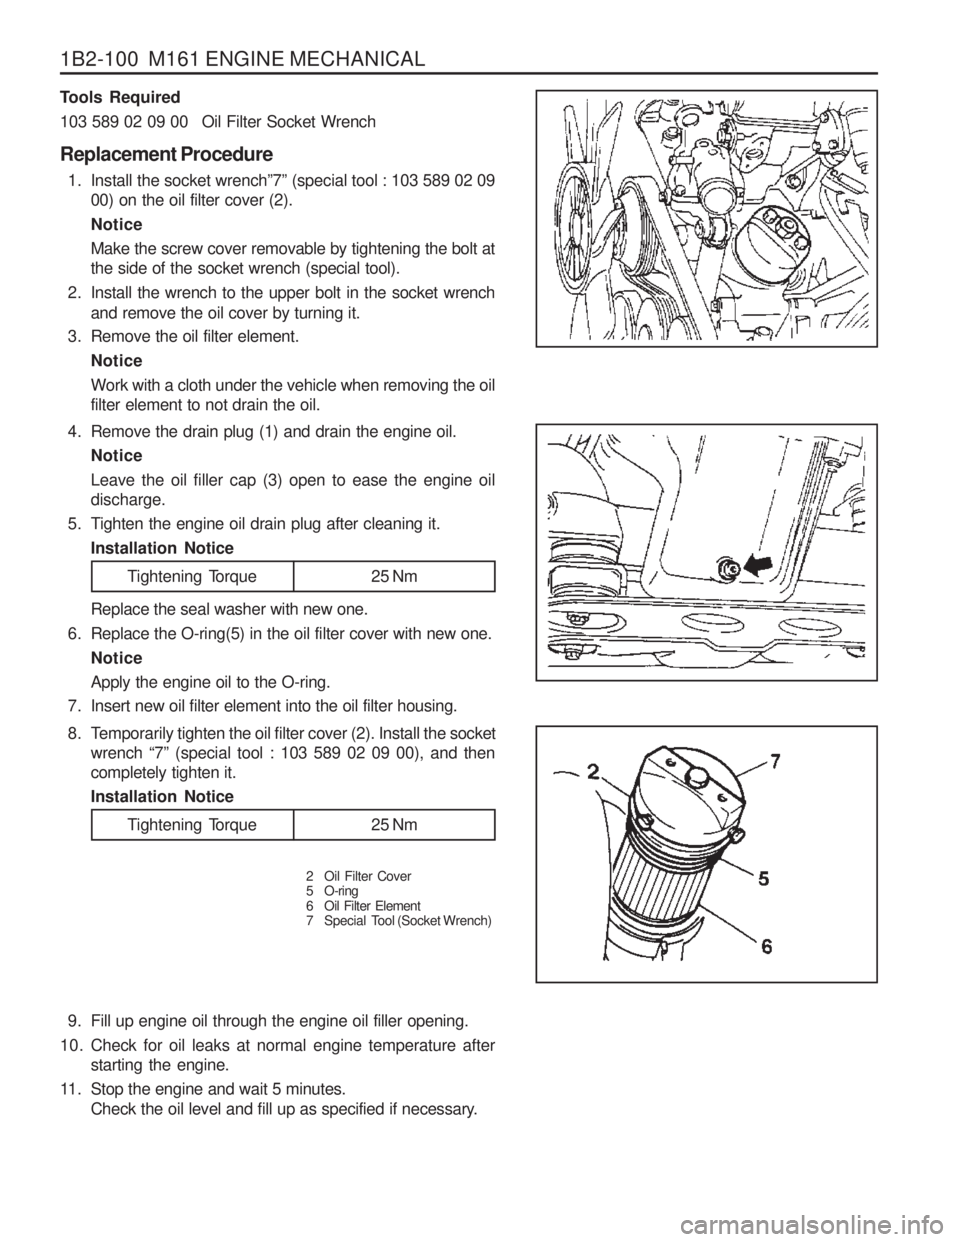
4. Remove the drain plug (1) and drain the engine oil.
Notice Leave the oil filler cap (3) open to ease the engine oil discharge.
5. Tighten the engine oil drain plug after cleaning it. Installation Notice
Tools Required
103 589 02 09 00 Oil Filter Socket Wrench Replacement Procedure
1. Install the socket wrench ”7” (special tool : 103 589 02 09
00) on the oil filter cover (2). NoticeMake the screw cover removable by tightening the bolt at the side of the socket wrench (special tool).
2. Install the wrench to the upper bolt in the socket wrench and remove the oil cover by turning it.
3. Remove the oil filter element.
Notice Work with a cloth under the vehicle when removing the oil filter element to not drain the oil. Replace the seal washer with new one.
6. Replace the O-ring(5) in the oil filter cover with new one.
Notice Apply the engine oil to the O-ring.
7. Insert new oil filter element into the oil filter housing.
Tightening Torque 25 Nm
8. Temporarily tighten the oil filter cover (2). Install the socket wrench “7” (special tool : 103 589 02 09 00), and then
completely tighten it. Installation Notice
2 Oil Filter Cover
5 O-ring
6 Oil Filter Element
7 Special Tool (Socket Wrench)
Tightening Torque 25 Nm
Page 257 of 1574
M161 ENGINE MECHANICAL 1B2-105
OIL DIPSTICK GUIDE TUBE
1 Oil Dipstick Level Gauge
2 Oil Dipstick Guide Tube
3 O-ring
Removal & Installation Procedure
1. Pull out the oil dipstick level gauge (1).
2. Unscrew the bolt (4) and remove the oil dipstick guide tube (2).Installation Notice 4 Bolt (M6 X 16, 1 piece)
........................... 9-11 Nm
5 Clamp
Tightening Torque 9 - 11 Nm
It is very hard to remove the oil dipstick guide tube without
special tool. If it is not necessary, do not remove the guide tube.
3. Installation should follow the removal procedure in the reverse order.
4. Check for leaks by starting the engine.
Page 357 of 1574

1B3-92 OM600 ENGINE MECHANICAL
28. Remove the connecting rod bearing cap.
29. Install the piston.
30. Rotate the crankshaft by hand and check whether it rotatessmoothly.
31. If the bearings are damaged,
- replace the oil presser relief valve. - clean the oil pump and oil filter housing carefully and
replace the hose if necessary. Notice After assembling the engine, check the camshaft timing, adjust the start of fuel injection and check the TDC sensorbracket setting.
32. Fill oil and run the engine and then check the oil pressure and oil level. Notice Install the original oil filter element and then change the engine oil and oil filter element after 1,000 - 1,500km.
27. Measure the radial clearance (L) of the connecting rod
bearing. Example) Measured value ‘J’ = 47.700mm
Measured value ‘K’ = 47.653mm
Clearance ‘L’ = 0.047mm
Radial Clearance ‘L’0.026 - 0.068mm
Notice If the clearance is out of standard, adjust the radial clearance of connecting rod bearing by replacing theconnecting rod bearing shells.
26. Measure connecting rod bearing journal diameter (K).
Notice Refer to measurement of the crankshaft bearing journal
diameter.
24. Insert the new connecting rod bearing shells into theconnecting rod and connecting rod bearing cap and tighten
the 12-sided stretch bolts (11).
25. Measure inner diameter of connecting rod bearing.
Tightening Torque 40 Nm + 90 °
Page 367 of 1574

1B3-102 OM600 ENGINE MECHANICAL
CheckingNotice The noise which continues short time during short travel (frequent starting of the engine) or engine starting after a long time storage is normal operating conditions. So, it doesnot need to be repaired. Determine the malfunctions in valveclearance compensation device with noise through following
tests. If defective, replace as respectively.
1. Run the engine at more than 3000rpm for approx. 4 minutes.
2. Stop the engine. After 5minutes, check the engine oil level and adjust if necessary.
3. Remove the cylinder head cover.
4. Check the valve tappets at TDC position of each cylinders.
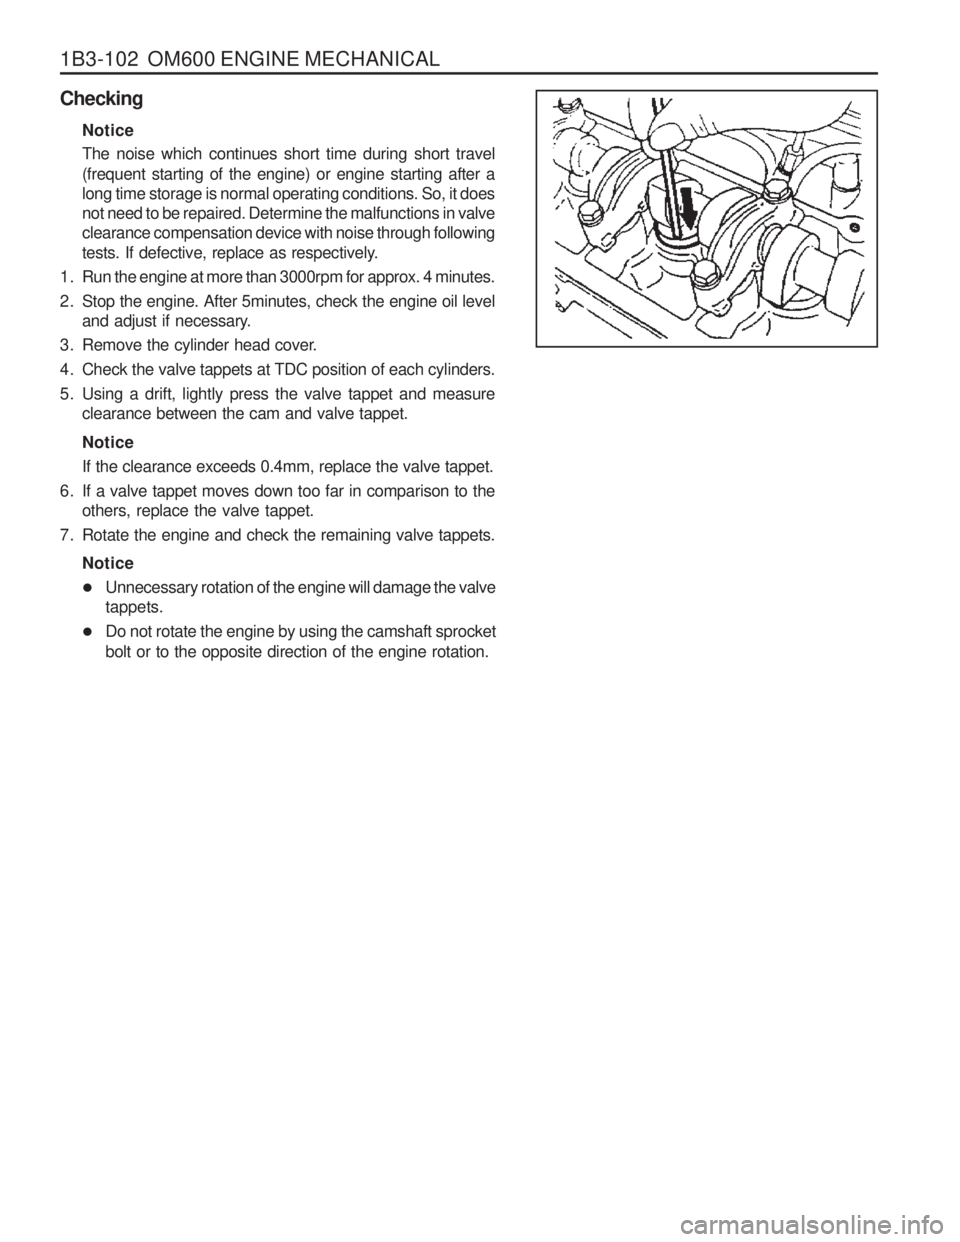
5. Using a drift, lightly press the valve tappet and measure clearance between the cam and valve tappet. Notice If the clearance exceeds 0.4mm, replace the valve tappet.
6. If a valve tappet moves down too far in comparison to the others, replace the valve tappet.
7. Rotate the engine and check the remaining valve tappets.
Notice
� Unnecessary rotation of the engine will damage the valve tappets.
� Do not rotate the engine by using the camshaft sprocket bolt or to the opposite direction of the engine rotation.
Page 651 of 1574
OM600 ENGINE CONTROLS 1F3-41
With Pulse Generator
Tools Required 617 589 09 21 00 Rl Sensor
617 589 10 21 00 Timing Tester667 589 00 21 00 TDC Pulse Generator
Commercial Tools
Item
Digital Tester
Without Pulse Generator Tools
Bosch, MOT 001.03
Hartmann & Braun, EOMT3 Bosch, ETD 019.00Sun, DIT 9000
ALV, Diesel - Tester 875
Test Procedure
1. Remove the screw plug (7) and seal (8) collect oil in a suitable vessel.
2. Install the Rl sensor into the governor housing of injection pump (1).
Rl Sensor 617 589 10 21 00
3. Connect the digital tester and TDC pulse sender unit according to connection diagram.
4. Run the engine at idle speed and check the Rl value on the digital tester Notice
If out of standard, adjust the start of delivery.
5. Stop the engine.
6. Remove the Rl sensor, digital tester and TDC pulse sender unit.
7. Replace the seal and tighten the plug.
8. Check engine oil level and adjust if necessary.
Rl value A TDC 14° - 16 °
Tightening Torque 30 Nm
Page 804 of 1574

HYDRAULIC BRAKES 4A-7
MAINTENANCE AND REPAIRON-VEHICLE SERVICE
BLEEDING THE BRAKES For Master Cylinder Replacement
1. Add oil after master cylinder replacement.
2. Run the engine and depress the brake pedal several times to build pressure and then keep the pedal fully depressed.
3. Loosen the screws of primary and secondary pipe at the master cylinder outlets to bleed air.
4. Repeat above step No.3 several times until there are no more air bubbles.
5. Bleed air in the system at the hydraulic unit outlet pipe and wheel if pressure building is not enough by depressing the pedal only after above air bleeding.
For Caliper and Brake Hose Replacement
1. Check the oil level from the oil reservoir and refill if necessary.
2. Run the engine and depress the pedal several times to build pressure and then keep the pedal fully depressed.
3. Connect a vinyl tube to the caliper breather and prepare a container to coentain brake oil.
4. Loosen the breather screw until there are no more bubbles.
5. Bleed air in the system at four (4) wheels in order as shown in right figure if pressure building is not enough by depressing the pedal after above air bleeding.
Tightening Torque
9 - 14 NmItem
Front Bleeder Screw
Rear Bleeder Screw
Notice
� Do not reuse the bled brake fluid.
� Always bleed the air after replacing brake fluid or
master cylinder, caliper, brake hose and pipe.
� Always operate in normal order.
Page 813 of 1574
4B-2 MASTER CYLINDER
1 Nut .......................................................14-22 Nm
2 Washer
3 Master Cylinder Assembly
4 Oil Level Sensor
5 Check V alve
6 Booster
7 Clevis Pin
8 Snap Pin9 Seal
10 Spacer 11 Nut ......................................................... 8-18 Nm
12 Front Tube (LH)
13 Front Tube (RH)
14 Rear Tube
15 1st Tube (Primary)
16 2nd Tube (Secondary)
MANDO
PBR
MAINTENANCE AND REPAIR
ON-VEHICLE SERVICE
BOOSTER AND BRAKE MASTER CYLINDER