Page 137 of 256

137 Starting and driving
Limp-homeIf the transmission malfunctions, the control
module will activate limp-home mode. In
this mode, only 2nd and 5th gears are avail-
able. Select 2nd gear when driving at low
speeds and 5th gear at higher speeds. 2nd
gear must be selected manually. Select 5th
gear manually or move the selector lever
to D (see page 139).
The following message is shown on the SID:Temporary override of Park Brake Shift
Lock
1 Apply the parking brake.
2 Lift up the rubber mat in the storage
compartment ahead of the selector
lever.
3 Under the floor of the storage compart-
ment is a yellow plastic lever. Use a thin
tool, such as a screwdriver, to press and
hold the plastic lever while moving the
selector lever from P to N.
4 Remove the tool.
5 Release the parking brake if the car is to
be moved immediately, otherwise it
should remain on.
Check fuse 6 in the engine bay fuse box.
If the fuse is OK the battery may be dead.
Contact a Saab dealer to have the problem
checked and rectified. Gearbox malfunction.
Limited performance.
Contact Saab dealer.
NOTICEDue to electrical problems it may not be
possible to move the selector lever out of
the park position, even if the ignition is
ON. If for some reason the selector lever
has to be moved out of the park position
(i.e. to tow the car a short distance) do as
described below.
Temporary override of Park Brake Shift
Lock
ProCarManuals.com
Page 138 of 256

138 Starting and drivingSelector lever positions
P
The selector lever is locked and the transmission
is mechanically blocked.
The engine can be started.
To move the selector lever out of the P position,
depress the brake pedal and press in the detent
(catch) on the selector lever.
Only select the park position (P) when the car is
stationary.
R
Only select the reverse position (R) when the car
stationary. The detent release button must be
pressed before the selector lever can be moved
to R.
Wait until reverse gear has engaged before
touching the accelerator.
N
You must press the brake pedal to move
the selector lever from the neutral position (N).
In neutral, the transmission is disengaged from the
engine. The engine can be started but make sure
the parking brake is on to prevent unexpected
movement.
To prevent the engine and transmission becoming
hotter than necessary, select N for long stops with
the engine running, e.g. when stuck in a traffic jam.
At traffic lights, leave the selector lever in the drive
position (D).
D
The drive position (D) is the normal one for forward
driving. The transmission shifts automatically
between all gears from 1st to 5th, the timing of
which depends on factors such as the current
accelerator position and the speed of the car.
Pause for a moment before applying the acce-
lerator, to allow the gears to engage.
ProCarManuals.com
Page 139 of 256

139 Starting and driving
Vector models also have steering wheel controls for manual gear
selection. On these models, it is possible to change gear manually
using the selector lever and the steering wheel controls. The steer-
ing wheel controls are only active when the selector lever is in the M
position.
Select a higher gear by pressing the right-hand button and a lower
gear by pressing the left-hand button. Sentronic, manual gear selection
Move the selector lever to the manual position (M)
(to the left position D) to select gear manually.
Select a higher gear by pressing the selector lever
forward or a lower gear by pulling it back. The
selector lever will return to a position adjacent to
the letter M after each gear change.
An example of when you may wish to make
manual gear changes is when overtaking, to
enable you to remain in a low gear for an extended
period of time.
If the road surface is slippery, you may wish to pull
off in 2nd or 3rd to reduce the risk of wheel spin.
When descending steep hills you should select a
low gear to increase the braking effect of the
engine and thus spare the brakes.
Manual gear selections are displayed on the main instrument
panel. The letter M and the current gear are displayed.
When the selector lever is in the M position, as opposed to the D
position, the engine is much more responsive to changes in accel-
erator position. The accelerator has a different feel.
Kick-down only operates for 4th and 5th gears (below 2,000 rpm).
When changing down, the desired gear can be selected but the
transmission will not change down until the engine speed is low
enough to avoid overrevving.Steering wheel controls for manual gear
selection (Vector models)
ProCarManuals.com
Page 140 of 256

140 Starting and drivingCruise control(Cruise control system)For safety reasons (brake system func-
tion), the brakes must be applied once
when the engine has started, before the
cruise control system can be activated.
The following message is shown on the SID:
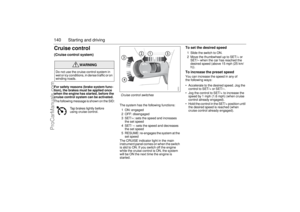
The system has the following functions:
1 ON: engaged
2 OFF: disengaged
3 SET/+: sets the speed and increases
the set speed
4 SET/ –: sets the speed and decreases
the set speed
5 RESUME: re-engages the system at the
set speed
The CRUISE indicator light in the main
instrument panel comes on when the switch
is slid to ON. If you switch off the engine
while the cruise control is ON, the system
will be ON the next time the engine is
started.
To set the desired speed1 Slide the switch to ON.
2 Move the thumbwheel up to SET/+ or
SET/– when the car has reached the
desired speed (above 15 mph (25 km/
h)).To increase the preset speedYou can increase the speed in any of
the following ways:
Accelerate to the desired speed. Jog the
control to SET/+ or SET/–.
Jog the control to SET/+ to increase the
speed by 1 mph (1.6 mph) (when cruise
control already engaged).
Hold the control in the SET/+ position until
the desired speed is reached (when
cruise control already engaged).
WARNING
Do not use the cruise control system in
wet or icy conditions, in dense traffic or on
winding roads.
Tap brakes lightly before
using cruise control.
Cruise control switches
ProCarManuals.com
Page 141 of 256

141 Starting and driving
To reduce the preset speedYou can reduce speed in any of the follow-
ing ways:
Brake to the desired speed. Jog the
control to SET/+ or SET/–.
Jog the control to SET/– to reduce the
speed by 1 mph (1.6 km/h).
Hold the control in the SET/– position until
the desired speed is reached.Temporary increase in speedAccelerate, without shifting down (manual
transmission), to exceed the set speed such
as for overtaking. When you release the
accelerator, the car will return to the set
speed.To disengage the system
temporarilySlide the switch to the left towards OFF, but
only as far as to disengage the cruise con-
trol. Allow the switch to spring back.
To re-engage the systemSlide the switch to RESUME. The car will
return to the previously set speed. Vehicle
speed must exceed 15 mph (25 km/h).To disengage the systemThe system will be disengaged:
As soon as the brake or clutch pedal is
depressed (cars with manual transmis-
sion).
When the switch is slid to To disengage
the system temporarily.
When the switch is slid to OFF.
When the TCS/ESP system is operative.
When position N is selected (cars with
automatic transmission).
BrakingIt is good practice to try your brakes period-
ically while driving. This is particularly
important when driving in heavy rain, on
roads with a lot of surface water, in snow or
in salty slush. In such conditions a slight
delay in the braking effect may be noticed.
To minimize this delay, dry the brakes by
applying them lightly now and again. This
should also be done after the car has been
washed, and in extremely damp weather.
To avoid the brakes becoming overheated,
such as when negotiating long descents
with a drop of several hundred yards (hun-
dred metres), select a low gear to utilize the
braking effect of the engine. If the car has
automatic transmission, select 1st or 2nd
gear.
You can help to prolong the life of the brakes
by thinking ahead and braking harder over
short periods, rather than braking more
moderately over long stretches.
ProCarManuals.com
Page 142 of 256

142 Starting and driving
ABS brakesThe Antilock Braking System (ABS) modu-
lates the brake pressure to each wheel. The
pressure is automatically reduced just
before the wheel locks up and then
increases again to the point at which the
wheel is just about to lock. The wheel sen-
sors send information to the brake system’s
electronic control module for every 4 or so
inches (decimetre) that the car rolls. This
information is processed continuously to
ensure that the adjustment of the brake
pressure will be as exact as possible.
Adjustment takes place up to 12 times per
second.The brake system provides Electronic
Brakeforce Distribution (EBD). This distri-
butes the brake pressure between the front
and rear wheels, in such a way as to achieve
optimum braking performance irrespective
of the car’s speed or load.
The ABS has a built-in diagnostics function
which will switch on the ABS warning light
if a fault is detected in the system (see
page 54).
The following message will appear on the
SID (and corresponding symbol on main
instrument unit) if a fault is detected:
WARNING
It is prudent to try your brakes from
time to time, especially when driving in
heavy rain, through water collected on
the road, in snow, on a wet road
surface or in salty slush. In such condi-
tions, the brakes may take longer than
normal to take effect. To rectify this,
touch the brake pedal periodically to
dry the brakes out.
The same applies after the car has
been washed or when the weather is
very humid.
Avoid parking the car with wet brakes.
Before parking, and if the traffic condi-
tions allow, brake quite heavily so that
the brake discs and pads warm up and
dry.
The brakes are power assisted and it
should be kept in mind that the servo
unit only provides the power assis-
tance when the engine is running.
The brake pressure required when the
engine is off,(e.g. when the car is
being towed) is roughly four times the
normal pedal force required. The
pedal also feels hard and unrespon-
sive.
Overheating can cause the brakes to
fade!
WARNING
The additional safety afforded by the
ABS system is not designed to allow
drivers to drive faster but to make
normal driving safer.
To stop as quickly as possible, without
loss of directional stability, whether
the road surface is dry, wet or slippery,
press the brake pedal down hard
without letting up (do not pump the
pedal), declutching simulta-
neously, and steer the car to safety.
Antilock brake malfunction.
Contact Saab dealer.
ProCarManuals.com
Page 143 of 256

143 Starting and driving
The ABS system will not reduce the braking
distance on loose gravel, snow or ice but,
because the wheels cannot lock up, steer-
ing control is retained.
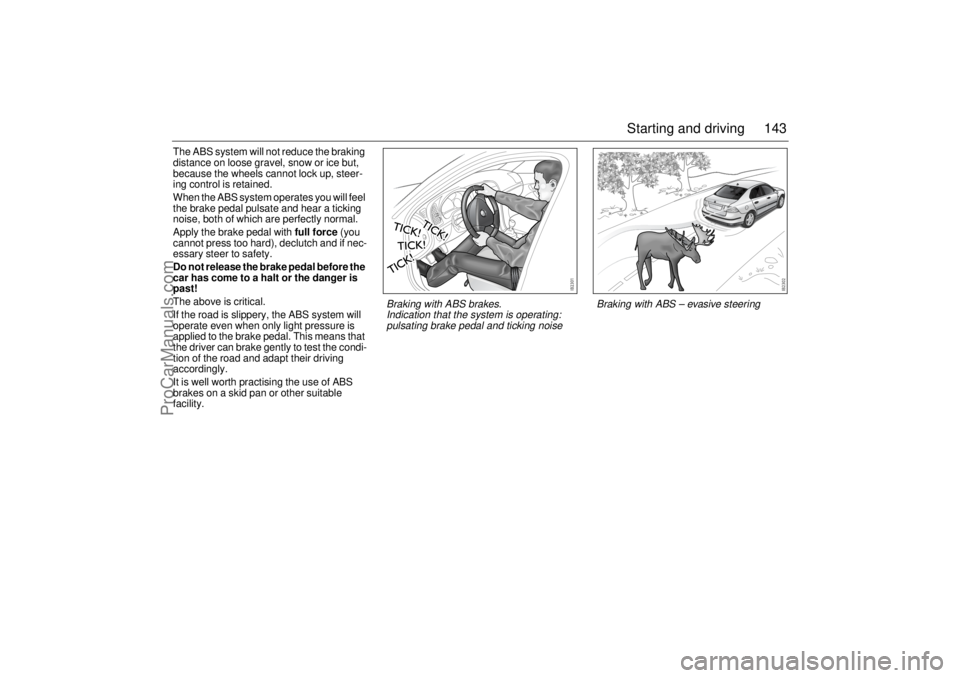
When the ABS system operates you will feel
the brake pedal pulsate and hear a ticking
noise, both of which are perfectly normal.
Apply the brake pedal with full force (you
cannot press too hard), declutch and if nec-
essary steer to safety.
Do not release the brake pedal before the
car has come to a halt or the danger is
past!
The above is critical.
If the road is slippery, the ABS system will
operate even when only light pressure is
applied to the brake pedal. This means that
the driver can brake gently to test the condi-
tion of the road and adapt their driving
accordingly.
It is well worth practising the use of ABS
brakes on a skid pan or other suitable
facility.
Braking with ABS – evasive steering
Braking with ABS brakes.
Indication that the system is operating:
pulsating brake pedal and ticking noise
ProCarManuals.com
Page 144 of 256

144 Starting and drivingTraction Control
System (TCS)Anti-spin system
How the system worksThe Traction Control System (TCS) is
designed to prevent wheelspin. This
enables the car to achieve the best possible
grip and, hence, maximum tractive effort,
together with greater stability.
The TCS uses information from the ABS
wheel sensors to detect when the front (driv-
ing) wheels are rotating faster then the rear
wheels. It then monitors whether one driving
wheel is rotating faster than the other. If so,
the faster wheel is retarded until both
wheels are rotating at the same speed.If the two front wheels are rotating at the
same speed but are turning faster than the
rear wheels, the torque from the engine is
reduced to eliminate the difference.
The process continues until all the wheels
are rotating at the same speed.
The advantages of the TCS become most
apparent when the cohesion between the
front wheels and the road surface is so low
that one or both of the wheels would lose
their grip were the car not equipped with the
TCS, e.g.:
When the car is pulling away or accelerat-
ing with the front wheels on different
surfaces (e.g. one slippery and one dry),
the TCS functions like an electronic differ-
ential lock, making sure that both wheels
rotate at the same speed.
When the car is pulling away or accelerat-
ing on a slippery surface, in which case
the system eliminates wheelspin. The
system also functions when the car is
reversing.
When cornering, if the inside front wheel
rotates faster than the other wheels.
TCS OFF
lights up under the speedometer if:
a fault has been detected and the system
has therefore been switched off
there is a fault in the ABS system
the system has been switched off
manually.
WARNING
When driving normally, the TCS system
helps to improve the car’s directional
stability. The TCS must not be regarded
as a system to enable the driver to main-
tain higher speeds. The same precau-
tions must be adopted as normal for safe
cornering and driving on slippery roads.
ProCarManuals.com