Page 94 of 381
2-30
Shifting Into PARK (P)
(Automatic Transaxle Only)
CAUTION:
It can be dangerous to get out of your vehicle if
the shift lever is not fully in PARK (P) with the
parking brake firmly set. Your vehicle can roll. If
you have left the engine running, the vehicle can
move suddenly. You or others could be injured.
To be sure your vehicle won't move, even when
you're on fairly level ground, use the steps that
follow. If you're pulling a trailer, see ªTowing a
Trailerº in the Index.
1. Hold the brake pedal down with your right foot and
set the parking brake by pulling up on the parking
brake lever.2. Move the shift lever into PARK (P) as follows:
�Hold in the button on
the shift lever.
�Push the lever all the way toward the front of
the vehicle.
3. Turn the ignition key to LOCK.
4. Remove the key and take it with you. If you can
leave your vehicle with the key in your hand, your
vehicle is in PARK (P).
Page 96 of 381

2-32
Shifting Out of PARK (P)
(Automatic Transaxle Only)
Your vehicle has an automatic transaxle shift lock
control system. You have to fully apply your regular
brakes before you can shift from PARK (P) when the
ignition is in ON. See ªAutomatic Transaxle Operationº
in the Index.
If you cannot shift out of PARK (P), ease pressure on
the shift lever
-- push the shift lever all the way into
PARK (P) and release the shift lever button as you
maintain brake application. Then press the shift lever
button and move the shift lever into the gear you wish.
If you ever hold the brake pedal down but still can't
shift out of PARK (P), try this:
1. Turn the ignition to LOCK. Make sure the parking
brake is applied.
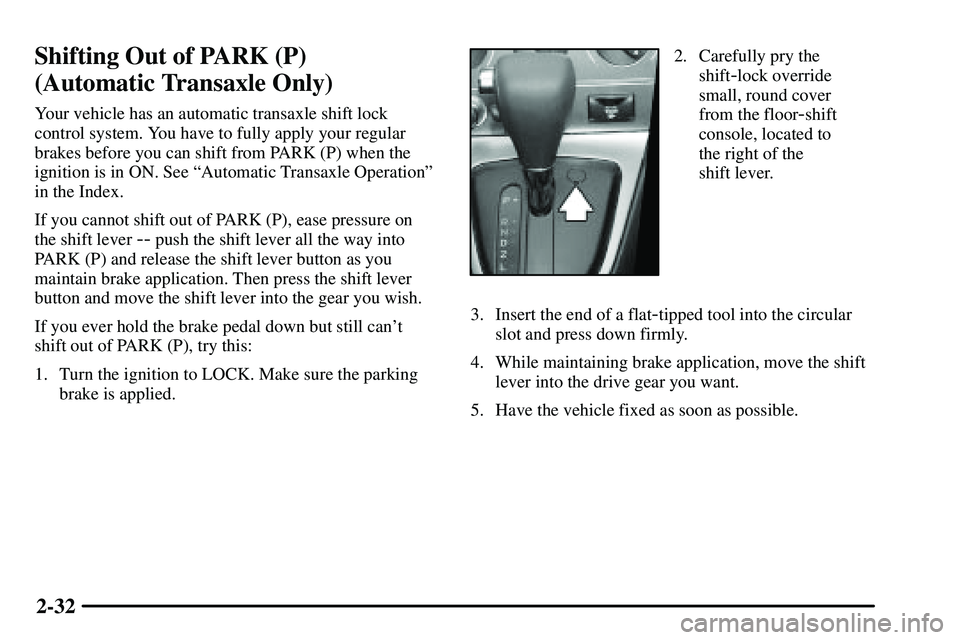
2. Carefully pry the
shift
-lock override
small, round cover
from the floor
-shift
console, located to
the right of the
shift lever.
3. Insert the end of a flat
-tipped tool into the circular
slot and press down firmly.
4. While maintaining brake application, move the shift
lever into the drive gear you want.
5. Have the vehicle fixed as soon as possible.
Page 97 of 381
2-33
Parking Your Vehicle
(Manual Transaxle Only)
Before you get out of your vehicle, move the shift lever
into REVERSE (R), and firmly apply the parking brake.
Once the shift lever has been placed into REVERSE (R)
with the clutch pedal pressed in, you can turn the
ignition key to OFF, remove the key and release
the clutch.
If you are towing a trailer, see ªTowing a Trailerº in
the Index.
Parking Over Things That Burn
CAUTION:
Things that can burn could touch hot exhaust
parts under your vehicle and ignite. Don't park
over papers, leaves, dry grass or other things that
can burn.
Page 105 of 381

2-41
Reducing Speed While Using Cruise Control
There are two ways to reduce your speed while using
cruise control:
�Push and hold the lever to SET/COAST until you
reach the lower speed you want, then release it.
�To slow down in very small amounts, push the lever
down briefly. Each time you do this, you'll go about
1 mph (1.6 km/h) slower.
Passing Another Vehicle While Using Cruise Control
Use the accelerator pedal to increase your speed. When
you take your foot off the pedal, your vehicle will slow
down to the cruise control speed you set earlier.
Using Cruise Control on Hills
How well your cruise control will work on hills depends
upon your speed, load and the steepness of the hills.
When going up steep hills, you may have to step on the
accelerator pedal to maintain your speed.When going downhill, you may have to brake or shift
to a lower gear to keep your speed down. Of course,
applying the brake or downshifting to SECOND (2) or
LOW (L) takes you out of cruise control. Many drivers
find this to be too much trouble and don't use cruise
control on steep hills.
Ending Cruise Control
There are several ways to turn off the cruise control:
�Step lightly on the brake pedal or push the clutch
pedal, if you have a manual transaxle.
�Press the CRUISE ON
-OFF button again.
�Pull the cruise control lever toward you.
Erasing Speed Memory
When you turn off the cruise control or the ignition,
your cruise control set speed memory is erased.
Page 107 of 381

2-43 Automatic Light Control (ALC)
Your vehicle is equipped with an automatic light sensor
on the top left corner of the instrument panel, so be
sure it is not covered or the headlamps will be on
continuously.
When it is dark enough outside, your ALC will turn on
your low
-beam headlamps at the normal brightness
along with other lamps such as the taillamps,
sidemarker, parking lamps and instrument panel lights.
The parking brake must be released for ALC to work.
This is indicated by the headlamp symbol on your
instrument panel cluster.
If you are driving through a parking garage, overcast
weather, or a tunnel, the ALC may turn on your
low
-beam headlamps at a normal brightness along with
the taillamps, sidemarker, parking lamps and the
instrument panel lights. The radio lights will be dimmer,
and the instrument panel cluster lights may dim. There
will be a 10 to 15 second delay before the lights will
turn on when starting the car at night.
Lamps On Reminder
If you turn the ignition to LOCK or ACC and leave
the lamps on, you'll hear a tone when you open the
driver's door.
Daytime Running Lamps
Daytime Running Lamps (DRL) can make it easier for
others to see the front of your vehicle during the day.
DRL can be helpful in many different driving
conditions, but they can be especially helpful in the
short periods after dawn and before sunset. Fully
functional daytime running lamps are required on all
vehicles first sold in Canada.
The DRL system will make your headlamps come
on at a reduced brightness when the following
conditions are met:
�The ignition is on with the engine running,
�the exterior lamps switch is off and
�the parking brake is released.
When the DRL are on, only your headlamps will be on
at a reduced brightness. The taillamps, sidemarker and
other lamps won't be on. Your instrument panel won't
be lit up either.
When you turn the exterior lamp switch to the headlamp
position, your DRL will go off and your headlamps will
come on. The other lamps that come on with your
headlamps will also come on.
Page 108 of 381

2-44
When it begins to get dark, the headlamps will
automatically switch from DRL to the regular
headlamps. See ªAutomatic Light Controlº earlier in
this section.
When you turn the exterior lamp switch off, the regular
lamps will go off and your headlamps will change to the
reduced brightness of DRL provided it is not dark
outside. DRL also comes on if only the parking lamps
are being used.
To idle your vehicle with the DRL off, do the following:
1. Set the parking brake.
2. Turn the ignition off.
3. Turn the ignition back on.
The DRL will stay off until you release the
parking brake.
As with any vehicle, you should turn on the regular
headlamp system when you need it.Interior Lamps
Interior/Instrument Panel Brightness Dial
The interior/instrument
panel brightness dial is
located to the left of the
steering wheel on the
instrument panel.
The brightness of the instrument panel lights will not
decrease when the headlamps are on. It is recommended
that the brightness level is kept at the maximum setting
for all daytime driving to insure proper visibility.
Page 109 of 381

2-45
The interior light has the following positions:
OFF: This position turns the light off.
ON: This position keeps the light on all the time.
DOOR: This position turns the light on when any of the
side doors, the liftgate or the liftglass is opened. The
light goes off when all the side doors, the liftgate and the
liftglass are closed.Illuminated Entry System (If Equipped)
When the interior/instrument panel brightness dial is in
the DOOR position, the light will come on when any
side door, the liftgate or the liftglass is opened. After
any side door, the liftgate or the liftglass is closed, the
light will remain on for about 15 seconds and then go
out except under the following conditions:
�All of the side doors, the liftgate and the liftglass
are closed when the ignition is in the ACC or ON
positions.
�The ignition is turned to ACC or ON after all the
side doors, the liftgate and the liftglass are closed.
�All the side doors and liftgate are locked when the
liftglass is closed and the light is still on.
When any side door is unlocked with the key or remote
keyless entry system transmitter, the light comes on for
15 seconds, even if the door is not opened.
To prevent the battery from draining, the lights will
automatically turn off when the key is removed and the
door is left opened with the dial in the DOOR position
for 20 minutes or more.
Page 118 of 381

2-54
Accessory Power Outlet
With the accessory power outlet, you can plug in
auxiliary electrical equipment.
The accessory power outlet is located in the center
console storage area.
To use the outlet, the ignition must be in ON or ACC.
Pull down the cover the small cover to access the outlet.
NOTICE:
When using the accessory power outlet,
maximum electrical loads must not exceed
15 amps. Always turn off any electrical
equipment when not in use. Leaving electrical
equipment on for extended periods will drain
your battery.
These circuits are protected by a fuse and have
maximum current levels.
Certain power accessory plugs may not be compatible to
the power accessory outlet and could result in blown
vehicle or adapter fuses. If you experience a problem see
your dealer for additional information on the power
accessory plugs.
NOTICE:
Adding some electrical equipment to your vehicle
can damage it or keep other things from working
as they should. This wouldn't be covered by your
warranty. Check with your dealer before adding
electrical equipment, and never use anything that
exceeds the amperage rating.
When adding electrical equipment, be sure to follow the
proper installation instructions included with the
equipment.
NOTICE:
Power outlets are designed for accessory plugs
only. Do not hang any type of accessory or
accessory bracket from the plug. Improper use of
the power outlet can cause damage not covered
by your warranty.