2003 PONTIAC GRAND PRIX key battery
[x] Cancel search: key batteryPage 72 of 378

At times you may notice a decrease in range. This is
normal for any remote keyless entry system.
If the
transmitter does not work or
if you have to stand closer
to your vehicle for the transmitter to work, try this:
e
e
e
e
Check the distance. You may be too far from your
vehicle.
You may need to stand closer during
rainy or snowy weather.
Check the location. Other vehicles or objects may
be blocking the signal. Take
a few steps to the
left or right, hold the transmitter higher, and
try again.
Check to determine
if battery replacement is
necessary. See “Battery Replacement” under
Remote Keyless Entry System Operation
on
page 2-5.
If you are still having trouble, see your dealer or a
qualified technician for service.
Remote Keyless Entry System
Operation
You can lock and unlock your doors or unlock your
trunk from about
3 feet (1 m) up to 30 feet (9 m) away
using the remote keyless entry transmitter supplied with
your vehicle.
LOCK: To lock all the
doors, press the LOCK
button. See Power
Door
Locks on page 2-9
for more details on
power door lock features.
If your vehicle is equipped with the content
theft-deterrent system, the
LOCK button may arm the
system. See Content Theft-Deterrent on page
2- 15
for more information.
2-5
Page 73 of 378

UNLOCK: When you press the UNLOCK button, only
the driver’s door will unlock.
If you press UNLOCK again
within five seconds, all the doors will unlock. If you
would like all the doors to unlock the first time you press
UNLOCK, see Power Door
Locks on page 2-9 The
UNLOCK button on the remote keyless entry transmitter
will disarm the content theft deterrent system. See
Content Theft-Deterrent
on page 2-75 for more details.
(Open Trunk): Press the button with the trunk
symbol to open your trunk. The transaxle must be
in PARK
(P) for this feature to operate.
.& (Remote Alarm): When you press the button with
the horn symbol, the headlamps will flash and the
horn will sound. This will allow you to attract attention
if needed.
Your vehicle may have Remote Lock/Unlock
Confirmation. This feature provides feedback to the
holder of the remote keyless entry transmitter that
a command has been received by the keyless entry
receiver.
To signal that a command has been received,
the headlamps will flash and the horn may sound
briefly. See Vehicle Personalization on page
2-43 for
programming information.
Matching Transmitter(s) to Your
Vehicle
Each remote keyless entry transmitter is coded to
prevent another transmitter from unlocking your vehicle.
If a transmitter is lost or stolen, a replacement can
be purchased through your dealer. Remember to bring
any remaining transmitters with you when you go to
your dealer. When the dealer matches the replacement
transmitter to your vehicle, any remaining transmitters
must
also be matched. Once your dealer has coded the
new transmitter, the lost transmitter will not unlock
your vehicle. Each vehicle can have a maximum of four
transmitters matched to it.
Battery Replacement
Under normal use, the battery in your remote keyless
entry transmitter should last about three years.
You can tell the battery is weak
if the transmitter won’t
work at the normal range in any location. If you have
to get close to your vehicle before the transmitter works,
it’s probably time to change the battery.
Page 87 of 378

Notice: If your key seems stuck in LOCK and you
can’t turn it, be sure you are using the correct key;
if
so, is it all the way in? Turn the key only with
your hand. Using a tool to force it could break the
key or the ignition switch. If none
of these works,
then your vehicle needs service.
B (LOCK): This position locks the ignition, steering
wheel and transaxle. It’s a theft-deterrent feature. It’s also
the only position from which you can remove the key.
C (OFF): This position lets you turn off the engine but
still turn the steering wheel. It doesn’t lock the
steering wheel like LOCK. Use
OFF if you must have
the vehicle pushed or towed.
D (RUN): This position is where the key returns to after
you start the vehicle. With the engine
off, you can use
RUN to display some of the warning and indicator lights.
E (START): This position starts the engine.
A warning chime will sound
if you open the driver’s door
while the ignition is in
OFF, LOCK or ACCESSORY
and the key is in the ignition.
Retained Accessory Power (RAP)
With Retained Accessory Power, (RAP), the power
windows, audio system and sunroof will continue to work
up to
10 minutes after the ignition key is turned to
OFF and none of the doors are opened.
Starting Your Engine
Move your shift lever to PARK (P) or NEUTRAL (N).
Your engine won’t start in any other position - that’s a
safety feature. To restart while you’re already moving,
use NEUTRAL
(N) only.
Nofice: Don’t try to shift to PARK (P) if your
vehicle is moving.
If you do, you could damage the
transaxle. Shift to
PARK (P) only when your
vehicle is stopped.
Shift Lock Release
This vehicle is equipped with an electric shift lock
release system. The shift lock release is designed to
do the following:
Prevent ignition key removal unless the shift lever is
in PARK (P) with the shift lever button fully released.
Prevent movement of the shift lever out of PARK (P)
unless the ignition is in a position other than
OFF or
LOCK. The shift lock release is always functional
except in the case
of a dead or low voltage
(less than
9 V) battery.
2-20
Page 88 of 378

If your vehicle has a dead battery or a battery with low
voltage, there is an override access slot that will
allow you to override the shift lock release.
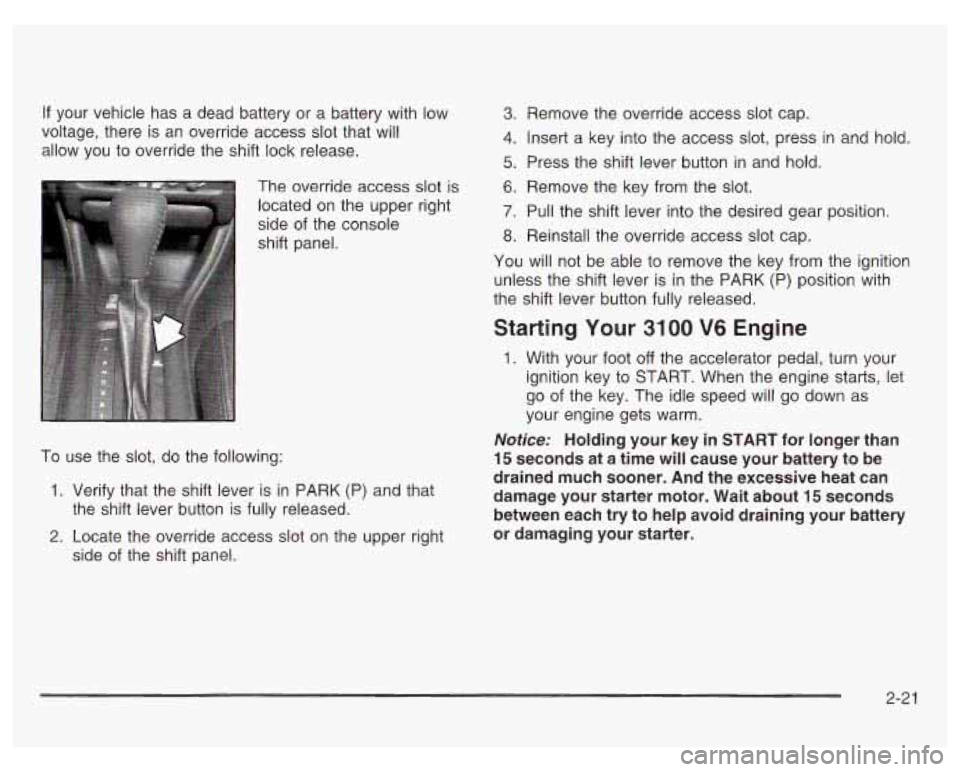
. ": The override access slot is
located on the upper right
side of the console
shift panel.
To use the slot, do the following:
1. Verify that the shift lever is in PARK (P) and that
2. Locate the override access slot on the upper right
the shift lever button
is fully released.
side of the shift panel.
3. Remove the override access slot cap.
4. insert a key into the access slot, press in and hold.
5. Press the shift lever button in and hold.
6. Remove the key from the slot.
7. Pull the shift lever into the desired gear position.
8. Reinstall the override access slot cap.
You will not be able to remove the key from the ignition
unless the shift lever is in the PARK (P) position with
the shift lever button fully released.
Starting Your 3100 V6 Engine
1. With your foot off the accelerator pedal, turn your
ignition key to START. When the engine starts, let
go of the key. The idle speed will go down as
your engine gets warm.
Notice: Holding your key in START for longer than
15 seconds at a time will cause your battery to be
drained much sooner. And the excessive heat can
damage your starter motor. Wait about
15 seconds
between each try to help avoid draining your battery
or damaging your starter.
2-21
Page 89 of 378

2. If your engine won’t start (or starts but then stops),
it could be flooded with too much gasoline. Try
pushing your accelerator pedal all the way to the
floor and holding it there as you hold the key
in START for not more than 15 seconds at a time.
This clears the extra gasoline from the engine.
Notice: Your engine is designed to work with the
electronics
in your vehicle. If you add electrical
parts or accessories, you could change the way the
engine operates. Before adding electrical equipment,
check with your dealer. If you don’t, your engine might not perform properly.
Starting Your 3800 Series II V6 Engine
1. With your foot off the accelerator pedal, turn
your ignition key to START. When the engine starts,
let go of the key. The idle speed will go down as
your engine gets warm.
Notice: Holding your key in START for longer than
15 seconds at a time will cause your battery to be
drained much sooner. And
the excessive heat can
damage your starter motor. Wait about
15 seconds
between each try to help avoid draining your battery
or damaging your starter.
2. If it doesn’t start within 10 seconds, hold your key in
START for about 10 seconds at a time until your
engine starts. Wait about 15 seconds between
each try.
3. If your engine still won’t start (or starts but then
stops), it could be flooded with too much gasoline.
Try pushing your accelerator pedal all the way to the
floor and holding it there as you hold the key in
START for about three seconds. If the vehicle starts
briefly but then stops again, do the same thing.
This time keep the pedal down for five or six
seconds to clear the extra gasoline from the engine.
After waiting about 15 seconds, repeat the normal
starting procedure.
Notice: Your engine is designed to work with the
electronics in your vehicle.
If you add electrical
parts or accessories, you could change the way the
engine operates. Before adding electrical equipment,
check with your dealer. If you don’t, your engine
might not perform properly.
2-22
Page 148 of 378

If the air bag readiness light stays on after you start the
vehicle or comes on when you are driving, your air
bag system may not work properly. Have your vehicle
serviced right away.
If the air bag reai.---less light
s 1s on after you
start your vehicle,
it means the air bag system
may not be working properly. The air bags
in
your vehicle may not inflate in a crash, or they
could even inflate without a crash. To help
avoid injury to yourself or others, have your
vehicle serviced right away if the air bag readiness light stays on after you start
your vehicle.
The air bag readiness light should flash for a few
seconds when you turn the ignition key to
RUN. If the
light doesn’t come on then, have
it fixed so it will
be ready to warn you
if there is a problem.
Charging System Light
The
charging system
light will come on briefly
when you turn on the
ignition as a check to
show you it’s working.
Then it will go out.
If it stays on, or comes on while you are driving, you
may have a problem with the electrical charging system.
It could indicate that you have a loose drive belt or
another electrical problem. Have
it checked right away.
Driving while this light is on could drain your battery.
If you must drive a short distance with the light on,
be certain to turn
off all your accessories, such as the
radio and air conditioner.
3-27
Page 277 of 378

Replacing Brake System Parts
The braking system on a vehicle is complex. Its many
parts have to be of top quality and work well together
if
the vehicle is to have really good braking. Your
vehicle was designed and tested with top-quality
GM
brake parts. When you replace parts of your braking
system
- for example, when your brake linings
wear down and you need new ones put in
- be sure
you get new approved
GM replacement parts. If
you don’t, your brakes may no longer work properly.
For example,
if someone puts in brake linings that are
wrong for your vehicle, the balance between your
front and rear brakes can change
- for the worse.
The braking performance you’ve come to expect can
change in many other ways
if someone puts in the
wrong replacement brake parts.
Battery
Your new vehicle comes with a maintenance free
ACDelco@ battery. When it’s time for a new battery, get
one that has the replacement number shown on the
original battery’s label. We recommend an ACDelco@
battery. See Engine Compartment Overview on
page
5- 12 for battery location.
Warning: Battery posts, terminals and related
accessories contain lead and lead compounds,
chemicals known to the State of California to cause
cancer and reproductive harm. Wash hands after
handling.
If your battery has a very low charge or is dead, you
may not be able to remove the ignition key from
the ignition switch or shift out of Park (P). Refer to
Shifting Out of Park
(P) on page 2-30.
5-52