2003 PONTIAC GRAND PRIX battery location
[x] Cancel search: battery locationPage 72 of 378

At times you may notice a decrease in range. This is
normal for any remote keyless entry system.
If the
transmitter does not work or
if you have to stand closer
to your vehicle for the transmitter to work, try this:
e
e
e
e
Check the distance. You may be too far from your
vehicle.
You may need to stand closer during
rainy or snowy weather.
Check the location. Other vehicles or objects may
be blocking the signal. Take
a few steps to the
left or right, hold the transmitter higher, and
try again.
Check to determine
if battery replacement is
necessary. See “Battery Replacement” under
Remote Keyless Entry System Operation
on
page 2-5.
If you are still having trouble, see your dealer or a
qualified technician for service.
Remote Keyless Entry System
Operation
You can lock and unlock your doors or unlock your
trunk from about
3 feet (1 m) up to 30 feet (9 m) away
using the remote keyless entry transmitter supplied with
your vehicle.
LOCK: To lock all the
doors, press the LOCK
button. See Power
Door
Locks on page 2-9
for more details on
power door lock features.
If your vehicle is equipped with the content
theft-deterrent system, the
LOCK button may arm the
system. See Content Theft-Deterrent on page
2- 15
for more information.
2-5
Page 73 of 378

UNLOCK: When you press the UNLOCK button, only
the driver’s door will unlock.
If you press UNLOCK again
within five seconds, all the doors will unlock. If you
would like all the doors to unlock the first time you press
UNLOCK, see Power Door
Locks on page 2-9 The
UNLOCK button on the remote keyless entry transmitter
will disarm the content theft deterrent system. See
Content Theft-Deterrent
on page 2-75 for more details.
(Open Trunk): Press the button with the trunk
symbol to open your trunk. The transaxle must be
in PARK
(P) for this feature to operate.
.& (Remote Alarm): When you press the button with
the horn symbol, the headlamps will flash and the
horn will sound. This will allow you to attract attention
if needed.
Your vehicle may have Remote Lock/Unlock
Confirmation. This feature provides feedback to the
holder of the remote keyless entry transmitter that
a command has been received by the keyless entry
receiver.
To signal that a command has been received,
the headlamps will flash and the horn may sound
briefly. See Vehicle Personalization on page
2-43 for
programming information.
Matching Transmitter(s) to Your
Vehicle
Each remote keyless entry transmitter is coded to
prevent another transmitter from unlocking your vehicle.
If a transmitter is lost or stolen, a replacement can
be purchased through your dealer. Remember to bring
any remaining transmitters with you when you go to
your dealer. When the dealer matches the replacement
transmitter to your vehicle, any remaining transmitters
must
also be matched. Once your dealer has coded the
new transmitter, the lost transmitter will not unlock
your vehicle. Each vehicle can have a maximum of four
transmitters matched to it.
Battery Replacement
Under normal use, the battery in your remote keyless
entry transmitter should last about three years.
You can tell the battery is weak
if the transmitter won’t
work at the normal range in any location. If you have
to get close to your vehicle before the transmitter works,
it’s probably time to change the battery.
Page 266 of 378

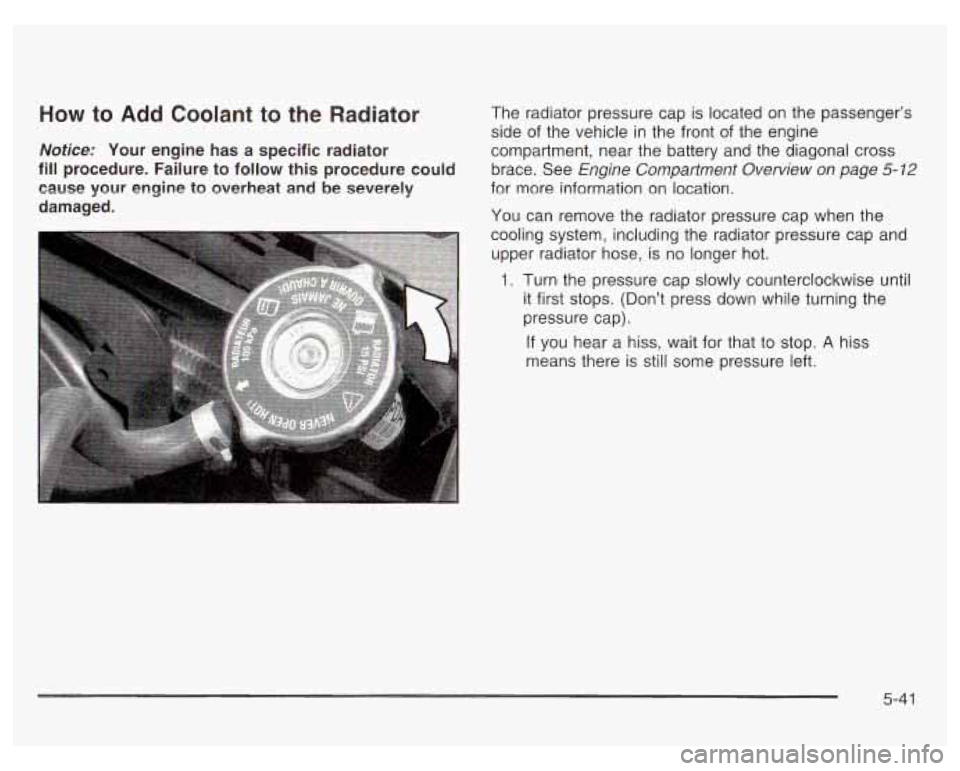
40w to Add Coolant to the Radiator The radiator pressure cap is located on the passenger’s
side of the vehicle
in the front of the engine
dotice: Your engine has a specific radiator compartment, near the battery and the diagonal cross
ill procedure. Failure to follow this procedure could brace. See Engine Compartment Overview on page 5-12
:ause your engine to overheat and be severely for more information on location.
lamaged. You can remove the radiator pressure cap when the
cooling system, including the radiator pressure cap and
upper radiator hose, is no longer hot.
1. Turn the pressure cap slowly counterclockwise until
it first stops. (Don’t press down while turning the
pressure cap).
If you hear a hiss, wait for that to stop. A hiss
means there is still some pressure left.
5-4 1
Page 277 of 378

Replacing Brake System Parts
The braking system on a vehicle is complex. Its many
parts have to be of top quality and work well together
if
the vehicle is to have really good braking. Your
vehicle was designed and tested with top-quality
GM
brake parts. When you replace parts of your braking
system
- for example, when your brake linings
wear down and you need new ones put in
- be sure
you get new approved
GM replacement parts. If
you don’t, your brakes may no longer work properly.
For example,
if someone puts in brake linings that are
wrong for your vehicle, the balance between your
front and rear brakes can change
- for the worse.
The braking performance you’ve come to expect can
change in many other ways
if someone puts in the
wrong replacement brake parts.
Battery
Your new vehicle comes with a maintenance free
ACDelco@ battery. When it’s time for a new battery, get
one that has the replacement number shown on the
original battery’s label. We recommend an ACDelco@
battery. See Engine Compartment Overview on
page
5- 12 for battery location.
Warning: Battery posts, terminals and related
accessories contain lead and lead compounds,
chemicals known to the State of California to cause
cancer and reproductive harm. Wash hands after
handling.
If your battery has a very low charge or is dead, you
may not be able to remove the ignition key from
the ignition switch or shift out of Park (P). Refer to
Shifting Out of Park
(P) on page 2-30.
5-52
Page 279 of 378

Notice: If the other system isn’t a 12-volt system
with a negative ground, both vehicles can be
damaged.
1. Check the other vehicle. It must have a 12-volt
battery with a negative ground system.
2. Get the vehicles close enough so the jumper cables
can reach, but be sure the vehicles aren’t touching
each other. If they are, it could cause a ground
connection you don’t want. You wouldn’t be able to
start your vehicle, and the bad grounding could
damage the electrical systems.
To avoid the possibility of the vehicles rolling, set
the parking brake firmly on both vehicles involved in
the jump start procedure. Put an automatic
transaxle in PARK
(P) or a manual transaxle in
NEUTRAL before setting the parking brake.
Notice: If you leave your radio on, it could be badly
damaged. The repairs wouldn’t be covered by
your warranty.
3. Turn off the ignition on both vehicles. Unplug
unnecessary accessories plugged into the cigarette
lighter or in the accessory power outlet. Turn
off
the radio and all lamps that aren’t needed. This will
avoid sparks and help save both batteries. And it
could save your radio!
4. Open the hoods and locate the batteries. Find the
positive
(+) and negative (-) terminal locations on
each vehicle. You will not need to access your
battery for jump starting. Your vehicle has
a remote
positive
(+) jump starting terminal for that purpose.
The terminal is located in the engine compartment
on the passenger’s side of the vehicle, near
the diagonal cross brace. See Engine Compartment
Ovewiew
on page 5-72 for more information on
location.
5-54
Page 281 of 378

5. Check that the jumper cables don’t have loose or
missing insulation.
If they do, you could get a
shock. The vehicles could be damaged too. Don’t connect positive
(+) to
negative (-), or you’ll get a
short that would damage the battery and maybe
other parts, too. And don’t connect the negative
(-)
cable to the negative (-) terminal on the dead battery
because this can cause sparks.
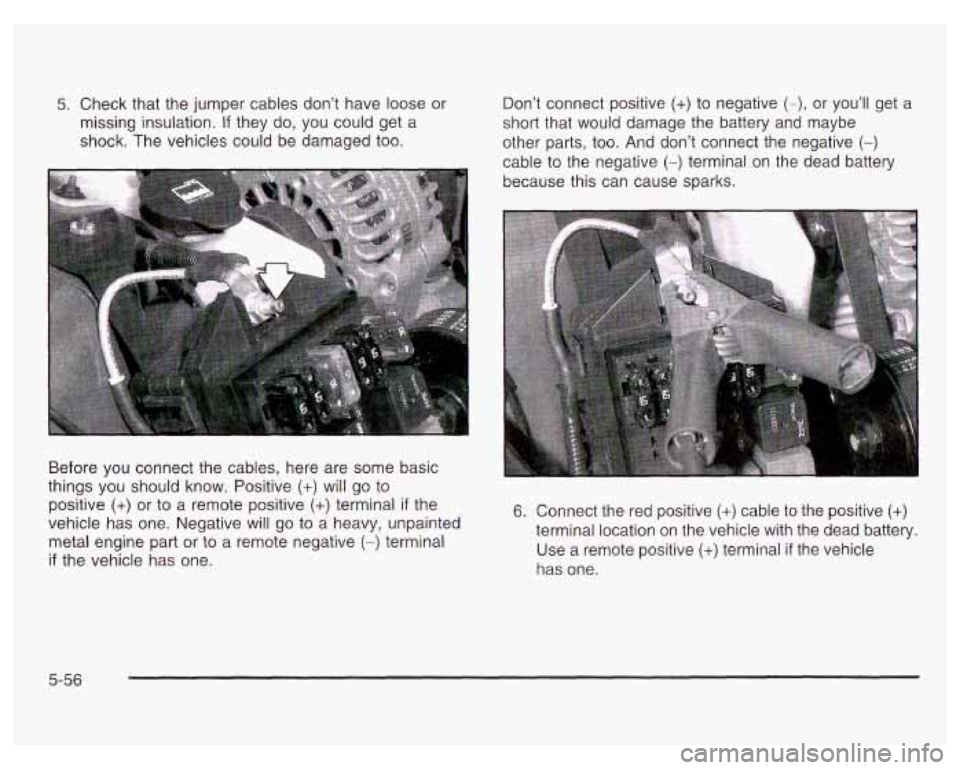
Before you connect the cables, here are some basic
things you should know. Positive
(+) will go to
positive
(+) or to a remote positive (+) terminal if the
vehicle has one. Negative will go to a heavy, unpainted
metal engine part or to a remote negative
(-) terminal
if the vehicle has one.
6. Connect the red positive (+) cable to the positive (+)
terminal location on the vehicle with the dead battery.
Use a remote positive
(+) terminal if the vehicle
has one.
5-56
Page 282 of 378

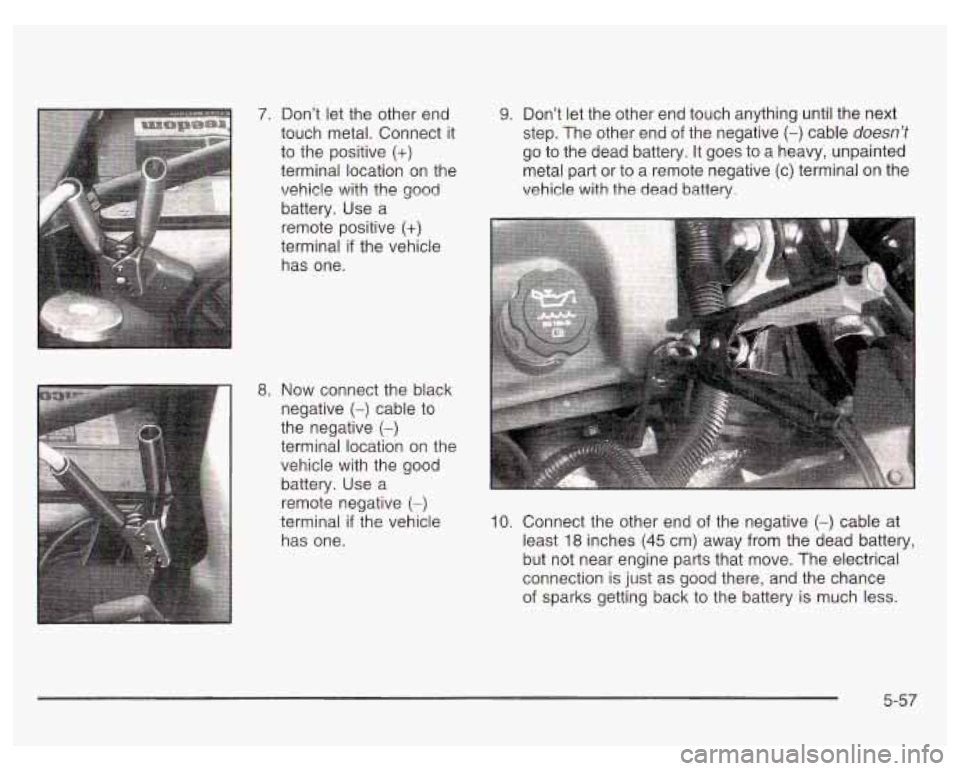
7. Don't let the other end
touch metal. Connect it
to the positive
(+)
terminal location on the
vehicle with the good
battery. Use a
remote positive
(+)
terminal if the vehicle
has one.
9. Don't let the other end touch anything until the next
step. The other end
of the negative (-) cable doesn't
go to the dead battery. It goes to a heavy, unpainted
metal part or to
a remote negative (c) terminal on the
vehicle with the dead battery.
8. Now connect the black
negative
(-) cable to
the negative
(-)
terminal location on the vehicle with the good
battery. Use a
remote negative
(-)
terminal if the vehicle
has one. 10. Connect the other end of the negative (-) cable at
least
18 inches (45 cm) away from the dead battery,
but not near engine parts that move. The electrical
connection is just
as good there, and the chance
of sparks getting back to the battery is much less.
5-57