2003 PONTIAC GRAND PRIX torque
[x] Cancel search: torquePage 96 of 378

Leaving Your Vehicle With the Engine
Runqing
It can be dangerous to leave your vehicle with
the engine running. Your vehicle could move
suddenly if the shift lever
is not fully in
PARK (P) with the parking brake firmly set.
And, if you leave the vehicle with the engine
running, it could overheat and even catch fire.
You or others could be injured. Don’t leave
your vehicle with the engine running.
If you have to leave your vehicle with the engine
running, be sure the vehicle
is in PARK (P) and the
parking brake is firmly set before you leave it. After
you’ve moved the shift lever into PARK (P), hold the
regular brake pedal down. Then, see if you can
move the shift lever away from PARK (P) (without first
pushing the shift lever button).
If you can, it means
that the shift lever wasn’t fully locked into PARK (P).
Torque Lock
If you are parking on a hill and you don’t shift your
transaxle into PARK (P) properly, the weight of
the vehicle may put too much force on the parking pawl
in the transaxle. You may find it difficult to pull the
shift lever out of PARK (P). This is called “torque lock”.
To prevent torque lock, set the parking brake and
then shift into PARK (P) properly before you leave the
driver’s seat.
To find out how, see Shifting Into Park (P)
on page 2-28.
When you are ready to drive, move the shift lever out of
PARK (P) before you release the parking brake.
If torque lock does occur, you may need to have another
vehicle push yours a little uphill to take some of the
pressure from the parking pawl in the transaxle,
so you
can pull the shift lever out of PARK
(P).
2-29
Page 295 of 378

Don’t include the compact spare tire in your tire rotation.
After the tires have been rotated, adjust the front and
rear inflation pressures as shown on the Tire-Loading
Information label. Make certain that all wheel nuts
are properly tightened. See “Wheel Nut Torque” under
Capacities and Snncifjcations
on page 5- 102.
Rust or dirt on a wheel, or on ,,le parts to
which it is fastened, can make wheel nuts
become loose after a time. The wheel could
come
off and cause an accident. When you
change a wheel, remove any rust or dirt from
places where the wheel attaches to the vehicle.
In an emergency, you can use a cloth or a
paper towel to do this; but be sure to use a
scraper or wire brush later, if you need to, to
get all the rust or
dirt off. See “Changing a Flat
Tire”
in the Index.
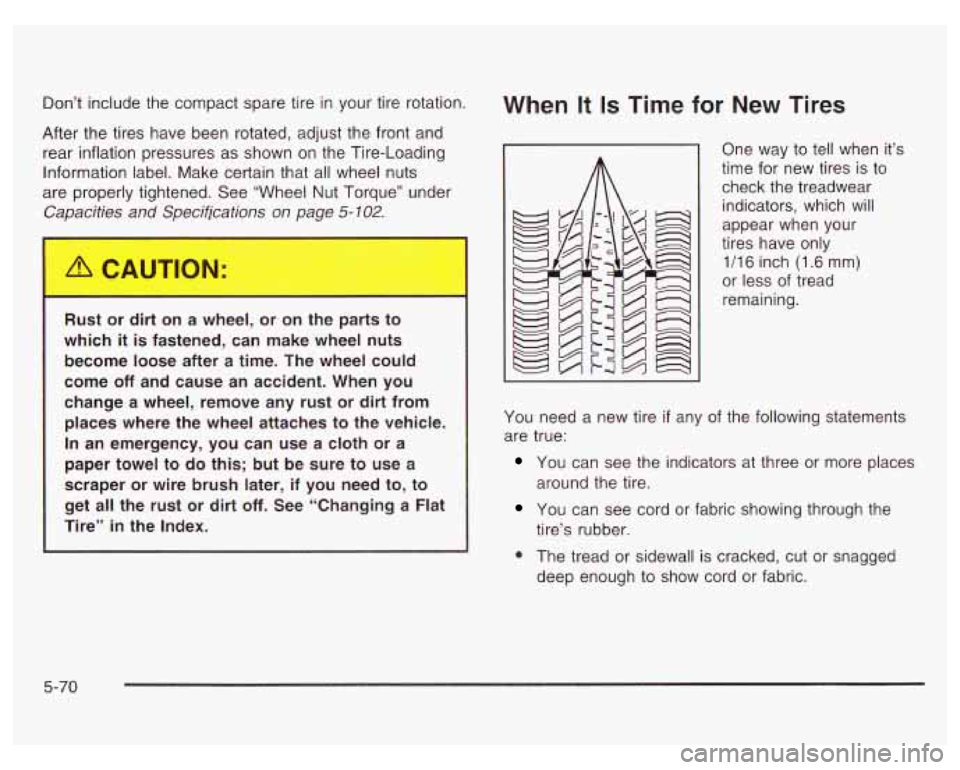
When It Is Time for New Tires
One way to tell when it’s
time for new tires is to
check the treadwear
indicators, which will
appear when your
tires have only
1/16 inch (1.6 mm)
or less of tread
remaining.
You need a new tire
if any of the following statements
are true:
You can see the indicators at three or more places
around the tire.
You can see cord or fabric showing through the
0 The tread or sidewall is cracked, cut or snagged
tire’s rubber.
deep enough to show cord or fabric.
5-70
Page 309 of 378

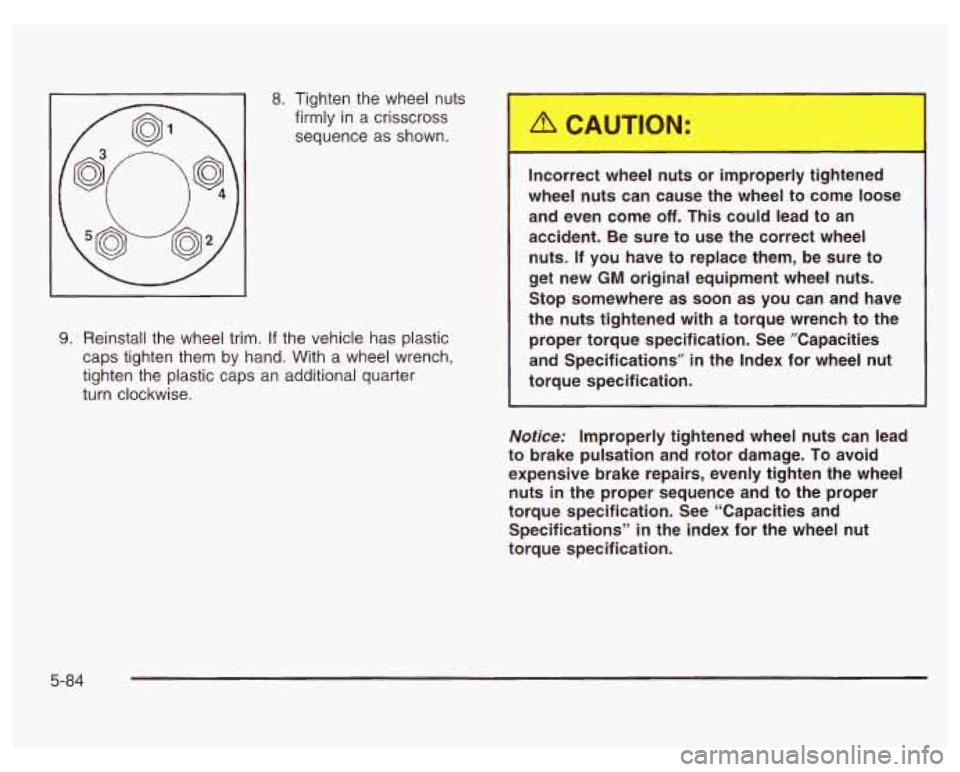
8. Tighten the wheel nuts
firmly in a crisscross
sequence
as shown.
9. Reinstall the wheel trim. If the vehicle has plastic
caps tighten them
by hand. With a wheel wrench.
tighten the plastic caps an additional quarter
turn clockwise.
I ~ ‘ect whe-- x improper tig..-med
wheel
nuts can cause the wheel to come loose
and even come
off. This could lead to an
accident. Be sure to use the correct wheel
nuts. If you have to replace them, be sure to
get new
GM original equipment wheel nuts.
Stop somewhere as soon as you can and have
the nuts tightened with
a torque wrench to the
proper torque specification. See ”Capacities
and Specifications” in the Index for wheel nut
torque specification.
Notice: Improperly tightened wheel nuts can lead
to brake pulsation and rotor damage.
To avoid
expensive brake repairs, evenly tighten the wheel
nuts in the proper sequence and to the proper
torque specification. See “Capacities and
Specifications”
in the index for the wheel nut
torque specification.
5-84
Page 326 of 378

I
21
22
I 27
Usaqe
Mass Air Flow (MAF), Heated
Sensors, Canister Purge, Boost
Solenoid
Spare
SDare
Spare lanition Module
Spare
trunk Release. Back-UD Lamps I
28 I AC Clutch, ABS Ignition
I I Remote Kevless Entrv. I
29 Theft-Deterient, Trip Computer,
HVAC Module, Security LED
30
Torque Converter Clutch (TCC) 31
Alt Sense idemarker Lamps,
Relays
Usage
Air Conditionina Clutch Diode I
9 I Coolina Fan
4
I
I 10 I Coolina Fan 2
v
1
I 11 I lanition Main I ~ ~
12 Cooling Fan 1
13 Air Conditioning Clutch
5-1 01
Page 328 of 378

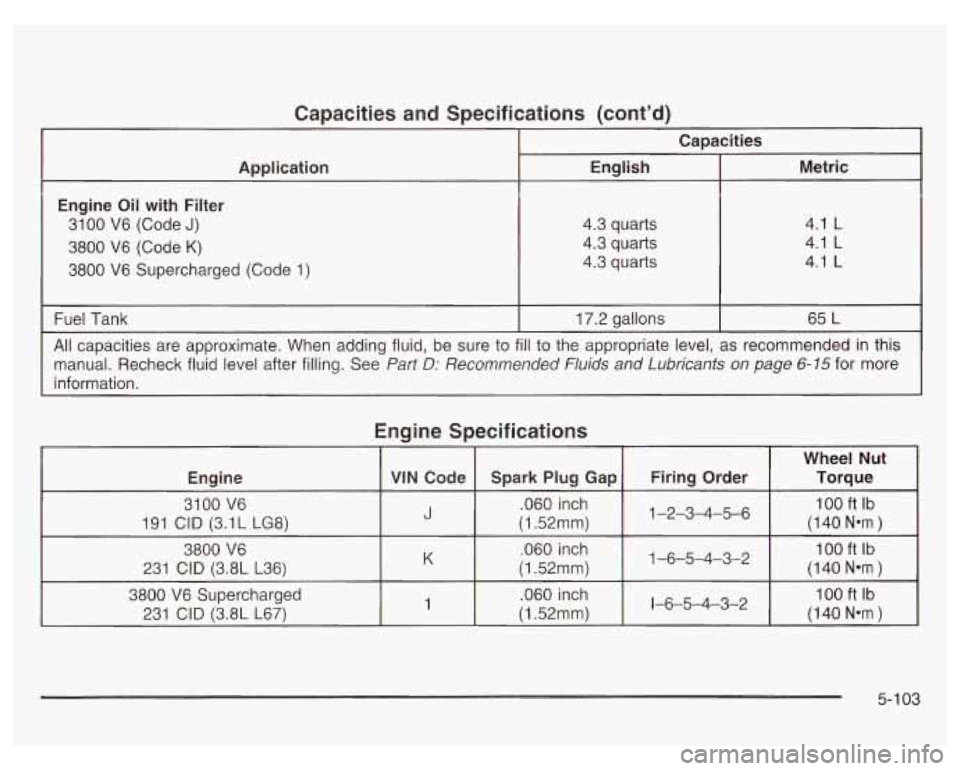
Capacities and Specifications (cont’d)
T
Application
Engine Oil with Filter
31 00 V6 (Code J)
3800 V6 (Code K)
3800 V6 Supercharged (Code 1)
Capacities
English
4.3 quarts
4.3 quarts
4.3 quarts
Metric
4.1 L
4.1 L
4.1 L
Fuel Tank
All capacities are approximate. When adding fluid, be sure to fill to the appropriate level, as recommended in this
manual. Recheck fluid level after filling. See
Pad D: Recommended Nuids and Lubricants on page 6-75 for more
information.
I 17.2 gallons 65 L
Engine Specifications
Wheel Nut
Engine Torque
Firing Order
Spark
Plug Gap VIN Code
3100 V6 J .060 inch 100 ft Ib
191
CID (3.1L LG8) (1.52mm) 1-2-3-4-5-6
(140 Nmm )
1-6-5-4-3-2
5-1 03
Page 373 of 378

To Use the Engine Coolant Heater .................... 2-23
Top
of the Instrument Panel ............................. 5-90
Top Strap
...................................................... 1-39
Top Strap Anchor Location
............................... 1-40
Torque Lock
................................................... 2-29
Total Weight on Your Vehicle’s Tires
.................. 4-39
Towing
Recreational Vehicle
..................................... 4-33
Towing a Trailer
.......................................... 4-37
Your Vehicle
............................................... 4-33
Control System (TCS)
.................................. 4-10
Traction
Control System Warning Light
....................... 3-29
Enhanced Traction System (ETS)
................... 4-1 1
Warning Light .......................................... 3-30
Enhanced
Traction System (ETS)
Low Light
................................................... 3-30
Trailer Brakes
................................................. 4-40
Transaxle Fluid, Automatic
....................................... 5-27
Transaxle Operation, Automatic
......................... 2-24
Transmission, Transaxle, Transfer Case Unit
Transportation Options
...................................... 7-7
Trip Computer
................................................ 3-40
Control Buttons
........................................... 3-42
Functions
.................... ............ 3-42
Trip Odometer
.......... ............ 3-25
Repair
Manual
............................................ 7-10 Trunk
........................... ................. 2-11
Trunk Access Panel
..., .... ............. 2-41
Trunk Lock
................................................ 2-11
Turn SignaVMultifunction Lever
........................... 3-5
Turn Signals When Towing a Trailer
.................. 4-42
Turn
and Lane-Change Signals
............... ... 3-5
Underbody Flushing Service
............................. 6-12
Underhood Fuse Block
................................... 5-100
Understanding Radio Reception ........................ 3-57
Uniform Tire Quality Grading
............................ 5-72
United States
................................................... 7-4
Unlocking the Theft-Deterrent Feature
After a Power Loss
...................................... 3-55
Used Replacement Wheels
.............................. 5-74
Using Cleaner on Fabric
.................................. 5-89
Variable Effort Steering
.................................... 4-13
Vehicle Control
........................................................ 4-6
Damage Warnings
........................................... iv
Loading
...................................................... 4-35
Symbols
......................................................... iv
14