2003 PONTIAC GRAND PRIX door lock
[x] Cancel search: door lockPage 87 of 378

Notice: If your key seems stuck in LOCK and you
can’t turn it, be sure you are using the correct key;
if
so, is it all the way in? Turn the key only with
your hand. Using a tool to force it could break the
key or the ignition switch. If none
of these works,
then your vehicle needs service.
B (LOCK): This position locks the ignition, steering
wheel and transaxle. It’s a theft-deterrent feature. It’s also
the only position from which you can remove the key.
C (OFF): This position lets you turn off the engine but
still turn the steering wheel. It doesn’t lock the
steering wheel like LOCK. Use
OFF if you must have
the vehicle pushed or towed.
D (RUN): This position is where the key returns to after
you start the vehicle. With the engine
off, you can use
RUN to display some of the warning and indicator lights.
E (START): This position starts the engine.
A warning chime will sound
if you open the driver’s door
while the ignition is in
OFF, LOCK or ACCESSORY
and the key is in the ignition.
Retained Accessory Power (RAP)
With Retained Accessory Power, (RAP), the power
windows, audio system and sunroof will continue to work
up to
10 minutes after the ignition key is turned to
OFF and none of the doors are opened.
Starting Your Engine
Move your shift lever to PARK (P) or NEUTRAL (N).
Your engine won’t start in any other position - that’s a
safety feature. To restart while you’re already moving,
use NEUTRAL
(N) only.
Nofice: Don’t try to shift to PARK (P) if your
vehicle is moving.
If you do, you could damage the
transaxle. Shift to
PARK (P) only when your
vehicle is stopped.
Shift Lock Release
This vehicle is equipped with an electric shift lock
release system. The shift lock release is designed to
do the following:
Prevent ignition key removal unless the shift lever is
in PARK (P) with the shift lever button fully released.
Prevent movement of the shift lever out of PARK (P)
unless the ignition is in a position other than
OFF or
LOCK. The shift lock release is always functional
except in the case
of a dead or low voltage
(less than
9 V) battery.
2-20
Page 105 of 378
Onstar@ System Onstar@' Services
Onstar@ provides a number of service plans to closely
meet your needs. Some of the services currently
provided by Onstar@ are:
Automatic Notification of Air Bag Deployment
Emergency Services
Roadside Assistance Stolen Vehicle Tracking
Onstar@ uses global positioning system (GPS) satellite
technology, wireless communications, and state of
the art call centers to provide you with a wide range of
safety, security, information and convenience services.
An Onstar@ subscription plan is included in the price
of your vehicle. You can easily upgrade or extend your
Onstar@ services to meet your personal needs.
A complete Onstar@ user's guide and the terms and
conditions of the Onstar@ Subscription Service
Agreement are included in your Onstar@-equipped
vehicle's glove box literature. For more information, visit
www.onstar.com, contact Onstar@ at
1 -888-4-ONSTAR
(1-888-466-7827),
or press the blue Onstar@ button
to speak to an Onstar@ advisor 24 hours a day,
7 days a week.
AccidentAssist
Remote Door Unlock
Remote Diagnostics
Onstar@ MED-NET (Requires separate activation
and annual fee on some plans)
0 Online and Personal Concierge Services
Route Support
RideAssist
Information and Convenience Services
2-38
Page 107 of 378
Storage Areas
Glove Box
Use your key to lock and unlock the glove box.
To open, lift the right side
of the latch.
Overhead Console
The overhead console has reading lamps and storage
compartments including one for your garage door
opener and one for sunglasses.
Garage Door Opener Compartment
You can store your garage door opener in the rear
compartment of the overhead console, and operate it
from this position. To install your garage door opener,
follow these instructions:
1. Open the compartment by pressing the latch
forward. Remove the hook and loop patch.
2. Peel the protective backing from the hook and loop
patch and press it firmly to the back of your garage
door opener.
3. Be sure that the button on your garage door opener
is centered above the area with raised lines on the
compartment door. Make sure the button is
facing down and press the opener firmly into place.
4. Add one peg at a time until your garage door opener
operates with the compartment door closed while
pressing the button.
Sunglasses Storage Compartment
The sunglasses storage compartment is the second
compartment from the rear on the overhead console.
To open the sunglasses storage compartment, press the
release latch forward and pull the compartment down
to the full open position.
Center Console Storage Area
To open the armrest storage area, pull up on the front
edge
of the latch. The console has cassette and
CD storage.
The center console also contains two cupholders.
Below the center ashtray is an open storage
compartment. In front
of this, you may have a smaller
compartment.
2-40
Page 110 of 378
Vehicle Personalization
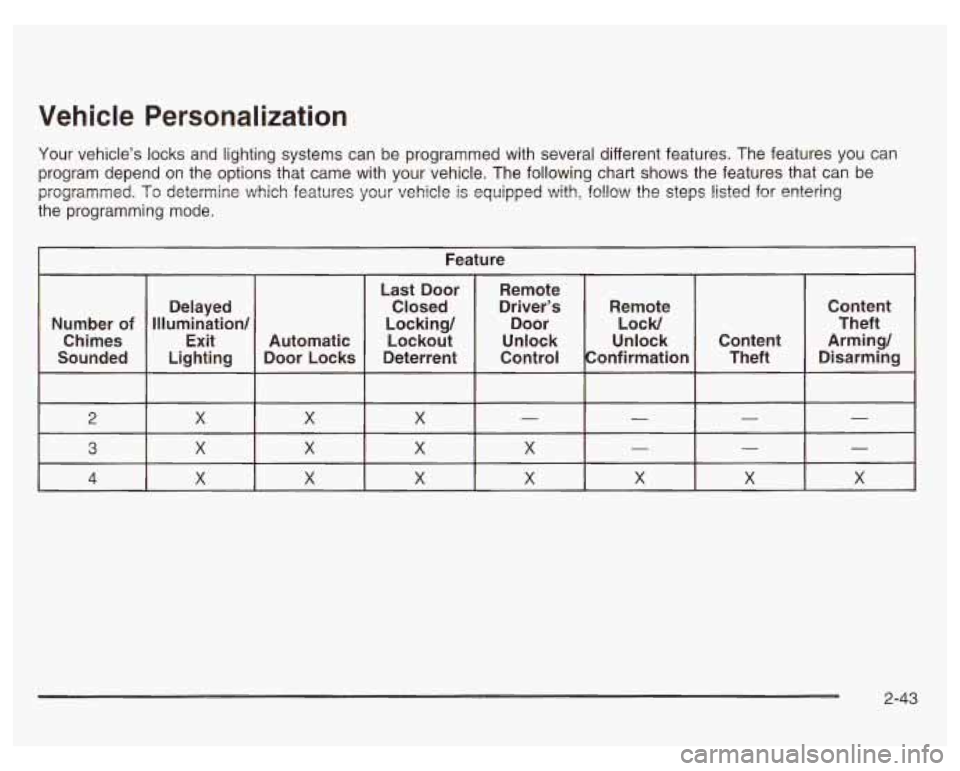
Your vehicle’s locks and lighting systems can be programmed with several different features. The features you can
program depend on the options that came with your vehicle. The following chart shows the features that can be
programmed. To determine
which features your vehicle is equipped with, follow the steps listed for eatering
the programming mode.
I Feature
Last Door
Delayed
Deterrent
Door Locks
Lighting
Sounded Lockout
Automatic
Exit Chimes Locking/
Illumination/ Number
of
Closed
X X
3
X
X X 4
X X
X
Content
Theft
Content Arming/
Theft Disarming
fi
X I X
2-43
Page 111 of 378
Entering Programming Mode
To program features, your vehicle must be in this
programming mode. Follow these steps:
1. Turn the ignition key to LOCK or OFF.
2. Remove the MALL
PGM fuse from the instrument
panel fuse block. See Fuses and Circuit Breakers
on page
5-97.
3. Turn the ignition key to ACCESSORY.
4. Count the number of chimes you hear. You will
hear up to four chimes, depending on vehicle
content. See “Vehicle Personalization’’ listed
previously.
YOU can now program your choices. After programming
a feature, you can exit the programming mode at
any time.
Delayed Illumination and Exit
Lighting
With delayed illumination, the interior lamps will stay on
for about 25 seconds after all doors are closed.
With exit lighting, the interior lamps will come on and
stay on for about
25 seconds whenever you remove the
key from the ignition.
Programmable Modes
Mode 1: Both Features Off - The interior lamps will
turn on or off at the same instant that a door is opened
or closed.
Mode 2: Delayed Illurnination Only -The interior lamps
will stay on for about
25 seconds after all the doors
are closed, or until you lock the doors.
Mode 3: Exit Lighting Only -The interior lamps will
come on whenever you remove the key from the ignition
and stay
on for about 25 seconds, or until you lock
the doors.
Mode 4: Both Features On -This combines Modes 2
and 3.
Before your vehicle was shipped from the factory, it was
programmed to Mode
4. The mode to which your
vehicle was programmed may have been changed since
it left the factory. To determine the mode
to which
your vehicle is programmed or to program your vehicle
to a different mode, do the following:
1. Follow the instructions for Entering Programming
2. Turn the interior lamps thumbwheel all the way to
Mode
on page 2-44.
the right
and then back slightly to the left.
2-44
Page 112 of 378
3.
4.
5.
Count the number of chimes you hear. The number
of chimes tells you which mode your vehicle is set
for.
If you do not wish to change the current
mode, you can either exit the programming mode
by following the instructions later in this section
or program the next feature available on your
vehicle.
Turn the interior lamps thumbwheel all the way to
the right and then back slightly to the left again to
change the current mode.
Repeat Step
4 until you hear the number of chimes
that matches the number of the mode you want.
The mode you selected is now set. You can either
exit the programming mode by following the instructions
later in this section or program the next feature
available on your vehicle. See Exiting Programming
Mode on page
2-53.
Automatic Door Locks
With automatic door locks, all doors will automatically
lock when you shift out
of PARK (P) and automatically
unlock when the ignition
is turned to OFF.
Programmable Modes
Mode 1: Both Features Off - Automatic door locking
and unlocking are disabled. You will always need to lock
your doors manually before driving to increase
occupant safety.
All doors will lock when you press the power
door lock switch rearward or when you press
the LOCK on the remote keyless entry transmitter
(if equipped).
All doors will unlock when you press the power
door lock switch forward or when you press
UNLOCK on the remote keyless entry transmitter
(if equipped).
Mode 2: Automatic Door Locking Only
Automatic Door Unlocking: The automatic door
Automatic Door Locking: Shift out of PARK (P)
unlock feature is turned off.
with the ignition on and the driver’s door closed,
all doors will lock automatically.
2-45
Page 113 of 378
Mode 3: Automatic Unlocking with the Ignition Off
Automatic Door Unlocking: Turn off the ignition with
the transaxle in PARK (P) and all doors will unlock
automatically.
Automatic Door Locking: Shift out of PARK (P) with
the ignition on and the driver’s door closed and all
doors will lock automatically.
Mode 4: Automatic Unlocking and Locking with
Transaxle in PARK (P)
Automatic Door Unlocking: Shift into PARK (P) with
the ignition on and all doors will unlock
automatically.
4 Automatic Door Locking: Shift out of PARK (P) with
the ignition on and the driver’s door closed and all
doors will lock automatically.
Before your vehicle was shipped from the factory,
it was programmed
to Mode 3. The mode to which your
vehicle was programmed may have been changed
since it left the factory. To
determine the mode to which your vehicle is
programmed or
to program your vehicle to a different
mode, do the following:
1. Follow the instructions for Entering Programming
2. Press LOCK on the power door lock switch.
Mode on page
2-44.
3. Count
the number of chimes you hear. The number
of chimes tells you which mode your vehicle is set
for. If you do not wish
to change the current mode,
you can either exit the programming mode by
following the instructions later in this section or
program the next feature available on your vehicle.
4. Press LOCK on the power door lock switch again to
change the current mode.
5. Repeat Step 4 until you hear the number of chimes
that matches the mode you want.
The mode you selected is now set. You can either exit
the programming mode by following the instructions
later in this section or program the next feature available
on your vehicle. See Exiting Programming Mode on
page
2-53.
2-46
Page 114 of 378
Last Door Closed Locking and
Lockout Protection
With the last door closed locking and lockout prevention
features, your vehicle will do the following:
0 If you leave your key in the ignition and leave the
driver’s door open, you won’t be able to use the
power door lock switches to lock the doors.
9 The doors will not lock when you press LOCK on
the driver’s door arm rest or the lock button on
the remote keyless entry transmitter
(if equipped)
while any door is open. Instead, you will hear three
chimes which let you know that the last door
closed locking feature is
in operation. Five seconds
after all the doors are closed, all the doors will
automatically lock.
Programmable Modes
Mode 1: Both Features Off - Doors will always lock
immediately when you press
LOCK on the driver’s door
armrest or the remote keyless entry transmitter,
if
equipped.
Mode 2: Lockout Prevention Only - If you leave your
key in the ignition with the driver’s door open, you
will not be able to lock the doors using your power locks.
Mode 3: Last Door Closed Locking Only - If the power
door lock switch or remote keyless entry transmitter,
if
equipped, is used to lock the vehicle while any door is
open and the key is out of the ignition, you will hear three
chimes. The doors will not lock. Five seconds after the
last door is closed, all doors will lock.
Mode 4: Both Features On - This combines Modes 2
and
3.
Before your vehicle was shipped from the factory, it was
programmed to Mode
4. The mode to which your
vehicle was programmed may have changed since it left
the factory. To determine the mode to which your
vehicle
is programmed or to program your vehicle to a
different mode, do the following:
1. Follow the instructions for Entering Programming
2. Press UNLOCK on the driver’s door armrest or the
Mode
on page 2-44.
unlock button
on the remote keyless entry
transmitter.
2-47