2003 PONTIAC GRAND PRIX reset
[x] Cancel search: resetPage 173 of 378
Finding a Station
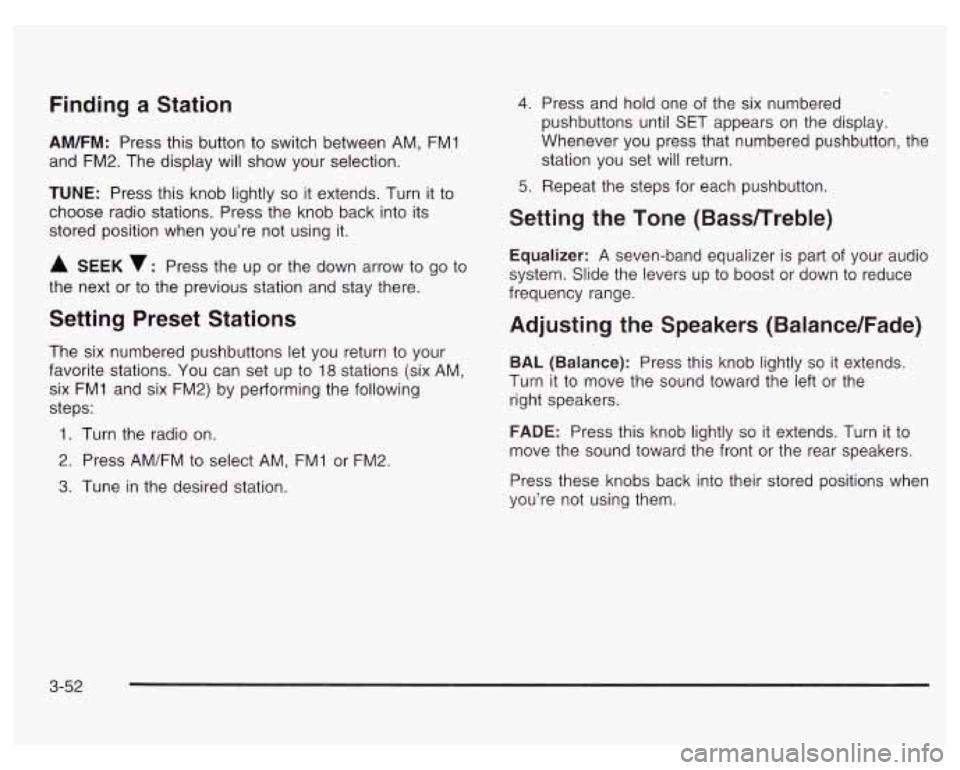
AM/FM: Press this button to switch between AM, FM1
and FM2. The display will show your selection.
TUNE: Press this knob lightly so it extends. Turn it to
choose radio stations. Press the knob back into its
stored position when you’re not using it.
A SEEK v: Press the up or the down arrow to go to
the next or to the previous station and stay there.
Setting Preset Stations
The six numbered pushbuttons let you return to your
favorite stations. You can set up to
18 stations (six AM,
six FMI and six FM2) by performing the following
steps:
1. Turn the radio on.
2. Press AM/FM to select AM, FM1 or FM2.
3. Tune in the desired station.
4. Press and hold one of the six numbered
pushbuttons until SET appears on the display.
Whenever you press that numbered pushbutton, the station you set will return.
5. Repeat the steps for each pushbutton.
Setting the Tone (Bass/Treble)
Equalizer: A seven-band equalizer is part of your audio
system. Slide the levers up to boost or down to reduce
frequency range.
Adjusting the Speakers (Balance/Fade)
BAL (Balance): Press this knob lightly so it extends.
Turn it to move the sound toward the left or the
right speakers.
FADE: Press this knob lightly so it extends. Turn it to
move the sound toward the front or the rear speakers.
Press these knobs back into their stored positions when
you’re not using them.
3-52
Page 177 of 378
Disabling the Theft-Deterrent Feature
Enter your secret code as follows; pause no more than
15 seconds between steps:
1. Turn the ignition on.
2. Turn the radio off.
3. Press the 1 and 4 pushbuttons at the same time.
Hold them down until
SEC shows on the display.
4. Press MIN and 000 will appear on the display.
5. Press MIN again to make the last two digits agree
with your code.
6. Press HR to make the first one or two digits agree
with your code.
7. Press AM/FM after you have confirmed that the
code matches the secret code you have written
down. The display will show
---, indicating that the
radio is no longer secured.
If the code entered is incorrect,
SEC will appear on the
display. The radio will remain secured until the correct
code is entered.
When battery power is removed and later applied to
a
secured radio, the radio won’t turn on and LOC will
appear on the display.
To unlock a secured radio, see “Unlocking the
Theft-Deterrent Feature After a Power
Loss” earlier in
this section.
Audio Steering Wheel Controls
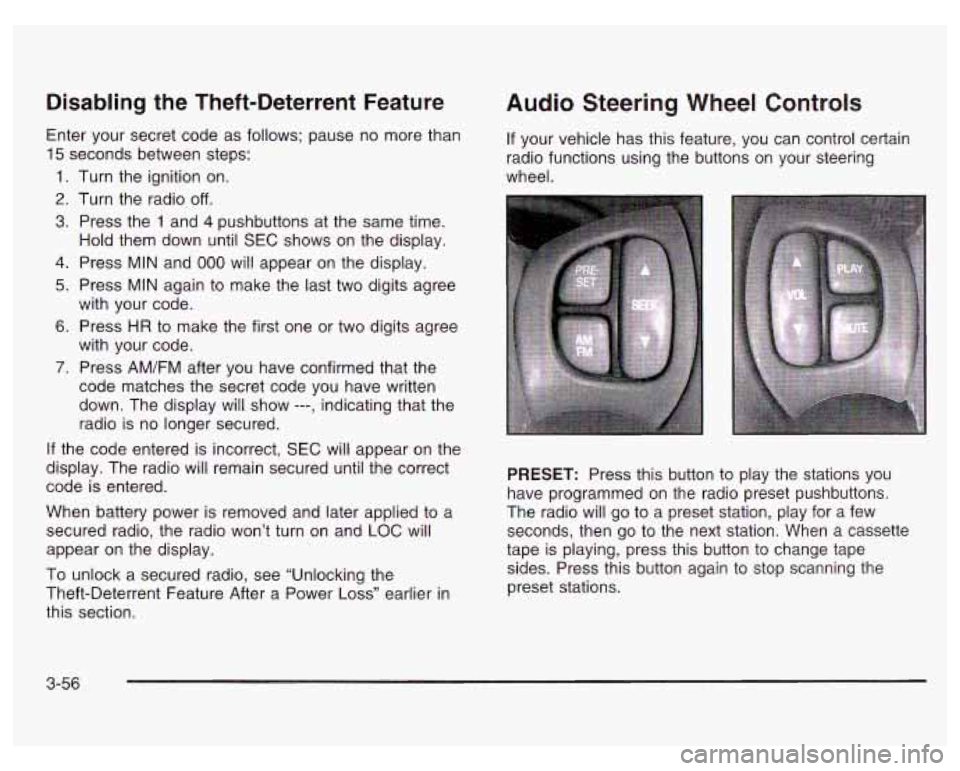
If your vehicle has this feature, you can control certain
radio functions using the buttons on your steering
wheel.
PRESET: Press this button to play the stations you
have programmed on the radio preset pushbuttons.
The radio will go to a preset station, play for a few
seconds, then go to the next station. When a cassette
tape is playing, press this button to change tape
sides. Press this button again to stop scanning the
preset stations.
3-56
Page 179 of 378
Care of Your Cassette Tape Player
A tape player that is not cleaned regularly can cause
reduced sound quality, ruined cassettes or a damaged
mechanism. Cassette tapes should be stored in their
cases away from contaminants, direct sunlight and
extreme heat.
If they aren’t, they may not operate
properly or may cause failure of the tape player.
Your tape player should be cleaned regularly after every
50 hours of use. Your radio may display CLN to
indicate that you have used your tape player for
50 hours without resetting the tape clean timer. If this
message appears on the display, your cassette
tape player needs to be cleaned. It will still play tapes,
but you should clean it as soon as possible to
prevent damage to your tapes and player. If you notice
a reduction in sound quality, try a known good
cassette to see
if the tape or the tape player is at fault.
If this other cassette has no improvement in sound
quality, clean the tape player.
For best results, use a scrubbing action, non-abrasive
cleaning cassette with pads which scrub the tape
head as the hubs of the cleaner cassette turn. The
recommended cleaning cassette is available through
your dealership. The
cut tape detection feature of your cassette tape
player may identify the cleaning cassette tape as
a damaged tape,
in error. To prevent the cleaning
cassette from being ejected, use the following steps:
1.
2.
3.
4.
5.
Turn the ignition on.
Turn the radio
off.
Press and hold the TAPE/PLAY button for five
seconds. The tape symbol on the display will
flash for two seconds.
Insert the scrubbing action cleaning cassette.
Eject the cleaning cassette after the manufacturer’s
recommended cleaning time.
After the cleaning cassette is ejected, the cut tape
detection feature will be active again.
You may also choose a non-scrubbing action, wet-type
cleaner which uses a cassette with a fabric belt to
clean the tape head. This type of cleaning cassette will
not eject on its own. A non-scrubbing action cleaner
may not clean as thoroughly as the scrubbing type
cleaner. The use of a non-scrubbing action, dry-type
cleaning cassette is not recommended.
After you clean the player, press and hold EJECT for
five seconds to reset the CLN indicator. The radio
will display
--- to show the indicator was reset.
3-58
Page 248 of 378
When to Change Engine Oil (GM Oil
Life SystemTM)
Your vehicle has a computer system that lets you know
when to change the engine
oil and filter. This is
based on engine revolutions and engine temperature,
and not on mileage. Based on driving conditions,
the mileage at which an oil change will be indicated
can vary considerably. For the oil life system to
work properly, you must reset the system every time
the oil is changed.
When the system has calculated that oil life has been
diminished, it will indicate that an oil change is
necessary.
A CHANGE OIL SOON light will come on.
Change your
oil as soon as possible within the next two
times you stop for fuel.
It is possible that, if you are
driving under the best conditions, the oil life system may
not indicate that an oil change is necessary for over a
year. However, your engine oil and filter must be
changed at least once a year and at this time the system
must be reset. It is also important to check your oil
regularly and keep it at the proper level.
If the system is ever reset accidentally, you must
change your oil at
3,000 miles (5 000 km) since your
last oil change. Remember
to reset the oil life system
whenever the oil is changed.
How to Reset the GM Oil Life System
The GM Oil Life SystemTM calculates when to change
your engine oil and filter based on vehicle use. Anytime
your oil is changed, reset the system
so it can calculate
when the next oil change is required.
If a situation occurs
where you change your oil prior to a CHANGE
OIL SOON
light being turned on, reset the system.
To reset the GM Oil Life SystemTM after the oil has
been changed, use one of the following two procedures:
Using the Driver Information Center (DIC)
1.
2.
3.
With the ignition key in RUN but the engine off, fully
push and release the accelerator pedal slowly three
times within five seconds.
If the CHANGE OIL SOON light flashes, the system
is resetting.
Turn the key to OFF after the light stops flashing,
then start the vehicle.
If the CHANGE OIL SOON light comes back on, the
engine oil life monitor has not reset. Repeat the
procedure.
Using the Trip Computer (If Equipped)
1. Press the MODE button until the light appears lit
2. Press and hold the RESET button for three seconds.
next to
OIL LIFE.
The
oil life percentage should change to 100%.
5-23
Page 258 of 378
Radiator Pressure Cap
Notice: Your radiator cap is a pressure-type cap
and must be tightly installed to prevent coolant
loss
and possible engine damage from overheating.
Be sure the arrows on the cap line up with the
overflow tube
on the radiator filler neck.
The radiator pressure cap is located in the front of the
engine compartment on the passenger’s side, near
the diagonal cross brace. See Engine Compartment
Overview on page
5-12 for more information on location.
Engine Overheating
You will find a coolant temperature gage and a warning
light concerning an overheated engine condition on
the instrument panel cluster. See Engine Coolant
Temperature Gage
on page 3-31 and Engine Coolant
Temperature Warning Light
on page 3-31.
Overheated Engine Protection
Operating Mode
This emergency operating mode allows your vehicle to
be driven tu
a safe place in an emergency situation.
If an overheated engine condition exists, an overheat
protection mode which alternates firing groups of
cylinders helps prevent engine damage. In this mode,
you will notice a significant
loss in power and engine
performance. The engine coolant temperature gage will
indicate an overheat condition exists. Driving extended
miles (km) and/or towing a trailer in the overheat
protection mode should be avoided.
Nofice: After driving in the overheated engine
protection operating mode, to avoid engine damage,
allow the engine to cool before attempting any
repair. The engine oil will be severely degraded.
Repair the cause of coolant
loss, change the oil
and reset the oil life system. See “Engine Oil”
ir
the Index.
5-33
Page 298 of 378

Temperature - A, B, C
The temperature grades are A (the highest), B, and C,
representing the tire’s resistance to the generation
of heat and its ability
to dissipate heat when tested
under controlled conditions on a specified indoor
laboratory test wheel. Sustained high temperature can
cause the material of the tire to degenerate and
reduce tire life, and excessive temperature can lead to
sudden tire failure. The grade
C corresponds to a
level of performance which all passenger car tires must
meet under the Federal Motor Vehicle Safety Standard
No. 109. Grades B and A represent higher levels of
performance on the laboratory test wheel than the
minimum required by law.
Warning: The temperature grade for this tire
is
established for a tire that is properly inflated and not
overloaded. Excessive speed, underinflation, or
excessive loading, either separately or in combination,
can cause heat buildup and possible tire failure.
Wheel Alignment and Tire Balance
The wheels on your vehicle were aligned and balanced
carefully at the factory to give you the longest tire life
and best overa!! performance.
Scheduled wheel alignment and wheel balancing are
not needed. However,
if you notice unusual tire wear or
your vehicle pulling one way or the other, the alignment
may need to be reset.
If you notice your vehicle
vibrating when driving on a smooth road, your wheels
may need to be rebalanced.
Wheel Replacement
Replace any wheel that is bent, cracked or badly rusted
or corroded. If wheel nuts keep coming loose, the
wheel, wheel bolts and wheel nuts should be replaced.
If the wheel leaks air, replace
it (except some
aluminum wheels, which can sometimes be repaired).
See your dealer
if any of these conditions exist.
Your dealer will know the kind of wheel you need.
Each new wheel should have the same load-carrying
capacity, diameter, width, offset and be mounted
the same way as the one it replaces.
5-73
Page 334 of 378
Scheduled Maintenance
The services shown in this schedule up to 100,000 miles
(1 66
000 km) should be repeated after 100,000 miles
(1 66 000 km) at the same intervals for the life of
this vehicle. The services shown at 150,000 miles
(240
000 km) should be repeated at the same interval
after 150,000 miles
(240 000 km) for the life of this
vehicle.
See Part B: Owner Checks and Services on page
6-9
and Part C: Periodic Maintenance Inspections on
page
6- 13.
Footnotes
t The U.S. Environmental Protection Agency or the
California Air Resources Board has determined that the
failure to perform this maintenance item will not nullify
the emission warranty or limit recall liability prior to
the completion of the vehicle’s useful life. We, however,
urge that all recommended maintenance services be
performed at the indicated intervals and the
maintenance be recorded.
+A good time to check your brakes is during tire
rotation. See Brake System Inspection on page
6-14,
Engine Oil Scheduled Maintenance
Change engine oil and filter as indicated by the GM
Oil Life SystemTM (or every 12 months, whichever
occurs first). Reset the system.
Your vehicle has a computer system that lets you know
when to change the engine oil and filter. This is
based on engine revolutions and engine temperature,
and not on mileage. Based on driving conditions,
the mileage at which an oil change will be indicated can
vary considerably. For the oil life system to work
properly, you must reset the system every time the oil is
changed.
When the system has calculated that oil life has been
diminished,
it will indicate that an oil change is
necessary.
A CHANGE OIL SOON light will come on.
Change your oil as soon as possible within the next two
times you stop for fuel. It is possible that,
if you are
driving under the best conditions, the oil life system may
not indicate that an oil change is necessary for over a
year. However, your engine oil and filter must be
changed at least once a year and at this time the system
must be reset.
It is also important to check your oil
regularly and keep it at the proper level.
6-5
Page 335 of 378

If the system is ever reset accidentally, you must
change your oil at
3,000 miles (5 000 km) since your
last oil change. Remember
to reset the oil life system
whenever the oil is changed. See Engine Oil on
page 5-18 for information on resetting the system.
After the services are performed, record the date,
odometer reading and who performed the service on the
maintenance record pages in Part
E of this schedule.
An Emission Control Service.
7,500 Miles (12 500 km)
LI Rotate tires. See Tire Inspection and Rotation on
page 5-69 for proper rotation pattern and additional
information. (See footnote
+.)
15,000 Miles (25 000 km)
0 Inspect engine air cleaner filter if you are driving in
dusty conditions. Replace filter
if necessary.
An Emission Control Service. (See footnote
f.)
Cl Rotate tires. See Tire Inspection and Rotation on
page 5-69 for proper rotation pattern and additional
information. (See footnote
+.)
22,500 Miles (37 500 km)
U Rotate tires. See Tire Inspection and Rotation on
page 5-69 for proper rotation pattern and additional
information. (See footnote
+.)
30,000 Miles (50 000 km)
0 Rotate tires. See Tire Inspection and Rotation on
page 5-69 for proper rotation pattern and additional
information. (See footnote
+.)
Control Service.
0 Replace engine air cleaner filter. An Emission
U For supercharged engines only: Check the
supercharger oil level and add the proper
supercharger oil as needed (or every
36 months,
whichever occurs first). See Part
D: Recommended
Fluids and Lubricants on page 6-15. An Emission
Control Service. (See footnote
f.)
37,500 Miles (62 500 km)
U Rotate tires. See Tire Inspection and Rotation on
page 5-69 for proper rotation pattern and additional
information. (See footnote
+.)
6-6