2003 PONTIAC BONNEVILLE turn signal
[x] Cancel search: turn signalPage 175 of 418
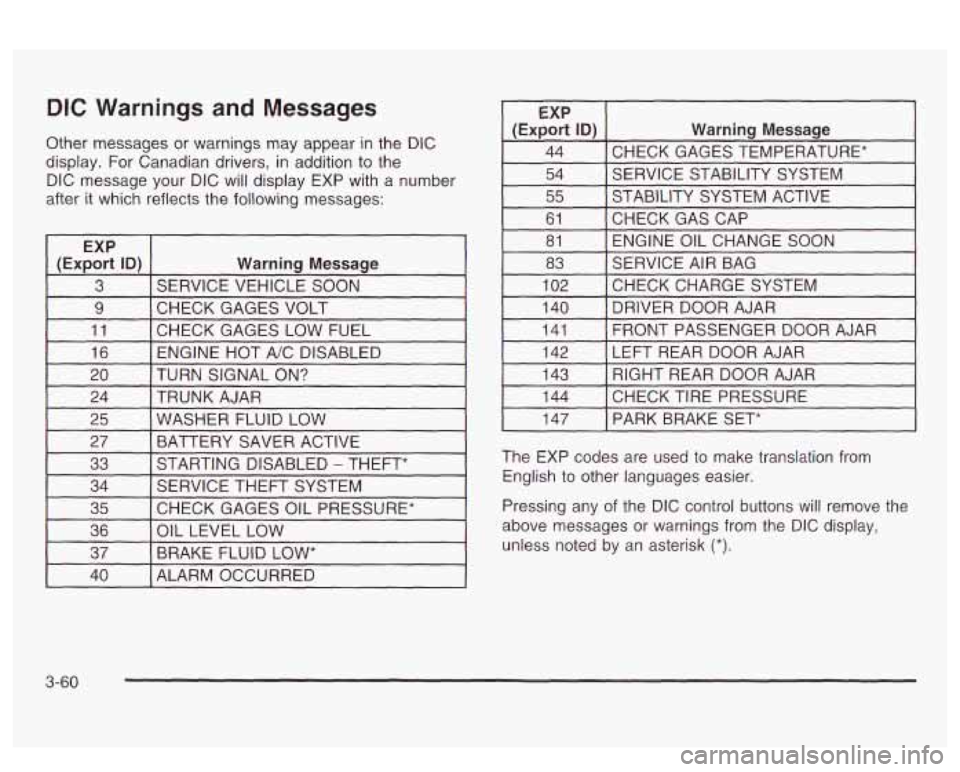
DIC Warnings and Messages
Other messages or warnings may appear in the DIC
display. For Canadian drivers, in addition to the
DIC message your DIC will display EXP with a number
after it which reflects the following messages:
~
EXP
(Export
ID) Warning Message
3 SERVICE VEHICLE SOON
9 I CHECK GAGES VOLT I I
11 [CHECK GAGES LOW FUEL 1
16 I ENGINE HOT A/C DISABLED I
EXP
(Export
ID) Warning Message
44 CHECK GAGES TEMPERATURE* ~~ ~
54 SERVICE STABILITY SYSTEM
55 STABILITY SYSTEM ACTIVE
61 ENGINE OIL CHANGE SOON
81
CHECKGASCAP
83
CHECKCHARGESYSTEM
102 SERVICE
AIR BAG
I 140 I DRIVER DOOR AJAR I
141
LEFT REAR DOOR AJAR
142 FRONT PASSENGER
DOOR AJAR
20 TRUNK AJAR
24 TURN SIGNAL
ON? 143
CHECK TIRE PRESSURE 144 RIGHT REAR DOOR AJAR
25 BATTERY SAVER ACTIVE
27
WASHER FLUID LOW
33
CHECK GAGES OIL PRESSURE*
35 SERVICE
THEFT SYSTEM
34 STARTING DISABLED
- THEFT*
36
BRAKE FLUID
LOW* 37
OIL
LEVEL LOW
I 147 I PARK BRAKE SET*
The EXP codes are used to make translation from
English to other languages easier.
Pressing any of the DIC control buttons
will remove the
above messages or warnings from the DIC display,
unless noted by an asterisk
(*).
40 I ALARM OCCURRED
3-60
Page 188 of 418
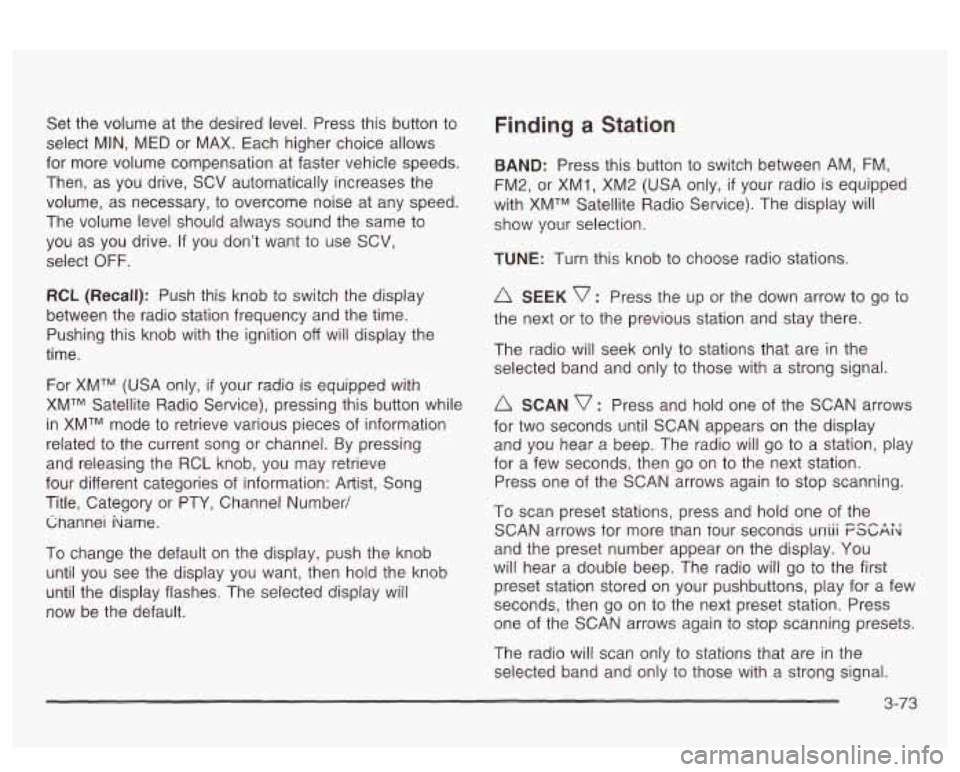
Set the volume at the desired level. Press this button to
select MIN, MED or MAX. Each higher choice allows
for more volume compensation at faster vehicle speeds.
Then, as you drive, SCV automatically increases the
volume, as necessary, to overcome noise at any speed.
The volume level should always sound the same to
you as you drive.
If you don’t want to use SCV,
select
OFF.
RCL (Recall): Push this knob to switch the display
between the radio station frequency and the time.
Pushing this knob with the ignition off will display the
time.
For
XMTM (USA only, if your radio is equipped with
XMTM Satellite Radio Service), pressing this button while
in XMTM mode to retrieve various pieces of information
related to the current song or channel. By pressing
and releasing the RCL knob, you may retrieve
four different categories of information: Artist, Song
Title, Category or PTY, Channel Number/ Cnannei hame.
To change the default on the display, push the knob
until you see the display you want, then hold the knob
until the display flashes. The selected display will
now be the default.
Finding a Station
BAND: Press this button to switch between AM, FM,
FM2, or XMI, XM2 (USA only,
if your radio is equipped
with XMTM Satellite Radio Service). The display will
show your selection.
TUNE: Turn this knob to choose radio stations.
A SEEK v : Press the up or the down arrow to go to
the next or to the previous station and stay there.
The radio will seek only to stations that are in the
selected band and only to those with a strong signal.
SCAN v : Press and hold one of the SCAN arrows
for two seconds until SCAN appears on the display
and you hear a beep. The radio will go to a station, play
for a few seconds, then go on to the next station.
Press one of the SCAN arrows again to stop scanning.
To scan preset stations, press and hold one of the
SCAN arrows for more man Tour seconas uniii FSGAi<
and the preset number appear on the display. You
will hear a double beep. The radio will go to the first
preset station stored on your pushbuttons, play for a few
seconds, then go on to the next preset station. Press
one of the SCAN arrows again to stop scanning presets.
The radio will scan only to stations that are
in the
selected band and only to those with a strong signal.
3-73
Page 193 of 418
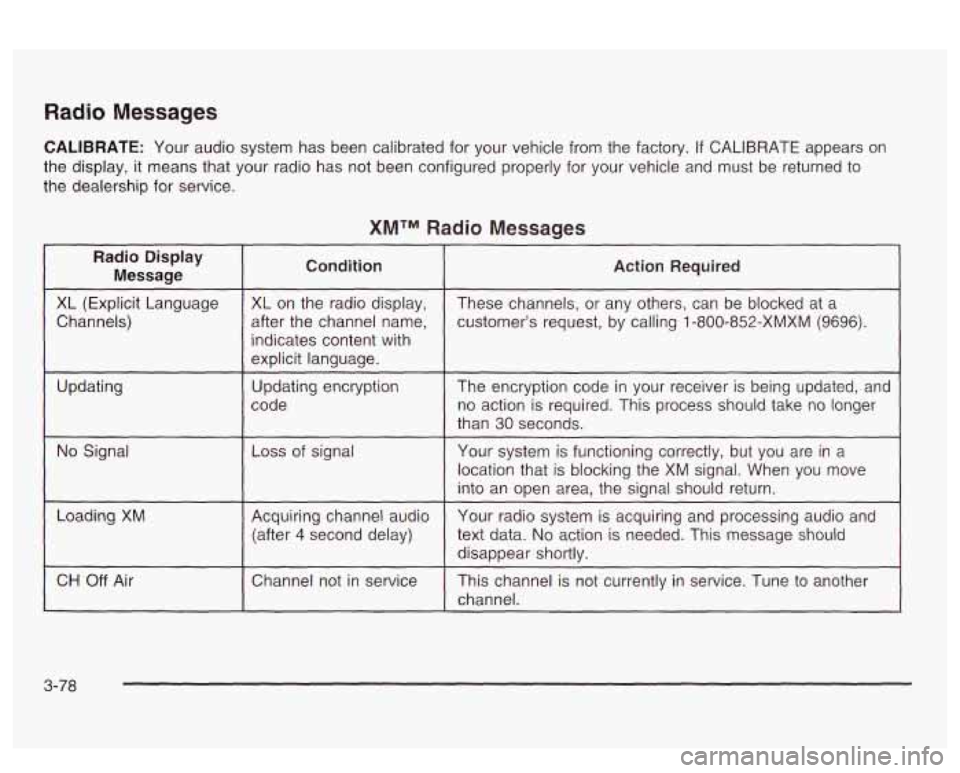
Radio Messages
CALIBRATE: Your audio system has been calibrated for your vehicle from the factory. If CALIBRATE appears on
the display, it means that your radio has not been configured properly for your vehicle and must be returned
to
the dealership for service.
XMTM Radio Messages
Radio Display
Message Condition
XL
(Explicit Language
after the channel name,
Channels) XL on
the radio display,
indicates content with
explicit language.
code
Updating
Updating encryption
No Signal Loss of
signal
~~
Loading XM Acquiring channel audio
(after
4 second delay)
CH
Off Air I Channel not in service
Action Required
These channels, or any others, can be blocked at a
customer’s request, by calling
1 -800-852-XMXM (9696).
The encryption code in your receiver is being updated, and
no action is required. This process should take no longer
than
30 seconds.
Your system is functioning correctly, but you are in a
location that
is blocking the XM signal. When you move
into an open area, the signal should return.
Your radio system is acquiring and processing audio and
text data.
No action is needed. This message should
disappear shortly.
This channel is not currently in service. Tune
to another
channel.
3-78
Page 198 of 418
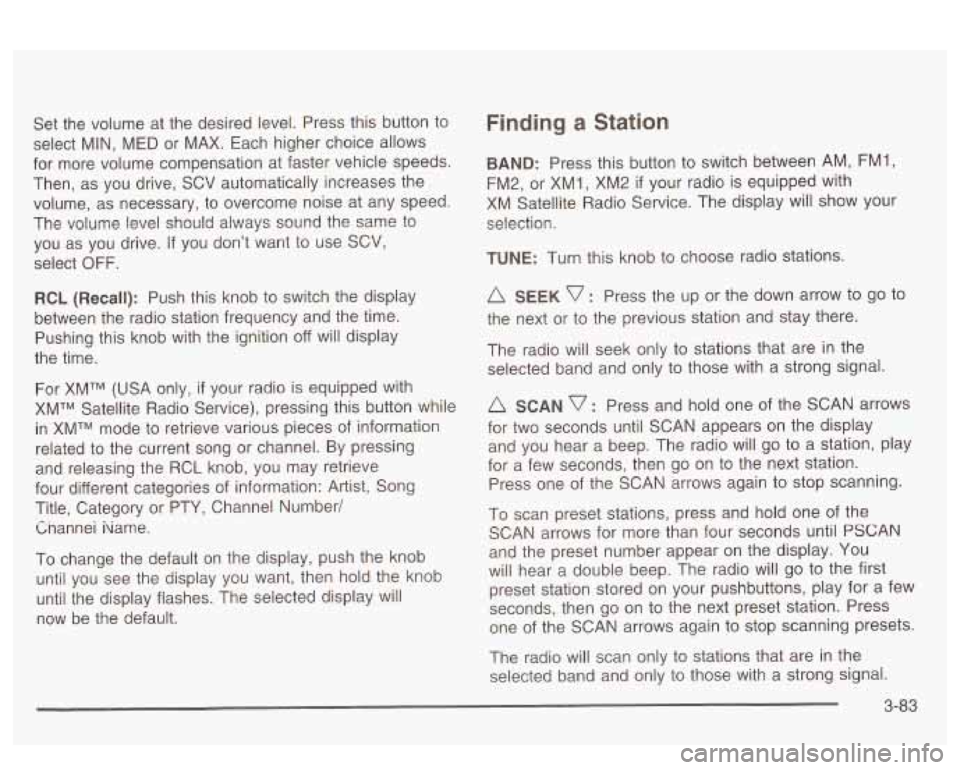
Set the volume at the desired level. Press this button to
select MIN,
MED or MAX. Each higher choice allows
for more volume compensation at faster vehicle speeds.
Then, as you drive,
SCV automatically increases the
volume, as necessary, to overcome noise at any speed.
The volume level should always sound the same to
you as you drive.
If you don’t want to use SCV,
select OFF.
RCL (Recall): Push this knob to switch the display
between the radio station frequency and the time.
Pushing this knob with the ignition off will display
the time.
For XMTM (USA only, if your radio is equipped with
XMTM Satellite Radio Service), pressing this button while
in XMTM mode to retrieve various pieces of information
related to the current song or channel. By pressing
and releasing the RCL knob, you may retrieve
four different categories of information: Artist, Song
Title, Category or PTY, Channel Number/
Cnannei iiame.
To change the default on the display, push the knob
until you see the display you want, then hold the knob
until the display flashes. The selected display will
now be the default.
Finding a Station
BAND: Press this button to switch between AM, FM1,
FM2, or XM1,
XM2 if your radio is equipped with
XM Satellite Radio Service. The display will show your
selection.
TUNE: Turn this knob to choose radio stations.
A SEEK v : Press the up or the down arrow to go to
the next or to the previous station and stay there.
The radio will seek only to stations that are in the
selected band and only to those with a strong signal.
A SCAN v : Press and hold one of the SCAN arrows
for two seconds until SCAN appears on the display
and you hear a beep. The radio will
go to a station, play
for a few seconds, then go on to the next station.
Press one of the SCAN arrows again to stop scanning.
To scan preset stations, press and hold one of the
SCAN arrows for more than four seconds until
PSCAN
and the preset number appear on the display. You
will hear a double beep. The radio will go to the first
preset station stored on your pushbuttons, play for
a few
seconds, then go on to the next preset station. Press
one of the SCAN arrows again to stop scanning presets.
The radio will scan only to stations that are in the
selected band and only to those with a strong signal.
3-83
Page 203 of 418
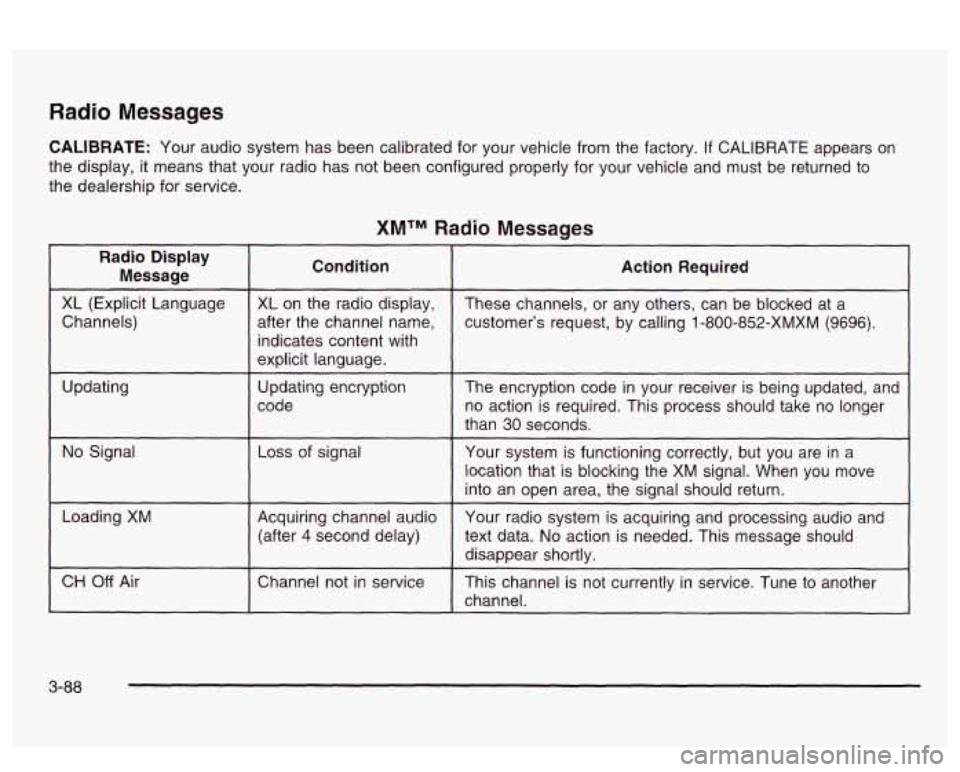
Radio Messages
CALIBRATE: Your audio system has been calibrated for your vehicle from the factory. If CALIBRATE appears on
the display, it means that your radio has not been configured properly for your vehicle and must be returned to
the dealership for service.
XMTM Radio Messages
Radio Display
Message Condition
Action Required
~~ ~
XL (Explicit Language
customer’s request, by calling 1-800-852-XMXM (9696).
after the channel
name,
Channels) These
channels, or any others, can be blocked at a
XL
on the radio display,
~ ~~ ~~ ~ ~~~~ ~ ~~
indicates content with
explicit language.
code no action is required. This process should take no longer
Updating
The
encryption code in your receiver is being updated, and
Updating
encryption
than
30 seconds.
location that is blocking the XM signal. When you move
into an open area, the signal should return.
No Signal
Your system is functioning correctly, but you are in a
Loss of signal
Loading XM
Your radio system is acquiring and processing audio and
Acquiring channel audio
(after
4 second delay)
text data. No action is needed. This message should
disappear shortly.
channel.
CH Off Air This channel is not currently in service. Tune to another
Channel
not in service
3-88
Page 214 of 418
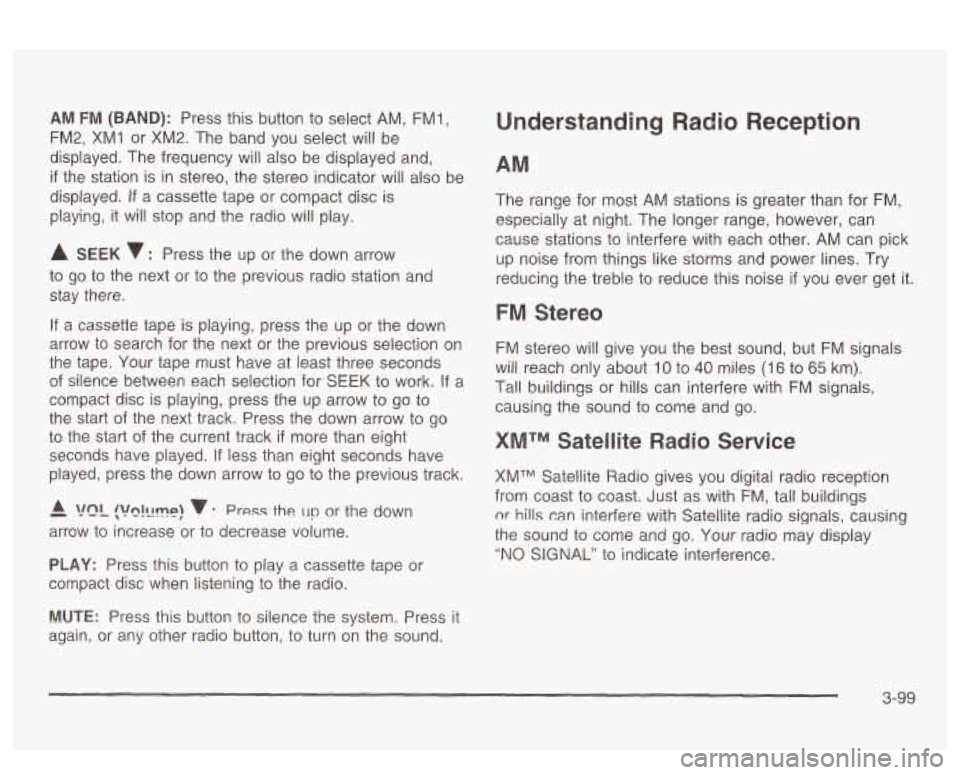
AM FM (BAND): Press this button to select AM, FMl,
FM2, XMI or XM2. The band you select will be
displayed. The frequency will also be displayed and,
if the station is in stereo, the stereo indicator will also be
displayed.
If a cassette tape or compact disc is
playing, it will stop and the radio
will play.
A SEEK 7 : Press the up or the down arrow
to go to the next or to the previous radio station and
stay there.
If a cassette tape is playing, press the up or the down
arrow to search for the next or the previous selection on
the tape. Your tape must have at least three seconds
of silence between each selection for SEEK to work. If a
compact disc is playing, press the up arrow
to go to
the start of the next track. Press the down arrow to go
to the start
of the current track if more than eight
seconds have played.
If less than eight seconds have
played, press the down arrow to go to the previous track.
- A !?ln!llmp! v : Press the un or the down
arrow to increase or to decrease volume.
PLAY: Press this button to play a cassette tape or
compact disc when listening to the radio.
Understanding Radio Reception
The range for most AM stations is greater than for FM,
especially at night. The longer range, however, can
cause stations to interfere with each other. AM can pick
up noise from things like storms and power lines. Try
reducing the treble to reduce this noise
if you ever get it.
FM Stereo
FM stereo will give you the best sound, but FM signals
will reach only about
10 to 40 miles (I 6 to 65 km).
Tal! buildings or hills can interfere with FM signals,
causing the sound to come and go.
XMTM Satellite Radio Service
XMTM Satellite Radio gives you digital radio reception
from coast to coast. Just as with FM, tall buildings
nr hills can interfere with Satellite radio signals, causing
the sound to come and
go. Your radio may display
"NO SIGNAL" to indicate interference.
MUTE: Press this button to silence the system. Press it
again, or any other radio button,
to turn on the sound.
3-99
Page 226 of 418
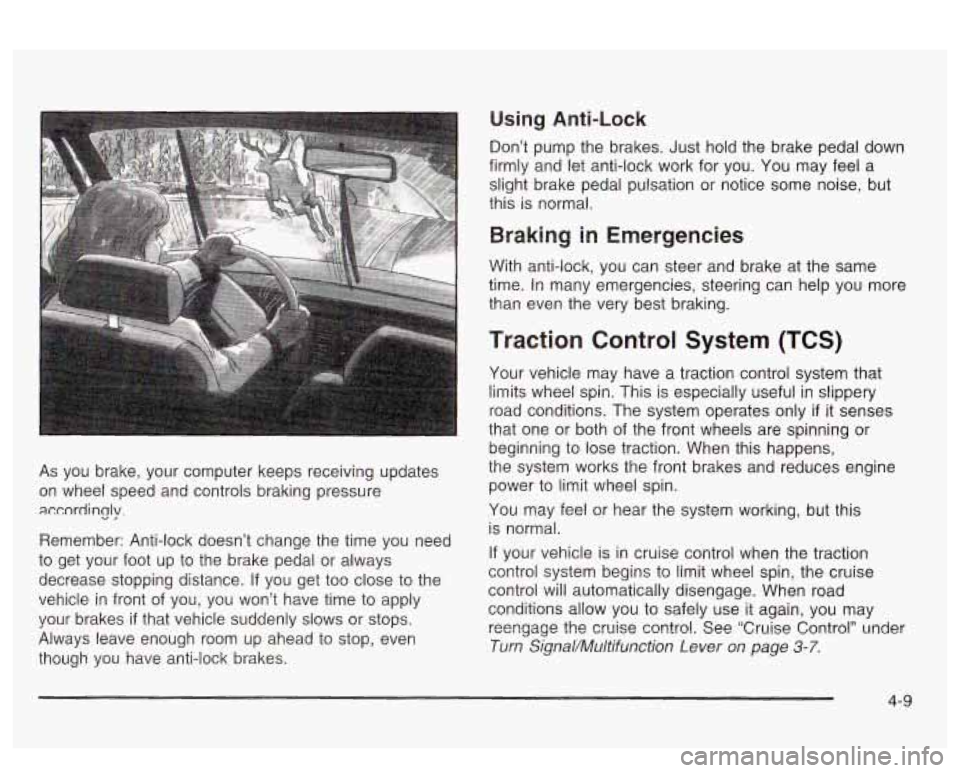
As you brake, your computer keeps receiving updates
on wheel speed and controls braking pressure
accordincjy.
Remember: Anti-lock doesn’t change the time you need
to get your foot up to the brake pedal or always
decrease stopping distance.
If you get too close to the
vehicle in front of you, you won’t have time to apply
your brakes
if that vehicle suddenly slows or stops.
Always leave enough room up ahead to stop, even
though you have anti-lock brakes.
Using Anti-Lock
Don’t pump the brakes. Just hold the brake pedal down
firmly and let anti-lock work for you. You may feel a
slight brake pedal pulsation or notice some noise, but
this is normal.
Braking in Emergencies
With anti-lock, you can steer and brake at the same
time. In many emergencies, steering can help you more
than even the very best braking.
Traction Control System (TCS)
Your vehicle may have a traction control system that
limits wheel
spin. This is especially useful in slippery
road conditions. The system operates only
if it senses
that one or both of the front wheels are spinning or
beginning to lose traction. When this happens,
the system works the front brakes and reduces engine
power
to limit wheel spin.
You may feel or hear the system working, but this
is normal.
If your vehicle is in cruise control when the traction
control system begins to limit wheel spin, the cruise
control will automatically disengage. When road
conditions allow you to safely use it again, you may
reengage the crake contro!. See ‘Cruise Control” under
Turn Signal/Muitifunction Lever on page 3-7.
4-9
Page 231 of 418
Do not get too close to the vehicle you want to
pass while you’re awaiting an opportunity. For
one thing, following too closely reduces your area
of vision, especially
if you’re following a larger
vehicle.
Also, you won’t have adequate space if the
vehicle ahead suddenly slows or stops. Keep
back a reasonable distance.
When it looks like a chance to pass is coming up,
start to accelerate but stay in the right lane and
don’t get too close. Time your move
so you will be
increasing speed as the time comes to move
into the other lane. If the way is clear to pass, you
will have a “running start” that more than makes
up for the distance you would lose by dropping
back. And
if something happens to cause you to
cancel your pass, you need only slow down
and drop back again and wait for another
opportunity.
If other vehicles are lined up to pass a slow vehicle,
wait your turn. But take care that someone isn’t
trying to pass you as you pull out to pass the slow
vehicle. Remember
to glance over your shoulder
and check the blind spot.
Check your mirrors, glance over your shoulder, and
start your left lane change signal before moving out
of the right lane to pass. When you are far
enough ahead of the passed vehicle to see its front
0
0
0
in your inside mirror, activate your right lane change
signal and move back into the right lane.
(Remember that your right outside mirror is convex.
The vehicle you just passed may seem to be
farther away from you than it really is.)
Try not to pass more than one vehicle at a time on
two-lane roads. Reconsider before passing the
next vehicle.
Don’t overtake a slowly moving vehicle too rapidly.
Even though the brake lamps are not flashing, it
may be slowing down or starting to turn.
If you’re being passed, make it easy for the
following driver
to get ahead of you. Perhaps you
can ease a little to the right.
Loss of Control
Let’s review what driving experts say about what
happens when the three control systems (brakes,
steering and acceleration) don’t have enough friction
where the tires meet the road to do what the driver has
asked.
In any emergency, don’t give up. Keep trying to steer
and constantly seek an escape route or area of
less danger.
4-1 4