2003 Oldsmobile Alero steering wheel
[x] Cancel search: steering wheelPage 63 of 354

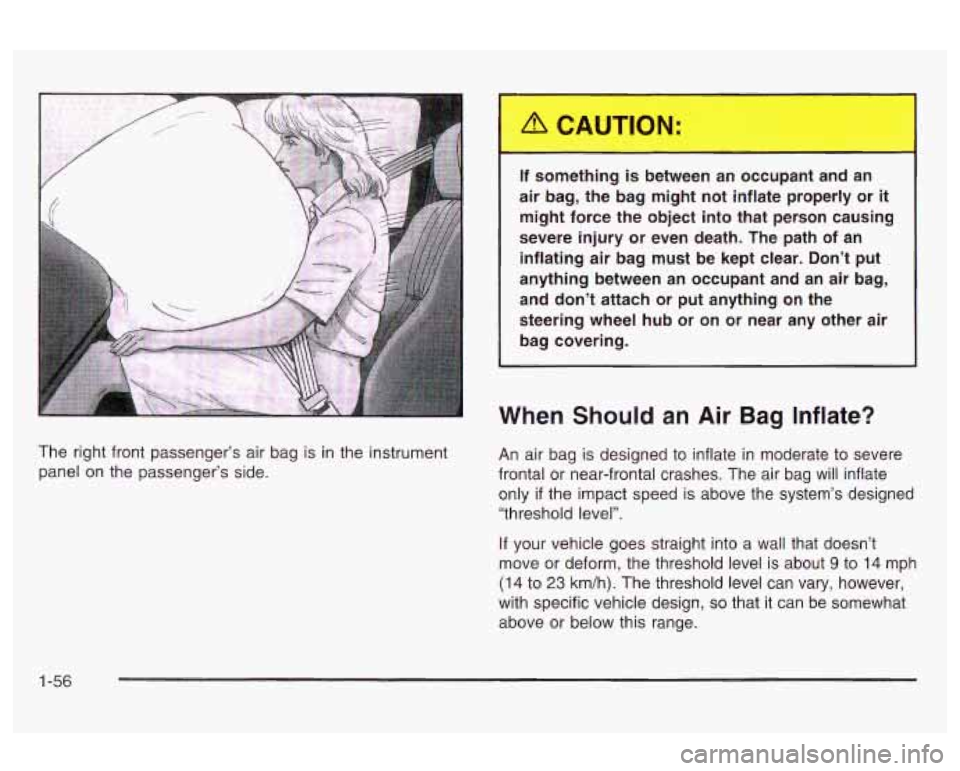
The right front passenger’s air bag is in the instrument
panel on the passenger’s side. If something is between
an occupant and an
air bag, the bag might not inflate properly or
it
might force the object into that person causing
severe injury or even death. The path of an
inflating air bag must be kept clear. Don’t put
anything between an occupant and an air bag,
and don’t attach or put anything on the
steering wheel hub or on or near any other air
bag covering.
When Should an Air Bag Inflate?
An air bag is designed to inflate in moderate to severe
frontal or near-frontal crashes. The air bag will inflate
only
if the impact speed is above the system’s designed
“threshold level”.
If your vehicle goes straight into a wall that doesn’t
move or deform, the threshold level is about
9 to 14 mph
(14 to 23 km/h). The threshold level can vary, however,
with specific vehicle design,
so that it can be somewhat
above or below this range.
1-56
Page 64 of 354

If your vehicle strikes something that will move or
deform, such as a parked car, the threshold level will be
higher. The air bag is not designed to inflate in
rollovers, rear impacts, or in many side impacts because
inflation would not help the occupant.
In any particular crash, no one can say whether an air
bag should have inflated simply because of the damage
to a vehicle or because of what the repair costs were.
Inflation is determined by the angle of the impact
and how quickly the vehicle slows down in frontal and
near-frontal impacts.
What Makes an Air Bag Inflate?
In an impact of sufficient severity, the air bag sensing
system detects that the vehicle is in a crash. The
sensing system triggers a release of gas from the
inflator, which inflates the air bag. The inflator, air bag
and related hardware are all part of the air bag modules
inside the steering wheel and in the instrument panel
in irorli ui ine rigni ironi passenger.
How Does an Air Bag Restrain?
In moderate to severe frontal or near-frontal collisions,
even belted occupants can contact the steering wheel or
the instrument panel. Air bags supplement the
protection provided by safety belts. Air bags distribute
the force of the impact more evenly over the occupant’s
upper body, stopping the occupant more gradually.
But air bags would not help you in many types
of
collisions, including rollovers, rear impacts and many
side impacts, primarily because an occupant’s motion is
not toward those air bags. Air bags should never be
regarded as anything more than a supplement to safety
belts, and then only
in moderate to severe frontal or
near-frontal collisions.
What Will You See After an Air Bag
Inflates?
After an air bag inflates, it quickly deflates, so quickly
that some people may not even realize the air bag
iniiated. some components
of the air bag module - the
steering wheel hub for the driver’s air bag or the
instrument panel for the right front passenger’s
bag
- will be hot for a short time. The parts of the
bag that come into contact with you may be warm,
but not
too hot to touch.
1-57
Page 65 of 354

There will be some smoke and dust coming from the
vents
in the deflated air bags. Air bag inflation doesn’t
prevent the driver from seeing or being able to steer the
vehicle, nor does it stop people from leaving the
vehicle.
When an air bag inflates, there
is dust in the
air. This dust could cause breathing problems
for people with a history of asthma or other
breathing trouble.
To avoid this, everyone in
the vehicle should get out as soon as it is safe
to do
so. If you have breathing problems but
can’t get out of the vehicle after an air bag inflates, then get fresh air by opening a
window or a door.
In many crashes severe enough to inflate an air bag,
windshields are broken by vehicle deformation.
Additional windshield breakage may also occur from the
right front passenger air bag.
e
e
e
Air bags are designed to inflate only once. After an
air bag inflates, you’ll need some new parts for
your air bag system.
If you don’t get them, the air
bag system won’t be there to help protect you
in another crash.
A new system will include air bag
modules and possibly other parts. The service
manual for your vehicle covers the need to replace
other parts.
Your vehicle is equipped with a crash sensing and
diagnostic module, which records information
about the air bag system. The module records
information about the readiness of the system, when
the system commands air bag inflation and
driver’s safety belt usage at deployment.
Let only qualified technicians work on your air bag
system. Improper service can mean that your air bag system won’t work properly. See your dealer for
service.
Notice: If you damage the covering for the driver’s
or the right front passenger’s air bag, the bag
may not work properly. You may have to replace the
air bag module
in the steering wheel or both the
air bag module and the instrument panel for
the right front passenger’s air bag.
Do not open or
break the air bag coverings.
1-58
Page 111 of 354

Hazard Warning Flashers
Your hazard warning flashers let you warn others. They
also let police know you have a problem. Your front
and rear turn signal lamps will flash on and
off.
The hazard warning
flasher is located near
the center of the
instrument panel.
Your hazard warning flashers work no matter what
position your key
is in, and even if the key isn't in.
Press the button to make the front and rear turn signal
lamps flash on and
off. Press the button again to
turn the flashers off.
When the hazard warning flashers are on, your turn
signals won't work.
Other Warning Devices
If you carry reflective triangles, you can set one up at
the side of the road about
300 feet (100 m) behind
your vehicle.
Horn
You can sound the horn by pressing the horn symbol on
your steering wheel.
3-6
Page 112 of 354

Tilt Wheel
A tilt wheel allows you to adjust the steering wheel
before you drive. You can raise it to the highest level to
give your legs more room when you exit and enter
your vehicle.
The lever that allows you to tilt the steering wheel is
located on the left side of the steering column.
Turn SignaVMultifunction Lever
I I
To tilt the wheel, hold the wheel and pull the lever
toward you. Then move the wheel
to a comfortable
position and release
the iever to iock the wheei in piace. The
lever on the left side of the steering column
includes the following:
Turn and Lane-Change Signals
Headlamp High/Low-Beam Changer
Flash-to-pass
For information on the exterior lamps. See
Exterior
Lamps on page 3-13 later in this section.
3-7
Page 114 of 354

Flash-to-Pass Feature
This feature lets you use your high-beam headlamps to
signal a driver in front of you that you want
to pass.
To use it, pull the turn signaVmultifunction lever toward
you until the high-beam headlamps come on, then
release the lever to turn them
off.
Windshield Wipers
Use this lever located on the right side of the steering
wheel
to operate the windshield wipers.
OFF: Move the lever to OFF to turn off the windshield
wipers.
INT (Intermittent): Move the lever to INT to choose a
delayed wiping cycle. Turn the INT ADJ band down
for a longer delay or up for a shorter delay. The further
the INT ADJ band is turned upward, the shorter the
delay will be and the further the INT ADJ band is turned
downward, the longer the delay will be. The wiper
speed can only be adjusted when the lever is in the INT
position. Use this position for light rain or snow.
LO
(Low Speed): Move the lever up to the first setting
past INT, for steady wiping at low speed.
HI (High Speed): Move the lever up to the second
setting past INT, for steady wiping at high speed.
MIST: Move the lever all the way down to MIST for a
single wiping cycle. Hold it there until the windshield
wipers start; then let go. The windshield wipers will stop
after one wipe. If you want more wipes, hold the
band on mist longer.
Remember that damaged wiper blades may prevent you
damage, be sure
to clear ice and snow from the wiper
blades before using them. If they’re frozen to the
windshield, carefully loosen or thaw them.
If your blades
do become damaged, get new blades or blade inserts.
Heavy snow or Ice can overload your wiper motor-
A circuit breaker will stop the motor until it cools. Clear
away snow or ice
to prevent an overload.
t--- -,-:,, ... - 11 ---..-.L L- -I.-:.,- --&-I., T, -.,-:A IIUIII ~GGII ~y VVGII GI wuy~ I LW UIIVC; aalC;;ly. I u avulu
3-9
Page 115 of 354

Windshield Washer Cruise Control
To wash your windshield, push in the button at the end
0 er until the washers begin.
In freezing weather, don’t use your washer
until the windshield is warmed. Otherwise the
washer fluid can form ice
on the windshield,
blocking your vision.
I I
When you release the button, the washers will stop, but
the wipers will continue to wipe about three times or
will resume the speed you were using before.
1
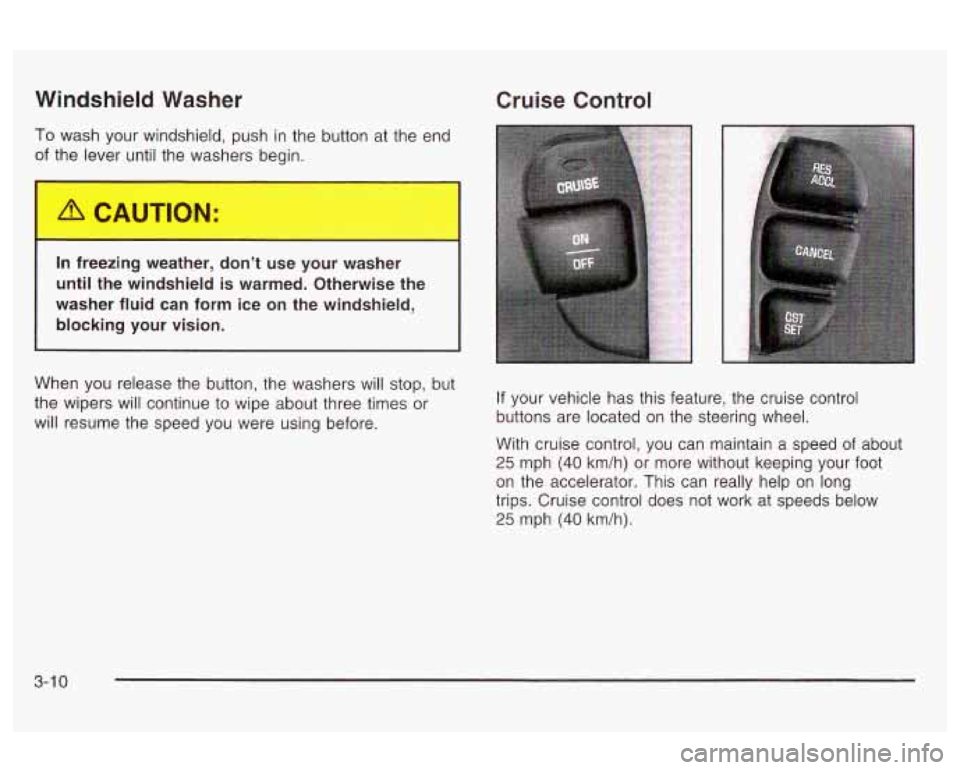
If your vehicle has this feature, the cruise control
buttons are located on the steering wheel.
With cruise control, you can maintain a speed of about
25 mph (40 km/h) or more without keeping your foot
on the accelerator. This can really help on long
trips. Cruise control does not work at speeds below
25 mph (40 km/h).
3-1 0
Page 120 of 354

The system may also be on when driving through a
parking garage, heavy overcast weather or a tunnel.
This is normal.
There is a delay in the transition between the daytime
and nighttime operation of the DRL and the Automatic
Headlamp System
so that driving under bridges or bright
overhead street lights does not affect the system. The
DRL and Automatic Headlamp Systems will only be
affected when the light sensor sees a change in lighting
lasting longer than this delay.
To idle your vehicle with the system off, set the parkin9
brake while the ignition is
off. Then start the vehicle.
The system will stay
off until you release the parking
brake.
As with any vehicle, you should turn on the regular
headlamps when you need them.
Headlamps Off in PARK (P)
To turn the headlamps off when it is dark outside, turn
the exterior lamps control
to the parking lamp position.
In this position, the parking lamps, sidemarker lamps,
taillamps, license plate lamps and instrument panel
lights will be on, but the headlamps will be off.
To turn on the headlamps along with the other lamps
when it is dark outside, turn the exterior lamps control
to
the AUTO or headlamp position.
Delayed Headlamps
The delayed headlamps feature will continue to
illuminate the headlamps for
20 seconds after the key is
turned to
OFF, then the headlamps will automatically
turn off.
To override the
20 second delayed headlamp feature
while it is active turn the turn signal/muItifunction
lever up one position and then back
to AUTO.
Fog Lamps
If your vehicle has this feature, the button for your fog
lamps is located on the instrument panel, to the left
of the steering wheel, beside the instrument panel
brightness thumbwheel.
When using the fog lamps, the ignition must be on as
well as the parking lamps or the low-beam headlamps.
Press the button to turn the fog lamps on. An indicator
light on the button will glow when the fog lamps are on.
Press the button again to turn the fog lamps off.
TI-- I--. I ... :I1 I ..... LT . I. . . I I luy I~III~ WIII Lull1 UII WII~II~V~I iile iliyil-bed1r1
headlamps are turned on. When the high beams
are turned off, the fog lamps will come on again.
3-1 5