Page 92 of 354

Then move the shift lever into the gear you wish. Press
the shift lever button before moving the shift lever. See
Shifting Out of Park (P) on page 2-28 later in this section.
REVERSE (R): Use this gear to back up.
Notice: Shifting to REVERSE (R) while your vehicle
is moving forward could damage your transaxle.
Shift to REVERSE (R) only after your vehicle
is stopped.
To rock your vehicle back and forth to get out of snow,
ice or sand without damaging your transaxle, see
If
You Are Stuck: In Sand, Mud, Ice or Snow on
page 4-29.
NEUTRAL (N): In this position, your engine doesn’t
connect with the wheels. To restart when you’re already
moving, use NEUTRAL (N) only. Also, use
NEUTRAL (N) when your vehicle is being towed.
,,ifling into a drive gear while your engine is
“racing” (running at high speed) is dangerous.
Unless your foot is firmly on the brake pedal,
your vehicle could move very rapidly. You
could lose control and hit people or objects.
Don’t shift into
a drive gear while your engine
is racing.
Notice: Damage to your transaxle caused by
shifting into a drive gear with the engine racing isn’t
covered by your warranty.
AUTOMATIC OVERDRIVE (D):
This position is for
normal driving.
If you need more power for passing,
and you’re:
Going less than 35 mph (55 km/h), push your
0 Going about 35 mph (55 km/h) or more, push the
You’ll shift down to the next gear and have more power.
acceieraivr pedai abwui ilaiiway ~UWI-I.
accelerator all the way down.
2-23
Page 93 of 354

Notice: If your vehicle seems to start up rather
slowly, or if
it seems not to shift gears as you go
faster, something may be wrong with a transaxle system sensor. If you drive very far that way, your
vehicle can be damaged.
So, if this happens,
have your vehicle serviced right away. Until then,
you can use SECOND
(2) when you are driving
less than
35 mph (55 kmh) and AUTOMATIC
OVERDRIVE (D) for higher speeds.
THIRD
(3): This position is also used for normal driving.
However, it offers more power and lower fuel economy
than AUTOMATIC OVERDRIVE (D). Here are some
times you might choose THIRD
(3) instead of
AUTOMATIC OVERDRIVE (D):
When driving on hilly, winding roads.
When towing a trailer, so there is less shifting
When going down a steep hill.
between
gears. SECOND
(2): This
position gives you more power but
lower fuel economy.
You can use SECOND (2) on
hills. It can help control your speed as you go down
steep mountain roads, but then you would also want to
use your brakes off and on.
Notice: Don’t drive in SECOND (2) for more than
25 miles (40 km), or at speeds over 55 mph
(90 km/h), or you can damage your transaxle. Use
THIRD
(3) or AUTOMATIC OVERDRIVE (D) as
much as possible. Don’t shift into SECOND
(2)
unless you are going slower than 65 mph (105 kdh)
or you can damage your engine.
FIRST
(1): This position gives you even more power
but lower fuel economy than SECOND
(2). You can use
it on very steep hills, or in deep snow or mud. If the
shift lever is put in FIRST
(I), the transaxle won’t shift
into first gear until the vehicle is going slowly enough.
Notice: If your front wheels won’t turn, don’t
try to drive. This might happen if you were stuck
in
very deep sand or mud or were up against a solid
object. You could damage your transaxle. Also,
if you stop when going uphill, don’t hold your
vehicle there with only the accelerator pedal. This
could overheat and damage the transaxle. Use your
brakes to hold your vehicle
in position on a hill.
2-24
Page 96 of 354

Notice: Driving with the parking brake on can
cause your rear brakes to overheat. You may have
to replace them, and you could also damage
other parts
of your vehicle.
If you are towing a trailer and are parking on a hill, see
Towing a Trailer on page 4-36.
1g Inti Park (P)
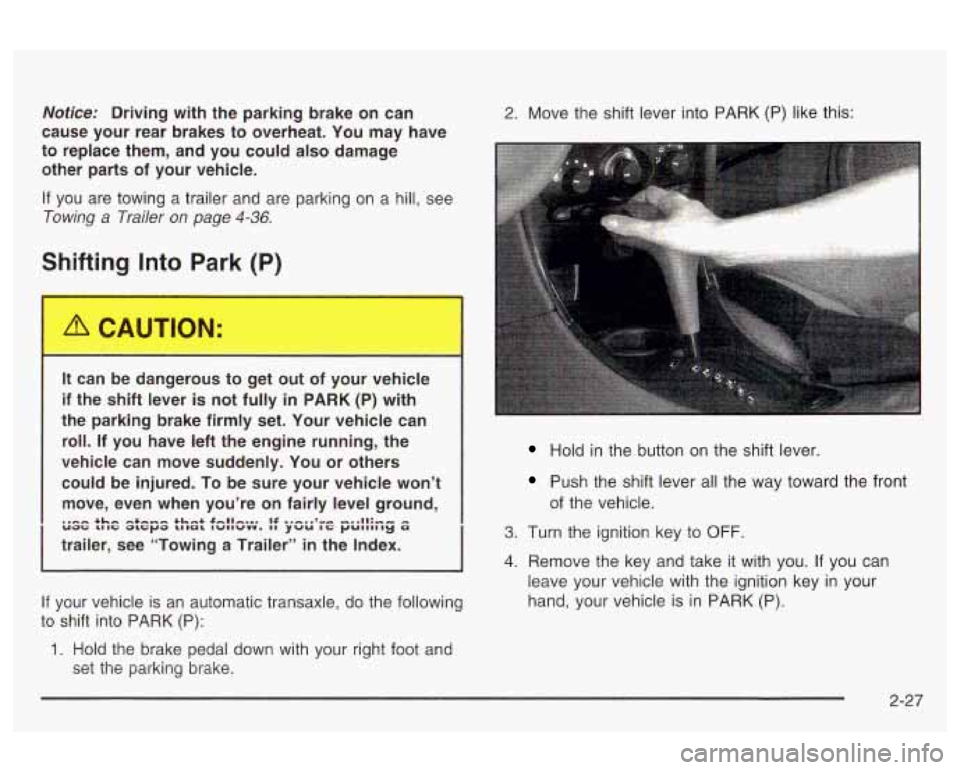
2. Move the shift lever into PARK (P) like this:
It can be dangerous to get t of yc r vehicle
if the shift lever is not fully in PARK (P) with
the parking brake firmly set. Your vehicle can
roll. If you have left the engine running, the
vehicle can move suddenly. You or others
could be injured.
To be sure your vehicle won’t
move, even when you’re on fairly level ground,
trailer, see “Towing a Trailer” in the Index.
6.E p& yt :G#436;i’. if ye.;’;e p6~w.~zg
If your vehicle is an automatic transaxle, do the following
to shift into PARK (P):
1. Hold the brake pedal down with your right foot and
set the parking brake.
Hold in the button on the shift lever.
Push the shift lever all the way toward the front
of the vehicle.
3. Turn the ignition key to OFF.
4. Remove the key and take it with you. If you can
leave your vehicle with the ignition key in your
hand, your vehicle
is in PARK (P).
2-27
Page 100 of 354
It can be dangerous to get out of your vehicle
if the shift lever
is not fully in PARK (P) with
the parking brake firmly set. Your vehicle can
roll. Don’t leave your vehicle when the engine
is running unless you have to. If you’ve left the
engine running, the vehicle can move suddenly. You or others could be injured.
To
be sure your vehicle won’t move, even when
you’re on fairly level ground, always set your parking brake and move the shift lever to
PARK (P).
I
Follow the proper steps to be sure your vehicle won’t
move. See
Shifting Into Park (P) on page 2-27.
If you are parking on a hill and if you’re pulling a trailer,
also see
Towing a Trailer on page 4-36.
2-31
Page 101 of 354
Mirrors
Manual Rearview Mirror
The mirror can be adjusted two ways. First, to adjust
the height
of the mirror, adjust the arm that connects the
mirror to the windshield. Second, adjust the angle
of
the mirror, by moving the mirror to a position that allows
you to see out
of the back window.
To reduce glare from headlamps behind you, move the
lever toward you to the night position. To return the
mirror
to the daytime position, move the lever away
from you.
Outside Remote Control Mirror
The outside rearview mirror should be adjusted so you
can see a little
of the side of your vehicle when you
are sitting in a comfortable driving position.
Adjust the driver’s outside mirror with the control lever
on the driver’s door.
To adjust your passenger’s mirror, sit in the driver’s seat
and have a passenger adjust the mirror for you.
2-32
Page 103 of 354
Storage Areas
Glove Box
To open, pull the glove box latch toward you.
Cupholder(s)
Pull down the door on the rear of the center console to
use the rear seat cupholders.
Center Console Storage Area
The center console has two separate storage areas. To
open, pull up on the lid.
2-34
Page 112 of 354
Tilt Wheel
A tilt wheel allows you to adjust the steering wheel
before you drive. You can raise it to the highest level to
give your legs more room when you exit and enter
your vehicle.
The lever that allows you to tilt the steering wheel is
located on the left side of the steering column.
Turn SignaVMultifunction Lever
I I
To tilt the wheel, hold the wheel and pull the lever
toward you. Then move the wheel
to a comfortable
position and release
the iever to iock the wheei in piace. The
lever on the left side of the steering column
includes the following:
Turn and Lane-Change Signals
Headlamp High/Low-Beam Changer
Flash-to-pass
For information on the exterior lamps. See
Exterior
Lamps on page 3-13 later in this section.
3-7
Page 113 of 354

Turn and Lane-Change Signals
The turn signal has two upward (for right) and two
downward (for left) positions. These positions allow you
to signal a turn or a lane change.
To signal a turn, move the lever all the way up or down.
When the turn is finished, the lever will return
automatically.
An arrow on the instrument
panel cluster will flash in
the direction
of the
turn or lane change.
To signal a lane change, just raise or lower the lever
until the arrow starts to flash. Hold it there until you
complete your lane change. The lever will return by itself
when you release it.
As you signal a turn or a lane change,
if the arrows
flash rapidly, a signal bulb may be burned out and other
drivers won’t see your turn signal.
If a bulb is burned out, replace it to help avoid an
accident.
If the arrows don’t go on at all when you signal
a turn, check for burned-out bulbs and then check the
fuse. See
Fuses and Circuit Breakers on page 5-81.
Turn Signal On Chime
If your turn signal is left on for more than 3/4 of a mile
(1.2 km), a chime will sound at each flash of the
turn signal.
To turn off the chime, move the turn signal
lever to the
off position.
Headlamps On Reminder
If you open the driver’s door and turn off the ignition
while leaving the lamps on, you will hear a warning
chime.
Headlamp High/Low-Beam Changer
To change the headlamps from low beam to high
beam, push the turn signaVmultifunction lever away
from you.
When the high beams are
on, a light on the
instrument panel cluster
will come on
if the ignition
is in
ON.
To change the headlamps from high beam to low beam,
pull the turn signal lever toward you.
3-8