Page 3535 of 4179
DUCTS AND GRILLES
ATC-139
C
D
E
F
G
H
I
K
L
MA
B
AT C
Removal of Adaptor
1. Remove heater & cooling unit. Refer to ATC-131, "HEATER & COOLING UNIT ASSEMBLY" .
2. Remove mounting screw and clip.
3. Slide adaptor toward vehicle front, and then remove adaptor.
Removal of Multi-box Duct
1. Remove instrument panel. Refer to IP-11, "Removal and Installation" .
2. Remove mounting screws, and then disconnect multi-box duct
from heater & cooling unit.
3. Remove mounting bolts, and then remove heater & cooling unit
bracket.
4. Remove multi-box duct from left side.
Removal of Foot Duct
1. Remove multi-box duct.
2. Remove mounting screws, and then remove foot duct.
RJIA2411E
RJIA2412E
RJIA0069E
Page 3564 of 4179

MA-4
DESCRIPTION
DESCRIPTIONPFP:00000
Pre-delivery Inspection ItemsELS000Y5
Shown below are Pre-delivery Inspection Items required for the new vehicle. It is recommended that
necessary items other than those listed here be added, paying due regard to the conditions in each
country.
Perform applicable items on each model. Consult text of this section for specifications.
Install vehicle protection kit
Fit all accessories ordered (if applicable) (e.g. towbar, audio, navigation, air conditioner, styling kit)
UNDER HOOD — engine off
Check coolant level and cooling system for leaks
Charge battery and check terminals for condition
Check drive belts tension (diesel only)
Check fuel filter for water or dust (diesel only) and fuel system for leaks
Check engine oil level and for oil leaks
Check brake and clutch fluid levels and fluid lines for leaks
Check and top up washer reservoirs
Check power steering fluid level and fluid lines for leaks (if applicable)
Check air conditioning system for gas leaks (if applicable)
ON INSIDE AND OUTSIDE
Install transit fuse if removed for vehicle storage
Check instruments, gauges, lamps, horn and accessories for operation
Check wipers and washers for operation and adjustment
Check interior and door mirrors and sun visors for operation
Set radio code and set clock
Check parking brake adjustment
Check clutch pedal adjustment
Check steering lock operation
Check seat adjusters and seat belts for operation
Check all windows for operation and alignment
Check mouldings, trim and fittings for fit and alignment
Check weatherstrips for fit and adhesion
Check hood, trunk lid, door panels and fuel lid for fit and alignment
Check latches, keys, remote key, door locks and remote trunk lid and fuel lid release for operation
Check wheel nut torques
Check tyre pressure (incl. spare tyre)
Check tool kit and jack for operation
Check automatic transmission/transaxle starter inhibitor (if applicable)
Check sunroof for operation and alignment (if applicable)
UNDER BODY
Check manual transmission/transaxle, differential and transfer box for oil level and oil leaks
Tighten bolts and nuts steering linkage and gear box, axle/suspension parts, propeller and exhaust system
Check brake and clutch lines, and oil/fluid reservoirs for leaks
Remove front suspension spacer blocks (if applicable)
Check body mounting torque (if applicable)
Page 3570 of 4179
 Inspect once per year.
� Maintenance items with “ ” should be performed more frequently according to “Maintenance Under Severe Driving
Conditions”.
MAIN")
MA-10
PERIODIC MAINTENANCE
NOTE:
�(1) Inspect once per year.
� Maintenance items with “ ” should be performed more frequently according to “Maintenance Under Severe Driving
Conditions”.
MAINTENANCE UNDER SEVERE DRIVING CONDITIONS
(Annual Mileage <30,000 Km/year)
The maintenance intervals shown on the preceding pages are for normal operating conditions. If the vehicle is
mainly operated under severe driving conditions as shown below, more frequent maintenance must be per-
formed on the following items as shown in the table.
Severe driving conditions
A — Driving in dusty conditions
B — Repeatedly driving short distances
C — Towing a trailer or caravan
D — Extensive idling
E — Driving in extremely adverse weather conditions or in areas where ambient temperatures are either
extremely low or extremely high
F — Driving in high humidity or mountainous areas
G — Driving in areas using salt or other corrosive materials
H — Driving on rough and/or muddy roads or in the desert
I — Driving with frequent use of braking or in mountainous areas
J — Frequent off road use or driving in water
K —Sustained high speed driving
L — For models without Euro-OBD system
Differential gear oil (For level & leaks or
replace)IIRIIRMA-40
Steering gear & linkage, axle & suspension
parts, propeller shaft, front drive shafts &
exhaust systemIIIIIIMA-43, MA-44
, MA-40
, MA-
45 , MA-37
Wheel alignment (If necessary, rotate & bal-
ance wheels)IIIIIIFSU-6, MA-41
Brake pads, rotors & other brake compo-
nentsIIIIIIMA-43, MA-43
, MA-43
Foot brake, parking brake & clutch (For free
play, stroke & operation)IIIIIIBR-6, CL-5
Ventilation air filterRRRRRRATC-130
Body corrosionSee
NOTE (1)MA-45
MAINTENANCE OPERATIONMAINTENANCE INTERVAL
Reference
page Perform either at number of kilometers (miles)
or months, whichever comes first.km x 1,000
(Miles x 1,000)
Months20
(12)
1240
(24)
2460
(36)
3680
(48)
48100
(60)
60120
(72)
72
Page 3575 of 4179
 Inspect once per year.
� Maintenance items with “ ” should be performed more frequently according to “Maintenance Under Severe D")
PERIODIC MAINTENANCE
MA-15
C
D
E
F
G
H
I
J
K
MA
B
MA
NOTE:
�(1) Inspect once per year.
� Maintenance items with “ ” should be performed more frequently according to “Maintenance Under Severe Driving
Conditions”.
MAINTENANCE UNDER SEVERE DRIVING CONDITIONS
(Annual Mileage >30,000 Km/year)
The maintenance intervals shown on the preceding pages are for normal operating conditions. If the vehicle is
mainly operated under severe driving conditions as shown below, more frequent maintenance must be per-
formed on the following items as shown in the table.
Severe driving conditions
A — Driving in dusty conditions
B — Repeatedly driving short distances
C — Towing a trailer or caravan
D — Extensive idling
E — Driving in extremely adverse weather conditions or in areas where ambient temperatures are either
extremely low or extremely high
F — Driving in high humidity or mountainous areas
G — Driving in areas using salt or other corrosive materials
H — Driving on rough and/or muddy roads or in the desert
I — Driving with frequent use of braking or in mountainous areas
J — Frequent off road use or driving in water
K —Sustained high speed driving
L — For models without Euro-OBD system
Differential gear oil (For level & leaks or
replace)IIRIIRMA-40
Steering gear & linkage, axle & suspension
parts, propeller shaft, front drive shafts &
exhaust systemIIMA-43, MA-44
, MA-40
, MA-
45 , MA-37
Wheel alignment (If necessary, rotate & bal-
ance wheels)IIIFSU-6, MA-41
Brake pads, rotors & other brake compo-
nentsIIIIIIMA-43, MA-43
, MA-43
Foot brake, parking brake & clutch (For free
play, stroke & operation)IIIIIIBR-6, CL-5
Ventilation air filterRRRRRRATC-130
Body corrosionSee
NOTE (1)MA-45
MAINTENANCE OPERATIONMAINTENANCE INTERVAL
Reference
page Perform either at number of kilometers (miles)
or months, whichever comes first.km x 1,000
(Miles x
1,000)
Months20
(12)40
(24)60
(36)80
(48)100
(60)120
(72)
Page 3605 of 4179
CHASSIS AND BODY MAINTENANCE
MA-45
C
D
E
F
G
H
I
J
K
MA
B
MA
Drive ShaftELS000CL
�Check boot and drive shaft for cracks, wear, damage and
grease leakage.
Lubricating Locks, Hinges and Hood LatchesELS000BR
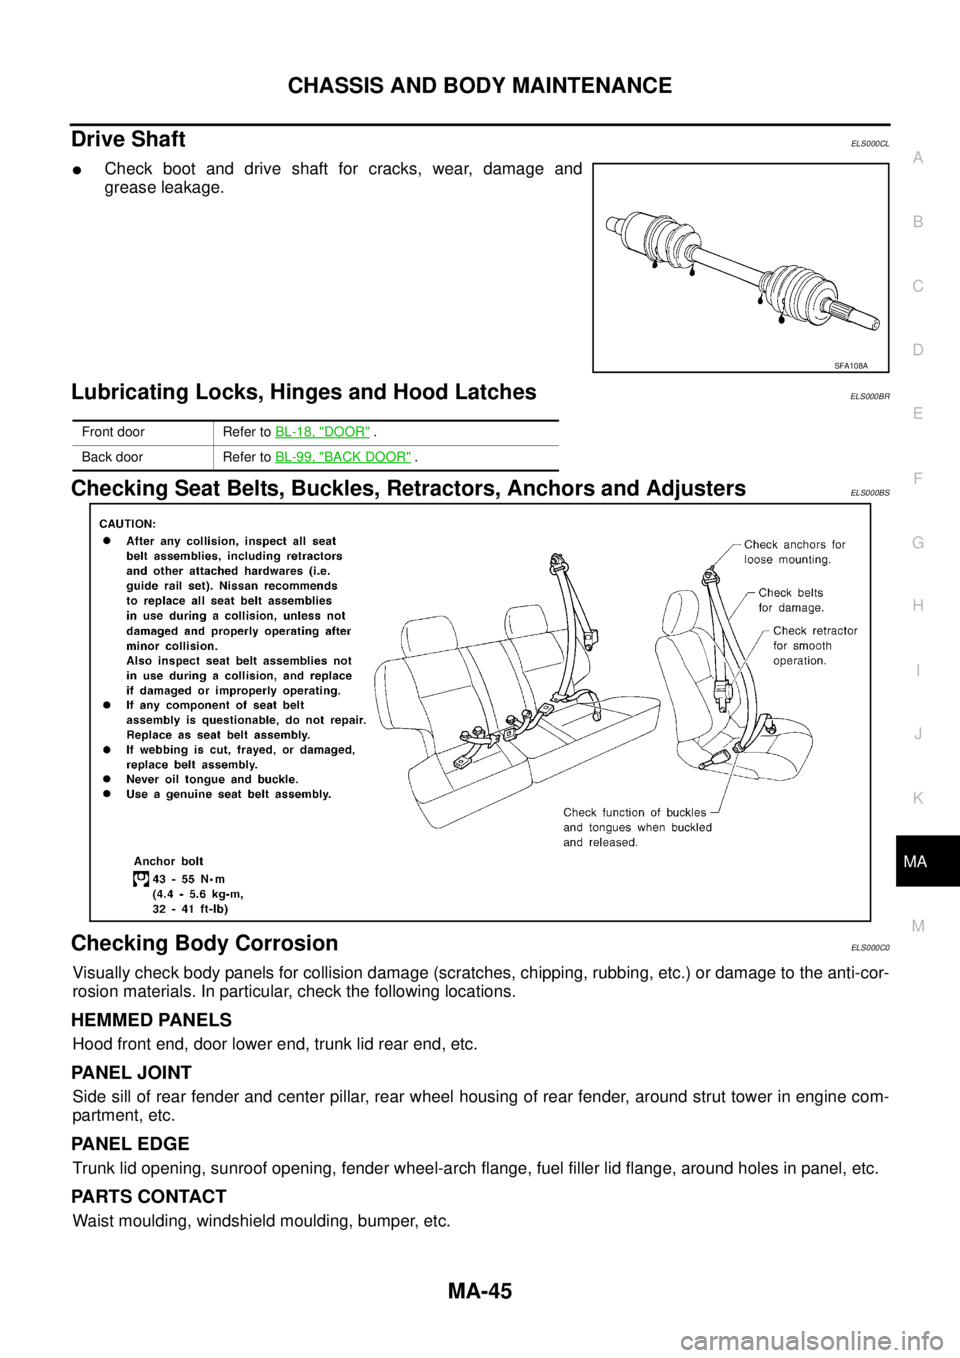
Checking Seat Belts, Buckles, Retractors, Anchors and AdjustersELS000BS
Checking Body CorrosionELS000C0
Visually check body panels for collision damage (scratches, chipping, rubbing, etc.) or damage to the anti-cor-
rosion materials. In particular, check the following locations.
HEMMED PANELS
Hood front end, door lower end, trunk lid rear end, etc.
PA N E L J O I N T
Side sill of rear fender and center pillar, rear wheel housing of rear fender, around strut tower in engine com-
partment, etc.
PA N E L E D G E
Trunk lid opening, sunroof opening, fender wheel-arch flange, fuel filler lid flange, around holes in panel, etc.
PARTS CONTACT
Waist moulding, windshield moulding, bumper, etc.
SFA108A
Front door Refer to BL-18, "DOOR" .
Back door Refer to BL-99, "
BACK DOOR" .
Page 3630 of 4179
MTC-22
BLOWER UNIT
BLOWER UNITPFP:27200
Removal and InstallationEJS004YB
REMOVAL
1. Remove glove box assembly.
2. Remove glove box cover, instrument passenger lower panel and instrument reinforcement. Refer to IP-11,
"Removal and Installation" .
3. Remove ECM with ECM bracket attached.
4. Remove instrument panel mounting screw.
5. Remove blower unit mounting bolt and screw.
6. Disconnect blower motor connector and fan resistor connector.
7. Disconnect intake door motor connector and harness clips.
8. Remove blower unit.
CAUTION:
Slide the blower unit toward the right, remove location pins
(2 pieces), then move it downward.
INSTALLATION
Installation is basically the reverse order of removal.
CAUTION:
�Make sure location pins (2 pieces) are securely installed.
RJIA3161E
Page 3643 of 4179
DUCTS AND GRILLES
MTC-35
C
D
E
F
G
H
I
K
L
MA
B
MTC
Removal of Adaptor
1. Remove heater (& cooling) unit. Refer toMTC-27, "HEATER UNIT" .
2. Remove mounting screw and clip.
3. Slide adaptor toward vehicle front, and then remove adaptor.
Removal of Multi-box Duct
1. Remove instrument panel. Refer to IP-11, "Removal and Installation" .
2. Remove mounting screws, and then disconnect multi-box duct
from heater (& cooling) unit.
3. Remove mounting bolts, and then remove heater (& cooling)
unit bracket.
4. Remove multi-box duct from left side.
Removal of Foot Duct
1. Remove multi-box duct.
2. Remove mounting screws, and then remove foot duct.
RJIA2411E
RJIA2412E
RJIA0069E
Page 3705 of 4179

COMBINATION METERS
DI-27
C
D
E
F
G
H
I
J
L
MA
B
DI
The Fuel Gauge Pointer Fluctuates, Indicator Wrong Value or VariesEKS00EHG
1. CHECK FUEL GAUGE FLUCTUATION
Test drive vehicle to see if gauge fluctuates only during driving and just before or soon after stopping.
Does the indication value vary only during driving and just before or soon after stopping?
YES >> The pointer fluctuation may be caused by fuel level change in the fuel tank. Condition is normal.
NO >> Ask the customer about the situation when the symptom occurs in detail, and perform the trouble
diagnosis.
The Fuel Gauge Does Not Move to FULL positionEKS00EHH
1. QUESTION 1
Does it take a long time for the pointer to move to FULL position?
YES or NO
YES >> GO TO 2.
NO >> GO TO 3.
2. QUESTION 2
Was the vehicle fueled with the ignition switch ON?
YES or NO
YES >> Be sure to fuel the vehicle with the ignition switch OFF. Otherwise, it will take a long time to move
to FULL position because of the characteristic of the fuel gauge.
NO >> GO TO 3.
3. QUESTION 3
Is the vehicle parked on an incline?
YES or NO
YES >> Check the fuel level indication with vehicle on a level surface.
NO >> GO TO 4.
4. QUESTION 4
During driving, does the fuel gauge pointer move gradually toward EMPTY position?
YES or NO
YES >> Check fuel level sensor unit. Refer to DI-30, "FUEL LEVEL SENSOR UNIT CHECK/GASOLINE
ENGINE MODELS" or DI-30, "FUEL LEVEL SENSOR UNIT CHECK/DIESEL ENGINE MOD-
ELS" .
NO >> The float arm may interfere or bind with any of the components in the fuel tank.


 unit. Refer toMTC-27, \"HEATER UNIT\" .
2. Remove mounting screw and clip.
3. Slide adaptor toward v")