Page 210 of 4179
EM-158
[YD22DDTi]
INJECTION TUBE AND FUEL INJECTOR
b. Remove injection tubes in order of 2-1-4-3 individually.
CAUTION:
Be careful not to allow leaked fuel to contaminate engine
room. Especially, ensure to keep engine mounting insulator
clear of fuel.
5. Remove nozzle oil seal.
�Using the flat-bladed screwdriver, pry flange to remove oil
seal.
NOTE:
Nozzle oil seal seals between fuel injector and rocker cover. If
only injection tube shall be removed and installed, nozzle oil
seal replacement is not required.
6. Remove rocker cover. Refer to EM-168, "
Removal and Installation" .
7. Remove spill tube mounting bolts and nut.
�Loosen bolts and nut to the reverse order in the figure and
remove them.
CAUTION:
When loosening nut, fix spill tube retaining bolt with span-
ner.
SBIA0203E
PBIC0944E
PBIC2038E
Page 212 of 4179
EM-160
[YD22DDTi]
INJECTION TUBE AND FUEL INJECTOR
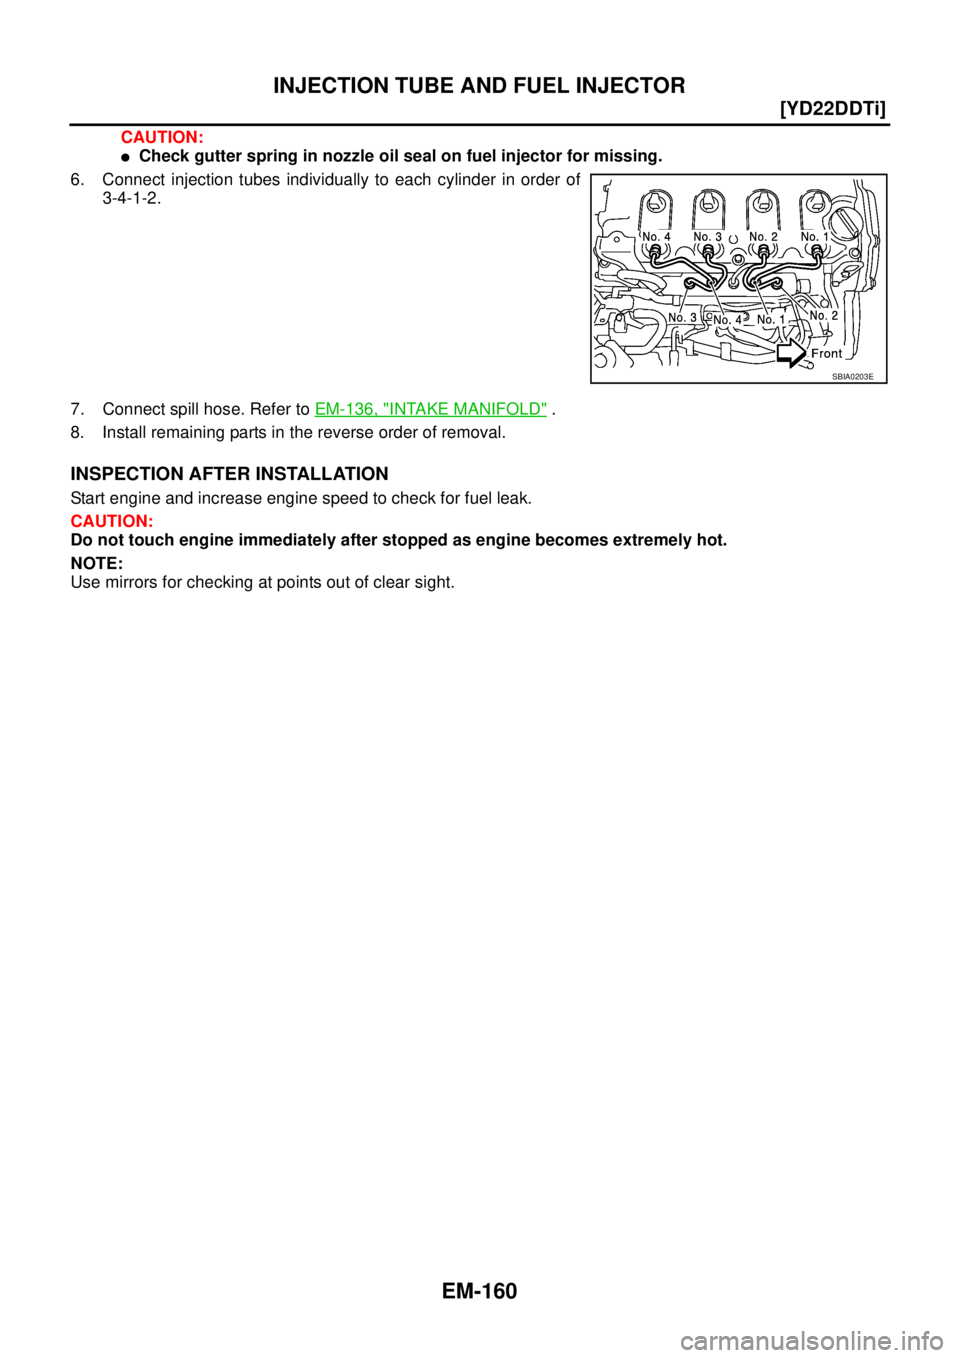
CAUTION:
�Check gutter spring in nozzle oil seal on fuel injector for missing.
6. Connect injection tubes individually to each cylinder in order of
3-4-1-2.
7. Connect spill hose. Refer to EM-136, "
INTAKE MANIFOLD" .
8. Install remaining parts in the reverse order of removal.
INSPECTION AFTER INSTALLATION
Start engine and increase engine speed to check for fuel leak.
CAUTION:
Do not touch engine immediately after stopped as engine becomes extremely hot.
NOTE:
Use mirrors for checking at points out of clear sight.
SBIA0203E
Page 213 of 4179
![NISSAN X-TRAIL 2003 Service Repair Manual FUEL PUMP
EM-161
[YD22DDTi]
C
D
E
F
G
H
I
J
K
L
MA
EM
FUEL PUMPPFP:17042
Removal and InstallationEBS00LRP
CAUTION:
�Before removing and installing fuel pump, be sure to remove sprocket. Do not loose](/manual-img/5/57404/w960_57404-212.png "NISSAN X-TRAIL 2003 Service Repair Manual FUEL PUMP
EM-161
[YD22DDTi]
C
D
E
F
G
H
I
J
K
L
MA
EM
FUEL PUMPPFP:17042
Removal and InstallationEBS00LRP
CAUTION:
�Before removing and installing fuel pump, be sure to remove sprocket. Do not loose")
FUEL PUMP
EM-161
[YD22DDTi]
C
D
E
F
G
H
I
J
K
L
MA
EM
FUEL PUMPPFP:17042
Removal and InstallationEBS00LRP
CAUTION:
�Before removing and installing fuel pump, be sure to remove sprocket. Do not loosen or remove
installation nut in the center of fuel pump. If loosened or removed, replace fuel pump.
�After removing timing chain, do not turn crankshaft and camshaft separately, or valves will strike
piston heads.
�When installing camshafts, chain tensioners, oil seals, or other sliding parts, lubricate contacting
surfaces with new engine oil.
REMOVAL
1. Remove engine coolant reservoir tank. Refer to CO-34, "RADIATOR" .
2. Remove charge air cooler. Refer to EM-135, "
Removal and Installation" .
3. Remove RH engine mounting insulator and bracket. Refer to EM-208, "
Removal and Installation" .
4. Pull power steering reservoir tank out of brackets to move power steering piping. Refer to PS-34,
"HYDRAULIC LINE" .
CAUTION:
To avoid removing power steering reservoir tank out of brackets, move it with power steering pip-
ing aside.
5. Remove RH front wheel.
1. Washer 2. Fuel pump sprocket 3. Seal washer
4. O-ring 5. Adjust shim 6. Sprocket nut
7. Coupling 8. Oil seal 9. Key
10. Fuel hose 11. Fuel pump 12. Spacer
PBIC2317E
Page 214 of 4179
![NISSAN X-TRAIL 2003 Service Repair Manual EM-162
[YD22DDTi]
FUEL PUMP
6. Remove RH engine undercover.
7. Remove front exhaust tube. Refer to EX-2, "
EXHAUST SYSTEM" .
8. Remove fuel hoses from fuel pump.
CAUTION:
Be careful not to spill fue](/manual-img/5/57404/w960_57404-213.png "NISSAN X-TRAIL 2003 Service Repair Manual EM-162
[YD22DDTi]
FUEL PUMP
6. Remove RH engine undercover.
7. Remove front exhaust tube. Refer to EX-2, \"
EXHAUST SYSTEM\" .
8. Remove fuel hoses from fuel pump.
CAUTION:
Be careful not to spill fue")
EM-162
[YD22DDTi]
FUEL PUMP
6. Remove RH engine undercover.
7. Remove front exhaust tube. Refer to EX-2, "
EXHAUST SYSTEM" .
8. Remove fuel hoses from fuel pump.
CAUTION:
Be careful not to spill fuel in the engine component.
9. Disconnect harness connector from fuel pump.
10. Remove injection tube center, clip and insert rubber. Refer to EM-157, "
INJECTION TUBE AND FUEL
INJECTOR" .
CAUTION:
Be careful not to spill fuel in the engine component.
11. Remove secondary timing chain. Refer to EM-180, "
Removal and Installation" .
12. Hold fuel pump sprocket and remove bolt.
a. Insert the positioning stopper pin (special service tool) into the
hole 6 mm (0.24 in) in the diameter on the fuel pump sprocket.
b. Using the TORX wrench (special service tool), turn pump shaft
little by little to adjust the position of fuel pump sprocket so that
the holes align.
c. Push the positioning stopper pin (special service tool) through
fuel pump sprocket to fuel pump body to hold fuel pump
sprocket.
�Insert the positioning stopper pin until its flange contacts the fuel
pump sprocket.
13. Using the hexagon wrench (special service tool) remove tighten-
ing bolts of fuel pump sprocket.
MBIA0049E
PBIC2535E
PBIC2404E
Page 216 of 4179
EM-164
[YD22DDTi]
FUEL PUMP
15. Using the extension bar and the TORX socket (size: E10),
remove the tightening bolts.
CAUTION:
Do not disassemble or adjust fuel pump.
16. Remove the fuel pump toward the rear of engine.
CAUTION:
For removal, be careful not to drop the seal washer into the engine.
NOTE:
The seal washer of the tightening bolts cannot be reused.
17. Remove adjust shim.
18. Attach a suitable tool in the M8 bolt hole on coupling.
19. Loosen sprocket nut with the TORX wrench (special service
tool).
20. Remove coupling with a suitable puller.
21. Remove spacer from fuel pump.
22. Remove oil seal from spacer.
PBIC2405E
MBIA0013E
MBIA0014E
Page 218 of 4179
![NISSAN X-TRAIL 2003 Service Repair Manual EM-166
[YD22DDTi]
FUEL PUMP
5. Before fuel pump is installed, make sure that spacer and the 6
mm (0.24 in) dia. hole on coupling are aligned.
6. Insert fuel pump to the mounting position from the re](/manual-img/5/57404/w960_57404-217.png "NISSAN X-TRAIL 2003 Service Repair Manual EM-166
[YD22DDTi]
FUEL PUMP
5. Before fuel pump is installed, make sure that spacer and the 6
mm (0.24 in) dia. hole on coupling are aligned.
6. Insert fuel pump to the mounting position from the re")
EM-166
[YD22DDTi]
FUEL PUMP
5. Before fuel pump is installed, make sure that spacer and the 6
mm (0.24 in) dia. hole on coupling are aligned.
6. Insert fuel pump to the mounting position from the rear side of
the engine, and install the tightening bolts with seal washer.
CAUTION:
Be careful not to drop the seal washer into engine.
7. Using the extension bar and the TORX socket (size: E10),
tighten the tightening bolts of fuel pump.
8. Remove the sprocket holder (special service tool).
9. Using the TORX wrench (special service tool), turn the pump
shaft gradually to adjust the position of fuel pump sprocket.
Then, insert the positioning stopper pin (special service tool) to
the 6 mm (0.24 in) dia. hole of the fuel pump sprocket through
the pump body.
10. Remove the TORX wrench (special service tool).
Part No. of adjusting shim Grade number Measuring dimension L mm (in)
16614 8H800 0.5 t 39.23 - 39.77 (1.5445 - 1.5657)
16614 8H810 1.0 t 38.76 - 39.23 (1.5260 - 1.5445)
16614 8H860 1.2 t 38.57 - 38.76 (1.5185 - 1.5260)
16614 8H820 1.6 t 38.18 - 38.57 (1.5031 - 1.5185)
MBIA0016E
PBIC2438E
PBIC2405E
MBIA0049E
Page 219 of 4179
![NISSAN X-TRAIL 2003 Service Repair Manual FUEL PUMP
EM-167
[YD22DDTi]
C
D
E
F
G
H
I
J
K
L
MA
EM
11. Using the hexagon wrench (special service tool), tighten the
sprocket tightening bolt.
�When the washer of the fuel pump sprocket is removed](/manual-img/5/57404/w960_57404-218.png "NISSAN X-TRAIL 2003 Service Repair Manual FUEL PUMP
EM-167
[YD22DDTi]
C
D
E
F
G
H
I
J
K
L
MA
EM
11. Using the hexagon wrench (special service tool), tighten the
sprocket tightening bolt.
�When the washer of the fuel pump sprocket is removed")
FUEL PUMP
EM-167
[YD22DDTi]
C
D
E
F
G
H
I
J
K
L
MA
EM
11. Using the hexagon wrench (special service tool), tighten the
sprocket tightening bolt.
�When the washer of the fuel pump sprocket is removed,
install it with the marking “F” (front) facing the front of the
engine.
12. Pull out the positioning stopper pin (special service tool).
13. Install secondary timing chain. Refer to EM-180, "
Removal and Installation" .
14. Following steps below, install injection tube center. Refer to EM-157, "
INJECTION TUBE AND FUEL
INJECTOR" .
a. Pre-set clip and insert rubber to injection tube center.
b. Pre-tight nut of injection tube center to fuel pump and fuel rail by hand. (until seal surface touched)
c. Adjust clip dimension and tight bolt for clip to intake manifold by tool.
d. Tight nut of injection tube center to fuel pump by tool.
e. Tight nut of injection tube center to fuel rail by tool.
15. Connect the harness connector to fuel pump.
16. Install fuel hoses.
17. Hereafter, install in the reverse order of removal.
PBIC2404E
Page 220 of 4179
EM-168
[YD22DDTi]
ROCKER COVER
ROCKER COVERPFP:13264
Removal and InstallationEBS00LRQ
REMOVAL
1. Remove charge air cooler. Refer to EM-135, "Removal and Installation" .
2. Disconnect harness connector from fuel injector. Refer to EM-157, "
INJECTION TUBE AND FUEL INJEC-
TOR" .
3. Following steps below, remove injection tube. Refer to EM-157, "
INJECTION TUBE AND FUEL INJEC-
TOR" .
a. Put a paint mark or tag on injection tubes to identify each cylinder.
�Use a fuel-resistant method.
b. Remove injection tubes in order of 2-1-4-3 individually.
CAUTION:
Be careful not to allow leaked fuel to contaminate engine room. Especially, ensure to keep engine
mounting insulator clear of fuel.
4. Remove injection nozzle oil seal.
�Using the flat-bladed screwdriver, pry flange to remove nozzle
oil seal.
1. Nozzle oil seal 2. Oil filler cap 3. Gasket
4. Rocker cover 5. Washer
PBIC2318E
PBIC0944E
![NISSAN X-TRAIL 2003 Service Repair Manual EM-158
[YD22DDTi]
INJECTION TUBE AND FUEL INJECTOR
b. Remove injection tubes in order of 2-1-4-3 individually.
CAUTION:
Be careful not to allow leaked fuel to contaminate engine
room. Especially, en](/manual-img/5/57404/w960_57404-209.png "NISSAN X-TRAIL 2003 Service Repair Manual EM-158
[YD22DDTi]
INJECTION TUBE AND FUEL INJECTOR
b. Remove injection tubes in order of 2-1-4-3 individually.
CAUTION:
Be careful not to allow leaked fuel to contaminate engine
room. Especially, en")
![NISSAN X-TRAIL 2003 Service Repair Manual EM-164
[YD22DDTi]
FUEL PUMP
15. Using the extension bar and the TORX socket (size: E10),
remove the tightening bolts.
CAUTION:
Do not disassemble or adjust fuel pump.
16. Remove the fuel pump toward](/manual-img/5/57404/w960_57404-215.png "NISSAN X-TRAIL 2003 Service Repair Manual EM-164
[YD22DDTi]
FUEL PUMP
15. Using the extension bar and the TORX socket (size: E10),
remove the tightening bolts.
CAUTION:
Do not disassemble or adjust fuel pump.
16. Remove the fuel pump toward")
![NISSAN X-TRAIL 2003 Service Repair Manual EM-168
[YD22DDTi]
ROCKER COVER
ROCKER COVERPFP:13264
Removal and InstallationEBS00LRQ
REMOVAL
1. Remove charge air cooler. Refer to EM-135, "Removal and Installation" .
2. Disconnect harness connect](/manual-img/5/57404/w960_57404-219.png "NISSAN X-TRAIL 2003 Service Repair Manual EM-168
[YD22DDTi]
ROCKER COVER
ROCKER COVERPFP:13264
Removal and InstallationEBS00LRQ
REMOVAL
1. Remove charge air cooler. Refer to EM-135, \"Removal and Installation\" .
2. Disconnect harness connect")