2003 NISSAN X-TRAIL heater
[x] Cancel search: heaterPage 2371 of 3066
![NISSAN X-TRAIL 2003 Electronic Repair Manual INSTRUMENT PANEL ASSEMBLY
IP-5
C
D
E
F
G
H
J
K
L
MA
B
IP
Removal and InstallationEIS0 00 NI
TA B L E O F W O R K I T E M
[ ]: The number shows the removal order.
ComponentsInstrument
panelCombination](/manual-img/5/57402/w960_57402-2370.png "NISSAN X-TRAIL 2003 Electronic Repair Manual INSTRUMENT PANEL ASSEMBLY
IP-5
C
D
E
F
G
H
J
K
L
MA
B
IP
Removal and InstallationEIS0 00 NI
TA B L E O F W O R K I T E M
[ ]: The number shows the removal order.
ComponentsInstrument
panelCombination")
INSTRUMENT PANEL ASSEMBLY
IP-5
C
D
E
F
G
H
J
K
L
MA
B
IP
Removal and InstallationEIS0 00 NI
TA B L E O F W O R K I T E M
[ ]: The number shows the removal order.
ComponentsInstrument
panelCombination
meterNavigation
DisplayAudio
Console
Up Down
Front speaker grille [1]
Instrument finisher A, B [2] [1]
Cup holder [3]
Instrument cluster lid A [4] [2]
Combination meter [5] [3]
Pocket [6]
Key cylinder escutcheon and steer-
ing column cover[7]
Instrument lower driver panel [8]
Mirror control switch [9]
GPS antenna [10]
Cluster lid C [11] [1] [1]
Audio unit and pocket [12] [2] [2]
Cluster lid finisher [13] [1] [1]
Heater control finisher [14] [2]
CD auto–changer and pocket [15] [3]
Heater controller [16]
A/T(M/T,CVT) finisher [17] [2]
Console mask [18] [3]
Center console [19] [4]
Lower instrument cover [20]
instrument lower center panel [21]
Glove box [22]
Lower instrument panel [23]
Glove box cover [24]
Front passenger air bag module [25]
Instrument reinforcement [26]
Instrument mask [27]
Front pillar garnish [28]
Instrument panel [29]
Page 2374 of 3066

IP-8
INSTRUMENT PANEL ASSEMBLY
A/T OR M/T FINISHER
1. Insert a screwdriver, wrapped with a shop cloth, into cutout on
rear edge of finisher, and lift up to unfasten clip on rear edge of
side face.
2. Pull forward and remove.
CENTER CONSOLE
1. Remove screws.
2. Remove console mask, and remove center console.
CD AUTO–CHANGER AND POCKET
lRemove screws. Disconnect and remove connector.
NOTE:
During removal or installation, use shop cloth to protect surrounding area from damage.
HEATER CONTROL FINISHER
lInsert a screwdriver or similar tool, wrapped with a shop cloth,
into lower edge (clip position). Unfasten and remove clip.
HEATER CONTROLLER
lRemove mounting screws on heater controller.Disconnect remove connector.
LOWER INSTRUMENT COVER
lUnfasten resin clips, and pull toward vehicle rear.
INSTRUMENT LOWER CENTER PANEL
lUndo and remove screws.
SIIA0233E
SIIA0235E
SIIA0236E
Page 2443 of 3066
![NISSAN X-TRAIL 2003 Electronic Repair Manual ILLUMINATION
LT-45
C
D
E
F
G
H
I
J
L
MA
B
LT
ILLUMINATIONPFP:27545
System DescriptionEKS003C7
Power is supplied at all times
lthrough 10A fuse [No. 31, located in the fuse and fusible link box]
lto li](/manual-img/5/57402/w960_57402-2442.png "NISSAN X-TRAIL 2003 Electronic Repair Manual ILLUMINATION
LT-45
C
D
E
F
G
H
I
J
L
MA
B
LT
ILLUMINATIONPFP:27545
System DescriptionEKS003C7
Power is supplied at all times
lthrough 10A fuse [No. 31, located in the fuse and fusible link box]
lto li")
ILLUMINATION
LT-45
C
D
E
F
G
H
I
J
L
MA
B
LT
ILLUMINATIONPFP:27545
System DescriptionEKS003C7
Power is supplied at all times
lthrough 10A fuse [No. 31, located in the fuse and fusible link box]
lto lighting switch terminal 11.
The lighting switch must be in the 1ST or 2ND position for illumination.
The following chart shows the power and ground connector terminals for the components included in the illu-
mination system.
Component Connector No. Power terminal Ground terminal
Headlamp washier switch M23 3 4
Headlamp aiming switch M24 3 4
Door mirror remote control
switchM26 10 1
VDC off switch M25 3 4
Hazard switch M51 7 8
4WD mode switch M39 4 3
Rear window defogger switch M50 5 6
A/C auto amp. M52 12 11
Combination meter
(LHD models)M46 56 66
Combination meter
(RHD models)M46 45 56
Audio M42 2 1
CD auto changer M82 34 35
Heater control panel M55 2 6
A/T device M58 3 4
Cigarette lighter M56 3 2
Heated seat switch LH
(LHD models)B131 5 6
Heated seat switch RH
(LHD models)B132 5 6
Heated seat switch LH
(RHD models)B35 5 6
Heated seat switch RH
(RHD models)B34 5 6
Page 2513 of 3066
ENGINE MAINTENANCE (QR20DE)
MA-21
C
D
E
F
G
H
I
J
K
MA
B
MA
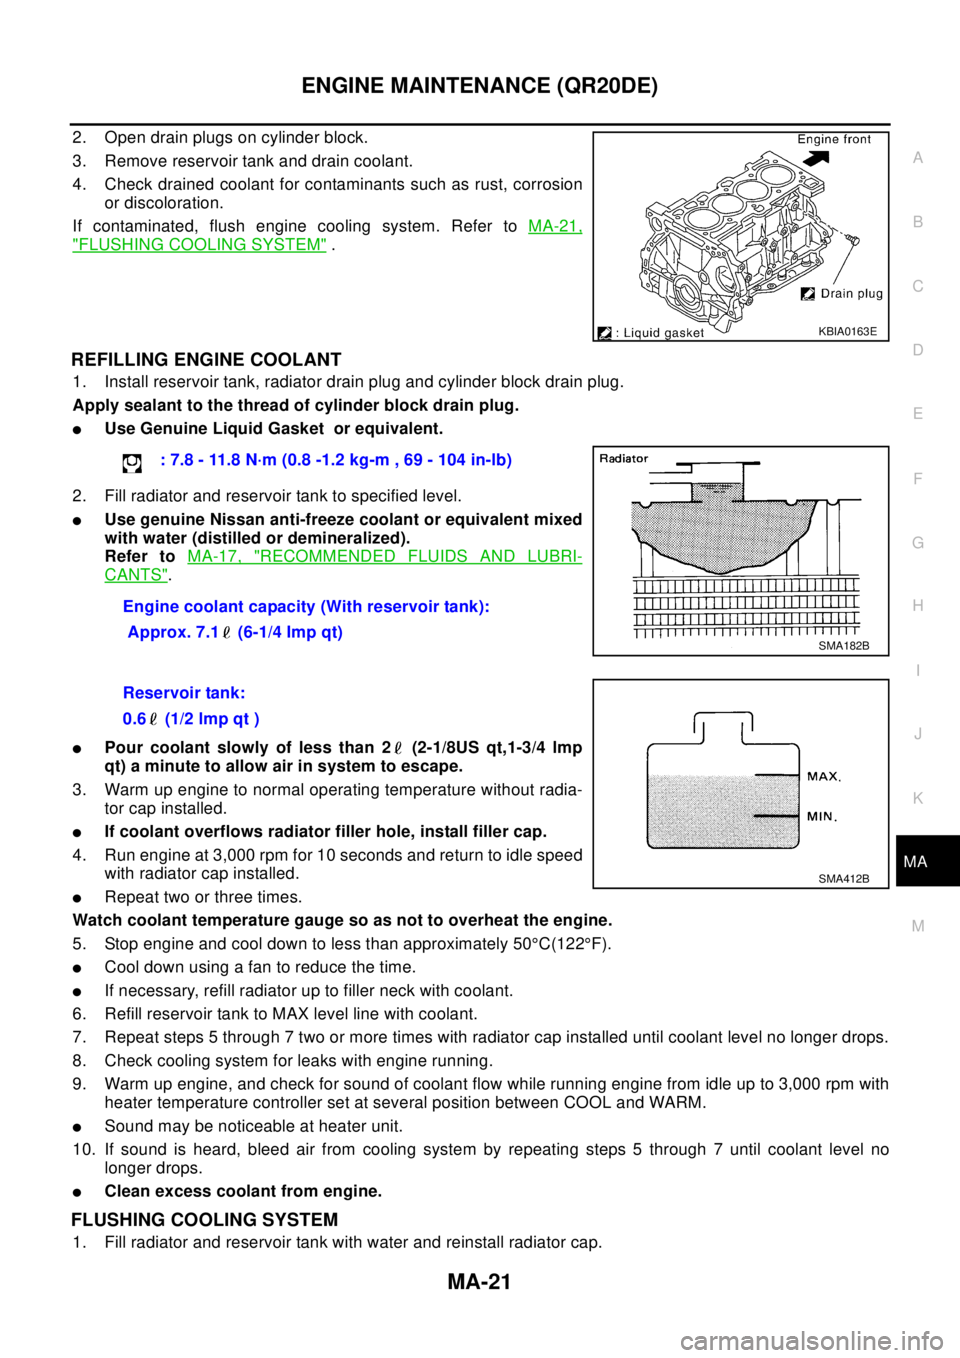
2. Open drain plugs on cylinder block.
3. Remove reservoir tank and drain coolant.
4. Check drained coolant for contaminants such as rust, corrosion
or discoloration.
If contaminated, flush engine cooling system. Refer toMA-21,
"FLUSHING COOLING SYSTEM".
REFILLING ENGINE COOLANT
1. Install reservoir tank, radiator drain plug and cylinder block drain plug.
Apply sealant to the thread of cylinder block drain plug.
lUse Genuine Liquid Gasket or equivalent.
2. Fill radiator and reservoir tank to specified level.
lUse genuine Nissan anti-freeze coolant or equivalent mixed
with water (distilled or demineralized).
Refer toMA-17, "
RECOMMENDED FLUIDS AND LUBRI-
CANTS".
lPour coolant slowly of less than 2 (2-1/8US qt,1-3/4 lmp
qt) a minute to allow air in system to escape.
3. Warm up engine to normal operating temperature without radia-
tor cap installed.
lIf coolant overflows radiator filler hole, install filler cap.
4. Run engine at 3,000 rpm for 10 seconds and return to idle speed
with radiator cap installed.
lRepeat two or three times.
Watch coolant temperature gauge so as not to overheat the engine.
5. Stop engine and cool down to less than approximately 50°C(122°F).
lCool down using a fan to reduce the time.
lIf necessary, refill radiator up to filler neck with coolant.
6. Refill reservoir tank to MAX level line with coolant.
7. Repeat steps 5 through 7 two or more times with radiator cap installed until coolant level no longer drops.
8. Check cooling system for leaks with engine running.
9. Warm up engine, and check for sound of coolant flow while running engine from idle up to 3,000 rpm with
heater temperature controller set at several position between COOL and WARM.
lSound may be noticeable at heater unit.
10. If sound is heard, bleed air from cooling system by repeating steps 5 through 7 until coolant level no
longer drops.
lClean excess coolant from engine.
FLUSHING COOLING SYSTEM
1. Fill radiator and reservoir tank with water and reinstall radiator cap.
KBIA0163E
: 7.8 - 11.8 N·m (0.8 -1.2 kg-m , 69 - 104 in-lb)
Engine coolant capacity (With reservoir tank):
Approx. 7.1 (6-1/4 Imp qt)
SMA182B
Reservoir tank:
0.6 (1/2 lmp qt )
SMA412B
Page 2521 of 3066
ENGINE MAINTENANCE (YD22DDTI)
MA-29
C
D
E
F
G
H
I
J
K
MA
B
MA
10. Warm up engine, and check for sound of coolant flow while running engine from idle up to 3,000 rpm with
heater temperature controller set at several position between COOL and WARM.
lSound may be noticeable at heater unit.
11. If sound is heard, bleed air from cooling system by repeating steps 5 through 7 until coolant level no
longer drops.
lClean excess coolant from engine.
FLUSHING COOLING SYSTEM
1. Fill radiator with water until water spills from the air relief hole, then close air relief flag. Fill radiator and
reservoir tank with water and reinstall radiator cap.
2. Run engine and warm it up to normal operating temperature.
3. Rev engine two or three times under no-load.
4. Stop engine and wait until it cools down.
5. Drain water.
6. Repeat steps 1 through 5 until clear water begins to drain from radiator.
Checking Cooling SystemELS000C4
WA RN ING:
Never remove the radiator cap when the engine is hot. Serious burns could occur from high pressure
coolant escaping from the radiator. Wrap a thick cloth around the cap. Slowly turn it a quarter turn to
allow built-up pressure to escape. Carefully remove the cap by turning it all the way.
CHECKING COOLING SYSTEM HOSES
Check hoses for improper attachment, leaks, cracks, damage, loose connections, chafing and deterioration.
CHECKING RADIATOR
Check radiator for mud or clogging. If necessary, clean radiator as follows.
lBe careful not to bend or damage the radiator fins.
lWhen radiator is cleaned without removal, remove all surrounding parts such as cooling fan, radiator
shroud and horns. Then tape the harness and connectors to prevent water from entering.
1. Apply water by hose to the back side of the radiator core vertically downwards.
2. Apply water again to all radiator core surface once per minute.
3. Stop washing if any stains no longer flow out from the radiator.
4. Blow air into the back side of radiator core vertically downwards.
lUse compressed air lower than 490 kpa (5 kg/cm2, 71psi) and keep distance more than 30 cm(11.8 in).
5. Blow air again into all the radiator core surface once per minute until no water sprays out.
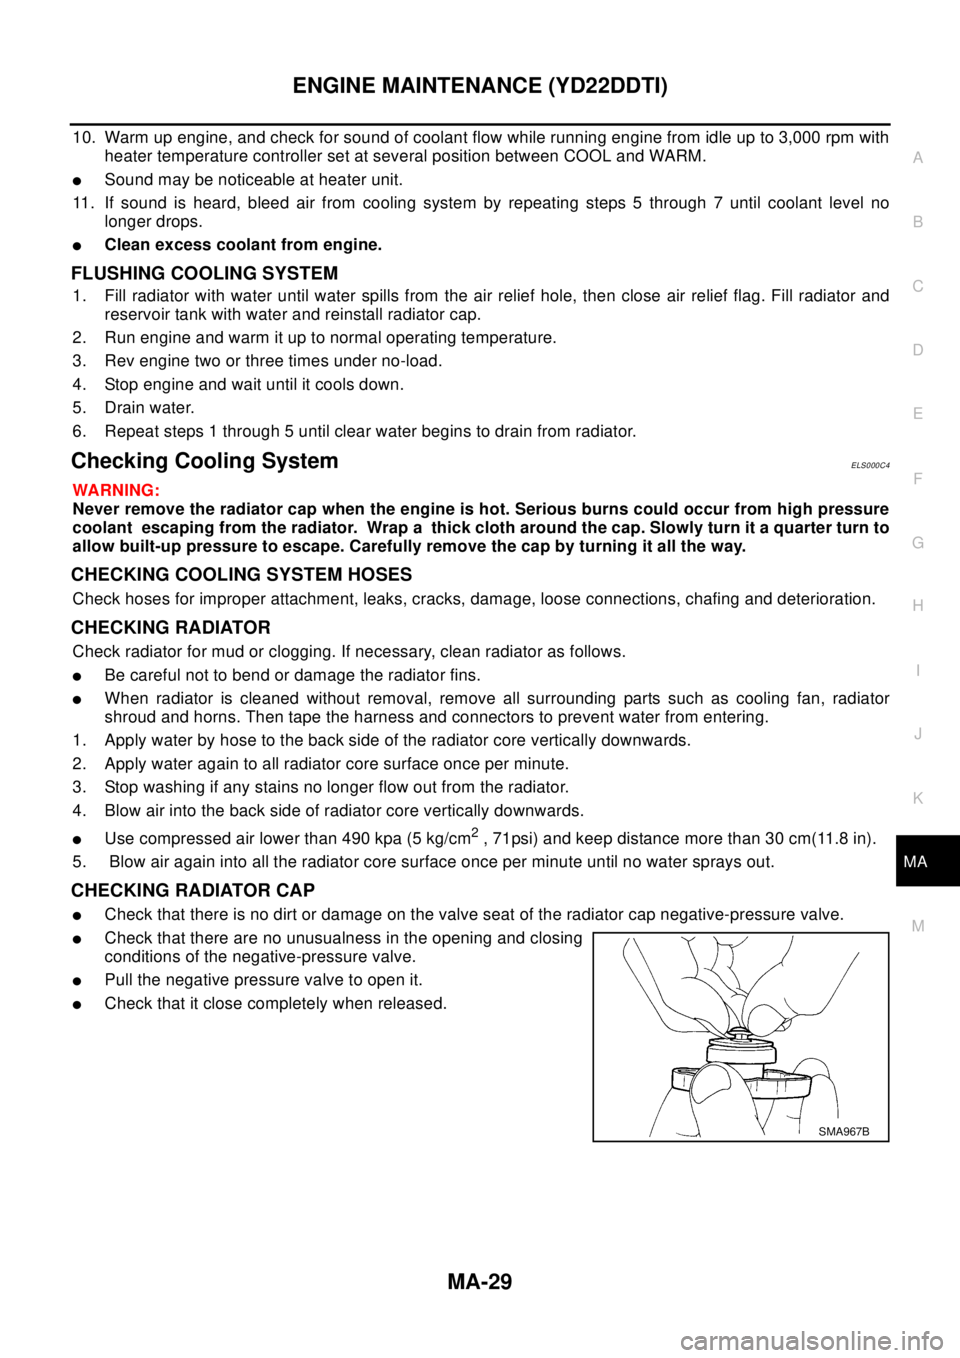
CHECKING RADIATOR CAP
lCheck that there is no dirt or damage on the valve seat of the radiator cap negative-pressure valve.
lCheck that there are no unusualness in the opening and closing
conditions of the negative-pressure valve.
lPull the negative pressure valve to open it.
lCheck that it close completely when released.
SMA967B
Page 2637 of 3066

MTC-1
MANUAL AIR CONDITIONER
J AIR CONDITIONER
CONTENTS
C
D
E
F
G
H
I
K
L
M
SECTION
A
B
MTC
MANUAL AIR CONDITIONER
PRECAUTIONS .......................................................... 2
Precautions for Supplemental Restraint System
(SRS) “AIR BAG” and “SEAT BELT PRE-TEN-
SIONER” .................................................................. 2
Wiring Diagrams and Trouble Diagnosis .................. 2
TROUBLE DIAGNOSIS .............................................. 3
How to Perform Trouble Diagnoses for Quick and
Accurate Repair ....................................................... 3
WORK FLOW ........................................................ 3
SYMPTOM TABLE ................................................ 3
Component Parts and Harness Connector Location..... 4
PASSENGER COMPARTMENT ........................... 4
Discharge Air Flow ................................................... 5
Wiring Diagram-HEATER ......................................... 6
Operational Check ................................................... 7
CHECKING BLOWER ........................................... 7
CHECKING DISCHARGE AIR .............................. 7
CHECKING RECIRCULATION ............................. 7
CHECKING TEMPERATURE DECREASE .......... 8
CHECKING TEMPERATURE INCREASE ............ 8
Mode Door ............................................................... 8
Air Mix Door ............................................................. 9
Intake Door Motor Circuit ....................................... 10
INSPECTION FLOW ............................................11
COMPONENT DESCRIPTION ............................11
DIAGNOSTIC PROCEDURE ...............................11
Blower Motor Circuit ............................................... 13
INSPECTION FLOW ........................................... 14
DIAGNOSTIC PROCEDURE .............................. 14
COMPONENT INSPECTION .............................. 17
Insufficient Heating ................................................. 17
INSPECTION FLOW ........................................... 18CONTROLLER .......................................................... 19
Removal and Installation ........................................ 19
Disassembly and Assembly .................................... 19
BLOWER MOTOR .................................................... 20
Removal and Installation ........................................ 20
BLOWER FAN RESISTOR ....................................... 21
Removal and Installation ........................................ 21
INTAKE DOOR MOTOR ........................................... 22
Removal and Installation ........................................ 22
HEATER UNIT ........................................................... 23
Removal and Installation ........................................ 23
REMOVAL ........................................................... 23
INSTALLATION ................................................... 24
Disassembly and Assembly .................................... 24
HEATER CORE ......................................................... 26
Removal and Installation ........................................ 26
MODE DOOR ............................................................ 27
Control Linkage adjustment .................................... 27
MODE DOOR CONTROL CABLE ....................... 27
AIR MIX DOOR ......................................................... 28
Control Linkage Adjustment ................................... 28
AIR MIX DOOR CONTROL CABLE .................... 28
DUCTS AND GRILLES ............................................. 29
Removal and Installation ........................................ 29
Ventilator Duct, Defroster Nozzle and Defroster
Ducts ...................................................................... 29
Center Ventilator Grille ........................................... 29
Side Ventilator Grille ............................................... 29
Foot Duct ................................................................ 30
Floor duct ................................................................ 30
Page 2642 of 3066

MTC-6
TROUBLE DIAGNOSIS
Wiring Diagram-HEATER
EJS001FD
TJWA0009E
Page 2648 of 3066
MTC-12
TROUBLE DIAGNOSIS
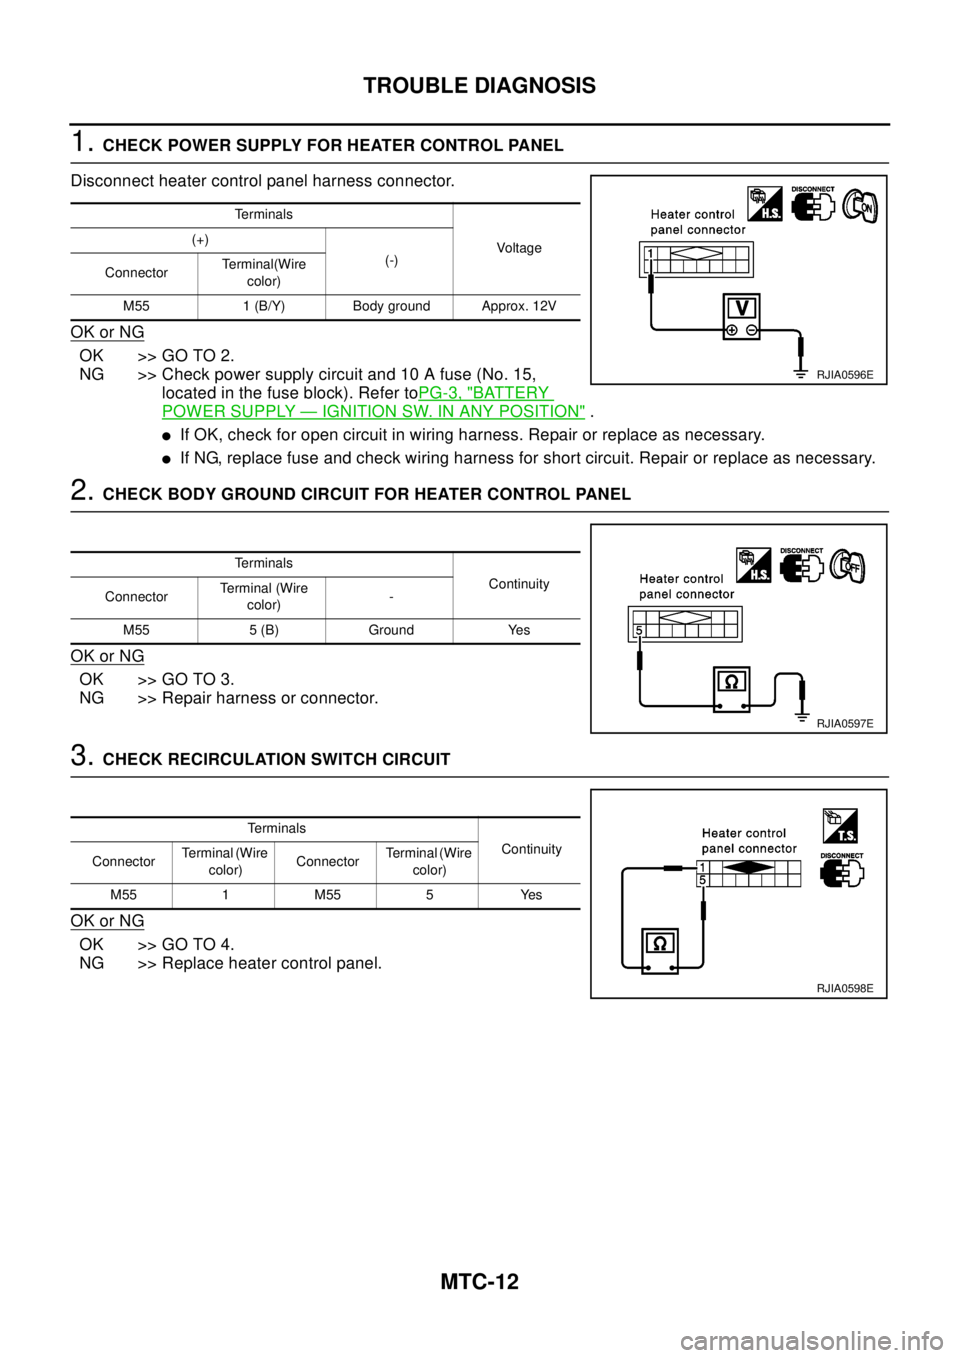
1.CHECK POWER SUPPLY FOR HEATER CONTROL PANEL
Disconnect heater control panel harness connector.
OK or NG
OK >> GO TO 2.
NG >> Check power supply circuit and 10 A fuse (No. 15,
located in the fuse block). Refer toPG-3, "
BATTERY
POWER SUPPLY—IGNITION SW. IN ANY POSITION".
lIf OK, check for open circuit in wiring harness. Repair or replace as necessary.
lIf NG, replace fuse and check wiring harness for short circuit. Repair or replace as necessary.
2.CHECKBODYGROUNDCIRCUITFORHEATERCONTROLPANEL
OK or NG
OK >> GO TO 3.
NG >> Repair harness or connector.
3.CHECK RECIRCULATION SWITCH CIRCUIT
OK or NG
OK >> GO TO 4.
NG >> Replace heater control panel.
Te r m i n a l s
Vo ltag e (+)
(-)
ConnectorTerminal(Wire
color)
M55 1 (B/Y) Body ground Approx. 12V
RJIA0596E
Te r m i n a l s
Continuity
ConnectorTerminal (Wire
color)-
M55 5 (B) Ground Yes
RJIA0597E
Te r m i n a l s
Continuity
ConnectorTerminal (Wire
color)ConnectorTerminal (Wire
color)
M55 1 M55 5 Yes
RJIA0598E