Page 78 of 3502
AT-70
TROUBLE DIAGNOSIS
HOW TO ERASE SELF-DIAGNOSTIC RESULTS
1. Touch “SELF-DIAG RESULTS” on “SELECT DIAG MODE”
screen.
2. Touch “ERASE”. (The self-diagnostic results will be erased.)
DATA MONITOR MODE
Operation Procedure
1. Touch “DATA MONITOR” on “SELECT DIAG MODE” screen.
NOTE:
When malfunction is detected, CONSULT-II performs
“REAL-TIME DIAGNOSIS”. Also, any malfunction detected
while in this mode will be displayed at real time.
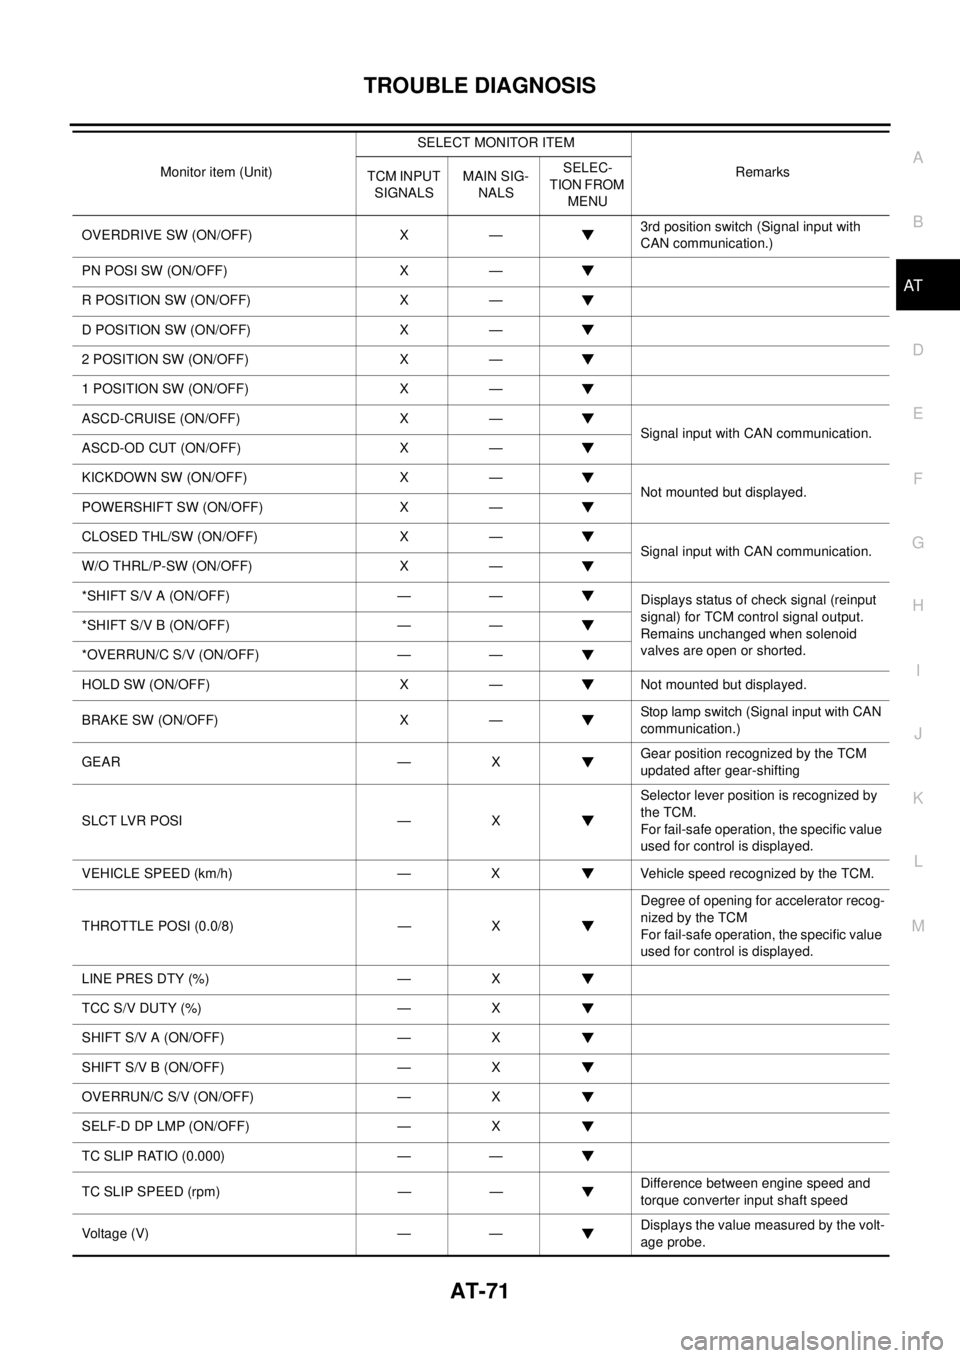
Display Items List
X: Standard, —: Not applicable, : Option
BCIA0031E
SCIA4849E
BCIA0031E
Monitor item (Unit)SELECT MONITOR ITEM
Remarks
TCM INPUT
SIGNALSMAIN SIG-
NALSSELEC-
TION FROM
MENU
VHCL/S SE-A/T (km/h) X — Revolution sensor
VHCL/S SE-MTR (km/h) X —Vehicle speed display may not be accu-
rate under approx. 10 km/h (6 mph). It
may not indicate 0 km/h (0 mph) when
vehicle is stationary.
THRTL POS SEN (V) X —
FLUID TEMP SE (V) X —
BATTERY VOLT (V) X —
ENGINE SPEED (rpm) X X
TURBINE REV (rpm) X —
Page 79 of 3502

TROUBLE DIAGNOSIS
AT-71
D
E
F
G
H
I
J
K
L
MA
B
AT
OVERDRIVE SW (ON/OFF) X —3rd position switch (Signal input with
CAN communication.)
PN POSI SW (ON/OFF) X —
R POSITION SW (ON/OFF) X —
D POSITION SW (ON/OFF) X —
2 POSITION SW (ON/OFF) X —
1 POSITION SW (ON/OFF) X —
ASCD-CRUISE (ON/OFF) X —
Signal input with CAN communication.
ASCD-OD CUT (ON/OFF) X —
KICKDOWN SW (ON/OFF) X —
Not mounted but displayed.
POWERSHIFT SW (ON/OFF) X —
CLOSED THL/SW (ON/OFF) X —
Signal input with CAN communication.
W/O THRL/P-SW (ON/OFF) X —
*SHIFT S/V A (ON/OFF) — —
Displays status of check signal (reinput
signal) for TCM control signal output.
Remains unchanged when solenoid
valves are open or shorted. *SHIFT S/V B (ON/OFF) — —
*OVERRUN/C S/V (ON/OFF) — —
HOLD SW (ON/OFF) X — Not mounted but displayed.
BRAKE SW (ON/OFF) X —Stop lamp switch (Signal input with CAN
communication.)
GEAR — XGear position recognized by the TCM
updated after gear-shifting
SLCT LVR POSI — XSelector lever position is recognized by
the TCM.
For fail-safe operation, the specific value
used for control is displayed.
VEHICLE SPEED (km/h) — X Vehicle speed recognized by the TCM.
THROTTLE POSI (0.0/8) — XDegree of opening for accelerator recog-
nized by the TCM
For fail-safe operation, the specific value
used for control is displayed.
LINE PRES DTY (%) — X
TCC S/V DUTY (%) — X
SHIFT S/V A (ON/OFF) — X
SHIFT S/V B (ON/OFF) — X
OVERRUN/C S/V (ON/OFF) — X
SELF-D DP LMP (ON/OFF) — X
TC SLIP RATIO (0.000) — —
TC SLIP SPEED (rpm) — —Difference between engine speed and
torque converter input shaft speed
Voltage (V) — —Displays the value measured by the volt-
age probe. Monitor item (Unit)SELECT MONITOR ITEM
Remarks
TCM INPUT
SIGNALSMAIN SIG-
NALSSELEC-
TION FROM
MENU
Page 84 of 3502

AT-76
TROUBLE DIAGNOSIS
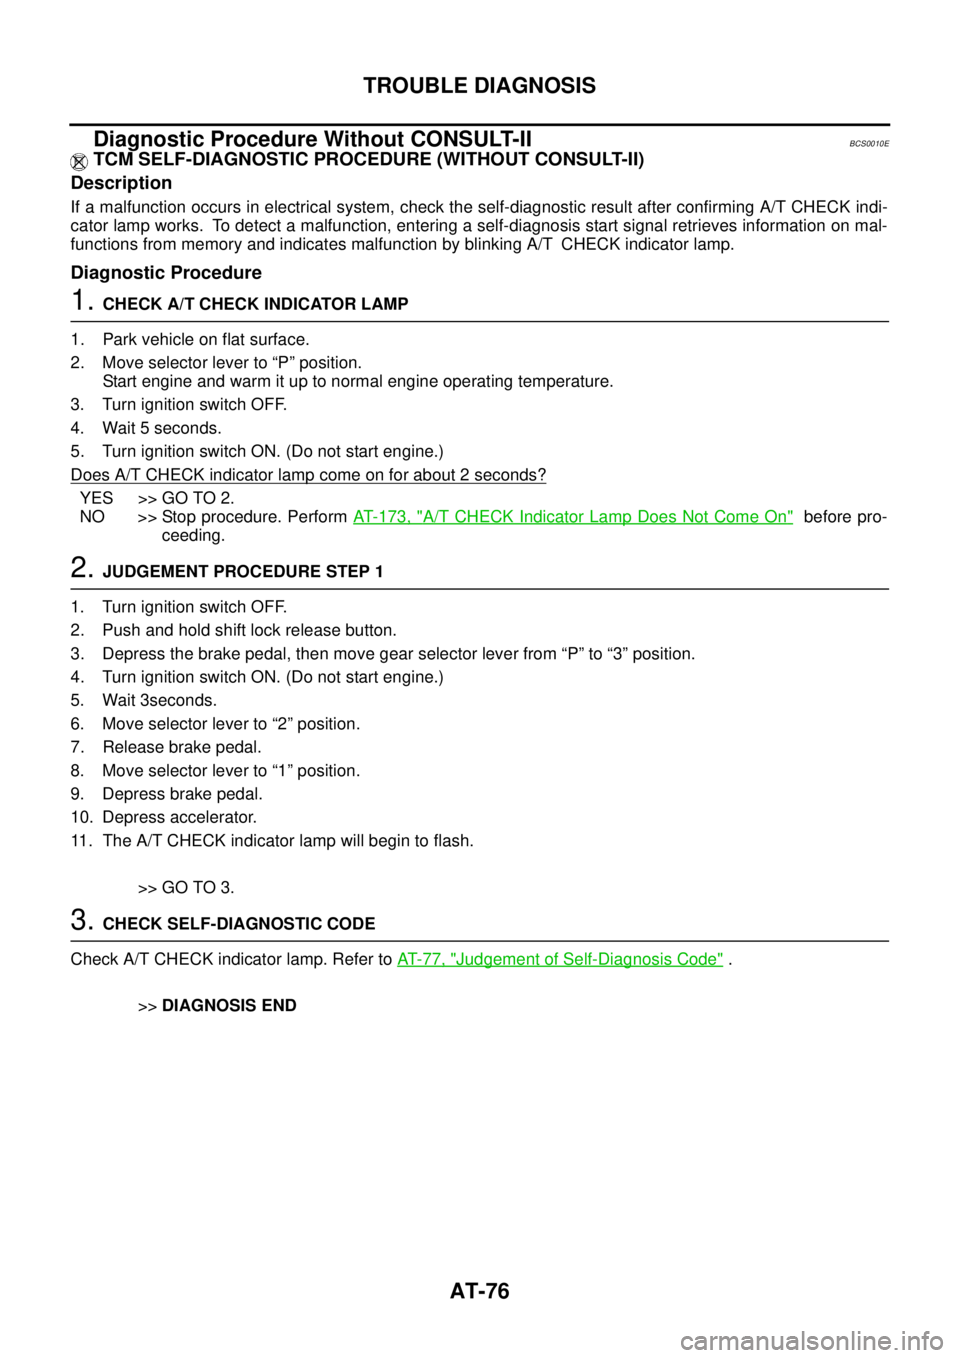
Diagnostic Procedure Without CONSULT-IIBCS0010E
TCM SELF-DIAGNOSTIC PROCEDURE (WITHOUT CONSULT-II)
Description
If a malfunction occurs in electrical system, check the self-diagnostic result after confirming A/T CHECK indi-
cator lamp works. To detect a malfunction, entering a self-diagnosis start signal retrieves information on mal-
functions from memory and indicates malfunction by blinking A/T CHECK indicator lamp.
Diagnostic Procedure
1. CHECK A/T CHECK INDICATOR LAMP
1. Park vehicle on flat surface.
2. Move selector lever to “P” position.
Start engine and warm it up to normal engine operating temperature.
3. Turn ignition switch OFF.
4. Wait 5 seconds.
5. Turn ignition switch ON. (Do not start engine.)
Does A/T CHECK indicator lamp come on for about 2 seconds?
YES >> GO TO 2.
NO >> Stop procedure. Perform AT- 1 7 3 , "
A/T CHECK Indicator Lamp Does Not Come On" before pro-
ceeding.
2. JUDGEMENT PROCEDURE STEP 1
1. Turn ignition switch OFF.
2. Push and hold shift lock release button.
3. Depress the brake pedal, then move gear selector lever from “P” to “3” position.
4. Turn ignition switch ON. (Do not start engine.)
5. Wait 3seconds.
6. Move selector lever to “2” position.
7. Release brake pedal.
8. Move selector lever to “1” position.
9. Depress brake pedal.
10. Depress accelerator.
11. The A/T CHECK indicator lamp will begin to flash.
>> GO TO 3.
3. CHECK SELF-DIAGNOSTIC CODE
Check A/T CHECK indicator lamp. Refer to AT- 7 7 , "
Judgement of Self-Diagnosis Code" .
>>DIAGNOSIS END
Page 86 of 3502
AT-78
TROUBLE DIAGNOSIS
7th judgement flicker is longer than others.
Torque converter clutch solenoid valve circuit is short-circuited or
disconnected.
� Go to AT- 1 0 5 , "
TORQUE CONVERTER CLUTCH SOLENOID
VA LV E" .8th judgement flicker is longer than others.
A/T fluid temperature sensor is disconnected or TCM power
source circuit is damaged.
� Go to AT-110, "
BATT/FLUID TEMP SEN (A/T FLUID TEMP
SENSOR CIRCUIT AND TCM POWER SOURCE)" .
9th judgement flicker is longer than others.
Engine speed signal circuit is short-circuited or disconnected.
� Go to AT- 11 6 , "
ENGINE SPEED SIGNAL" .10th judgement flicker is longer than others.
Turbine revolution sensor (power train revolution sensor) circuit is
short-circuited or disconnected.
� Go to AT-120, "
TURBINE REVOLUTION SENSOR" . A/T CHECK indicator lamp:
SCIA3237ESCIA3238E
SCIA3239ESCIA3240E
Page 88 of 3502

AT-80
VEHICLE SPEED SENSOR·A/T (REVOLUTION SENSOR)
VEHICLE SPEED SENSOR·A/T (REVOLUTION SENSOR)PFP:32702
DescriptionBCS0010F
The revolution sensor detects the revolution of the idler gear parking pawl lock gear and emits a pulse signal.
The pulse signal is sent to the TCM which converts it into vehicle speed.
CONSULT-II Reference ValueBCS0010G
On Board Diagnosis LogicBCS0010H
Diagnostic trouble code “VHCL SPEED SEN-A/T” with CONSULT-II or 1st judgement flicker without CON-
SULT-II is detected when TCM does not receive the proper voltage signal from the sensor.
Possible CauseBCS0010I
�Harness or connector
(Sensor circuit is open or shorted.)
�Revolution sensor
DTC Confirmation ProcedureBCS0010J
CAUTION:
�Always drive vehicle at a safe speed.
�Be careful not to rev engine into the red zone on the tachometer.
�If performing this “DTC Confirmation Procedure” again, always turn ignition switch OFF and wait
at least 10 seconds before continuing.
After the repair, perform the following procedure to confirm the malfunction is eliminated.
WITH CONSULT-II
1. Turn ignition switch ON and select “DATA MONITOR” mode for
“A/T” with CONSULT-II.
2. Drive vehicle and check for an increase of “VHCL/S SE-MTR”
value.
If the check result is NG, go to AT- 8 8 , "
Diagnostic Procedure" .
If the check result is OK, go to following step.
3. Select “DATA MONITOR” mode for “A/T” with CONSULT-II.
4. Start engine and maintain the following conditions for at least 5
consecutive seconds.
VEHICLE SPEED: 30 km/h (19 MPH) or more
THROTTLE POSI: More than 1.0/8
SLCT LVR POSI: “D” position
Driving location: Driving the vehicle uphill (increased engine load) will help maintain the driving
conditions required for this test.
If the check result is NG, go to AT- 8 3 , "
Diagnostic Procedure" .
If the check result is OK, go to following step.
5. Maintain the following conditions for at least 5 consecutive seconds.
ENGINE SPEED: 3,500 rpm or more
THROTTLE POSI: More than 1.0/8
SLCT LVR POSI: “D” position
Driving location: Driving the vehicle uphill (increased engine load) will help maintain the driving
conditions required for this test.
6. If DTC is detected, go to AT- 8 3 , "
Diagnostic Procedure" .
Item name Condition Display value
VHCL/S SE-A/T During driving Approximately matches the speedometer reading.
BCIA0031E
Page 89 of 3502
VEHICLE SPEED SENSOR·A/T (REVOLUTION SENSOR)
AT-81
D
E
F
G
H
I
J
K
L
MA
B
AT
WITHOUT CONSULT-II
1. Start engine.
2. Drive vehicle under the following conditions for more than 5 seconds.
Selector lever position: “D” position
Vehicle speed: 30 km/h (19 MPH) or more
Throttle position: greater than 1.0/8 of the full throttle position
3. Perform self-diagnosis. Refer to AT- 7 6 , "
Diagnostic Procedure Without CONSULT-II" .
4. If the check result is NG, go to AT- 8 3 , "
Diagnostic Procedure" .
Page 91 of 3502

VEHICLE SPEED SENSOR·A/T (REVOLUTION SENSOR)
AT-83
D
E
F
G
H
I
J
K
L
MA
B
AT
Data are reference value and are measured between each terminal and ground.
Diagnostic ProcedureBCS0010L
1. CHECK INPUT SIGNAL
With CONSULT-II
1. Start engine.
2. Select “TCM INPUT SIGNALS” in “DATA MONITOR” mode for “A/T” with CONSULT-II.
3. Read out the value of “VHCL/S SE-A/T” while driving.
Check the value changes according to driving speed.
OK or NG
OK >> GO TO 8.
NG >> GO TO 2.
2. CHECK REVOLUTION SENSOR
With CONSULT-II
1. Start engine.
2. Check power supply to revolution sensor by voltage between TCM connector terminals. Refer to AT- 1 5 8 ,
"Wiring Diagram — AT — MAIN" .
3. If OK check the pulse when vehicle cruises.
OK or NG
OK >> GO TO 8.
NG >> GO TO 3.
Terminal Wire color Item ConditionJudgement standard
(Approx.)
29 W/R Revolution sensorWhen moving at 20 km/h
(12 MPH)450 Hz
42 B Sensor ground Always 0 V
Item name Condition Display value
VHCL/S SE-A/T During drivingApproximately matches the speedometer
reading.
SCIA4730E
Item Connector TerminalJudgement standard
(Approx.)
TCM con-
nectorF10510 - 42
Battery voltage
19 - 42
Name Condition
Revolution sensorWhen moving at 20 km/h (12 MPH), use the CONSULT-II
pulse frequency measuring function.
CAUTION:
Connect the diagnosis data link cable to the data link
connector.
Item Connector Terminal Data (Approx.)
TCM connector F105 29 450 Hz
SCIA4939E
Page 92 of 3502

AT-84
VEHICLE SPEED SENSOR·A/T (REVOLUTION SENSOR)
3. CHECK POWER AND SENSOR GROUND
1. Turn ignition switch OFF.
2. Disconnect revolution sensor harness connector.
3. Turn ignition switch ON. (Do not start engine.)
4. Check voltage between revolution sensor harness connector
terminals.
5. Check voltage between revolution sensor harness connector
terminal and ground.
6. If OK, check harness for short to ground and short power.
7. Reinstall any part removed.
OK or NG
OK >> GO TO 4.
NG - 1 >> Battery voltage is not supplied between terminals 1 and 3, terminals 1 and ground: GO TO 6.
NG - 2 >> Battery voltage is not supplied between terminals 1 and 3 only: GO TO 7.
4. CHECK HARNESS BETWEEN TCM AND REVOLUTION SENSOR
1. Turn ignition switch OFF.
2. Disconnect TCM connector and revolution sensor harness connector.
3. Check continuity between TCM connector terminal and revolu-
tion sensor harness connector terminal.
4. If OK, check harness for short to ground and short power.
5. Reinstall any part removed.
OK or NG
OK >> GO TO 5.
NG >> Repair open circuit or short to ground or short to power in harness or connectors.
5. CHECK TCM
1. Check TCM input/output signals. Refer to AT- 6 4 , "
TCM Terminals and Reference Value" .
2. If NG, re-check TCM pin terminals for damage or loose connection with harness connector.
OK or NG
OK >> GO TO 8.
NG >> Repair or replace damaged parts.
Item Connector TerminalData
(Approx.)
Revolution sensor harness
connectorF15 1 - 3Battery volt-
age
SCIA5589E
Item Connector TerminalData
(Approx.)
Revolution sensor harness
connectorF15 1 - groundBattery volt-
age
SCIA5590E
Item Connector Terminal Continuity
TCM connector F105 29
Ye s
Revolution sensor harness
connectorF15 2
SCIA2616E