Page 2823 of 3502
FRONT FOG LAMP
LT-135
C
D
E
F
G
H
I
J
L
MA
B
LT
Front Fog Lamps Do Not Illuminate (Both Sides)BKS001P1
1. PERFORM IPDM E/R ACTIVE TEST
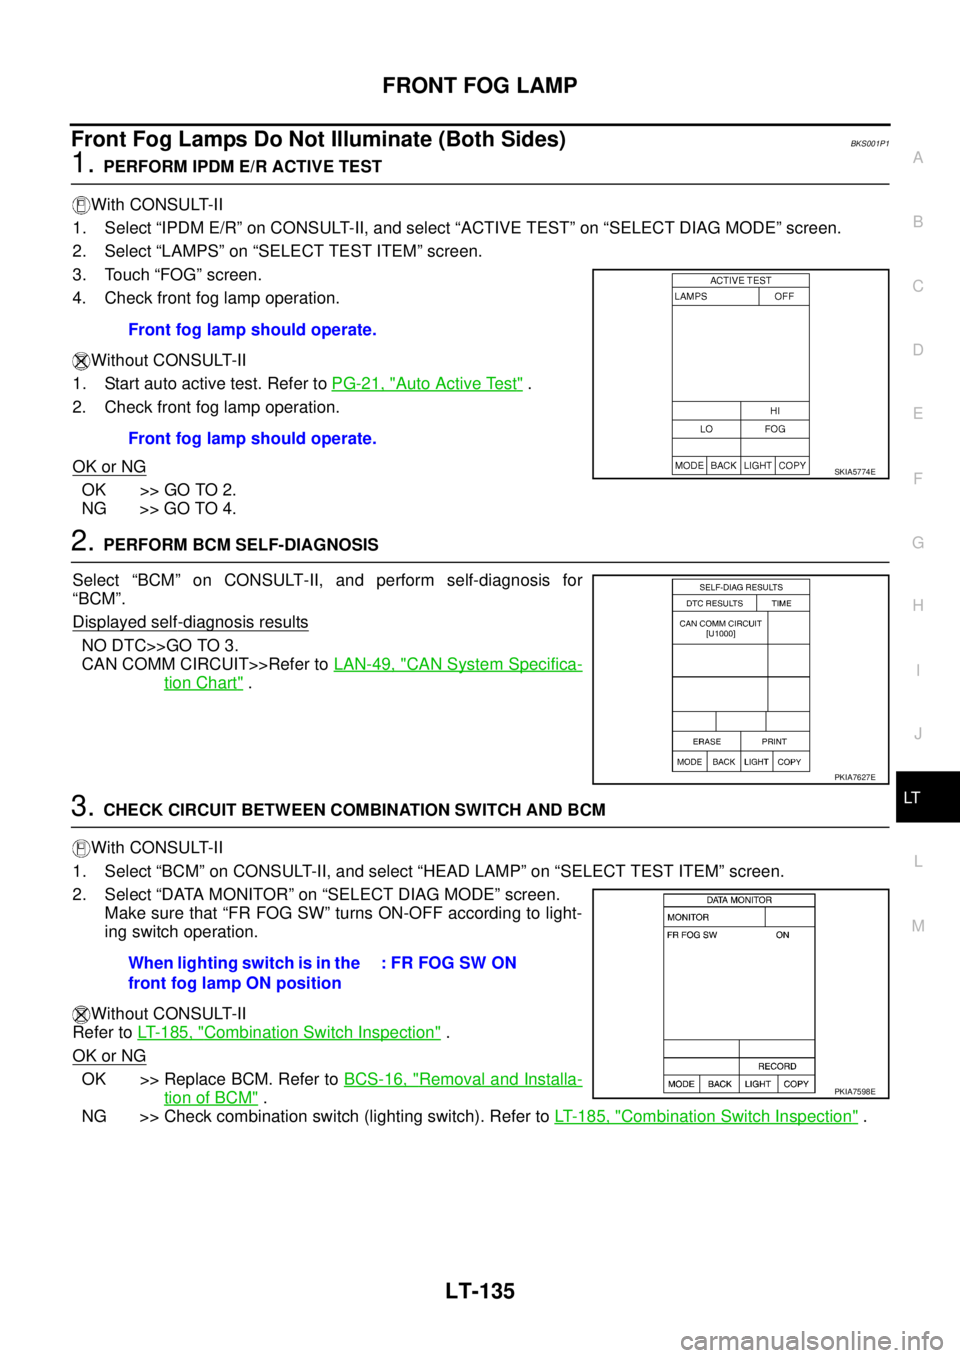
With CONSULT-II
1. Select “IPDM E/R” on CONSULT-II, and select “ACTIVE TEST” on “SELECT DIAG MODE” screen.
2. Select “LAMPS” on “SELECT TEST ITEM” screen.
3. Touch “FOG” screen.
4. Check front fog lamp operation.
Without CONSULT-II
1. Start auto active test. Refer to PG-21, "
Auto Active Test" .
2. Check front fog lamp operation.
OK or NG
OK >> GO TO 2.
NG >> GO TO 4.
2. PERFORM BCM SELF-DIAGNOSIS
Select “BCM” on CONSULT-II, and perform self-diagnosis for
“BCM”.
Displayed self
-diagnosis results
NO DTC>>GO TO 3.
CAN COMM CIRCUIT>>Refer to LAN-49, "
CAN System Specifica-
tion Chart" .
3. CHECK CIRCUIT BETWEEN COMBINATION SWITCH AND BCM
With CONSULT-II
1. Select “BCM” on CONSULT-II, and select “HEAD LAMP” on “SELECT TEST ITEM” screen.
2. Select “DATA MONITOR” on “SELECT DIAG MODE” screen.
Make sure that “FR FOG SW” turns ON-OFF according to light-
ing switch operation.
Without CONSULT-II
Refer to LT- 1 8 5 , "
Combination Switch Inspection" .
OK or NG
OK >> Replace BCM. Refer to BCS-16, "Removal and Installa-
tion of BCM" .
NG >> Check combination switch (lighting switch). Refer to LT- 1 8 5 , "
Combination Switch Inspection" . Front fog lamp should operate.
Front fog lamp should operate.
SKIA5774E
PKIA7627E
When lighting switch is in the
front fog lamp ON position: FR FOG SW ON
PKIA7598E
Page 2826 of 3502
LT-138
FRONT FOG LAMP
Front Fog Lamp Indicator Lamp Does Not IlluminateBKS001P3
1. CHECK UNIFIED METER AND A/C AMP.
1. Select “METER A/C AMP” on CONSULT-II, and perform self-
diagnosis for “METER A/C AMP”.
2. Check if malfunction is indicated.
Is malfunction indicated?
YES >> Repair or Replace malfunctioning parts.
NO >> GO TO 2.
2. CHECK COMBINATION METER INPUT SIGNAL
1. Select “METER A/C AMP” on CONSULT-II.
2. Select “DATA MONITOR” on “SELECT DIAG MODE” screen.
Make sure that “FR FOG IND” turns ON-OFF according to light-
ing switch operation.
OK or NG
OK >> Replace combination meter. Refer to DI-25, "Removal
and Installation of Combination Meter" .
NG >> Replace unified meter and A/C amp. Refer to DI-34,
"Removal and Installation of Unified Meter and A/C
Amp." .
PKIA6866E
When lighting switch is in the
front fog lamp ON position: FR FOG IND ON
PKID0089E
Page 2827 of 3502
FRONT FOG LAMP
LT-139
C
D
E
F
G
H
I
J
L
MA
B
LT
Front Fog Lamps Does Not Go OFF (Both Sides) BKS001P4
1. PERFORM IPDM E/R ACTIVE TEST
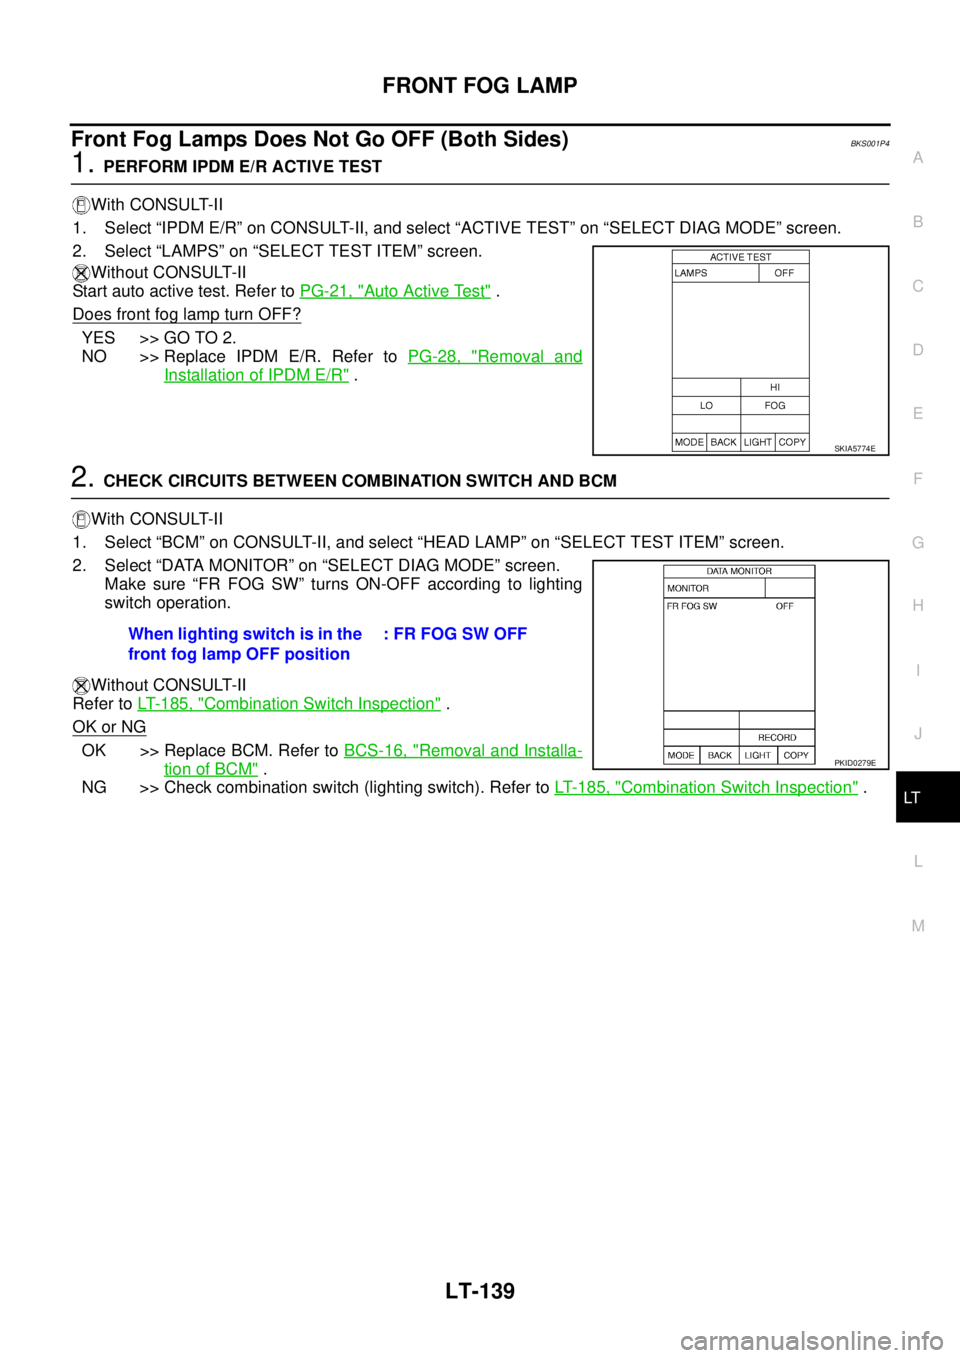
With CONSULT-II
1. Select “IPDM E/R” on CONSULT-II, and select “ACTIVE TEST” on “SELECT DIAG MODE” screen.
2. Select “LAMPS” on “SELECT TEST ITEM” screen.
Without CONSULT-II
Start auto active test. Refer to PG-21, "
Auto Active Test" .
Does front fog lamp turn OFF?
YES >> GO TO 2.
NO >> Replace IPDM E/R. Refer to PG-28, "
Removal and
Installation of IPDM E/R" .
2. CHECK CIRCUITS BETWEEN COMBINATION SWITCH AND BCM
With CONSULT-II
1. Select “BCM” on CONSULT-II, and select “HEAD LAMP” on “SELECT TEST ITEM” screen.
2. Select “DATA MONITOR” on “SELECT DIAG MODE” screen.
Make sure “FR FOG SW” turns ON-OFF according to lighting
switch operation.
Without CONSULT-II
Refer to LT- 1 8 5 , "
Combination Switch Inspection" .
OK or NG
OK >> Replace BCM. Refer to BCS-16, "Removal and Installa-
tion of BCM" .
NG >> Check combination switch (lighting switch). Refer to LT- 1 8 5 , "
Combination Switch Inspection" .
SKIA5774E
When lighting switch is in the
front fog lamp OFF position: FR FOG SW OFF
PKID0279E
Page 2829 of 3502
FRONT FOG LAMP
LT-141
C
D
E
F
G
H
I
J
L
MA
B
LT
Bulb ReplacementBKS001P6
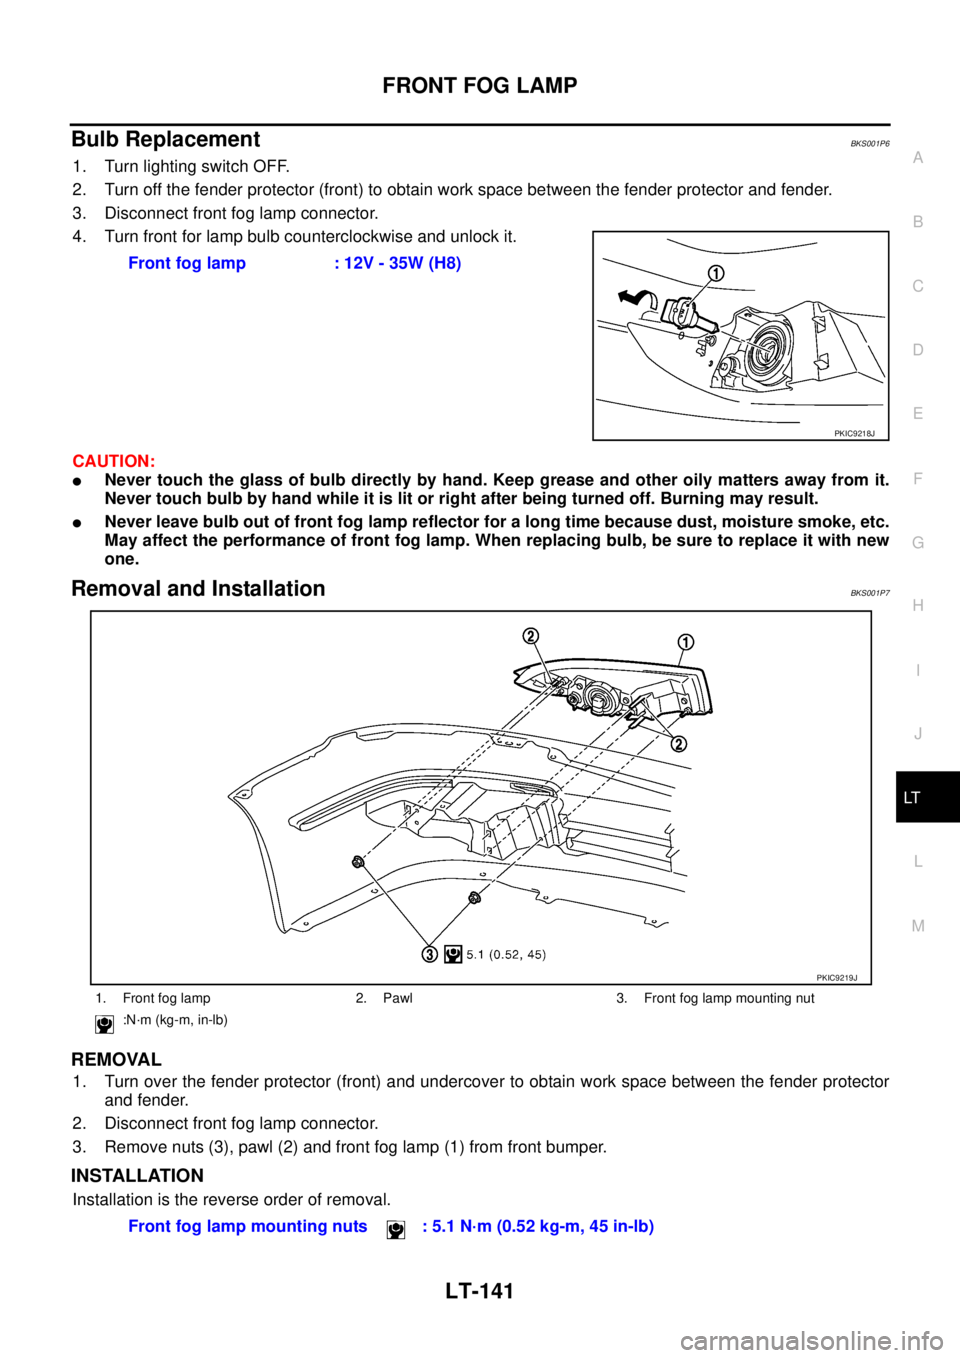
1. Turn lighting switch OFF.
2. Turn off the fender protector (front) to obtain work space between the fender protector and fender.
3. Disconnect front fog lamp connector.
4. Turn front for lamp bulb counterclockwise and unlock it.
CAUTION:
�Never touch the glass of bulb directly by hand. Keep grease and other oily matters away from it.
Never touch bulb by hand while it is lit or right after being turned off. Burning may result.
�Never leave bulb out of front fog lamp reflector for a long time because dust, moisture smoke, etc.
May affect the performance of front fog lamp. When replacing bulb, be sure to replace it with new
one.
Removal and InstallationBKS001P7
REMOVAL
1. Turn over the fender protector (front) and undercover to obtain work space between the fender protector
and fender.
2. Disconnect front fog lamp connector.
3. Remove nuts (3), pawl (2) and front fog lamp (1) from front bumper.
INSTALLATION
Installation is the reverse order of removal.Front fog lamp : 12V - 35W (H8)
PKIC9218J
1. Front fog lamp 2. Pawl 3. Front fog lamp mounting nut
:N·m (kg-m, in-lb)
PKIC9219J
Front fog lamp mounting nuts : 5.1 N·m (0.52 kg-m, 45 in-lb)
Page 2831 of 3502
REAR FOG LAMP
LT-143
C
D
E
F
G
H
I
J
L
MA
B
LT
Ground is supplied
�to BCM terminal 52 and
�to combination meter terminals 10, 11 and 12
�through grounds M71and M72.
REAR FOG LAMP OPERATION
When the lighting switch is in rear fog lamp ON position and also in 1ST or 2ND position or AUTO position
(headlamp is ON), BCM detects RR FOG (ON) and the HEAD LAMP1, 2 (ON) or the AUTO LIGHT (ON) by
BCM combination switch reading function. And then, BCM sends rear fog lamp request signal (ON) through
CAN communication.
When receiving rear fog lamp request signal (ON), BCM supplies power
�through BCM terminal 67
�to rear fog lamp terminal 1.
Ground is supplied
�to rear fog lamp terminal 2
�through grounds B16 and B17.
With power and ground supplied, the rear fog lamp illuminates.
Unified meter and A/C amp. receives rear fog lamp request signal (ON) through CAN communication, and
make rear fog lamp indicator go ON in combination meter.
COMBINATION SWITCH READING FUNCTION
Refer to BCS-3, "COMBINATION SWITCH READING FUNCTION" .
EXTERIOR LAMP BATTERY SAVER CONTROL
Refer to LT- 1 9 7 , "EXTERIOR LAMP BATTERY SAVER CONTROL" .
CAN Communication System DescriptionBKS001PA
CAN (Controller Area Network) is a serial communication line for real time application. It is an on-vehicle mul-
tiplex communication line with high data communication speed and excellent error detection ability. Many elec-
tronic control units are equipped onto a vehicle, and each control unit shares information and links with other
control units during operation (not independent). In CAN communication, control units are connected with 2
communication lines (CAN H line, CAN L line) allowing a high rate of information transmission with less wiring.
Each control unit transmits/receives data but selectively reads required data only.
CAN Communication UnitBKS001PB
Refer to LAN-49, "CAN System Specification Chart" .
Page 2834 of 3502
LT-146
REAR FOG LAMP
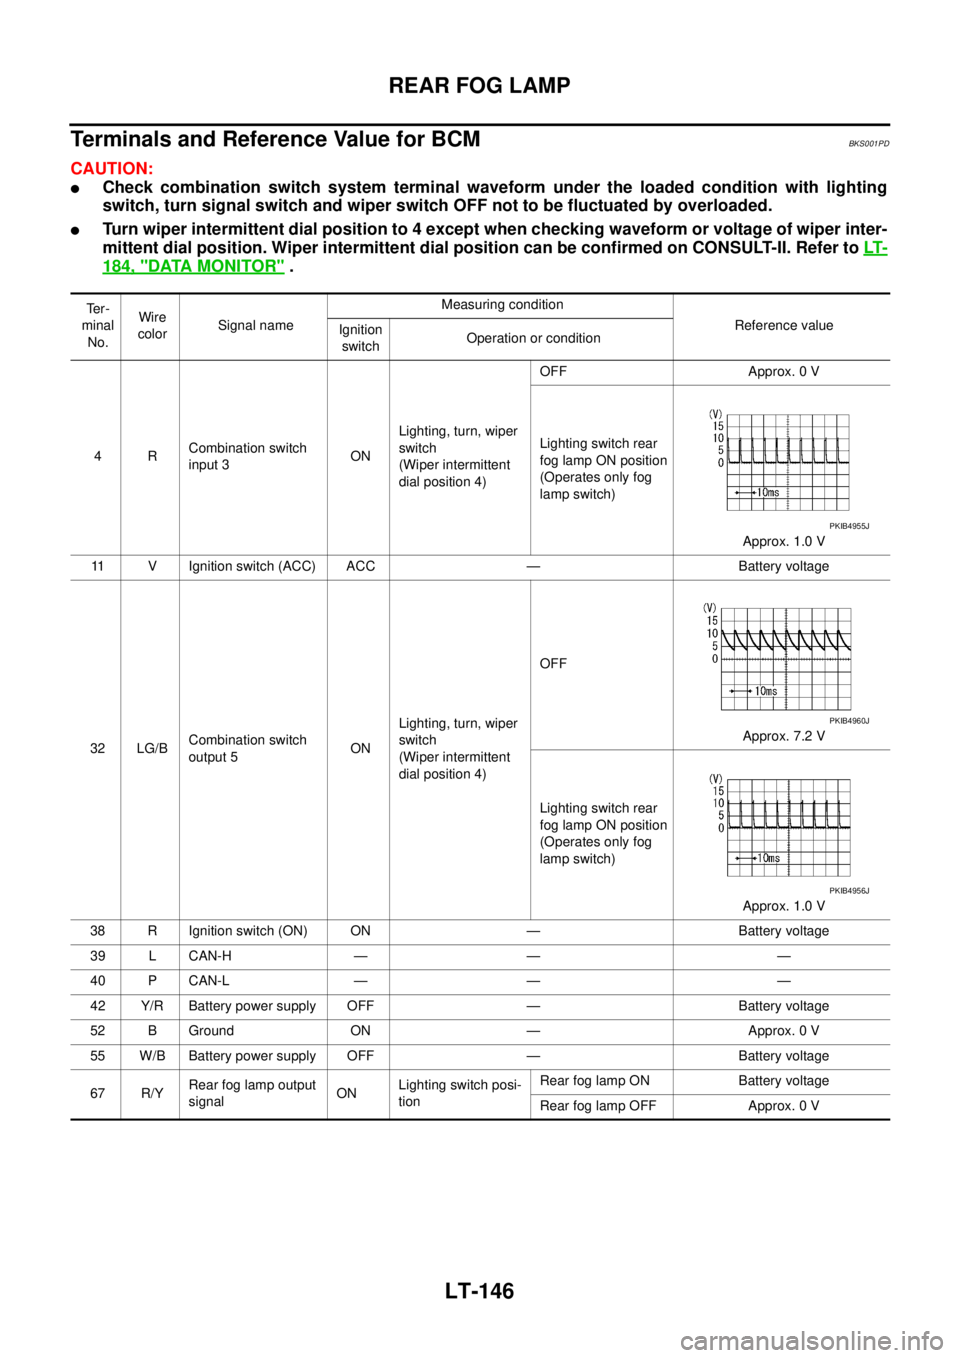
Terminals and Reference Value for BCMBKS001PD
CAUTION:
�Check combination switch system terminal waveform under the loaded condition with lighting
switch, turn signal switch and wiper switch OFF not to be fluctuated by overloaded.
�Turn wiper intermittent dial position to 4 except when checking waveform or voltage of wiper inter-
mittent dial position. Wiper intermittent dial position can be confirmed on CONSULT-II. Refer to LT-
184, "DATA MONITOR" .
Te r -
minal
No.Wire
colorSignal nameMeasuring condition
Reference value
Ignition
switchOperation or condition
4RCombination switch
input 3ONLighting, turn, wiper
switch
(Wiper intermittent
dial position 4)OFF Approx. 0 V
Lighting switch rear
fog lamp ON position
(Operates only fog
lamp switch)
Approx. 1.0 V
11 V Ignition switch (ACC) ACC — Battery voltage
32 LG/BCombination switch
output 5ONLighting, turn, wiper
switch
(Wiper intermittent
dial position 4)OFF
Approx. 7.2 V
Lighting switch rear
fog lamp ON position
(Operates only fog
lamp switch)
Approx. 1.0 V
38 R Ignition switch (ON) ON — Battery voltage
39 L CAN-H — — —
40 P CAN-L — — —
42 Y/R Battery power supply OFF — Battery voltage
52 B Ground ON — Approx. 0 V
55 W/B Battery power supply OFF — Battery voltage
67 R/YRear fog lamp output
signalONLighting switch posi-
tionRear fog lamp ON Battery voltage
Rear fog lamp OFF Approx. 0 V
PKIB4955J
PKIB4960J
PKIB4956J
Page 2836 of 3502
LT-148
REAR FOG LAMP
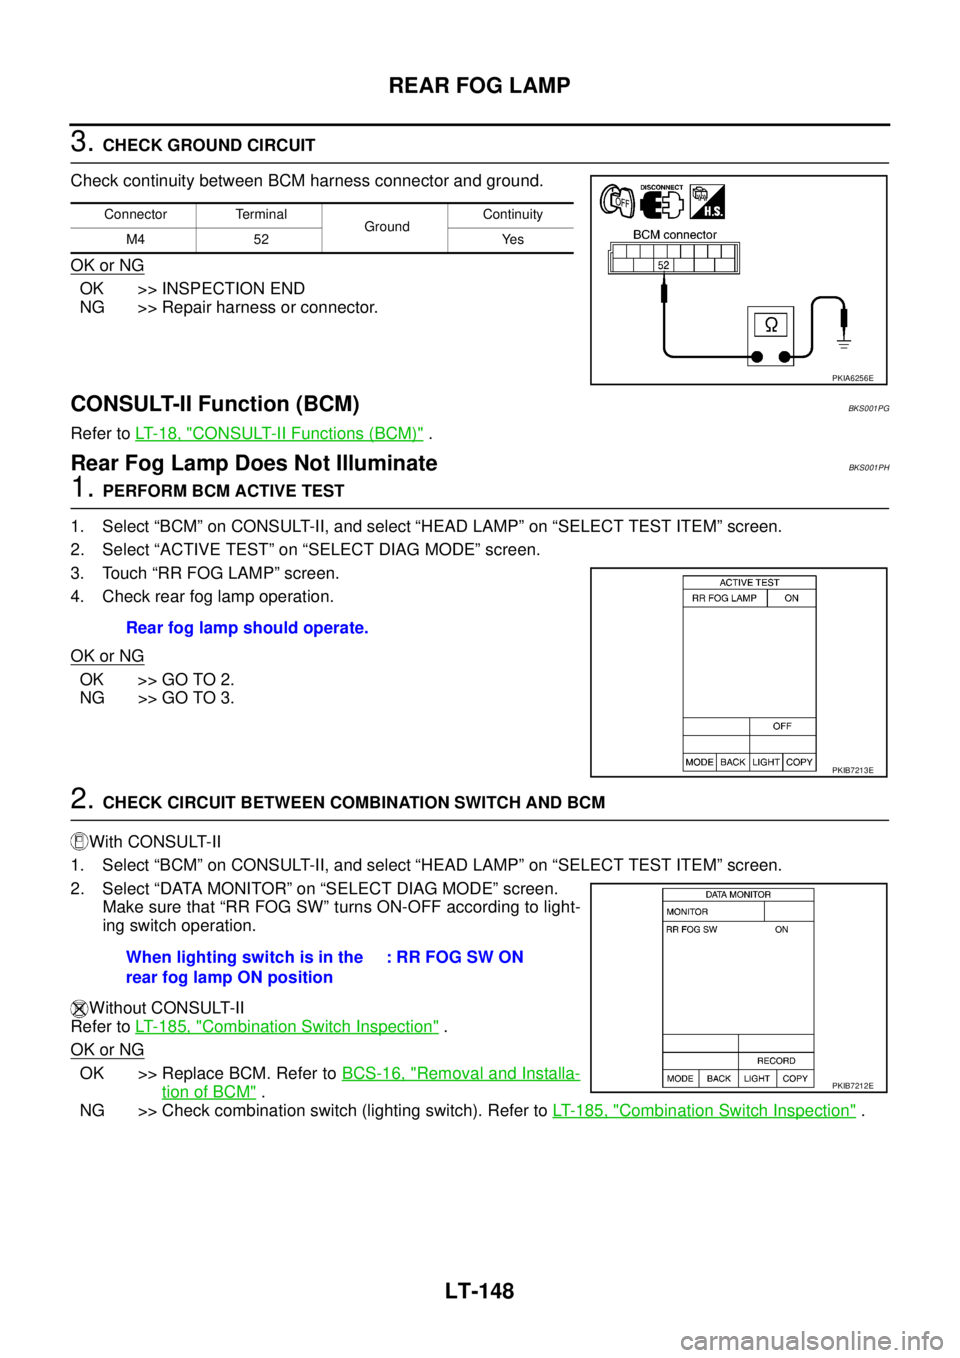
3. CHECK GROUND CIRCUIT
Check continuity between BCM harness connector and ground.
OK or NG
OK >> INSPECTION END
NG >> Repair harness or connector.
CONSULT-II Function (BCM)BKS001PG
Refer to LT- 1 8 , "CONSULT-II Functions (BCM)" .
Rear Fog Lamp Does Not IlluminateBKS001PH
1. PERFORM BCM ACTIVE TEST
1. Select “BCM” on CONSULT-II, and select “HEAD LAMP” on “SELECT TEST ITEM” screen.
2. Select “ACTIVE TEST” on “SELECT DIAG MODE” screen.
3. Touch “RR FOG LAMP” screen.
4. Check rear fog lamp operation.
OK or NG
OK >> GO TO 2.
NG >> GO TO 3.
2. CHECK CIRCUIT BETWEEN COMBINATION SWITCH AND BCM
With CONSULT-II
1. Select “BCM” on CONSULT-II, and select “HEAD LAMP” on “SELECT TEST ITEM” screen.
2. Select “DATA MONITOR” on “SELECT DIAG MODE” screen.
Make sure that “RR FOG SW” turns ON-OFF according to light-
ing switch operation.
Without CONSULT-II
Refer to LT- 1 8 5 , "
Combination Switch Inspection" .
OK or NG
OK >> Replace BCM. Refer to BCS-16, "Removal and Installa-
tion of BCM" .
NG >> Check combination switch (lighting switch). Refer to LT- 1 8 5 , "
Combination Switch Inspection" .
Connector Terminal
GroundContinuity
M4 52 Yes
PKIA6256E
Rear fog lamp should operate.
PKIB7213E
When lighting switch is in the
rear fog lamp ON position: RR FOG SW ON
PKIB7212E
Page 2837 of 3502
REAR FOG LAMP
LT-149
C
D
E
F
G
H
I
J
L
MA
B
LT
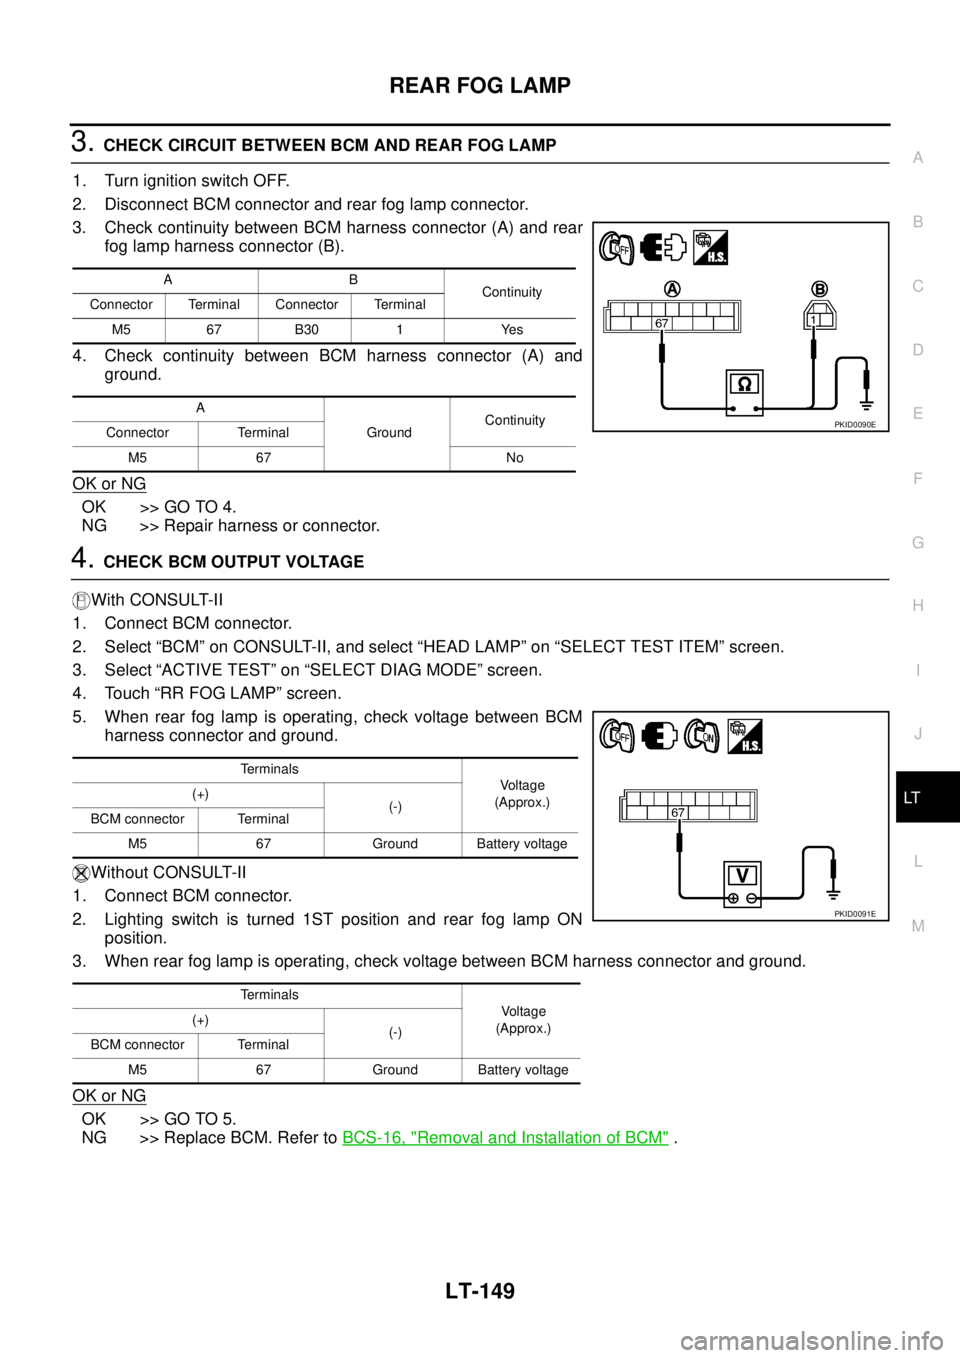
3. CHECK CIRCUIT BETWEEN BCM AND REAR FOG LAMP
1. Turn ignition switch OFF.
2. Disconnect BCM connector and rear fog lamp connector.
3. Check continuity between BCM harness connector (A) and rear
fog lamp harness connector (B).
4. Check continuity between BCM harness connector (A) and
ground.
OK or NG
OK >> GO TO 4.
NG >> Repair harness or connector.
4. CHECK BCM OUTPUT VOLTAGE
With CONSULT-II
1. Connect BCM connector.
2. Select “BCM” on CONSULT-II, and select “HEAD LAMP” on “SELECT TEST ITEM” screen.
3. Select “ACTIVE TEST” on “SELECT DIAG MODE” screen.
4. Touch “RR FOG LAMP” screen.
5. When rear fog lamp is operating, check voltage between BCM
harness connector and ground.
Without CONSULT-II
1. Connect BCM connector.
2. Lighting switch is turned 1ST position and rear fog lamp ON
position.
3. When rear fog lamp is operating, check voltage between BCM harness connector and ground.
OK or NG
OK >> GO TO 5.
NG >> Replace BCM. Refer to BCS-16, "
Removal and Installation of BCM" .
AB
Continuity
Connector Terminal Connector Terminal
M5 67 B30 1 Yes
A
GroundContinuity
Connector Terminal
M5 67 No
PKID0090E
Terminals
Voltage
(Approx.) (+)
(-)
BCM connector Terminal
M5 67 Ground Battery voltage
Terminals
Voltage
(Approx.) (+)
(-)
BCM connector Terminal
M5 67 Ground Battery voltage
PKID0091E