2003 NISSAN FRONTIER lock
[x] Cancel search: lockPage 122 of 272
Adjusting tone quality and speaker balance
Press the AUDIO button to enter the audio adjust
mode:
Bass!Mid!Treb!Fade!Bal
Press the TUNE/FF-REV (
or)or
SEEK/TRACK (or) to adjust to the de-
sired levels. The display will return to the regular
radio display after 7 seconds, or you may press
the AUDIO button again to return to the regular
radio display.
Clock operation
Pressing the CLOCK button displays the clock
with the radio on or off. Press the CLOCK button
again to turn off the clock display.
Clock set
1. Press and hold the CLOCK button until it
beeps (>2 seconds) .
2. The hours will start flashing. Press
TUNE/FF-REV (
or)or
SEEK/TRACK (or) to adjust the
hours.
3. Press the CLOCK button to switch to the
minute adjustment.
4. Press TUNE/FF-REV (
or)or
SEEK/TRACK (or) to adjust the min-
utes.5. Press the CLOCK button again to exit the
clock set mode.
The display will return to the regular clock display
after 7 seconds, or you may press the CLOCK
button again to return to the regular clock display.
FM-AM radio operation
FM-AM band select
Push the AM or the FM button to change from AM
to FM reception.
The FM stereo indicator, ST, illuminates during
FM stereo reception. When the stereo broadcast
signal is weak, the radio automatically changes
from stereo to monaural reception.
TUNE/FF—REV
WARNING
The radio should not be tuned while driv-
ing so full attention may be given to ve-
hicle operation.
Use the
andbuttons for manual
tuning. To move quickly through the channels,
hold the tuning buttons down.
SEEK tuning
Push SEEK/TRACK tuning button (
or).
SEEK tuning begins from low to high frequencies
or high to low frequencies, depending on which
button is pressed, and stops at the next broad-
casting station. If using the up button, once the
highest broadcasting station is reached, the ra-
dio continues in the SEEK mode at the lowest
broadcasting station. If using the down button,
once the lowest broadcasting station is reached,
the radio continues in the SEEK mode at the
highest broadcasting station.
SCAN tuning
Push the SCAN button. SCAN illuminates in the
display window. SCAN tuning begins from low to
high frequencies or high to low frequencies.
SCAN tuning stops for 5 seconds at each broad-
casting station that has sufficient signal strength.
When scanning, SCAN blinks in the display.
Pushing the SCAN button again during this 5
second period stops SCAN tuning and the radio
remains tuned to that station.
4-18Heater, air conditioner and audio systems
ZREVIEW COPY:Ð2003 Truck/Frontier(d22)
Owners Manual(owners)ÐUSA English(nna)
01/15/03Ðarosenma
X
Page 126 of 272

All preset scan
Pressing the PRESET SCAN button (>1.5 sec-
onds) scans all the permanent preset memory
banks (A, B or C) from 1–6 for 5 seconds. If the
Travel Preset is ON, all the travel preset memory
banks (A, B or C) from 1–6 are scanned for 5
seconds.
Canceling preset scan mode
Pressing any button except CLOCK, EJECT and
PTY cancels the Preset Scan mode.
RDS (radio data system)
RDS stands for Radio Data System, and is a data
information service transmitted by some radiostations on the FM band (not AM band) encoded
within a regular radio broadcast. Currently, most
RDS stations are in large cities, but many stations
are now considering broadcasting RDS data.
RDS can display:
cStation call sign, such as “WHFR 98.3”.
cStation name, such as “The Groove”.
cMusic or programming type, such as “Classi-
cal”, “Country”, or “Rock”.
cTraffic reports about delays or construction.
If the station broadcasts RDS information the
RDS icon is displayed. The RDS information will
be displayed according to the option chosen in
the RDS setup mode. (FM & RDS is the default.)
Press the RDS button again to display the fre-
quency for 3 seconds. The radio will then return
to the normal display. If the station does not
broadcast RDS information, the RDS icon will not
be displayed.
Setting RDS mode
Press and RDS button (>3 seconds) until the
display shows“RDS SET MODE”. This display
will last 2 seconds and then change to
“TRAFFIC-OFF”. Press TUNE/FF-REV (or) to toggle the RDS traffic mode from
“OFF” to “ON”. Press the RDS button again to
set your RDS traffic mode selection.The display changes to“SHOW”for the second
part of the RDS mode selection. Press TUNE/FF-
REV (
or) to switch between the
following RDS display modes:
c“FM & RDS”: the radio display will show the
station’s broadcast frequency and the sta-
tion’s name.
c“RDS ONLY”: the radio display will show the
station’s name only.
c“RDS TEMP”: the radio display will show the
station’s name for 5 seconds and then display
only the radio station’s broadcast frequency.
PTY (program type)
PTY can be used to search for a certain program
type. Certain areas have a limited number of
stations that transmit RDS. Many stations trans-
mit call letters and frequencies only. Searching or
scanning by program type may yield a limited
number of selections.
1. Press the PTY button. The display changes
from“RDS PTY SEARCH”to“SELECT
BY TUNE”.
2. Press TUNE/FF-REV (
or)
up/down button to choose a specific pro-
gram type:
ROCK, CLASSIC ROCK, SOFT ROCK,
TOP 40, COUNTRY, JAZZ, CLASSICAL,
OLDIES, NEWS, SPORTS, TALK, ANY
LHA0086
4-22Heater, air conditioner and audio systems
ZREVIEW COPY:Ð2003 Truck/Frontier(d22)
Owners Manual(owners)ÐUSA English(nna)
01/15/03Ðarosenma
X
Page 132 of 272
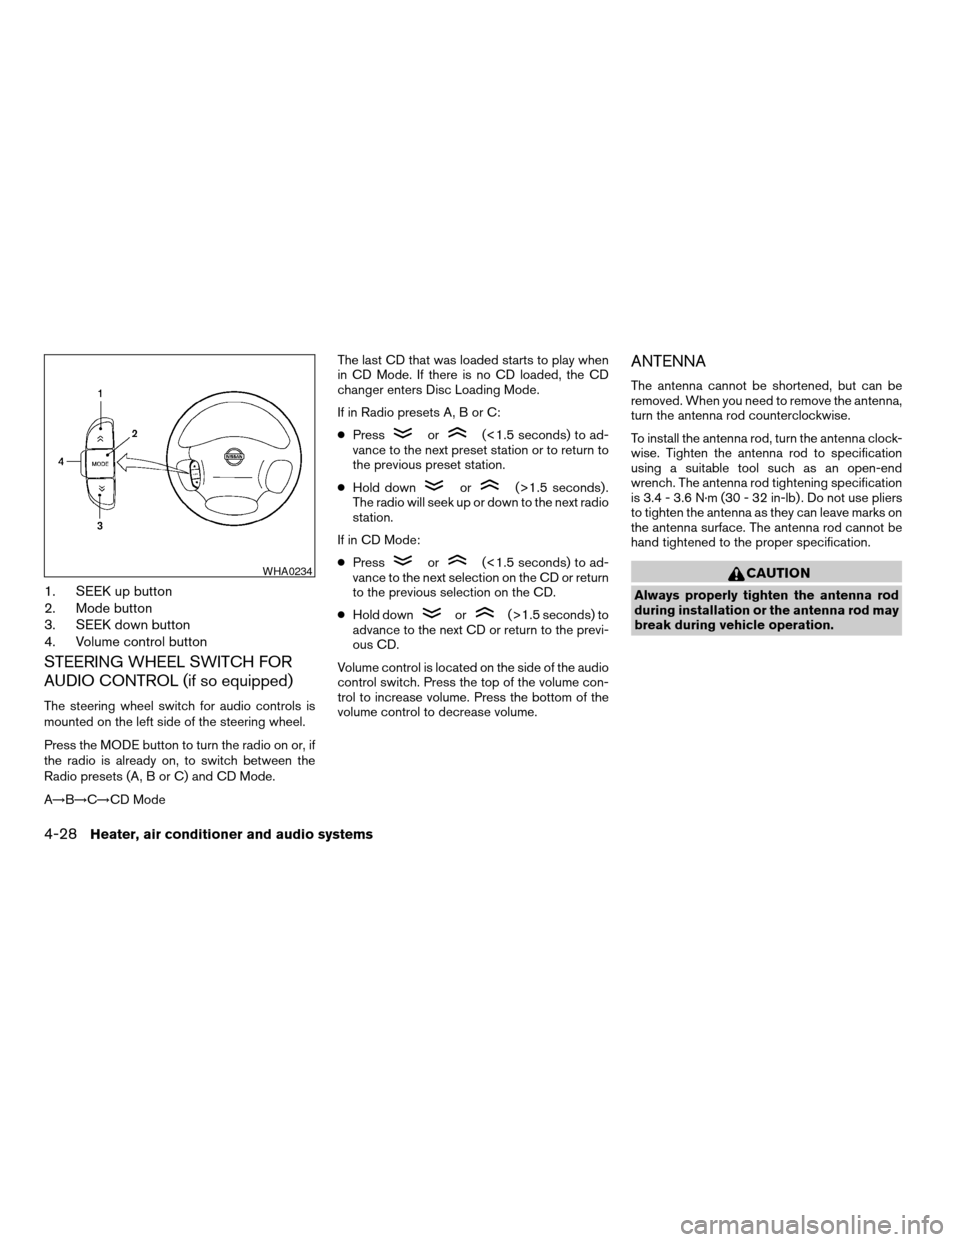
1. SEEK up button
2. Mode button
3. SEEK down button
4. Volume control button
STEERING WHEEL SWITCH FOR
AUDIO CONTROL (if so equipped)
The steering wheel switch for audio controls is
mounted on the left side of the steering wheel.
Press the MODE button to turn the radio on or, if
the radio is already on, to switch between the
Radio presets (A, B or C) and CD Mode.
A!B!C!CD ModeThe last CD that was loaded starts to play when
in CD Mode. If there is no CD loaded, the CD
changer enters Disc Loading Mode.
If in Radio presets A, B or C:
cPress
or(<1.5 seconds) to ad-
vance to the next preset station or to return to
the previous preset station.
cHold down
or(>1.5 seconds) .
The radio will seek up or down to the next radio
station.
If in CD Mode:
cPress
or(<1.5 seconds) to ad-
vance to the next selection on the CD or return
to the previous selection on the CD.
cHold down
or(>1.5 seconds) to
advance to the next CD or return to the previ-
ous CD.
Volume control is located on the side of the audio
control switch. Press the top of the volume con-
trol to increase volume. Press the bottom of the
volume control to decrease volume.
ANTENNA
The antenna cannot be shortened, but can be
removed. When you need to remove the antenna,
turn the antenna rod counterclockwise.
To install the antenna rod, turn the antenna clock-
wise. Tighten the antenna rod to specification
using a suitable tool such as an open-end
wrench. The antenna rod tightening specification
is 3.4 - 3.6 N·m (30 - 32 in-lb) . Do not use pliers
to tighten the antenna as they can leave marks on
the antenna surface. The antenna rod cannot be
hand tightened to the proper specification.
CAUTION
Always properly tighten the antenna rod
during installation or the antenna rod may
break during vehicle operation.
WHA0234
4-28Heater, air conditioner and audio systems
ZREVIEW COPY:Ð2003 Truck/Frontier(d22)
Owners Manual(owners)ÐUSA English(nna)
01/15/03Ðarosenma
X
Page 135 of 272

5 Starting and driving
Precautions when starting and driving................5-2
Exhaust gas (carbon monoxide)..................5-2
Three-way catalyst..............................5-2
Low tire pressure warning system
(if so equipped)................................5-3
On-pavement and off-road driving
precautions....................................5-4
Avoiding collision and rollover....................5-4
Drinking alcohol/drugs and driving................5-5
Driving safety precautions.......................5-5
Ignition switch.....................................5-7
Automatic transmission..........................5-7
Manual transmission............................5-8
Key positions..................................5-8
Before starting the engine..........................5-9
Starting the engine................................5-9
Driving the vehicle................................5-10
Automatic transmission (if so equipped)..........5-10
Manual transmission...........................5-16
Parking brake....................................5-18
Cruise control (if so equipped).....................5-19
Precautions on cruise control...................5-19Cruise control operations.......................5-19
Break-in schedule................................5-20
Increasing fuel economy...........................5-21
Using four wheel drive (4WD)......................5-21
Transfer case shifting procedures...............5-21
Auto-lock free-running hubs............5-22
Parking/parking on hills............................5-25
Power steering...................................5-26
Brake system....................................5-26
Brake precautions.............................5-26
Anti-lock Brake System (ABS)..................5-27
Vehicle dynamic control (VDC) system
(if so equipped)..................................5-28
Cold weather driving..............................5-30
Freeing a frozen door lock......................5-30
Anti-freeze....................................5-30
Battery.......................................5-30
Draining of coolant water.......................5-30
Tire equipment................................5-30
Special winter equipment.......................5-31
Driving on snow or ice.........................5-31
Engine block heater (if so equipped).............5-31
ZREVIEW COPY:Ð2003 Truck/Frontier(d22)
Owners Manual(owners)ÐUSA English(nna)
01/15/03Ðarosenma
X
Page 141 of 272
AUTOMATIC TRANSMISSION
On automatic transmission models, the ignition
lock is designed so the key cannot be turned to
LOCK position and removed until the shift selec-
tor lever is moved to the P (Park) position.
When removing the key from the ignition, make
sure the shift selector lever is in the P (Park)
position.
If the key cannot be turned to the LOCK position,
proceed as follows to remove the key.
1. Move the shift selector lever into the P (Park)
position.2. Turn the ignition key slightly toward the ON
position.
3. Turn the key to the LOCK position.
4. Remove the key.
The shift selector lever is designed so it cannot
moved out of P (Park) and into any of the other
gear positions if the ignition key is turned to OFF
position or if the key is removed from the switch.
The shift selector lever can be moved if the
ignition switch is in the ACC position. This
allows the vehicle to be moved if the bat-
tery is discharged. The shift selector lever
can also be moved if the ignition switch is
in the ON position and the foot brake pedal
is depressed.
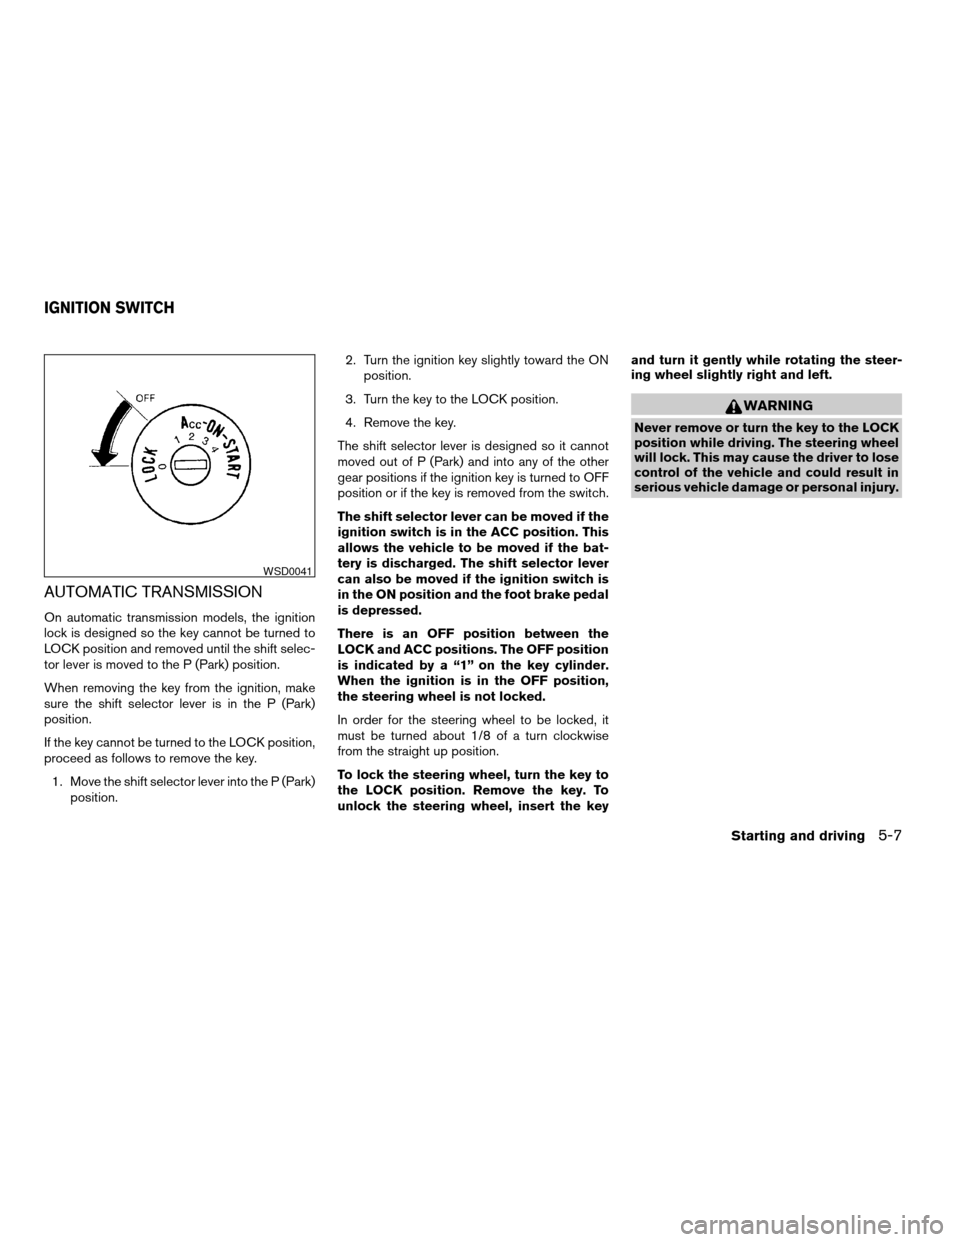
There is an OFF position between the
LOCK and ACC positions. The OFF position
is indicated by a “1” on the key cylinder.
When the ignition is in the OFF position,
the steering wheel is not locked.
In order for the steering wheel to be locked, it
must be turned about 1/8 of a turn clockwise
from the straight up position.
To lock the steering wheel, turn the key to
the LOCK position. Remove the key. To
unlock the steering wheel, insert the keyand turn it gently while rotating the steer-
ing wheel slightly right and left.
WARNING
Never remove or turn the key to the LOCK
position while driving. The steering wheel
will lock. This may cause the driver to lose
control of the vehicle and could result in
serious vehicle damage or personal injury.
WSD0041
IGNITION SWITCH
Starting and driving5-7
ZREVIEW COPY:Ð2003 Truck/Frontier(d22)
Owners Manual(owners)ÐUSA English(nna)
01/15/03Ðarosenma
X
Page 142 of 272
MANUAL TRANSMISSION
The ignition switch includes an anti-theft steering
lock device.
The key can only be removed when the ignition
switch is in the LOCK position.
On manual transmission models, to turn the igni-
tion key to LOCK position from ACC or ON
position, turn the key to OFF, push the key in, then
turn the key to LOCK.
In order for the steering wheel to be locked, it
must be turned about 1/8 of a turn clockwise
from the straight up position.To lock the steering wheel, turn the key to
the LOCK position. Remove the key. To
unlock the steering wheel, insert the key
and turn it gently while rotating the steer-
ing wheel slightly right and left.
WARNING
Never remove or turn the key to the LOCK
position while driving. The steering wheel
will lock. This may cause the driver to lose
control of the vehicle and could result in
serious vehicle damage or personal injury.
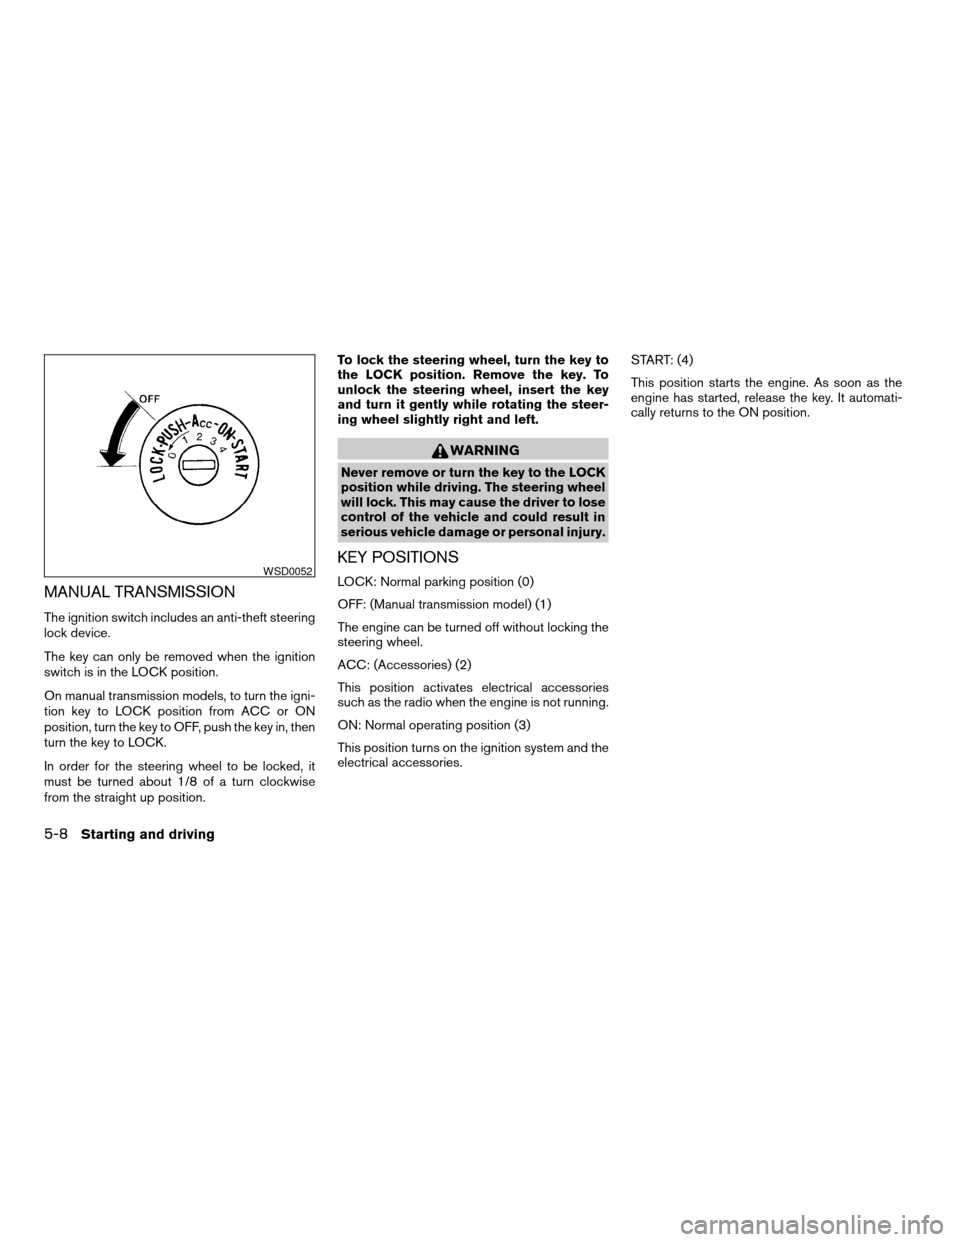
KEY POSITIONS
LOCK: Normal parking position (0)
OFF: (Manual transmission model) (1)
The engine can be turned off without locking the
steering wheel.
ACC: (Accessories) (2)
This position activates electrical accessories
such as the radio when the engine is not running.
ON: Normal operating position (3)
This position turns on the ignition system and the
electrical accessories.START: (4)
This position starts the engine. As soon as the
engine has started, release the key. It automati-
cally returns to the ON position.WSD0052
5-8Starting and driving
ZREVIEW COPY:Ð2003 Truck/Frontier(d22)
Owners Manual(owners)ÐUSA English(nna)
01/15/03Ðarosenma
X
Page 143 of 272
cMake sure the area around the vehicle is clear.
cCheck fluid levels such as engine oil, coolant,
brake and clutch fluid, and window washer
fluid as frequently as possible, or at least
whenever you refuel.
cCheck that all windows and lights are clean.
cVisually inspect tires for their appearance and
condition. Also check tires for proper inflation.
cLock all doors.
cPosition seat and adjust head restraints.
cAdjust inside and outside mirrors.
cFasten seat belts and ask all passengers to do
likewise.
cCheck the operation of warning lights when
the key is turned to the ON (3) position. See
“Warning/indicator lights and audible remind-
ers” in the “Instruments and controls” section
of this manual.1. Apply the parking brake.
2.Automatic transmission:
Move the shift selector lever to P (Park) or N
(Neutral) . P (Park) is recommended.
The shift selector lever cannot be
moved out of P (Park) and into any of
the other gear positions if the ignition
key is turned to the OFF position or if
the key is removed from the ignition
switch.
The starter is designed not to operate if
the shift selector lever is in any of the
driving positions.
Manual transmission:
Move the shift lever to N (Neutral) . Depress
the clutch pedal to the floor while cranking
the engine.
The starter is designed not to operate
unless the clutch pedal is fully de-
pressed.
3. Crank the enginewith your foot off the
accelerator pedalby turning the ignition
key to START. Release the key when the
engine starts. If the engine starts, but fails to
run, repeat the above procedure.cWhen the engine is very hard to start in
extremely cold weather or when restart-
ing, depress the accelerator pedal a little
(approximately 1/5 to the floor) and hold it
and then crank the engine. Release the
key and the accelerator pedal when the
engine starts.
cWhen the engine is very hard to start
because it is flooded, depress the accel-
erator pedal all the way to the floor and
hold it. Crank the engine for 5-6 seconds.
After cranking the engine, release the ac-
celerator pedal. Crank the enginewith
your foot off the accelerator pedalby
turning the ignition key to START. Release
the key when the engine starts. If the
engine starts, but fails to run, repeat the
above procedure.
CAUTION
Do not operate the starter for more than
15 seconds at a time. If the engine does
not start, turn the key off and wait 10
seconds before cranking again, otherwise
the starter could be damaged.
4. Allow the engine to idle for at least 30 sec-
onds after starting. Drive at moderate speed
for a short distance first, especially in cold
weather.
BEFORE STARTING THE ENGINE STARTING THE ENGINE
Starting and driving5-9
ZREVIEW COPY:Ð2003 Truck/Frontier(d22)
Owners Manual(owners)ÐUSA English(nna)
01/16/03Ðcathy
X
Page 144 of 272
AUTOMATIC TRANSMISSION (if so
equipped)
WARNING
cDo not depress the accelerator pedal
while shifting from P (Park) or N (Neu-
tral) to R (Reverse) , D (Drive) , 2 or 1.
Always depress the brake pedal until
shifting is completed. Failure to do so
could cause you to lose control and
have an accident.
cCold engine idle speed is high, so use
caution when shifting into a forward or
reverse gear before the engine has
warmed up.
cNever shift to P (Park) or R (Reverse)
while the vehicle is moving. This could
cause an accident.
CAUTION
cWhen stopping the vehicle on an uphill
grade, do not hold the vehicle by de-
pressing the accelerator pedal. The foot
brake should be used for this purpose.
cOn slippery roads, do not downshift.
This may cause a loss of control.The automatic transmission in your vehicle is
electronically controlled to produce maximum
power and smooth operation.
The recommended operating procedures for this
transmission are shown on the following pages.
Follow these procedures for maximum vehicle
performance and driving enjoyment.
Starting the vehicle
1. After starting the engine, fully depress the
foot brake pedal before attempting to move
the shift selector lever out of the P (Park)
position.
2. Keep the foot brake pedal depressed and
move the shift selector lever into a driving
gear.
3. Release the foot brake, then gradually start
the vehicle in motion.
The automatic transmission is designed so
the foot brake pedal MUST be depressed
before shifting from P (Park) to any drive
position while the ignition switch is in the
ON position.
The shift selector lever cannot be moved
out of P (Park) and into any of the other
gear positions if the ignition key is turned
to the LOCK position or if the key is re-
moved.The shift selector lever can be moved if the
ignition switch is in the ACC position. This
allows the vehicle to be moved if the bat-
tery is discharged. The shift selector lever
can also be moved if the ignition switch is
in the ON position and the foot brake pedal
is depressed.
DRIVING THE VEHICLE
5-10Starting and driving
ZREVIEW COPY:Ð2003 Truck/Frontier(d22)
Owners Manual(owners)ÐUSA English(nna)
01/15/03Ðarosenma
X