2003 NISSAN ALMERA N16 SRS HARNESS
[x] Cancel search: SRS HARNESSPage 3085 of 3189
![NISSAN ALMERA N16 2003 Electronic Repair Manual Diagnostic item ExplanationRepair order
Recheck SRS at each
replacement.
SATELLITE SENS RH
[UNIT FAIL]
SATELLITE SENS RH
[COMM FAIL]RH side air bag (satellite) sensor 1. Visually check the wiring
harn NISSAN ALMERA N16 2003 Electronic Repair Manual Diagnostic item ExplanationRepair order
Recheck SRS at each
replacement.
SATELLITE SENS RH
[UNIT FAIL]
SATELLITE SENS RH
[COMM FAIL]RH side air bag (satellite) sensor 1. Visually check the wiring
harn](/manual-img/5/57350/w960_57350-3084.png)
Diagnostic item ExplanationRepair order
Recheck SRS at each
replacement.
SATELLITE SENS RH
[UNIT FAIL]
SATELLITE SENS RH
[COMM FAIL]RH side air bag (satellite) sensor 1. Visually check the wiring
harness connection.
2. Replace the harness if it
has visible damage.
3. Replace the RH side air
bag (satellite) sensor.
4. Replace the diagnosis sen-
sor unit.
5. Replace the related har-
ness.
PRE-TEN FRONT LH
[OPEN/VB-SHORT]Front LH pre-tensioner circuit is open or shorted to a power
supply circuit.1. Visually check the wiring
harness connections.
2. Replace the harness if it
has visible damage.
3. Replace the front LH seat
belt.
(Before disposal, it must be
deactivated.)
4. Replace the diagnosis sen-
sor unit.
5. Replace the related har-
ness. PRE-TEN FRONT LH
[GND-SHORT]Front LH pre-tensioner circuit is shorted to ground.
PRE-TEN FRONT RH
[OPEN/VB-SHORT]Front RH pre-tensioner circuit is open or shorted to a power
supply circuit.1. Visually check the wiring
harness connections.
2. Replace the harness if it
has visible damage.
3. Replace the front RH seat
belt.
(Before disposal, it must be
deactivated.)
4. Replace the diagnosis sen-
sor unit.
5. Replace the related har-
ness. PRE-TEN FRONT RH
[GND-SHORT]Front RH pre-tensioner circuit is shorted to ground.
CONTROL UNIT Low battery voltage (Less than 9V) Go to DIAGNOSTIC PRO-
CEDURE 3 (RS-54) after
charging battery.
Diagnosis sensor unit is malfunctioning. 1. Visually check wiring har-
ness connections.
2. Replace the harness if it
has visible damage.
3. Replace diagnosis sensor
unit.
4. Replace the related har-
ness.
* Follow the procedures in numerical order when repairing malfunctioningparts. Confirm whether malfunction is eliminated
using the air bag or seat belt warning lamp or CONSULT-II each time repair isfinished. If malfunction is still observed, pro-
ceed to the next step. When malfunction is eliminated, further repair workis not required.GI
MA
EM
LC
EC
FE
CL
MT
AT
AX
SU
BR
ST
BT
HA
SC
EL
IDX
SUPPLEMENTAL RESTRAINT SYSTEM (SRS)
Trouble Diagnoses with CONSULT-II (Cont’d)
RS-53
Page 3090 of 3189
10. Touch “PRINT”.
11. Compare diagnostic codes to “Intermittent Malfunction Diag-
nostic Code Chart”, RS-58.
12. Touch “BACK” key of CONSULT-II until “SELECT SYSTEM”
appears.
13. Turn ignition switch “OFF”, then turn off and disconnect
CONSULT-II, and disconnect both battery cables.
14. Repair the system as outlined by the “Repair order” in “Inter-
mittent Malfunction Diagnostic Code Chart”, that corresponds
to the self-diagnostic result. For replacement procedure of
component parts, refer to RS-26.
15. Go to DIAGNOSTIC PROCEDURE 3, page RS-54, for final
checking.
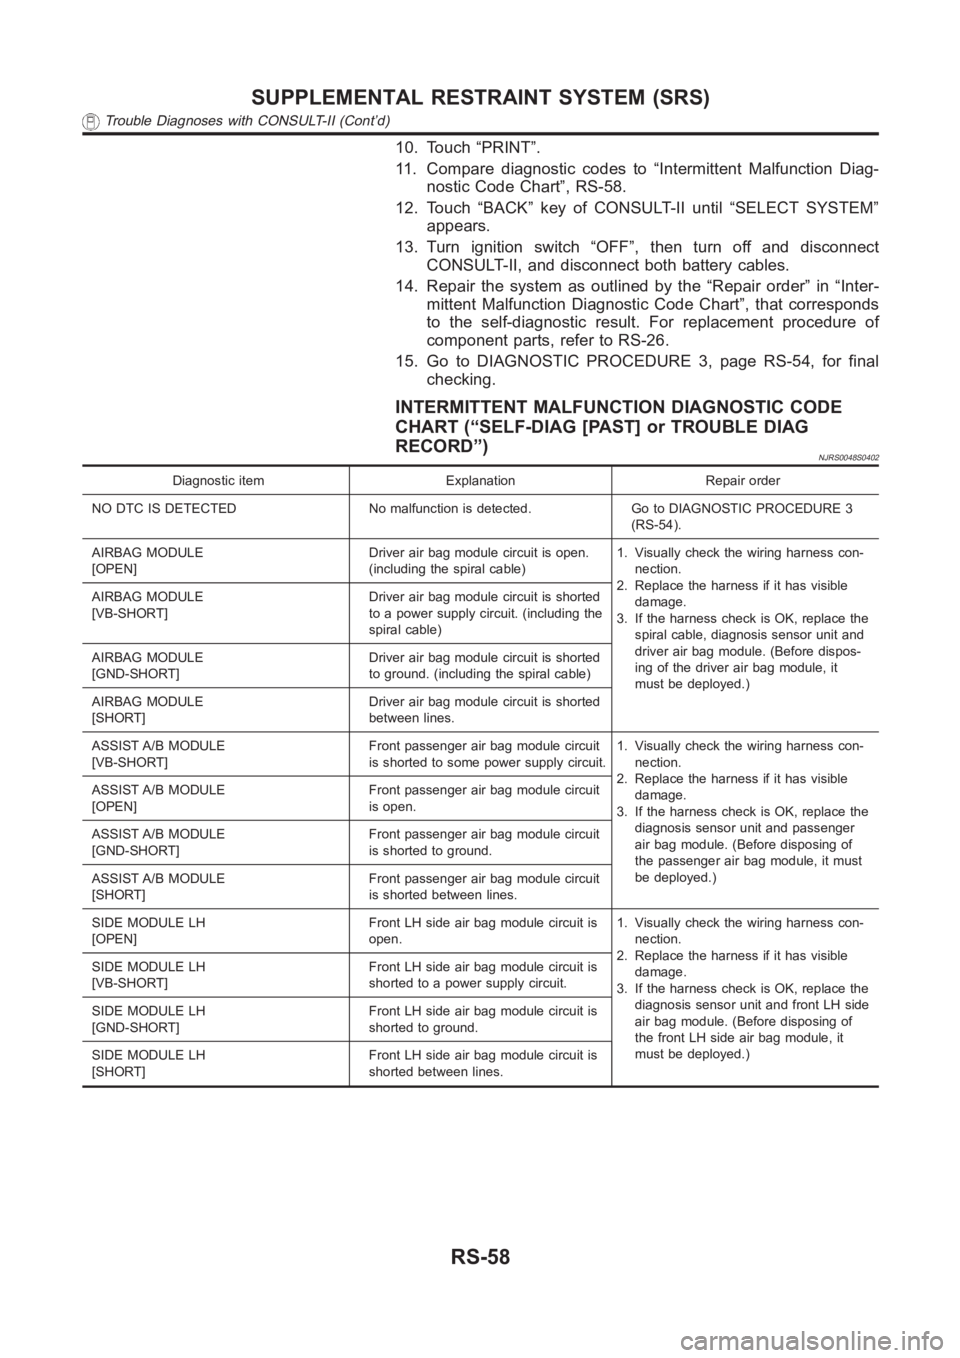
INTERMITTENT MALFUNCTION DIAGNOSTIC CODE
CHART (“SELF-DIAG [PAST] or TROUBLE DIAG
RECORD”)
NJRS0048S0402
Diagnostic item Explanation Repair order
NO DTC IS DETECTED No malfunction is detected. Go to DIAGNOSTIC PROCEDURE 3
(RS-54).
AIRBAG MODULE
[OPEN]Driver air bag module circuit is open.
(including the spiral cable)1. Visually check the wiring harness con-
nection.
2. Replace the harness if it has visible
damage.
3. If the harness check is OK, replace the
spiral cable, diagnosis sensor unit and
driver air bag module. (Before dispos-
ing of the driver air bag module, it
must be deployed.) AIRBAG MODULE
[VB-SHORT]Driver air bag module circuit is shorted
to a power supply circuit. (including the
spiral cable)
AIRBAG MODULE
[GND-SHORT]Driver air bag module circuit is shorted
to ground. (including the spiral cable)
AIRBAG MODULE
[SHORT]Driver air bag module circuit is shorted
between lines.
ASSIST A/B MODULE
[VB-SHORT]Front passenger air bag module circuit
is shorted to some power supply circuit.1. Visually check the wiring harness con-
nection.
2. Replace the harness if it has visible
damage.
3. If the harness check is OK, replace the
diagnosis sensor unit and passenger
air bag module. (Before disposing of
the passenger air bag module, it must
be deployed.) ASSIST A/B MODULE
[OPEN]Front passenger air bag module circuit
is open.
ASSIST A/B MODULE
[GND-SHORT]Front passenger air bag module circuit
is shorted to ground.
ASSIST A/B MODULE
[SHORT]Front passenger air bag module circuit
is shorted between lines.
SIDE MODULE LH
[OPEN]Front LH side air bag module circuit is
open.1. Visually check the wiring harness con-
nection.
2. Replace the harness if it has visible
damage.
3. If the harness check is OK, replace the
diagnosis sensor unit and front LH side
air bag module. (Before disposing of
the front LH side air bag module, it
must be deployed.) SIDE MODULE LH
[VB-SHORT]Front LH side air bag module circuit is
shorted to a power supply circuit.
SIDE MODULE LH
[GND-SHORT]Front LH side air bag module circuit is
shorted to ground.
SIDE MODULE LH
[SHORT]Front LH side air bag module circuit is
shorted between lines.
SUPPLEMENTAL RESTRAINT SYSTEM (SRS)
Trouble Diagnoses with CONSULT-II (Cont’d)
RS-58
Page 3091 of 3189
![NISSAN ALMERA N16 2003 Electronic Repair Manual Diagnostic item Explanation Repair order
SIDE MODULE RH
[OPEN]Front RH side air bag module circuit is
open.1. Visually check the wiring harness con-
nection.
2. Replace the harness if it has visible
d NISSAN ALMERA N16 2003 Electronic Repair Manual Diagnostic item Explanation Repair order
SIDE MODULE RH
[OPEN]Front RH side air bag module circuit is
open.1. Visually check the wiring harness con-
nection.
2. Replace the harness if it has visible
d](/manual-img/5/57350/w960_57350-3090.png)
Diagnostic item Explanation Repair order
SIDE MODULE RH
[OPEN]Front RH side air bag module circuit is
open.1. Visually check the wiring harness con-
nection.
2. Replace the harness if it has visible
damage.
3. If the harness check is OK, replace the
diagnosis sensor unit and front RH
side air bag module. (Before disposing
of the front RH side air bag module, it
must be deployed.) SIDE MODULE RH
[VB-SHORT]Front RH side air bag module circuit is
shorted to a power supply circuit.
SIDE MODULE RH
[GND-SHORT]Front RH side air bag module circuit is
shorted to ground.
SIDE MODULE RH
[SHORT]Front RH side air bag module circuit is
shorted between lines.
SATELLITE SENS LH
[UNIT FAIL]
SATELLITE SENS LH
[COMM FAIL]LH side air bag (satellite) sensor 1. Visually check the wiring harness con-
nection.
2. Replace the harness if it has visible
damage.
3. If the harness check is OK, replace the
diagnosis sensor unit and LH side air
bag (satellite) sensor.
SATELLITE SENS RH
[UNIT FAIL]
SATELLITE SENS RH
[COMM FAIL]RH side air bag (satellite) sensor 1. Visually check the wiring harness con-
nection.
2. Replace the harness if it has visible
damage.
3. If the harness check is OK, replace the
diagnosis sensor unit and RH side air
bag (satellite) sensor.
PRE-TEN FRONT LH
[OPEN/VB-SHORT]Front LH seat belt pre-tensioner circuit
is open or shorted to a power supply
circuit.1. Visually check the wiring harness con-
nections.
2. Replace the harness if it has visible
damage.
3. If the harness check is OK, replace the
diagnosis sensor unit and front LH
seat belt. (Before disposing of the front
LH seat belt pre-tensioner, if must be
deployed.) PRE-TEN FRONT LH
[GND-SHORT]Front LH seat belt pre-tensioner circuit
is shorted to ground.
PRE-TEN FRONT RH
[OPEN/VB-SHORT]Front RH seat belt pre-tensioner circuit
is open or shorted to a power supply
circuit.1. Visually check the wiring harness con-
nections.
2. Replace the harness if it has visible
damage.
3. If the harness check is OK, replace the
diagnosis sensor unit and front RH
seat belt. (Before disposing of the front
RH seat belt pre-tensioner, if must be
deployed.) PRE-TEN FRONT RH
[GND-SHORT]Front RH seat belt pre-tensioner circuit
is shorted to ground.
CONTROL UNIT Diagnosis sensor unit is malfunctioning. 1. Visually check the wiring harness con-
nection.
2. Replace the harness if it has visible
damage.
3. If the harness check is OK, replace the
diagnosis sensor unit.
* Follow the procedures in numerical order when repairing malfunctioningparts, then make the final system check.
GI
MA
EM
LC
EC
FE
CL
MT
AT
AX
SU
BR
ST
BT
HA
SC
EL
IDX
SUPPLEMENTAL RESTRAINT SYSTEM (SRS)
Trouble Diagnoses with CONSULT-II (Cont’d)
RS-59
Page 3094 of 3189
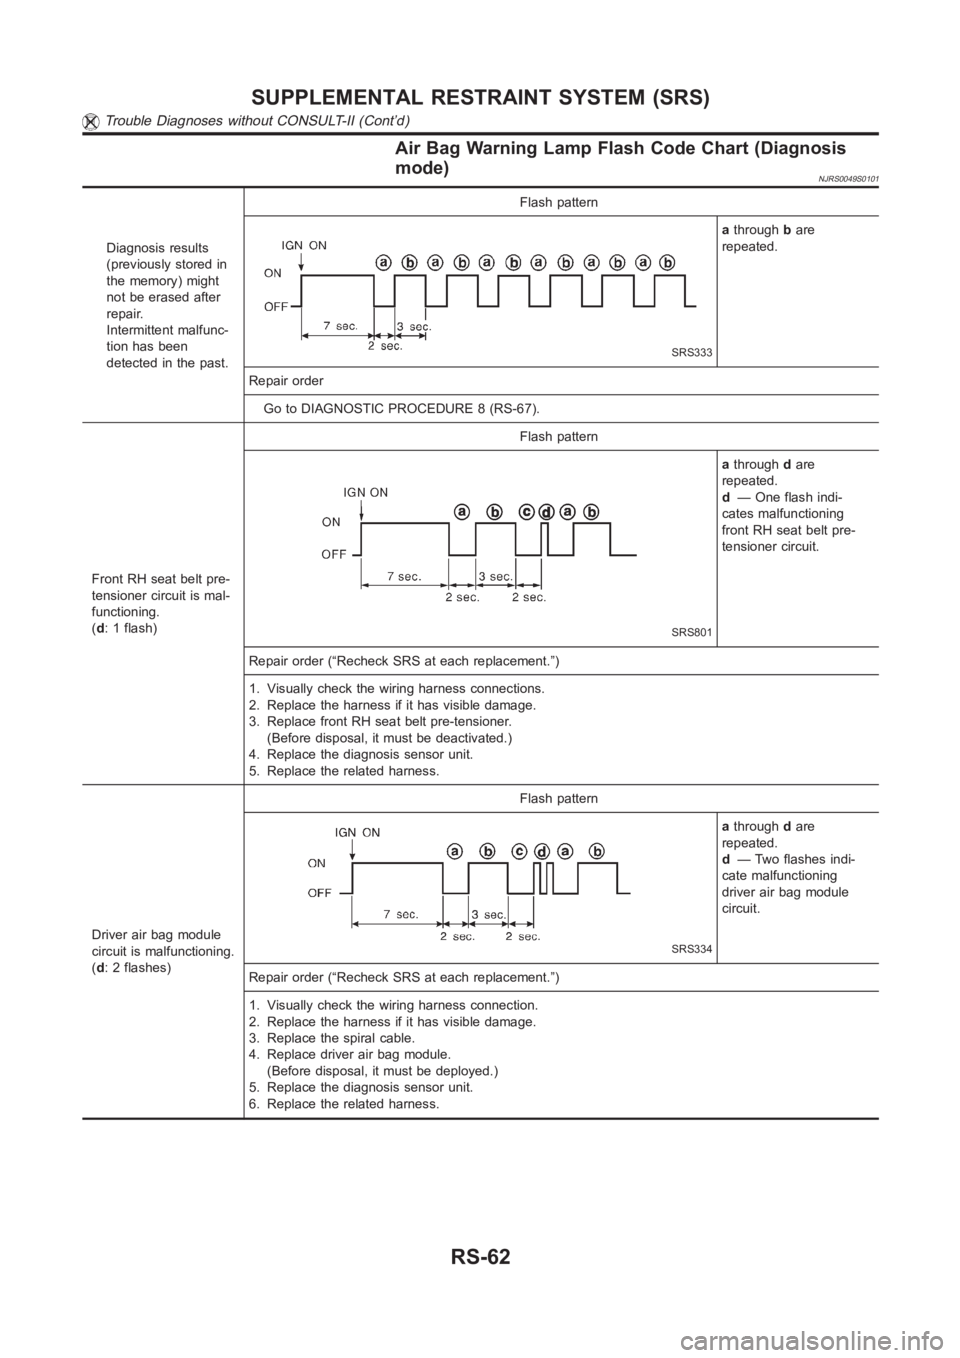
Air Bag Warning Lamp Flash Code Chart (Diagnosis
mode)
NJRS0049S0101
Diagnosis results
(previously stored in
the memory) might
not be erased after
repair.
Intermittent malfunc-
tion has been
detected in the past.Flash pattern
SRS333
athroughbare
repeated.
Repair order
Go to DIAGNOSTIC PROCEDURE 8 (RS-67).
Front RH seat belt pre-
tensioner circuit is mal-
functioning.
(d: 1 flash)Flash pattern
SRS801
athroughdare
repeated.
d— One flash indi-
cates malfunctioning
front RH seat belt pre-
tensioner circuit.
Repair order (“Recheck SRS at each replacement.”)
1. Visually check the wiring harness connections.
2. Replace the harness if it has visible damage.
3. Replace front RH seat belt pre-tensioner.
(Before disposal, it must be deactivated.)
4. Replace the diagnosis sensor unit.
5. Replace the related harness.
Driver air bag module
circuit is malfunctioning.
(d: 2 flashes)Flash pattern
SRS334
athroughdare
repeated.
d— Two flashes indi-
cate malfunctioning
driver air bag module
circuit.
Repair order (“Recheck SRS at each replacement.”)
1. Visually check the wiring harness connection.
2. Replace the harness if it has visible damage.
3. Replace the spiral cable.
4. Replace driver air bag module.
(Before disposal, it must be deployed.)
5. Replace the diagnosis sensor unit.
6. Replace the related harness.
SUPPLEMENTAL RESTRAINT SYSTEM (SRS)
Trouble Diagnoses without CONSULT-II (Cont’d)
RS-62
Page 3095 of 3189
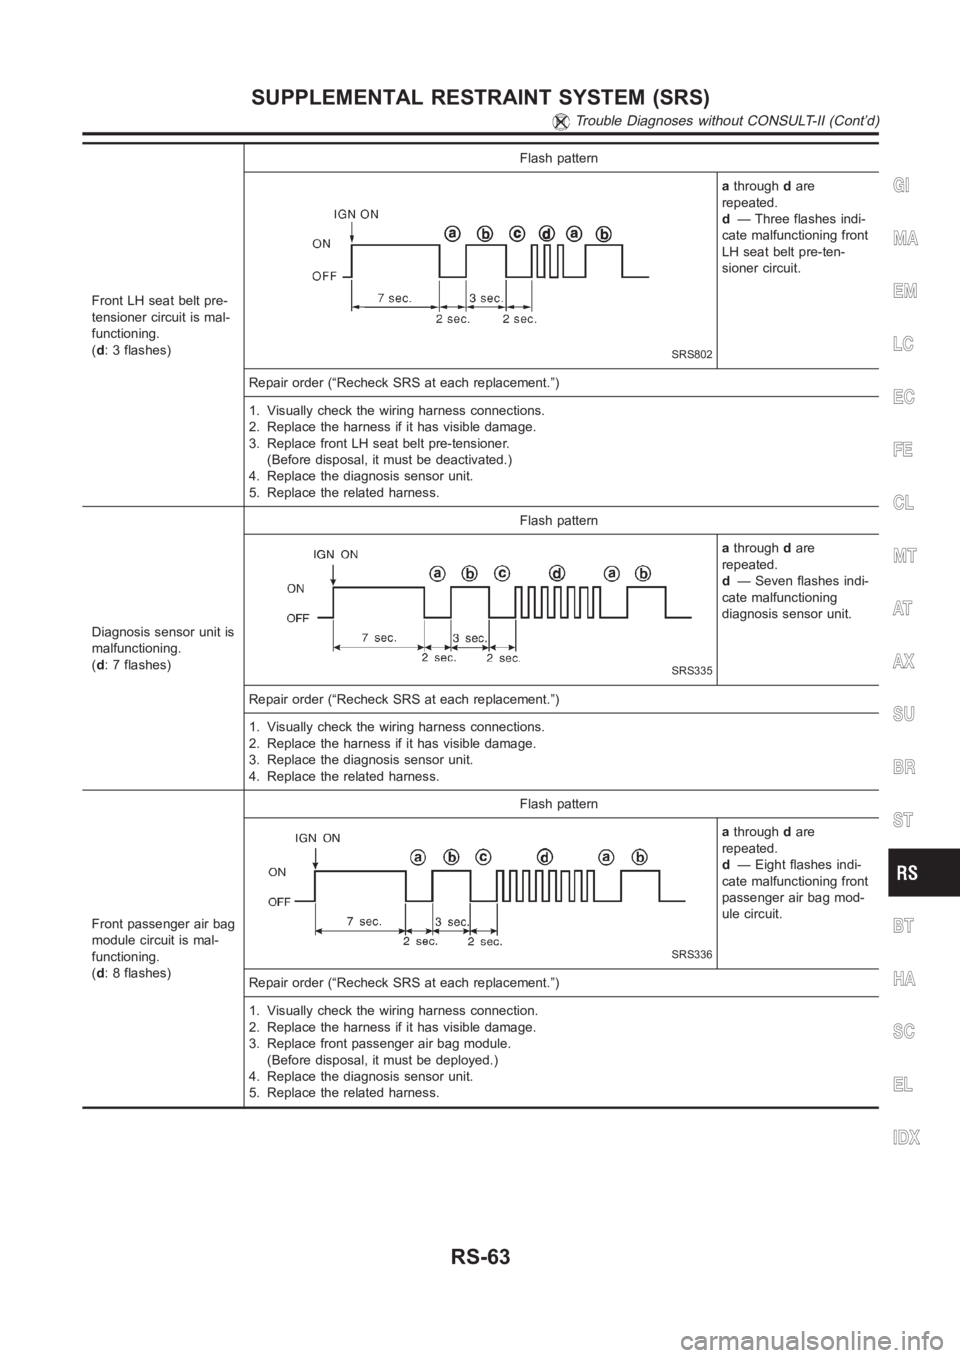
Front LH seat belt pre-
tensioner circuit is mal-
functioning.
(d: 3 flashes)Flash pattern
SRS802
athroughdare
repeated.
d— Three flashes indi-
cate malfunctioning front
LH seat belt pre-ten-
sioner circuit.
Repair order (“Recheck SRS at each replacement.”)
1. Visually check the wiring harness connections.
2. Replace the harness if it has visible damage.
3. Replace front LH seat belt pre-tensioner.
(Before disposal, it must be deactivated.)
4. Replace the diagnosis sensor unit.
5. Replace the related harness.
Diagnosis sensor unit is
malfunctioning.
(d: 7 flashes)Flash pattern
SRS335
athroughdare
repeated.
d— Seven flashes indi-
cate malfunctioning
diagnosis sensor unit.
Repair order (“Recheck SRS at each replacement.”)
1. Visually check the wiring harness connections.
2. Replace the harness if it has visible damage.
3. Replace the diagnosis sensor unit.
4. Replace the related harness.
Front passenger air bag
module circuit is mal-
functioning.
(d: 8 flashes)Flash pattern
SRS336
athroughdare
repeated.
d— Eight flashes indi-
cate malfunctioning front
passenger air bag mod-
ule circuit.
Repair order (“Recheck SRS at each replacement.”)
1. Visually check the wiring harness connection.
2. Replace the harness if it has visible damage.
3. Replace front passenger air bag module.
(Before disposal, it must be deployed.)
4. Replace the diagnosis sensor unit.
5. Replace the related harness.
GI
MA
EM
LC
EC
FE
CL
MT
AT
AX
SU
BR
ST
BT
HA
SC
EL
IDX
SUPPLEMENTAL RESTRAINT SYSTEM (SRS)
Trouble Diagnoses without CONSULT-II (Cont’d)
RS-63
Page 3096 of 3189
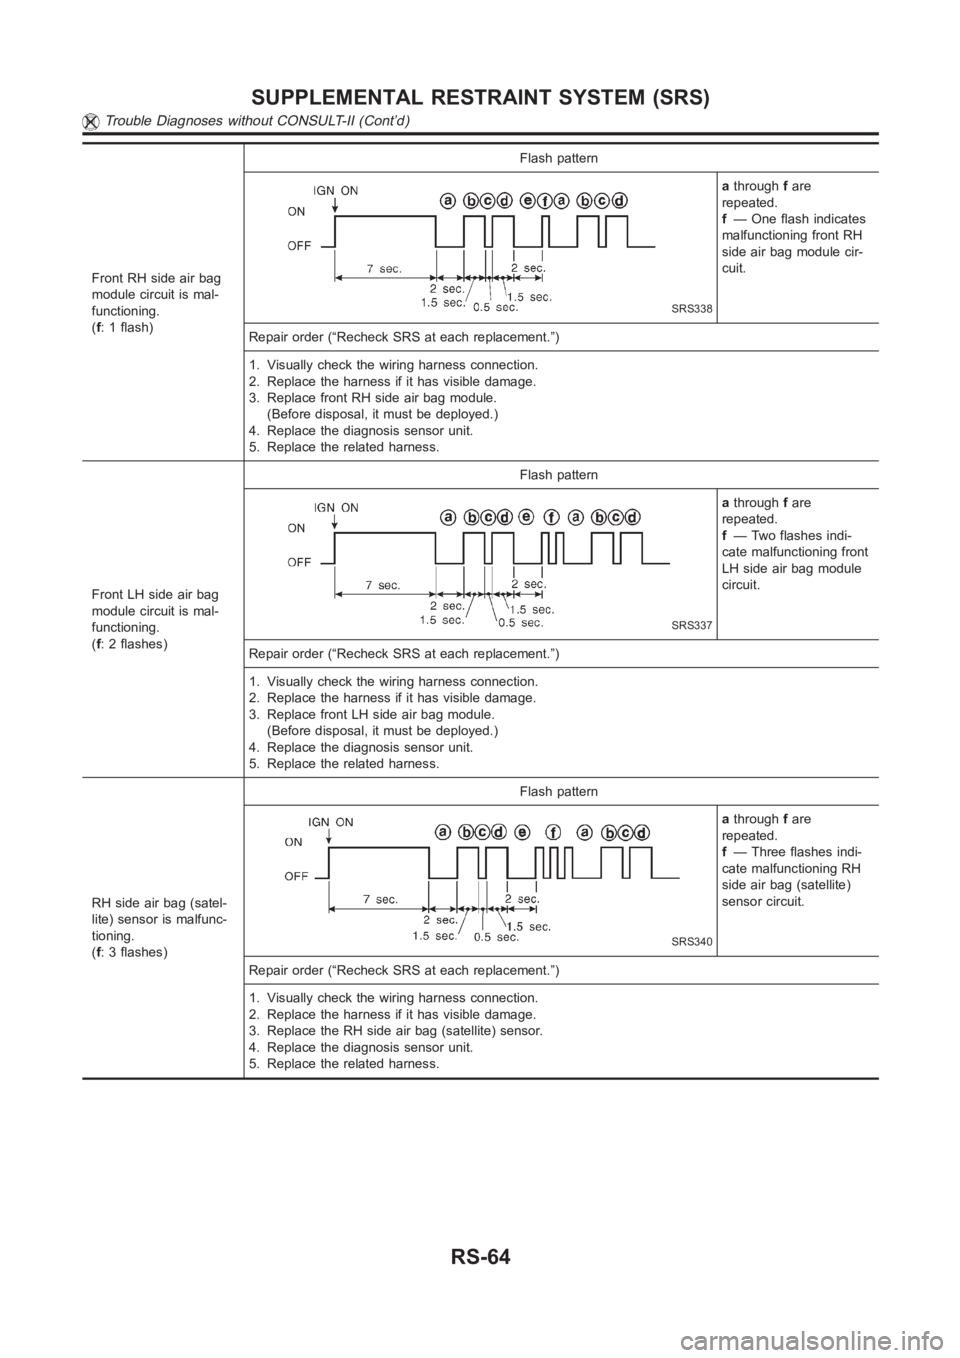
Front RH side air bag
module circuit is mal-
functioning.
(f: 1 flash)Flash pattern
SRS338
athroughfare
repeated.
f— One flash indicates
malfunctioning front RH
side air bag module cir-
cuit.
Repair order (“Recheck SRS at each replacement.”)
1. Visually check the wiring harness connection.
2. Replace the harness if it has visible damage.
3. Replace front RH side air bag module.
(Before disposal, it must be deployed.)
4. Replace the diagnosis sensor unit.
5. Replace the related harness.
Front LH side air bag
module circuit is mal-
functioning.
(f: 2 flashes)Flash pattern
SRS337
athroughfare
repeated.
f— Two flashes indi-
cate malfunctioning front
LH side air bag module
circuit.
Repair order (“Recheck SRS at each replacement.”)
1. Visually check the wiring harness connection.
2. Replace the harness if it has visible damage.
3. Replace front LH side air bag module.
(Before disposal, it must be deployed.)
4. Replace the diagnosis sensor unit.
5. Replace the related harness.
RH side air bag (satel-
lite) sensor is malfunc-
tioning.
(f: 3 flashes)Flash pattern
SRS340
athroughfare
repeated.
f— Three flashes indi-
cate malfunctioning RH
side air bag (satellite)
sensor circuit.
Repair order (“Recheck SRS at each replacement.”)
1. Visually check the wiring harness connection.
2. Replace the harness if it has visible damage.
3. Replace the RH side air bag (satellite) sensor.
4. Replace the diagnosis sensor unit.
5. Replace the related harness.
SUPPLEMENTAL RESTRAINT SYSTEM (SRS)
Trouble Diagnoses without CONSULT-II (Cont’d)
RS-64
Page 3097 of 3189
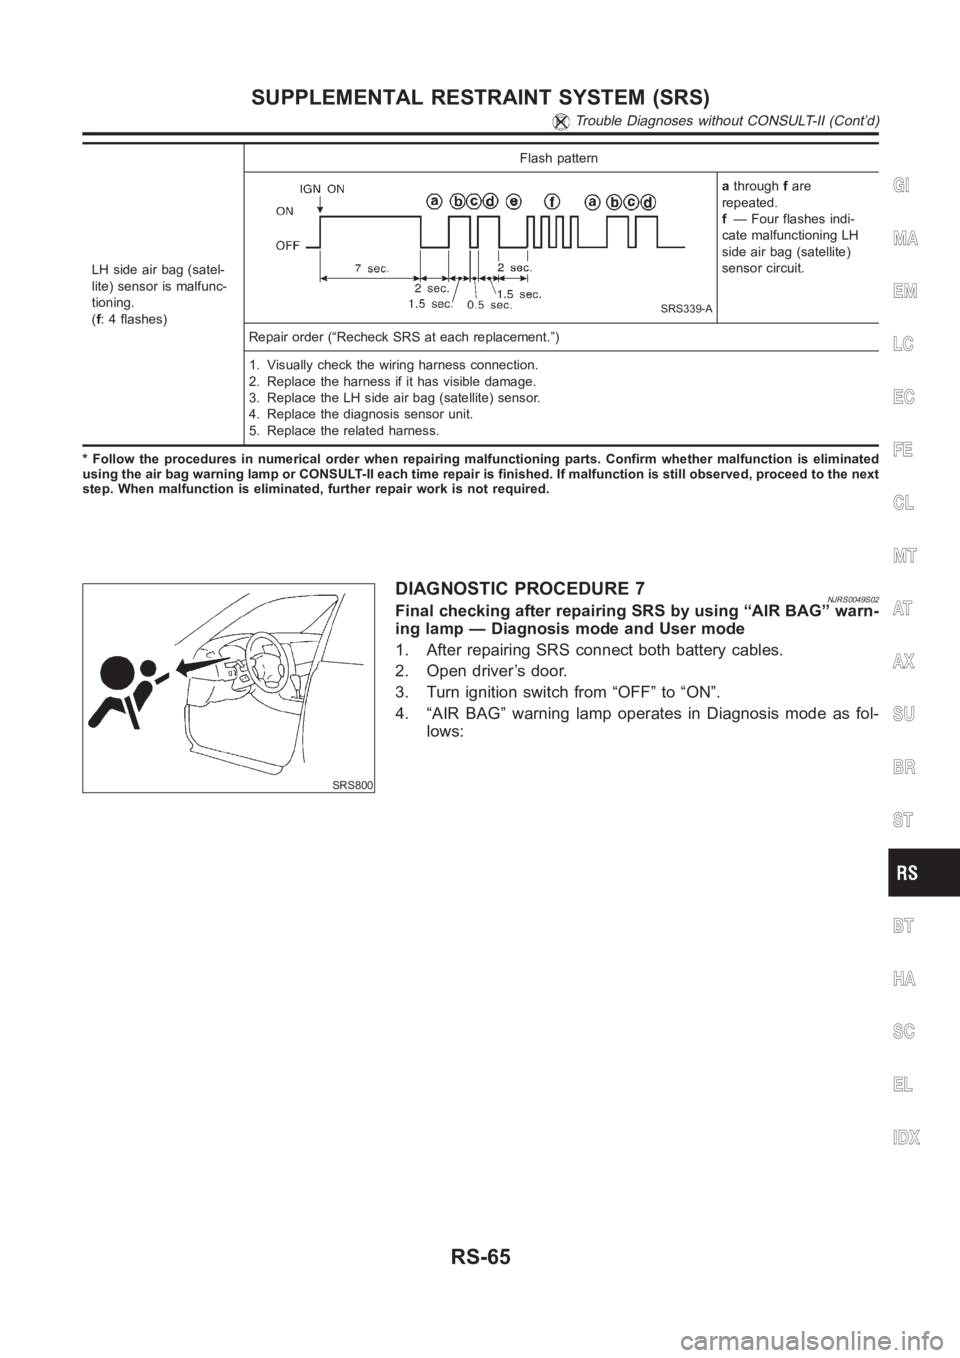
LH side air bag (satel-
lite) sensor is malfunc-
tioning.
(f: 4 flashes)Flash pattern
SRS339-A
athroughfare
repeated.
f— Four flashes indi-
cate malfunctioning LH
side air bag (satellite)
sensor circuit.
Repair order (“Recheck SRS at each replacement.”)
1. Visually check the wiring harness connection.
2. Replace the harness if it has visible damage.
3. Replace the LH side air bag (satellite) sensor.
4. Replace the diagnosis sensor unit.
5. Replace the related harness.
* Follow the procedures in numerical order when repairing malfunctioningparts. Confirm whether malfunction is eliminated
using the air bag warning lamp or CONSULT-II each time repair is finished. If malfunction is still observed, proceed to the next
step. When malfunction is eliminated, further repair work is not required.
SRS800
DIAGNOSTIC PROCEDURE 7NJRS0049S02Final checking after repairing SRS by using “AIR BAG” warn-
ing lamp — Diagnosis mode and User mode
1. After repairing SRS connect both battery cables.
2. Open driver’s door.
3. Turn ignition switch from “OFF” to “ON”.
4. “AIR BAG” warning lamp operates in Diagnosis mode as fol-
lows:
GI
MA
EM
LC
EC
FE
CL
MT
AT
AX
SU
BR
ST
BT
HA
SC
EL
IDX
SUPPLEMENTAL RESTRAINT SYSTEM (SRS)
Trouble Diagnoses without CONSULT-II (Cont’d)
RS-65
Page 3099 of 3189
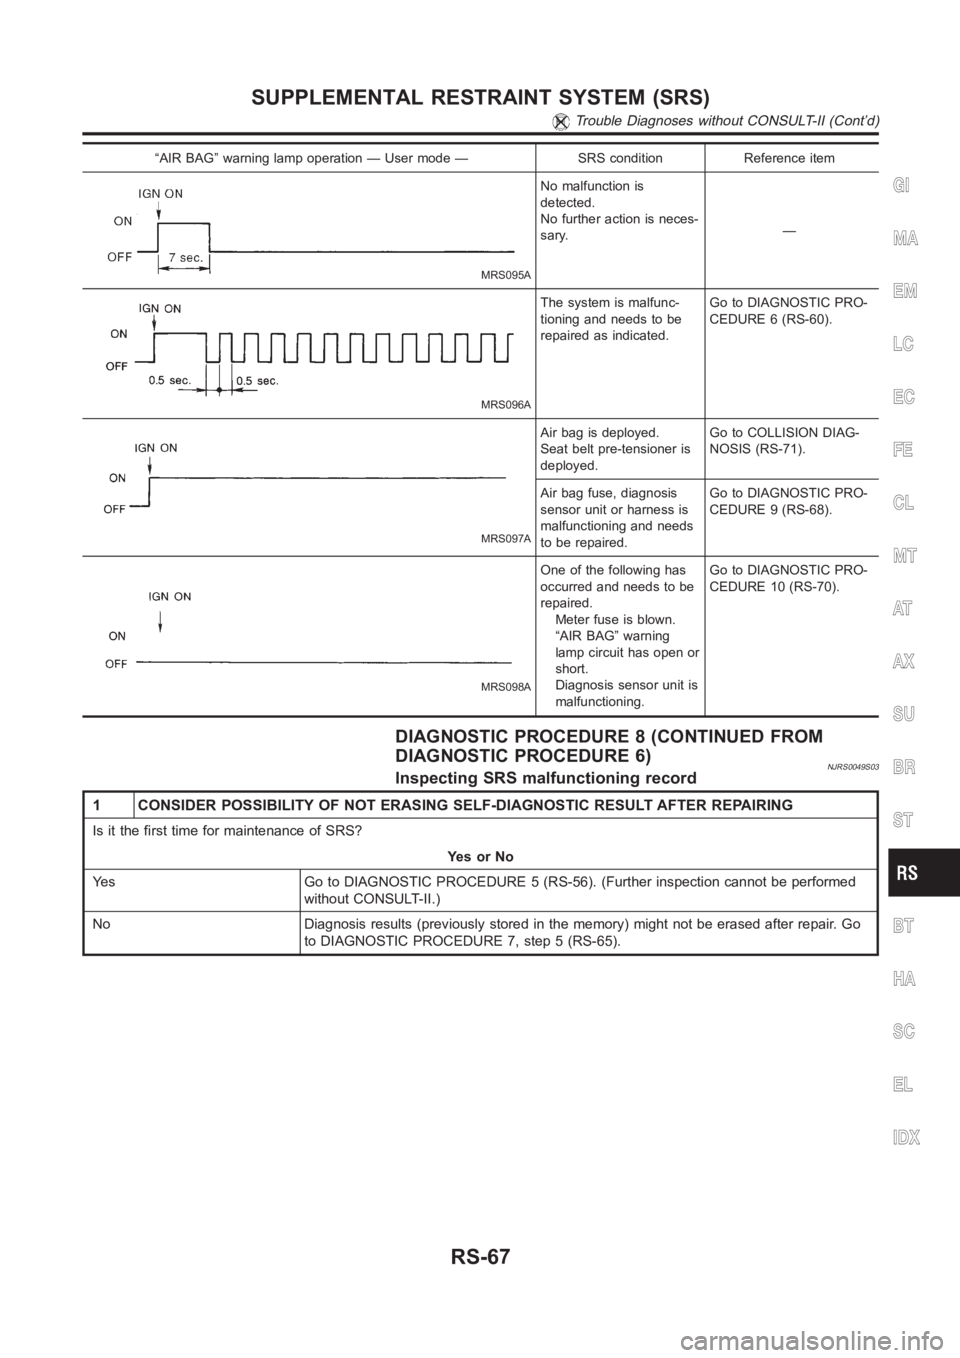
“AIR BAG” warning lamp operation — User mode — SRS condition Reference item
MRS095A
No malfunction is
detected.
No further action is neces-
sary.—
MRS096A
The system is malfunc-
tioning and needs to be
repaired as indicated.Go to DIAGNOSTIC PRO-
CEDURE 6 (RS-60).
MRS097A
Air bag is deployed.
Seat belt pre-tensioner is
deployed.Go to COLLISION DIAG-
NOSIS (RS-71).
Air bag fuse, diagnosis
sensor unit or harness is
malfunctioning and needs
to be repaired.Go to DIAGNOSTIC PRO-
CEDURE 9 (RS-68).
MRS098A
One of the following has
occurred and needs to be
repaired.
Meter fuse is blown.
“AIR BAG” warning
lamp circuit has open or
short.
Diagnosis sensor unit is
malfunctioning.Go to DIAGNOSTIC PRO-
CEDURE 10 (RS-70).
DIAGNOSTIC PROCEDURE 8 (CONTINUED FROM
DIAGNOSTIC PROCEDURE 6)
NJRS0049S03Inspecting SRS malfunctioning record
1 CONSIDER POSSIBILITY OF NOT ERASING SELF-DIAGNOSTIC RESULT AFTER REPAIRING
Is it the first time for maintenance of SRS?
YesorNo
Yes Go to DIAGNOSTIC PROCEDURE 5 (RS-56). (Further inspection cannot be performed
without CONSULT-II.)
No Diagnosis results (previously stored in the memory) might not be erasedafter repair. Go
to DIAGNOSTIC PROCEDURE 7, step 5 (RS-65).
GI
MA
EM
LC
EC
FE
CL
MT
AT
AX
SU
BR
ST
BT
HA
SC
EL
IDX
SUPPLEMENTAL RESTRAINT SYSTEM (SRS)
Trouble Diagnoses without CONSULT-II (Cont’d)
RS-67