2003 NISSAN ALMERA N16 oil pressure
[x] Cancel search: oil pressurePage 1899 of 3189
![NISSAN ALMERA N16 2003 Electronic Repair Manual REPAIR FOR COMPONENT PARTS
AT-443
[ALL]
D
E
F
G
H
I
J
K
L
MA
B
AT
●Check to see that retainer plates are properly positioned in
upper body.
●Be careful not to lose these parts.
Oil Strain NISSAN ALMERA N16 2003 Electronic Repair Manual REPAIR FOR COMPONENT PARTS
AT-443
[ALL]
D
E
F
G
H
I
J
K
L
MA
B
AT
●Check to see that retainer plates are properly positioned in
upper body.
●Be careful not to lose these parts.
Oil Strain](/manual-img/5/57350/w960_57350-1898.png)
REPAIR FOR COMPONENT PARTS
AT-443
[ALL]
D
E
F
G
H
I
J
K
L
MA
B
AT
●Check to see that retainer plates are properly positioned in
upper body.
●Be careful not to lose these parts.
Oil Strainer
●Check wire netting of oil strainer for damage.
Shift Solenoid Valves “A” and “B”, Line Pressure Solenoid Valve, Torque Converter Clutch
Solenoid Valve and Overrun Clutch Solenoid Valve
●Measure resistance.
●Except for EURO-OBD:
●For shift solenoid valve A, refer to AT- 3 5 7 , "SHIFT SOLENOID
VA LV E A" .
●For shift solenoid valve B, refer to AT- 3 6 2 , "SHIFT SOLENOID
VA LV E B" .
●For line pressure solenoid valve, refer to AT- 3 8 8 , "LINE PRES-
SURE SOLENOID VALVE" .
●For torque converter clutch solenoid valve, refer to AT- 3 7 2 ,
"TORQUE CONVERTER CLUTCH SOLENOID VALVE" .
●For overrun clutch solenoid valve, refer to AT- 3 6 7 , "OVERRUN
CLUTCH SOLENOID VALVE" .
●EURO-OBD:
●For shift solenoid valve A, refer to AT-171, "DTC P0750 SHIFT SOLENOID VALVE A" .
●For shift solenoid valve B, refer to AT-176, "DTC P0755 SHIFT SOLENOID VALVE B" .
●For line pressure solenoid valve, refer to AT-164, "DTC P0745 LINE PRESSURE SOLENOID VALVE" .
●For torque converter clutch solenoid valve, refer to AT-159, "DTC P0740 TORQUE CONVERTER
CLUTCH SOLENOID VALVE" .
●For overrun clutch solenoid valve, refer to AT- 1 8 7 , "DTC P1760 OVERRUN CLUTCH SOLENOID VALVE"
.
SAT321G
SAT115D
SAT283HB
Page 1903 of 3189
![NISSAN ALMERA N16 2003 Electronic Repair Manual REPAIR FOR COMPONENT PARTS
AT-447
[ALL]
D
E
F
G
H
I
J
K
L
MA
B
AT
a. Install and tighten bolts B to specified torque.
b. Install solenoid valve assembly and line pressure solenoid valve
to lower body NISSAN ALMERA N16 2003 Electronic Repair Manual REPAIR FOR COMPONENT PARTS
AT-447
[ALL]
D
E
F
G
H
I
J
K
L
MA
B
AT
a. Install and tighten bolts B to specified torque.
b. Install solenoid valve assembly and line pressure solenoid valve
to lower body](/manual-img/5/57350/w960_57350-1902.png)
REPAIR FOR COMPONENT PARTS
AT-447
[ALL]
D
E
F
G
H
I
J
K
L
MA
B
AT
a. Install and tighten bolts B to specified torque.
b. Install solenoid valve assembly and line pressure solenoid valve
to lower body.
c. Remove reamer bolts F and set oil strainer on control valve
assembly.
d. Reinstall reamer bolt F from lower body side.
SAT869J
: 7 - 9 N-m (0.7 - 0.9 kg-m, 61 - 78 in-lb)
SAT081F
SAT316GA
SAT323G
Page 1984 of 3189
ATC-4
PRECAUTIONS
PRECAUTIONS
PFP:00001
Precautions for Supplemental Restraint System (SRS) “AIR BAG” and “SEAT
BELT PRE-TENSIONER”
EJS001YP
The Supplemental Restraint System such as “AIR BAG” and “SEAT BELT PRE-TENSIONER”, used along
with a front seat belt, helps to reduce the risk or severity of injury to the driver and front passenger for certain
types of collision. Information necessary to service the system safely is included in the SRS and SB section of
this Service Manual.
WARNING:
●To avoid rendering the SRS inoperative, which could increase the risk of personal injury or death
in the event of a collision which would result in air bag inflation, all maintenance must be per-
formed by an authorized NISSAN/INFINITI dealer.
●Improper maintenance, including incorrect removal and installation of the SRS, can lead to per-
sonal injury caused by unintentional activation of the system. For removal of Spiral Cable and Air
Bag Module, see the SRS section.
●Do not use electrical test equipment on any circuit related to the SRS unless instructed to in this
Service Manual. SRS wiring harnesses can be identified by yellow and/or orange harness connec-
tors.
Precautions for Working with HFC-134a (R-134a)EJS001YQ
WARNING:
●Use only specified lubricant for the HFC-134a (R-134a) A/C system and HFC-134a (R-134a) compo-
nents. If lubricant other than that specified is used, compressor malfunction is likely to occur.
●The specified HFC-134a (R-134a) lubricant rapidly absorbs moisture from the atmosphere. The fol-
lowing handling precautions must be observed:
–When removing refrigerant components from a vehicle, immediately cap (seal) the component to
minimize the entry of moisture from the atmosphere.
–When installing refrigerant components to a vehicle, do not remove the caps (unseal) until just
before connecting the components. Connect all refrigerant loop components as quickly as possi-
ble to minimize the entry of moisture into system.
–Only use the specified lubricant from a sealed container. Immediately reseal containers of lubri-
cant. Without proper sealing, lubricant will become moisture saturated and should not be used.
–Avoid breathing A/C refrigerant and lubricant vapor or mist. Exposure may irritate eyes, nose and
throat. Remove HFC-134a (R-134a) from the A/C system, using certified service equipment meet-
ing requirements of SAE J2210 HFC-134a (R-134a) recycling equipment, or J2209 HFC-134a (R-
134a) recovery equipment. If accidental system discharge occurs, ventilate work area before
resuming service. Additional health and safety information may be obtained from refrigerant and
lubricant manufacturers.
–Do not allow lubricant (Nissan A/C System Oil Type S) to come in contact with styrofoam parts.
Damage may result.
General Refrigerant PrecautionsEJS001YR
WARNING:
●Do not release refrigerant into the air. Use approved recovery/recycling equipment to capture the
refrigerant every time an air conditioning system is discharged.
●Always wear eye and hand protection (goggles and gloves) when working with any refrigerant or
air conditioning system.
●Do not store or heat refrigerant containers above 52°C (125°F).
●Do not heat a refrigerant container with an open flame; if container warming is required, place the
bottom of the container in a warm pail of water.
●Do not intentionally drop, puncture, or incinerate refrigerant containers.
●Keep refrigerant away from open flames: poisonous gas will be produced if refrigerant burns.
●Refrigerant will displace oxygen, therefore be certain to work in well ventilated areas to prevent
suffocation.
●Do not pressure test or leak test HFC-134a (R-134a) service equipment and/or vehicle air condi-
tioning systems with compressed air during repair. Some mixtures of air and HFC-134a (R-134a)
Page 1985 of 3189
PRECAUTIONS
ATC-5
C
D
E
F
G
H
I
K
L
MA
B
AT C
have been shown to be combustible at elevated pressures. These mixtures, if ignited, may cause
injury or property damage. Additional health and safety information may be obtained from refriger-
ant manufacturers.
Lubricant PrecautionsEJS001YS
●Use only specified lubricant for the HFC-134a (R-134a) A/C system and HFC-134a (R-134a) components.
If lubricant other than that specified is used, compressor malfunction is likely to occur.
●The specified HFC-134a (R-134a) lubricant rapidly absorbs moisture from the atmosphere. The following
handling precautions must be observed:
–When removing refrigerant components from a vehicle, immediately cap (seal) the component to minimize
the entry of moisture from the atmosphere.
–When installing refrigerant components to a vehicle, do not remove the caps (unseal) until just before con-
necting the components. Connect all refrigerant loop components as quickly as possible to minimize the
entry of moisture into system.
–Only use the specified lubricant from a sealed container. Immediately reseal containers of lubricant. With-
out proper sealing, lubricant will become moisture saturated and should not be used.
●Avoid breathing A/C refrigerant and lubricant vapor or mist. Exposure may irritate eyes, nose and throat.
Remove HFC-134a (R-134a) from the A/C system, using certified service equipment meeting require-
ments of SAE J2210 HFC-134a (R-134a) recycling equipment, or J2209 HFC-134a (R-134a) recovery
equipment. If accidental system discharge occurs, ventilate work area before resuming service. Additional
health and safety information may be obtained from refrigerant and lubricant manufacturers.
●Do not allow lubricant (Nissan A/C System Oil Type S) to come in contact with styrofoam parts. Damage
may result.
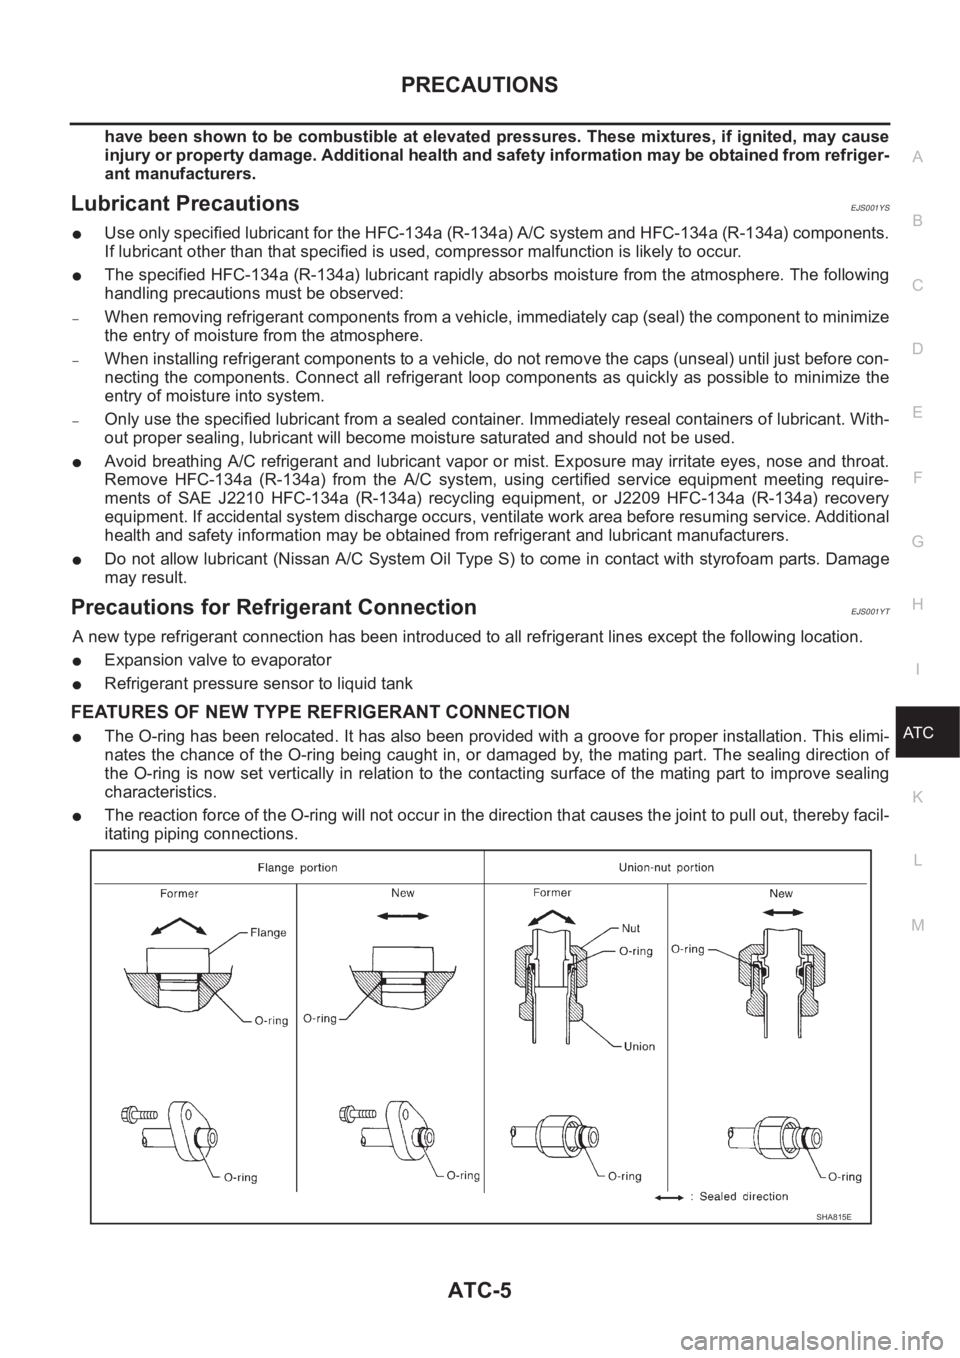
Precautions for Refrigerant ConnectionEJS001YT
A new type refrigerant connection has been introduced to all refrigerant lines except the following location.
●Expansion valve to evaporator
●Refrigerant pressure sensor to liquid tank
FEATURES OF NEW TYPE REFRIGERANT CONNECTION
●The O-ring has been relocated. It has also been provided with a groove for proper installation. This elimi-
nates the chance of the O-ring being caught in, or damaged by, the mating part. The sealing direction of
the O-ring is now set vertically in relation to the contacting surface of the mating part to improve sealing
characteristics.
●The reaction force of the O-ring will not occur in the direction that causes the joint to pull out, thereby facil-
itating piping connections.
SHA815E
Page 1995 of 3189
REFRIGERATION SYSTEM
ATC-15
C
D
E
F
G
H
I
K
L
MA
B
AT C
REFRIGERATION SYSTEMPFP:KA990
Refrigerant CycleEJS001Z0
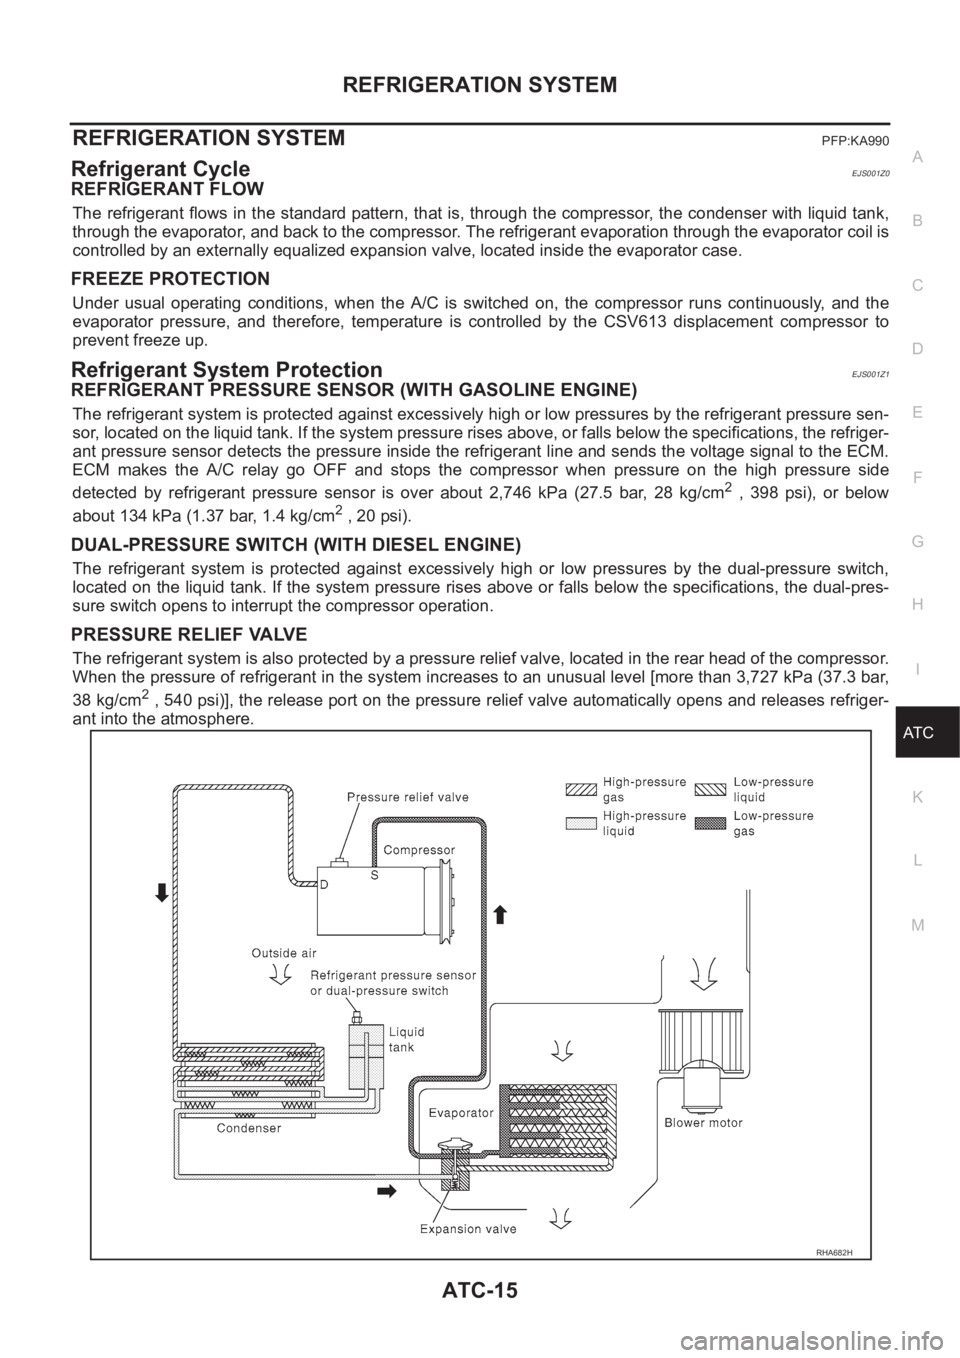
REFRIGERANT FLOW
The refrigerant flows in the standard pattern, that is, through the compressor, the condenser with liquid tank,
through the evaporator, and back to the compressor. The refrigerant evaporation through the evaporator coil is
controlled by an externally equalized expansion valve, located inside the evaporator case.
FREEZE PROTECTION
Under usual operating conditions, when the A/C is switched on, the compressor runs continuously, and the
evaporator pressure, and therefore, temperature is controlled by the CSV613 displacement compressor to
prevent freeze up.
Refrigerant System ProtectionEJS001Z1
REFRIGERANT PRESSURE SENSOR (WITH GASOLINE ENGINE)
The refrigerant system is protected against excessively high or low pressures by the refrigerant pressure sen-
sor, located on the liquid tank. If the system pressure rises above, or falls below the specifications, the refriger-
ant pressure sensor detects the pressure inside the refrigerant line and sends the voltage signal to the ECM.
ECM makes the A/C relay go OFF and stops the compressor when pressure on the high pressure side
detected by refrigerant pressure sensor is over about 2,746 kPa (27.5 bar, 28 kg/cm
2 , 398 psi), or below
about 134 kPa (1.37 bar, 1.4 kg/cm
2 , 20 psi).
DUAL-PRESSURE SWITCH (WITH DIESEL ENGINE)
The refrigerant system is protected against excessively high or low pressures by the dual-pressure switch,
located on the liquid tank. If the system pressure rises above or falls below the specifications, the dual-pres-
sure switch opens to interrupt the compressor operation.
PRESSURE RELIEF VALVE
The refrigerant system is also protected by a pressure relief valve, located in the rear head of the compressor.
When the pressure of refrigerant in the system increases to an unusual level [more than 3,727 kPa (37.3 bar,
38 kg/cm
2 , 540 psi)], the release port on the pressure relief valve automatically opens and releases refriger-
ant into the atmosphere.
RHA682H
Page 2058 of 3189
ATC-78
TROUBLE DIAGNOSIS
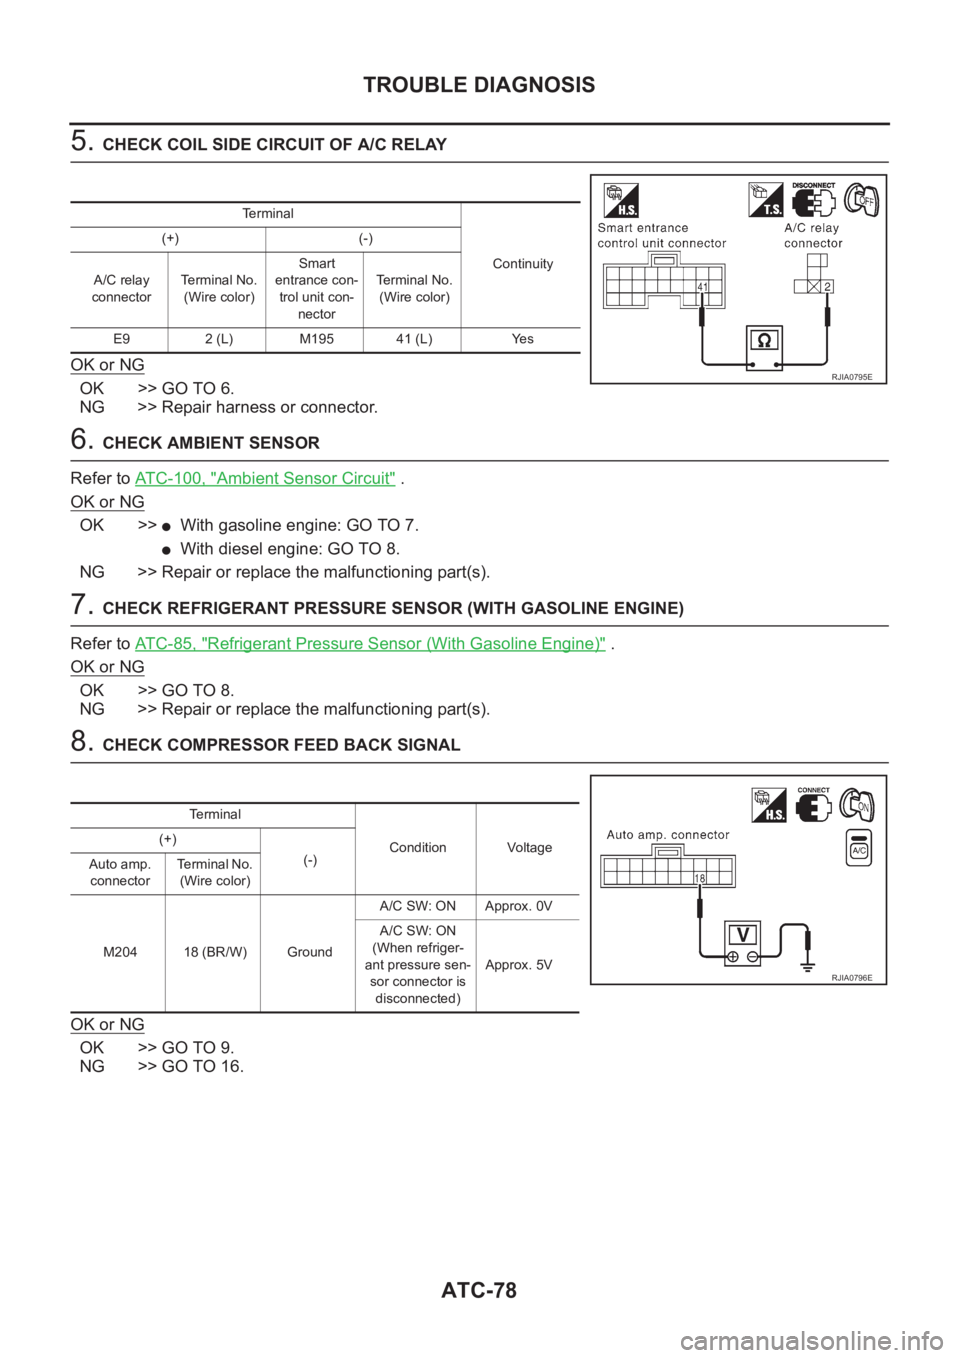
5. CHECK COIL SIDE CIRCUIT OF A/C RELAY
OK or NG
OK >> GO TO 6.
NG >> Repair harness or connector.
6. CHECK AMBIENT SENSOR
Refer to ATC-100, "
Ambient Sensor Circuit" .
OK or NG
OK >>●With gasoline engine: GO TO 7.
●With diesel engine: GO TO 8.
NG >> Repair or replace the malfunctioning part(s).
7. CHECK REFRIGERANT PRESSURE SENSOR (WITH GASOLINE ENGINE)
Refer to AT C - 8 5 , "
Refrigerant Pressure Sensor (With Gasoline Engine)" .
OK or NG
OK >> GO TO 8.
NG >> Repair or replace the malfunctioning part(s).
8. CHECK COMPRESSOR FEED BACK SIGNAL
OK or NG
OK >> GO TO 9.
NG >> GO TO 16.
Terminal
Continuity (+) (-)
A/C relay
connectorTerminal No.
(Wire color)Smart
entrance con-
trol unit con-
nectorTerminal No.
(Wire color)
E9 2 (L) M195 41 (L) Yes
RJIA0795E
Terminal
Condition Voltage (+)
(-)
Auto amp.
connectorTerminal No.
(Wire color)
M204 18 (BR/W) GroundA/C SW: ON Approx. 0V
A/C SW: ON
(When refriger-
ant pressure sen-
sor connector is
disconnected)Approx. 5V
RJIA0796E
Page 2117 of 3189
REFRIGERANT LINES
ATC-137
C
D
E
F
G
H
I
K
L
MA
B
AT C
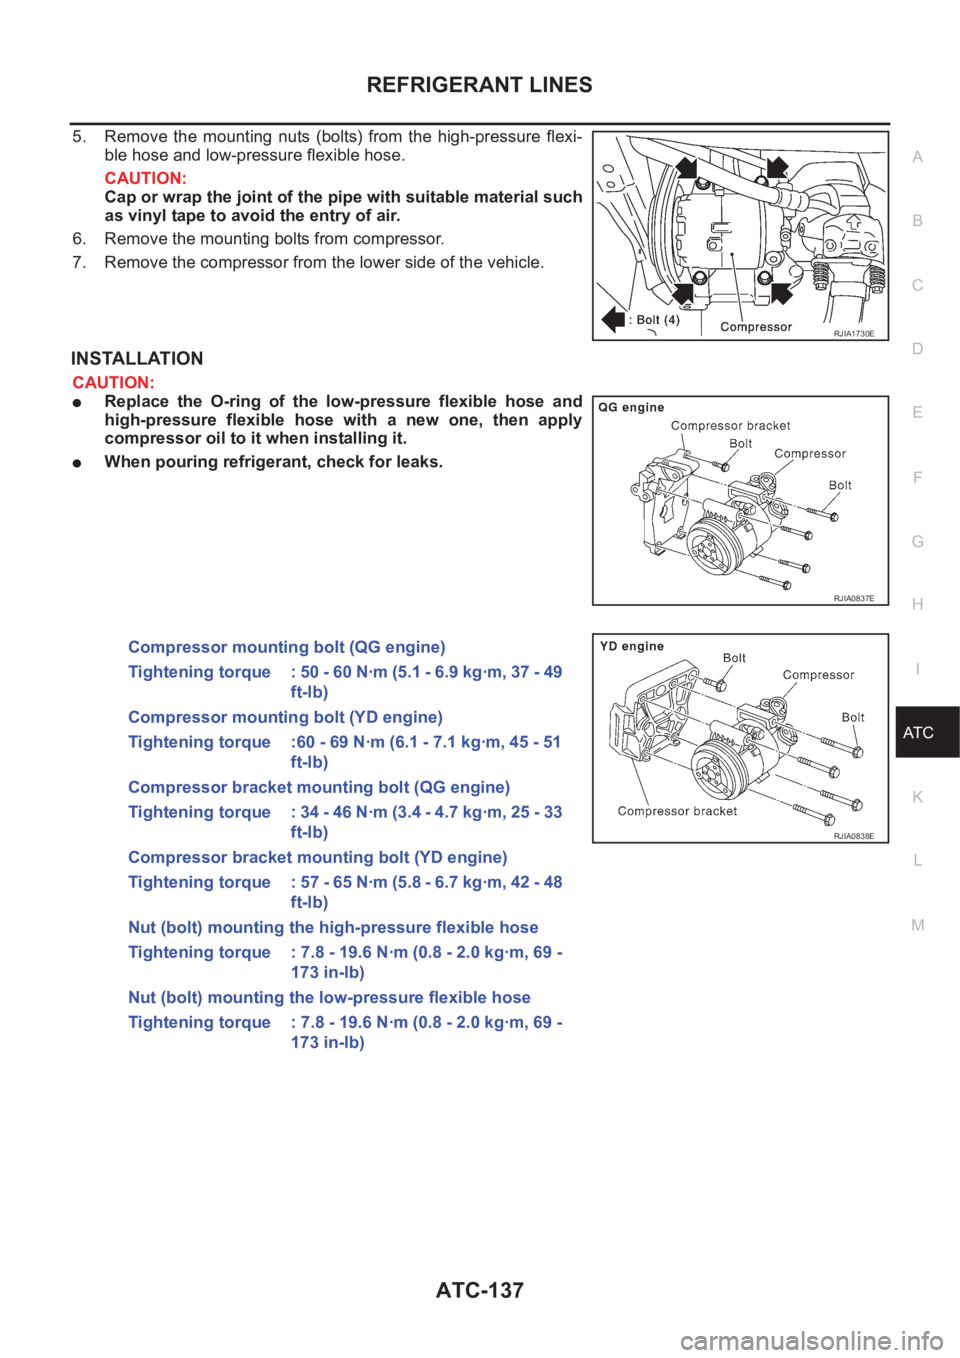
5. Remove the mounting nuts (bolts) from the high-pressure flexi-
ble hose and low-pressure flexible hose.
CAUTION:
Cap or wrap the joint of the pipe with suitable material such
as vinyl tape to avoid the entry of air.
6. Remove the mounting bolts from compressor.
7. Remove the compressor from the lower side of the vehicle.
INSTALLATION
CAUTION:
●Replace the O-ring of the low-pressure flexible hose and
high-pressure flexible hose with a new one, then apply
compressor oil to it when installing it.
●When pouring refrigerant, check for leaks.
RJIA1730E
RJIA0837E
Compressor mounting bolt (QG engine)
Tightening torque : 50 - 60 N·m (5.1 - 6.9 kg·m, 37 - 49
ft-lb)
Compressor mounting bolt (YD engine)
Tightening torque :60 - 69 N·m (6.1 - 7.1 kg·m, 45 - 51
ft-lb)
Compressor bracket mounting bolt (QG engine)
Tightening torque : 34 - 46 N·m (3.4 - 4.7 kg·m, 25 - 33
ft-lb)
Compressor bracket mounting bolt (YD engine)
Tightening torque : 57 - 65 N·m (5.8 - 6.7 kg·m, 42 - 48
ft-lb)
Nut (bolt) mounting the high-pressure flexible hose
Tightening torque : 7.8 - 19.6 N·m (0.8 - 2.0 kg·m, 69 -
173 in-lb)
Nut (bolt) mounting the low-pressure flexible hose
Tightening torque : 7.8 - 19.6 N·m (0.8 - 2.0 kg·m, 69 -
173 in-lb)
RJIA0838E
Page 2121 of 3189
REFRIGERANT LINES
ATC-141
C
D
E
F
G
H
I
K
L
MA
B
AT C
Break-In Operation
When replacing compressor clutch assembly, always carry out the break-in operation. This is done by engag-
ing and disengaging the clutch about thirty times. Break-in operation raises the level of transmitted torque.
Low-pressure Flexible HoseEJS0020M
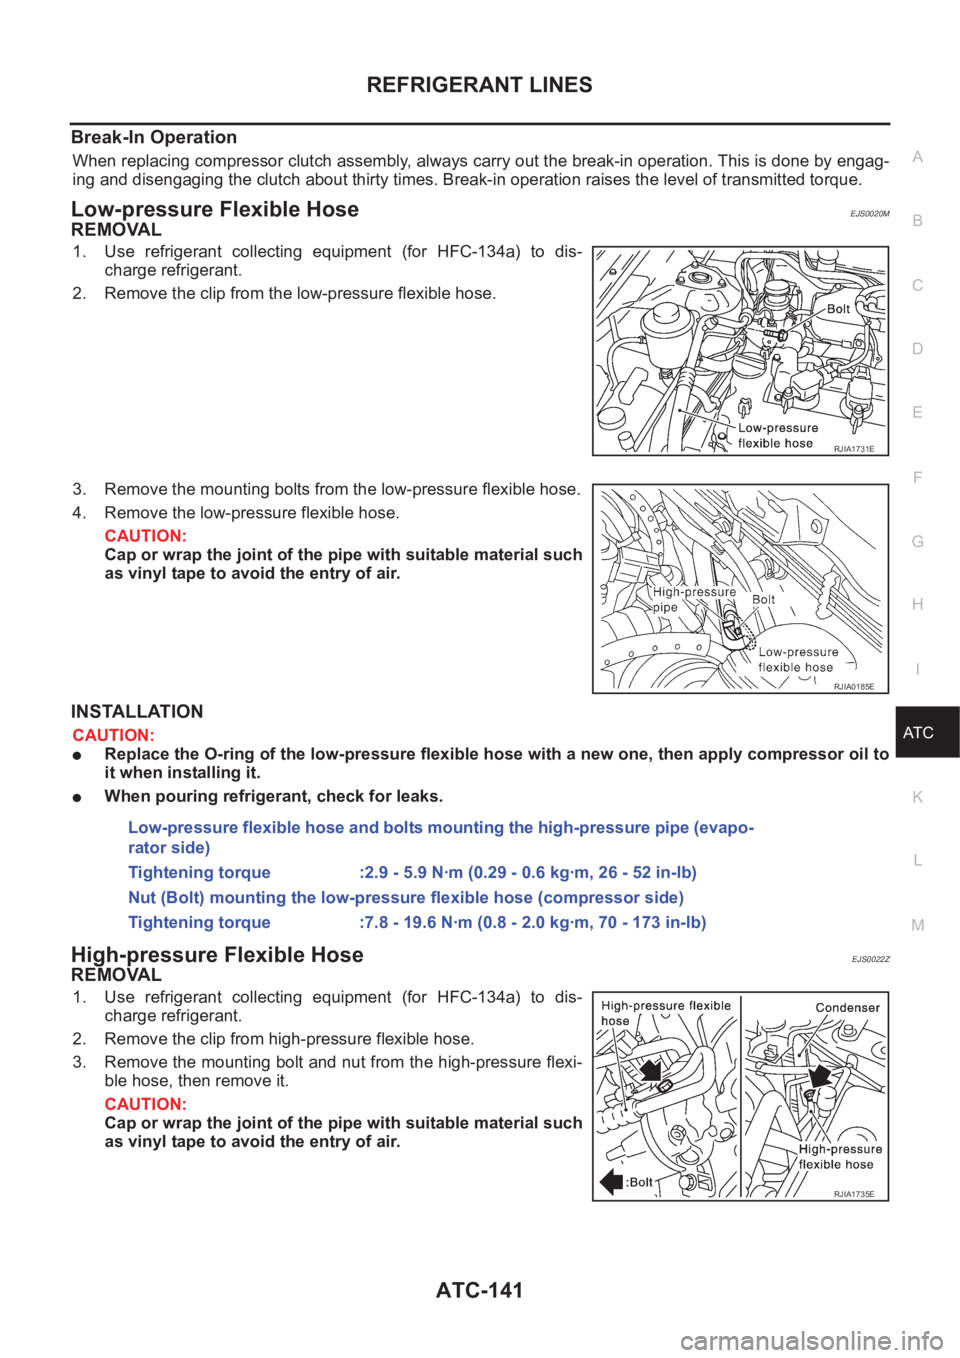
REMOVAL
1. Use refrigerant collecting equipment (for HFC-134a) to dis-
charge refrigerant.
2. Remove the clip from the low-pressure flexible hose.
3. Remove the mounting bolts from the low-pressure flexible hose.
4. Remove the low-pressure flexible hose.
CAUTION:
Cap or wrap the joint of the pipe with suitable material such
as vinyl tape to avoid the entry of air.
INSTALLATION
CAUTION:
●Replace the O-ring of the low-pressure flexible hose with a new one, then apply compressor oil to
it when installing it.
●When pouring refrigerant, check for leaks.
High-pressure Flexible HoseEJS0022Z
REMOVAL
1. Use refrigerant collecting equipment (for HFC-134a) to dis-
charge refrigerant.
2. Remove the clip from high-pressure flexible hose.
3. Remove the mounting bolt and nut from the high-pressure flexi-
ble hose, then remove it.
CAUTION:
Cap or wrap the joint of the pipe with suitable material such
as vinyl tape to avoid the entry of air.
RJIA1731E
RJIA0185E
Low-pressure flexible hose and bolts mounting the high-pressure pipe (evapo-
rator side)
Tightening torque :2.9 - 5.9 N·m (0.29 - 0.6 kg·m, 26 - 52 in-lb)
Nut (Bolt) mounting the low-pressure flexible hose (compressor side)
Tightening torque :7.8 - 19.6 N·m (0.8 - 2.0 kg·m, 70 - 173 in-lb)
RJIA1735E