2003 NISSAN 350Z change wheel
[x] Cancel search: change wheelPage 17 of 227
may inflate if the forces in another type of
collision are similar to those of a higher severity
frontal impact. They may not inflate in certain
frontal collisions. Vehicle damage (or lack of it) is
not always an indication of proper supplemental
air bag operation.
The supplemental air bag system has dual stage
inflators for both the driver and passenger air
bags. The system monitors information from the
crash zone sensor, the diagnosis sensor unit and
seat belt buckle sensors that detect if the seat
belts are fastened, inflator operation is based on
the severity of a collision and whether the seat
belts are being used. Only one front air bag may
inflate in a crash, depending on the crash sever-
ity and whether the front occupants are belted or
unbelted. This does not indicate improper per-
formance of the system. If you have any ques-
tions about the performance of your air bag
system, please contact your NISSAN dealer.
When the supplemental front air bag inflates, a
fairly loud noise may be heard, followed by
release of smoke. This smoke is not harmful and
does not indicate a fire. Care should be taken
not to inhale it, as it may cause irritation and
choking. Those with a history of a breathing
condition should get fresh air promptly.
Supplemental front air bags, along with the use
of seat belts, help to cushion the impact force onthe face and chest of the front occupants. They
can help save lives and reduce serious injuries.
However, an inflating front air bag may cause
facial abrasions or other injuries. Front air bags
do not provide restraint to the lower body.
The seat belts should be correctly worn and the
driver and passenger seated upright as far as
practical away from the steering wheel or instru-
ment panel. The supplemental front air bags
inflates quickly in order to help protect the front
occupants. Because of this, the force of the front
air bag inflating can increase the risk of injury if
the occupant is too close to, or is against, the air
bag module during inflation. The air bag will
deflate quickly after the collision is over.
After turning the ignition key to the ON
position, the supplemental air bag warning
light illuminates. The supplemental air bag
warning light will turn off after about 7
seconds if the system is operational.
WARNING
IDo not place any objects on the
steering wheel pad or on the instru-
ment panel. Also, do not place any
objects between any occupant andthe steering wheel or instrument
panel. Such objects may become
dangerous projectiles and cause in-
jury if the supplemental front air bag
inflates.
IRight after inflation, several air bag
system components will be hot. Do
not touch them; you may severely
burn yourself.
INo unauthorized changes should be
made to any components or wiring of
the supplemental front air bag sys-
tem. This is to prevent accidental in-
flation of the air bag or damage to
the air bag system.
IDo not make unauthorized changes
to your vehicle's electrical system,
suspension system or front end
structure. This could affect proper
operation of the supplemental air
bag system.
ITampering with the supplemental
front air bag system may result in
serious personal injury. Tampering
1-12
Seats, restraints and supplemental air bag systems
Z
02.9.13/Z33-D/V5.0
X
Page 18 of 227
includes changes to the steering
wheel and the instrument panel as-
sembly by placing material over the
steering wheel pad, above the dash-
board, or by installing additional trim
material around the air bag system.
IWork around and on the supplemen-
tal front air bag system should be
done by a NISSAN dealer. Installa-
tion of electrical equipment should
also be done by a NISSAN dealer.
The yellow and orange Supplemental
Restrain System (SRS) wiring and
connectors should not be modified or
disconnected. Unauthorized electri-
cal test equipment and probing de-
vices should not be used on the air
bag system.
IA cracked windshield should be re-
placed immediately by a qualified re-
pair facility. A cracked windshield
could affect inflation of the supple-
mental air bag system.
IThe SRS wiring harness connectors
are yellow and orange for easyidentification.
When selling your vehicle, we request that you
inform the buyer about the supplemental front air
bag system and guide the buyer to the appro-
priate sections in this Owner's Manual.
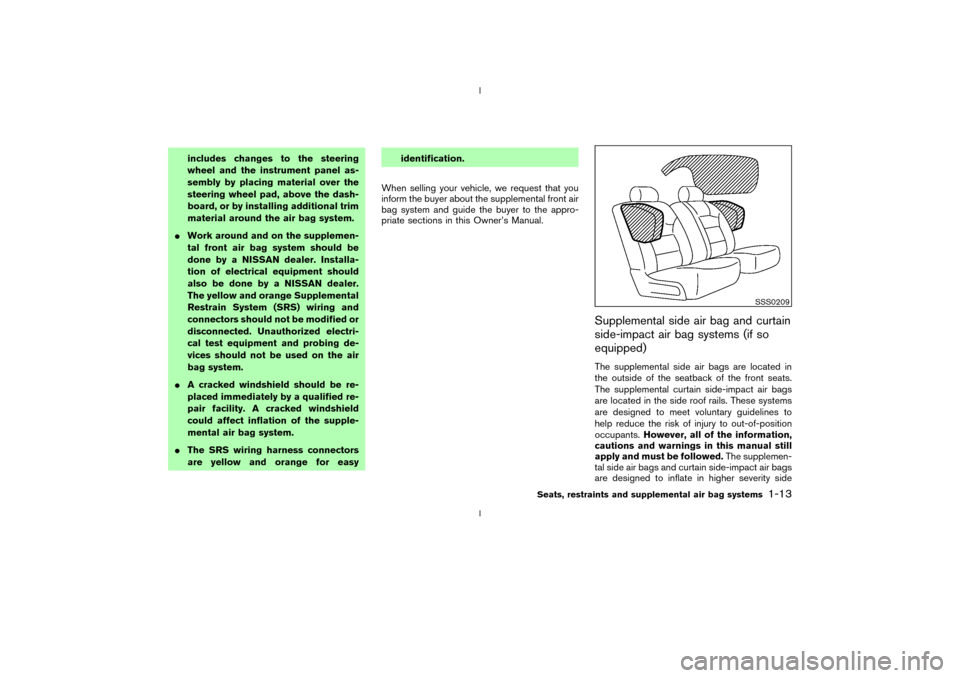
Supplemental side air bag and curtain
side-impact air bag systems (if so
equipped)The supplemental side air bags are located in
the outside of the seatback of the front seats.
The supplemental curtain side-impact air bags
are located in the side roof rails. These systems
are designed to meet voluntary guidelines to
help reduce the risk of injury to out-of-position
occupants.However, all of the information,
cautions and warnings in this manual still
apply and must be followed.The supplemen-
tal side air bags and curtain side-impact air bags
are designed to inflate in higher severity side
SSS0209
Seats, restraints and supplemental air bag systems
1-13
Z
02.9.13/Z33-D/V5.0
X
Page 48 of 227

temperature displayed on various signs or bill-
boards.Distance to empty (dte Ð mile or km)The distance to empty (dte) mode provides you
with an estimation of the distance that can be
driven before refueling. The dte is constantly
being calculated, based on the amount of fuel in
the fuel tank and the actual fuel consumption.
The display is updated every 30 seconds.
The dte mode includes a low range warning
feature: when the fuel level is low, the dte mode
is automatically selected and the digits blink in
order to draw the driver's attention. Press the
mode switch
qAif you wish to return to the mode
that was selected before the warning occurred.
The dte indicator will remain blinking until the
vehicle is refuelled.
When the fuel level drops even lower, the dte
display will change to (----).
NOTE:
IIf the amount of fuel added while the
ignition switch is OFF is small, the dis-
play just before the ignition switch is
turned OFF may continue to be dis-
played.
IWhen driving uphill or rounding curves,
the fuel in the tank shifts, which maymomentarily change the display.
Average fuel consumption
(Mpg or l/100 km)The average fuel consumption mode shows the
average fuel consumption since the last reset.
Resetting is done by pressing the trip computer
setting switch
qB
for more than approximately 1
second. (The average speed is also reset at the
same time.)
The display is updated every 30 seconds. At
about the first 1/3 miles (500 m) after a reset,
the display shows (----).
Average speed (MPH or km/h)The average speed mode shows the average
vehicle speed since the last reset. Resetting is
done by pressing the setting switch
qB
for more
than approximately 1 second. (The average fuel
consumption is also reset at the same time.)
The display is updated every 30 seconds. The
first 30 seconds after a reset, the display shows
(----).
Elapsed time (h:m:s)The elapsed time mode shows the time since the
last reset. The displayed time can be reset by
pressing the trip computer setting switch
qB
for
more than approximately 1 second. (The tripodometer is also reset at the same time.)
Trip odometer (MLS or km)The trip odometer mode shows the total dis-
tance the vehicle has been driven since the last
reset. Resetting is done by pressing the setting
switch
qBfor more than approximately 1 second.
(The elapsed time is also reset at the same time.)
Stopwatch (h:m:s)You can use the trip computer as a stopwatch.
Each time the trip computer setting switch
qB
is
pressed, the stopwatch will be operated as
follows:
After 100 hours, the time will start from the reset
display again.
Even if the display is switched to the other mode
while the time is starting, the stopwatch contin-
ues to advance until you stop the time in the
stopwatch mode. When the ignition switch is
turned OFF, the time is reset.Tire pressure indicator (PSI) (if so
equipped)The tire pressure indicator shows tire pressure
(0 - 51 psi) of all wheels (except the spare tire)
Instruments and controls
2-9
Z
02.9.13/Z33-D/V5.0
X
Page 49 of 227
by sending a signal from a sensor that is installed
in each wheel. Press the trip computer setting
switch
qBto change the display to F (front) or R
(rear).
The tire pressure sensor will activate only when
the vehicle is driven at speeds above 20 MPH
(32 km/h). If the tire pressure signal cannot be
received correctly, the display shows (----).
The tire pressure indicator mode includes a low
tire pressure warning feature. If the vehicle is
being driven with very low tire pressure or a flat
tire, the tire pressure indicator mode is automati-
cally selected and the PSI indicator will blink in
order to attract the driver's attention. Press the
trip computer mode switch
qA
if you wish to
return to the mode that was selected before the
warning occurred. The PSI indicator will con-
tinue blinking until the tire pressure of each tire is
properly adjusted.
For additional information, see ªLow tire pres-
sure warning systemº in the ª5. Starting and
drivingº section and ªFlat tireº in the ª6. In case
of emergencyº section.
Tire pressure shown in the display may rise
or fall while driving depending on the driv-
ing conditions (heat, etc.) and/or the out-
side temperature. This does not indicate a
system malfunction.
WARNING
The low tire pressure warning system is
not a substitute for the regular tire pres-
sure check. Be sure to check the tire
pressure regularly and adjust it to the
COLD tire pressure shown in the tire
placard.Up-shift indicator setting (rpm) (for
manual transmission models)The up-shift indicator setting mode is used to
set the desired engine speed (rpm) for the
up-shift indicator (situated in the tachometer) to
illuminate. When the engine speed approaches
or reaches the set figure, the up-shift indicator
will flash or illuminate to show the driver the
timing for shifting into a higher gear. See ªDriving
the vehicleº in the ª5. Starting and drivingº
section for the use of the up-shift indicator.
When the up-shift indicator setting mode is
selected, the rpm indicator blinks and the engine
speed currently set is displayed. (The initial
factory setting is 6,600 rpm.) The figure can be
changed between 2,000 and 8,000 rpm by
pressing trip computer setting switch
qB. Press-
ing the switch for less than approximately 1second will add the figure by 100 rpm. If press-
ing for more than approximately 1 second, the
figure will increase by 500 rpm.
If the battery cable is disconnected, the set
engine speed will be returned to the initial figure
(6,600 rpm).
Display priorityIf a low outside air temperature warning,
low dte (distance to empty) range warning
and low tire pressure warning occur simul-
taneously, other display modes switch au-
tomatically to the outside air temperature
display.
When trip computer mode switch
qA
is
pressed, the display switches to the mode
chosen before the warning display, but the
ICY indicator will continue blinking.
2-10
Instruments and controls
Z
02.9.13/Z33-D/V5.0
X
Page 121 of 227
ªWarning/indicator lights and audible remind-
ersº in the ª2. Instruments and controlsº section.
WARNING
IIf the low tire pressure warning light
in the meter panel comes on and/or
the PSI indicator on the trip computer
flashes while driving, avoid sudden
steering maneuvers or abrupt brak-
ing, reduce vehicle speed, pull off the
road to a safe location and stop the
vehicle as soon as possible. Serious
vehicle damage could occur and may
lead to an accident and could result
in serious personal injury. Check the
pressure for all four tires and adjust
the pressure to the COLD tire pres-
sure shown on the tire placard. If you
have a flat tire, replace it with a spare
tire as soon as possible. (See ªFlat
tireº in the ª6. In case of emergencyº
section for changing a flat tire.)
IWhen a spare tire is mounted or a
wheel is replaced, tire pressure will
not be indicated and the low tirepressure warning system will not
function. Contact your NISSAN
dealer as soon as possible for tire
replacement and/or system reset-
ting.
IDo not inject any tire liquid or aerosol
tire sealant into the tires, as this may
cause a malfunction of the tire pres-
sure sensors.
CAUTION
Do not place metalized film or any metal
parts (antenna, etc.) on the windows.
This may cause poor reception of the
signals from the tire pressure sensors,
and the low tire pressure warning sys-
tem will not function properly.
FCC Notice:
Changes or modifications not expressly
approved by the manufacturer compliance
could void the user's authority to operate
the equipment.This device complies with Part 15 of the
FCC Rules and RSS-210 of Industry
Canada.
Operation is subject to the following two
conditions: (1) This device may not cause
harmful interference, and (2) this device
must accept any interference received, in-
cluding interference that may cause undes-
ired operation of the device.
AVOIDING COLLISION AND
ROLLOVER
WARNING
Failure to operate this vehicle in a safe
and prudent manner may result in loss
of control or an accident.
Be alert and drive defensively at all times. Obey
all traffic regulations. Avoid excessive speed,
high speed cornering, or sudden steering ma-
neuvers, because these driving practices could
cause you to lose control of your vehicle.As
with any vehicle, a loss of control could
result in a collision with other vehicles or
objects, or cause the vehicle to rollover,
particularly if the loss of control causes the
vehicle to slide sideways.Be attentive at all
5-4
Starting and driving
Z
02.9.13/Z33-D/V5.0
X
Page 146 of 227
verse), or the automatic transmission
into P (Park).
INever change tires when the vehicle
is on a slope, ice or slippery areas.
This is hazardous.
INever change tires if oncoming traffic
is close to your vehicle. Wait for pro-
fessional road assistance.
IWhen a spare tire is mounted or a
wheel is replaced, tire pressure will
not be indicated and the low tire
pressure warning system will not
function. Contact your NISSAN
dealer as soon as possible for tire
replacement and/or system reset-
ting. (For models with the low tire
pressure warning system)
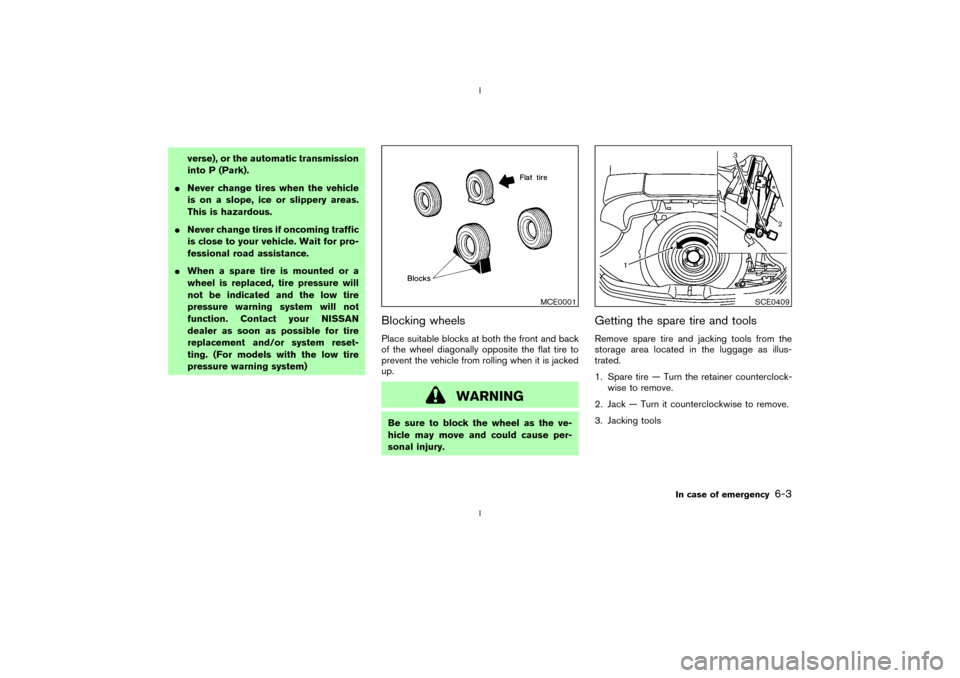
Blocking wheelsPlace suitable blocks at both the front and back
of the wheel diagonally opposite the flat tire to
prevent the vehicle from rolling when it is jacked
up.
WARNING
Be sure to block the wheel as the ve-
hicle may move and could cause per-
sonal injury.
Getting the spare tire and toolsRemove spare tire and jacking tools from the
storage area located in the luggage as illus-
trated.
1. Spare tire Ð Turn the retainer counterclock-
wise to remove.
2. Jack Ð Turn it counterclockwise to remove.
3. Jacking tools
MCE0001
SCE0409
In case of emergency
6-3
Z
02.9.13/Z33-D/V5.0
X
Page 147 of 227
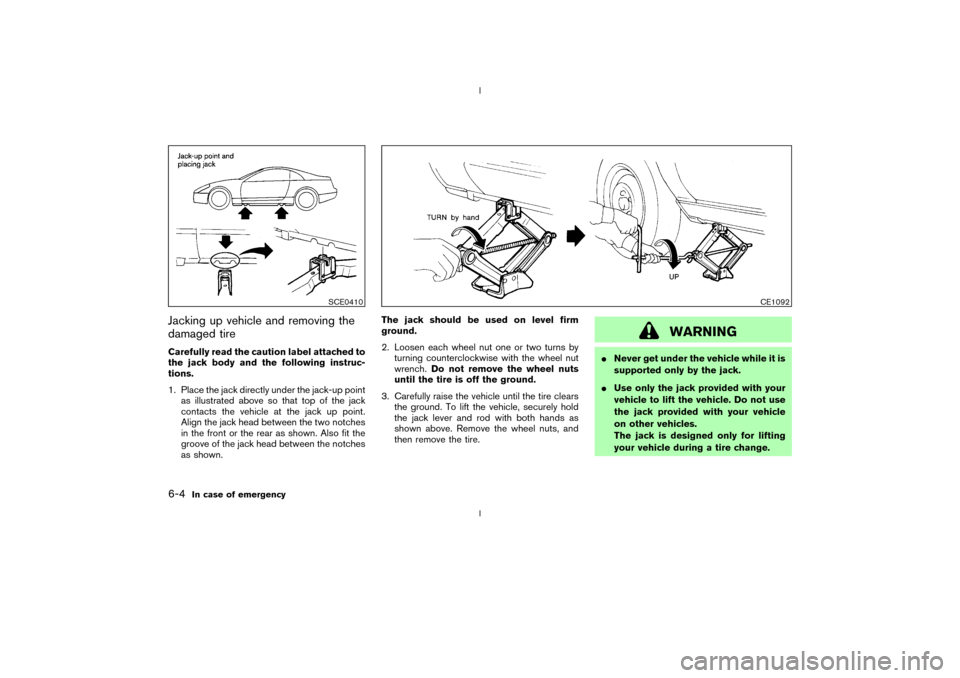
Jacking up vehicle and removing the
damaged tireCarefully read the caution label attached to
the jack body and the following instruc-
tions.
1. Place the jack directly under the jack-up point
as illustrated above so that top of the jack
contacts the vehicle at the jack up point.
Align the jack head between the two notches
in the front or the rear as shown. Also fit the
groove of the jack head between the notches
as shown.The jack should be used on level firm
ground.
2. Loosen each wheel nut one or two turns by
turning counterclockwise with the wheel nut
wrench.Do not remove the wheel nuts
until the tire is off the ground.
3. Carefully raise the vehicle until the tire clears
the ground. To lift the vehicle, securely hold
the jack lever and rod with both hands as
shown above. Remove the wheel nuts, and
then remove the tire.
WARNING
INever get under the vehicle while it is
supported only by the jack.
IUse only the jack provided with your
vehicle to lift the vehicle. Do not use
the jack provided with your vehicle
on other vehicles.
The jack is designed only for lifting
your vehicle during a tire change.
SCE0410
CE1092
6-4
In case of emergency
Z
02.9.13/Z33-D/V5.0
X
Page 164 of 227

Tire rotation*:Tires cannot be rotated in this
vehicle.
Wheel alignment and balance:If the vehicle
pulls to either side while driving on a straight and
level road, or if you detect uneven or abnormal
tire wear, there may be a need for wheel align-
ment.
If the steering wheel or seat vibrates at normal
highway speeds, wheel balancing may be
needed.
For additional information regarding tires, refer to
ªImportant Tire Safety Informationº (US) or ªTire
Safety Informationº (Canada) in the Warranty
Information booklet.
Windshield:Clean the windshield on a regular
basis. Check the windshield at least every six
months for cracks or other damage. Have a
damaged windshield repaired by a qualified re-
pair facility.
Windshield wiper blades*:Check for cracks
or wear if they do not wipe properly.
Doors and engine hood:Check that all doors
and the engine hood operate smoothly as well as
the trunk lid or back hatch. Also make sure that
all latches lock securely. Lubricate if necessary.
Make sure that the secondary latch keeps the
hood from opening when the primary latch is
released.When driving in areas using road salt or other
corrosive materials, check lubrication frequently.
Lights*:Clean the headlights on a regular basis.
Make sure that the headlights, stop lights, tail
lights, turn signal lights, and other lights are all
operating properly and installed securely. Also
check headlight aim.
Inside the vehicleThe maintenance items listed here should be
checked on a regular basis, such as when
performing periodic maintenance, cleaning the
vehicle, etc.
Warning lights and chimes:Make sure that all
warning lights and chimes are operating prop-
erly.
Windshield wiper and washer*:Check that
the wipers and washer operate properly and that
the wipers do not streak.
Windshield defroster:Check that the air
comes out of the defroster outlets properly and
in good quantity when operating the heater or air
conditioner.
Steering wheel:Check for changes in the
steering conditions, such as excessive free play,
hard steering or strange noises.
Seats:Check seat position controls such as
seat adjusters, seatback recliner, etc. to ensurethey operate smoothly and that all latches lock
securely in every position. Check that the head
restraints move up and down smoothly and that
the locks (if equipped) hold securely in all
latched positions.
Seat belts:Check that all parts of the seat belt
system (for example, buckles, anchors, adjusters
and retractors) operate properly and smoothly,
and are installed securely. Check the belt web-
bing for cuts, fraying, wear or damage.
Accelerator pedal:Check the pedal for
smooth operation and make sure the pedal does
not catch or require uneven effort. Keep the floor
mat away from the pedal.
Clutch pedal*:Make sure the pedal operates
smoothly and check that it has the proper free
play.
Brakes:Check that the brakes do not pull the
vehicle to one side when applied.
Brake pedal and booster*:Check the pedal
for smooth operation and make sure it has the
proper distance under it when depressed fully.
Check the brake booster function. Be sure to
keep floor mat away from the pedal.
Parking brake*:Check that the lever has the
proper travel and make sure that the vehicle is
held securely on a fairly steep hill when only the
parking brake is applied.
Maintenance and do-it-yourself
8-3
Z
02.9.13/Z33-D/V5.0
X