2003 NISSAN 350Z warning light
[x] Cancel search: warning lightPage 145 of 227
LOW TIRE PRESSURE WARNING
SYSTEM (if so equipped)The low tire pressure warning system which
displays pressure of all tires (except the spare
tire) on the trip computer by sending a signal
from a sensor that is installed in each wheel. If
the vehicle is being driven with a flat tire or very
low tire pressure (lower than 28 psi), the low tire
pressure warning system will activate and warn
you of it by the low tire pressure warning light (in
the meter panel) or the PSI indicator (on the trip
computer). This system will activate only when
the vehicle is driven at speeds above 20 MPH
(32 km/h). For more details, refer to ªTrip com-
puterº and ªWarning/indicator lights and audible
remindersº in the ª2. Instruments and controlsº
section and ªLow tire pressure warning systemº
in the ª5. Starting and drivingº section.
WARNING
IIf the low tire pressure warning light
comes on and/or the PSI indicator
flashes while driving, avoid sudden
steering maneuvers or abrupt brak-
ing, reduce vehicle speed, pull off the
road to a safe location and stop thevehicle as soon as possible. Serious
vehicle damage could occur and may
lead to an accident and could result
in serious personal injury. Check the
pressure for all four tires and adjust
the pressure to the COLD tire pres-
sure shown on the tire placard. If you
have a flat tire, replace it with a spare
tire as soon as possible.
IWhen a spare tire is mounted or a
wheel is replaced, tire pressure will
not be indicated and the low tire
pressure warning system will not
function. Contact your NISSAN
dealer as soon as possible for tire
replacement and/or system reset-
ting.
IDo not inject any tire liquid or aerosol
tire sealant into the tires, as this may
cause a malfunction of the tire pres-
sure sensors.
CHANGING A FLAT TIREIf you have a flat tire, follow the instructions
below.Stopping the vehicle1. Safely move the vehicle off the road away
from traffic.
2. Turn on the hazard warning flashers.
3. Park on a level surface and apply the parking
brake. Shift the manual transmission into R
(Reverse) position (automatic transmission in
P (Park) position).
4. Turn off the engine.
5. Raise the hood to warn other traffic, and to
signal professional road assistance person-
nel that you need assistance.
6. Have all passengers get out of the vehicle
and stand in a safe place, away from traffic
and clear of the vehicle.
WARNING
IMake sure that the parking brake is
securely applied and the manual
transmission is shifted into R (Re-
FLAT TIRE6-2
In case of emergency
Z
02.9.13/Z33-D/V5.0
X
Page 150 of 227
12 volts. Use of an improperly rated
battery can damage your vehicle.
IWhenever working on or near a bat-
tery, always wear suitable eye protec-
tors (for example, goggles or indus-
trial safety spectacles) and remove
rings, metal bands, or any other jew-
elry. Do not lean over the battery
when jump starting.
IDo not attempt to jump start a frozen
battery. It could explode and cause
serious injury.
WARNING
Always follow the instructions below.
Failure to do so could result in damage
to the charging system and cause per-
sonal injury.
1. If the booster battery is in another vehicle,
position the two vehicles to bring their bat-
teries into close proximity to each other.
Do not allow the two vehicles to touch.
2. Apply parking brake. Move the shift lever tothe N (Neutral) position (On automatic trans-
mission models, move the selector lever to
the P (Park) position). Switch off all unnec-
essary electrical systems (light, heater, air
conditioner, etc.).
3. Remove vent caps on the battery (if so
equipped). Cover the battery with an old
cloth to reduce explosion hazard.
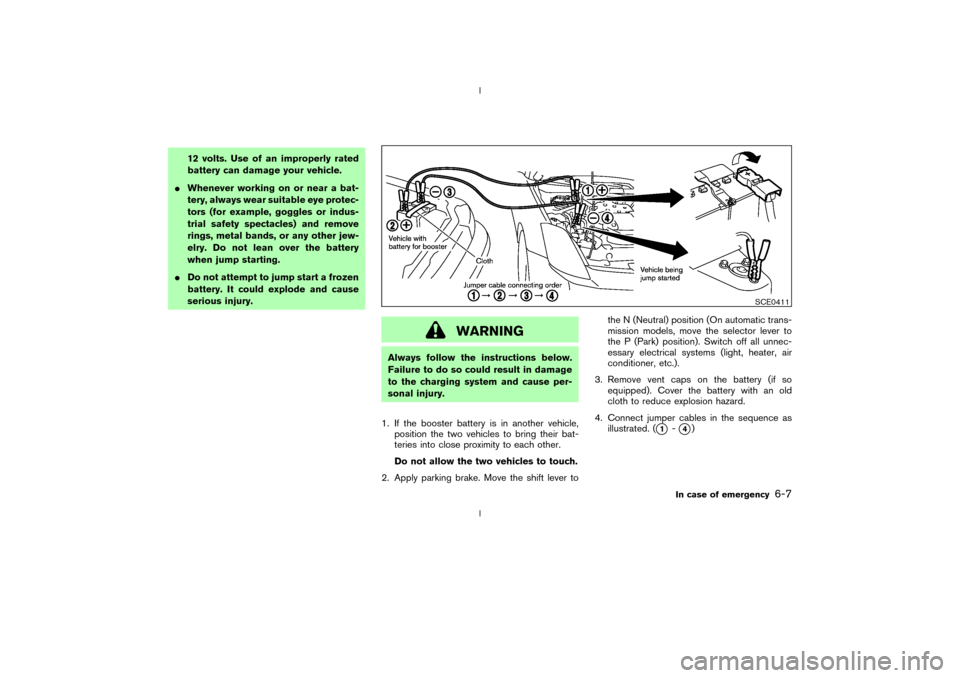
4. Connect jumper cables in the sequence as
illustrated. (
q1
-q4)
SCE0411
In case of emergency
6-7
Z
02.9.13/Z33-D/V5.0
X
Page 164 of 227

Tire rotation*:Tires cannot be rotated in this
vehicle.
Wheel alignment and balance:If the vehicle
pulls to either side while driving on a straight and
level road, or if you detect uneven or abnormal
tire wear, there may be a need for wheel align-
ment.
If the steering wheel or seat vibrates at normal
highway speeds, wheel balancing may be
needed.
For additional information regarding tires, refer to
ªImportant Tire Safety Informationº (US) or ªTire
Safety Informationº (Canada) in the Warranty
Information booklet.
Windshield:Clean the windshield on a regular
basis. Check the windshield at least every six
months for cracks or other damage. Have a
damaged windshield repaired by a qualified re-
pair facility.
Windshield wiper blades*:Check for cracks
or wear if they do not wipe properly.
Doors and engine hood:Check that all doors
and the engine hood operate smoothly as well as
the trunk lid or back hatch. Also make sure that
all latches lock securely. Lubricate if necessary.
Make sure that the secondary latch keeps the
hood from opening when the primary latch is
released.When driving in areas using road salt or other
corrosive materials, check lubrication frequently.
Lights*:Clean the headlights on a regular basis.
Make sure that the headlights, stop lights, tail
lights, turn signal lights, and other lights are all
operating properly and installed securely. Also
check headlight aim.
Inside the vehicleThe maintenance items listed here should be
checked on a regular basis, such as when
performing periodic maintenance, cleaning the
vehicle, etc.
Warning lights and chimes:Make sure that all
warning lights and chimes are operating prop-
erly.
Windshield wiper and washer*:Check that
the wipers and washer operate properly and that
the wipers do not streak.
Windshield defroster:Check that the air
comes out of the defroster outlets properly and
in good quantity when operating the heater or air
conditioner.
Steering wheel:Check for changes in the
steering conditions, such as excessive free play,
hard steering or strange noises.
Seats:Check seat position controls such as
seat adjusters, seatback recliner, etc. to ensurethey operate smoothly and that all latches lock
securely in every position. Check that the head
restraints move up and down smoothly and that
the locks (if equipped) hold securely in all
latched positions.
Seat belts:Check that all parts of the seat belt
system (for example, buckles, anchors, adjusters
and retractors) operate properly and smoothly,
and are installed securely. Check the belt web-
bing for cuts, fraying, wear or damage.
Accelerator pedal:Check the pedal for
smooth operation and make sure the pedal does
not catch or require uneven effort. Keep the floor
mat away from the pedal.
Clutch pedal*:Make sure the pedal operates
smoothly and check that it has the proper free
play.
Brakes:Check that the brakes do not pull the
vehicle to one side when applied.
Brake pedal and booster*:Check the pedal
for smooth operation and make sure it has the
proper distance under it when depressed fully.
Check the brake booster function. Be sure to
keep floor mat away from the pedal.
Parking brake*:Check that the lever has the
proper travel and make sure that the vehicle is
held securely on a fairly steep hill when only the
parking brake is applied.
Maintenance and do-it-yourself
8-3
Z
02.9.13/Z33-D/V5.0
X
Page 174 of 227
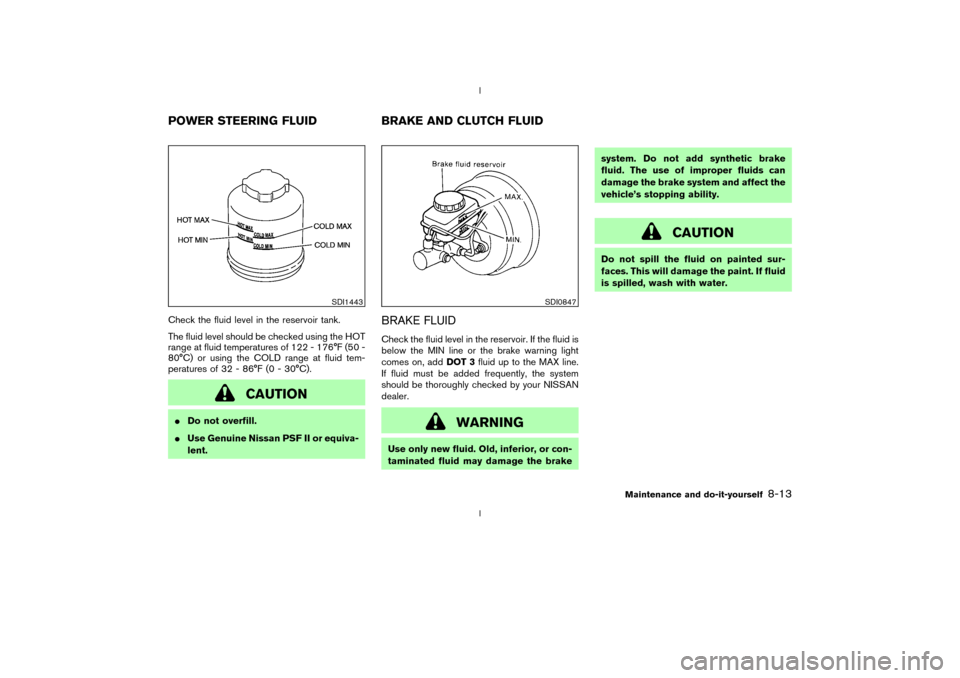
Check the fluid level in the reservoir tank.
The fluid level should be checked using the HOT
range at fluid temperatures of 122 - 176ÉF (50 -
80ÉC) or using the COLD range at fluid tem-
peratures of 32 - 86ÉF (0 - 30ÉC).
CAUTION
IDo not overfill.
IUse Genuine Nissan PSF II or equiva-
lent.
BRAKE FLUIDCheck the fluid level in the reservoir. If the fluid is
below the MIN line or the brake warning light
comes on, addDOT 3fluid up to the MAX line.
If fluid must be added frequently, the system
should be thoroughly checked by your NISSAN
dealer.
WARNING
Use only new fluid. Old, inferior, or con-
taminated fluid may damage the brakesystem. Do not add synthetic brake
fluid. The use of improper fluids can
damage the brake system and affect the
vehicle's stopping ability.
CAUTION
Do not spill the fluid on painted sur-
faces. This will damage the paint. If fluid
is spilled, wash with water.
SDI1443
SDI0847
POWER STEERING FLUID BRAKE AND CLUTCH FLUID
Maintenance and do-it-yourself
8-13
Z
02.9.13/Z33-D/V5.0
X
Page 175 of 227
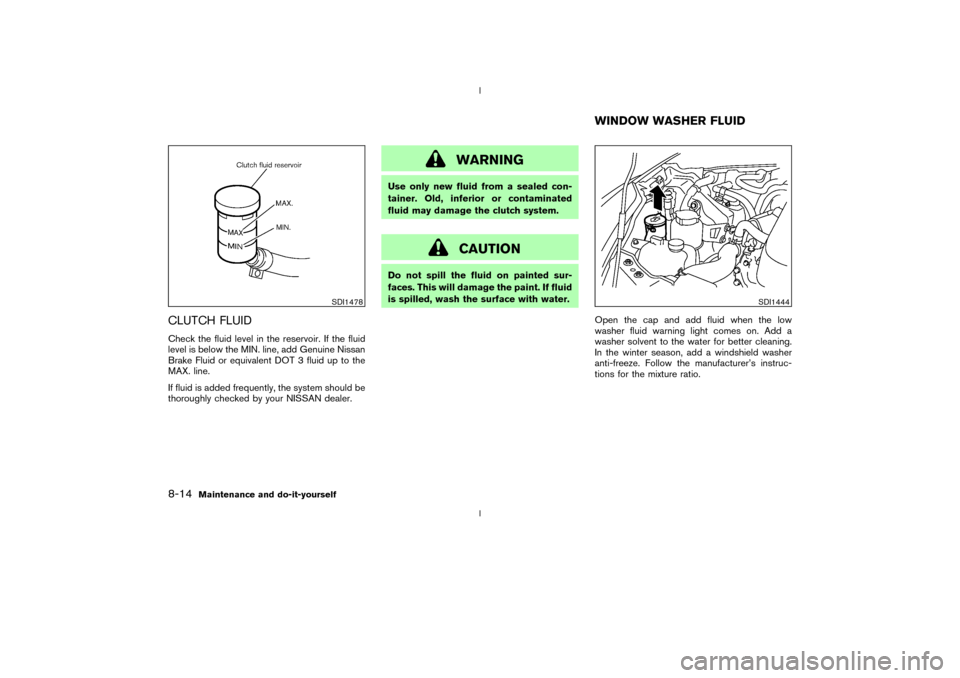
CLUTCH FLUIDCheck the fluid level in the reservoir. If the fluid
level is below the MIN. line, add Genuine Nissan
Brake Fluid or equivalent DOT 3 fluid up to the
MAX. line.
If fluid is added frequently, the system should be
thoroughly checked by your NISSAN dealer.
WARNING
Use only new fluid from a sealed con-
tainer. Old, inferior or contaminated
fluid may damage the clutch system.
CAUTION
Do not spill the fluid on painted sur-
faces. This will damage the paint. If fluid
is spilled, wash the surface with water.
Open the cap and add fluid when the low
washer fluid warning light comes on. Add a
washer solvent to the water for better cleaning.
In the winter season, add a windshield washer
anti-freeze. Follow the manufacturer's instruc-
tions for the mixture ratio.
SDI1478
SDI1444
WINDOW WASHER FLUID
8-14
Maintenance and do-it-yourself
Z
02.9.13/Z33-D/V5.0
X
Page 182 of 227
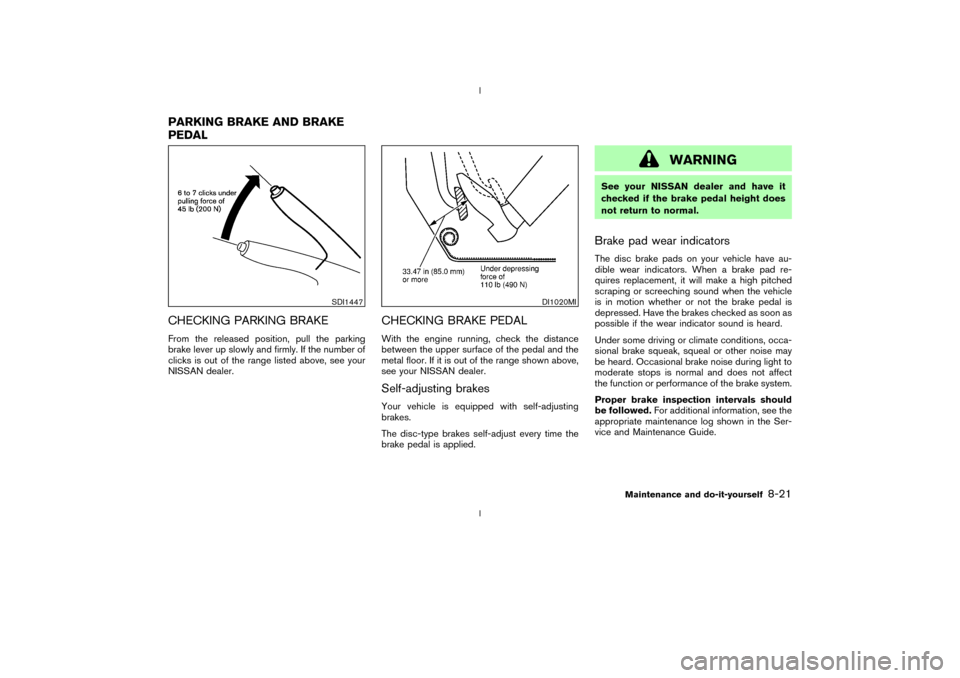
CHECKING PARKING BRAKEFrom the released position, pull the parking
brake lever up slowly and firmly. If the number of
clicks is out of the range listed above, see your
NISSAN dealer.
CHECKING BRAKE PEDALWith the engine running, check the distance
between the upper surface of the pedal and the
metal floor. If it is out of the range shown above,
see your NISSAN dealer.Self-adjusting brakesYour vehicle is equipped with self-adjusting
brakes.
The disc-type brakes self-adjust every time the
brake pedal is applied.
WARNING
See your NISSAN dealer and have it
checked if the brake pedal height does
not return to normal.Brake pad wear indicatorsThe disc brake pads on your vehicle have au-
dible wear indicators. When a brake pad re-
quires replacement, it will make a high pitched
scraping or screeching sound when the vehicle
is in motion whether or not the brake pedal is
depressed. Have the brakes checked as soon as
possible if the wear indicator sound is heard.
Under some driving or climate conditions, occa-
sional brake squeak, squeal or other noise may
be heard. Occasional brake noise during light to
moderate stops is normal and does not affect
the function or performance of the brake system.
Proper brake inspection intervals should
be followed.For additional information, see the
appropriate maintenance log shown in the Ser-
vice and Maintenance Guide.
SDI1447
DI1020MI
PARKING BRAKE AND BRAKE
PEDAL
Maintenance and do-it-yourself
8-21
Z
02.9.13/Z33-D/V5.0
X
Page 187 of 227
HEADLIGHTS
ReplacingIf replacement is required, see a NISSAN dealer.
Xenon headlight bulb:
WARNINGHIGH VOLTAGE
When xenon headlights are on, they
produce a high voltage. To prevent an
electric shock, never attempt to modify
or disassemble the headlight assembly.
Always have your xenon headlights re-
placed at a NISSAN dealer. For addi-
tional information, see ªHeadlight and
turn signal switchº in the ª2. Instruments
and controlsº section.
Halogen headlight bulb:
The headlight is a semi-sealed beam type which
uses a replaceable headlight (halogen) bulb. A
bulb can be replaced from under the engine
compartment without removing the headlight
assembly.
CAUTION
IHigh pressure halogen gas is sealed
inside the halogen bulb. The bulb
may break if the glass envelope is
scratched or the bulb is dropped.
IWhen handling the bulb, do not touch
the glass envelope.
IDo not touch the bulb.
IUse the same number and wattage as
originally installed:
Bulb no. (Wattage)
D2R (35W) - Xenon low-beam
H7 (55W) - High-beam
or
H7 (55W) - Halogen low-beam
H1 (55W) - High-beam
IDo not leave the bulb out of the
headlight reflector for a long period
of time as dust, moisture, and smoke
may enter the headlight body and
affect the performance of the head-
light.
8-26
Maintenance and do-it-yourself
Z
02.9.13/Z33-D/V5.0
X
Page 191 of 227
parked for 3 or more hours, or driven less than 1
mile (1.6 km) at moderate speeds. COLD tire
pressures are shown on the tire placard affixed
to the inside of the console box lid.Low tire pressure warning system (if
so equipped)The low tire pressure warning system displays
the tire pressure of all tires (except the spare tire)
on the trip computer by sending a signal from a
sensor that is installed in each wheel. For more
details, refer to ªTrip computerº and ªLow tire
pressure warning lightº in the ª2. Instruments
and controlsº section, ªLow tire pressure warn-
ing systemº in the ª5. Starting and drivingº
section, and ªFlat tireº in the ª6. In case of
emergencyº section. If the tire pressure dis-
played on the trip computer is lower than the
COLD tire pressure shown on the tire placard,
check the pressure of all four tires and adjust
them to the COLD tire pressure as indicated
above. The low tire pressure warning system will
activate only when the vehicle is driven at
speeds above 20 MPH (32 km/h).
WARNING
IImproperly inflated tires can fail sud-
denly and cause an accident.IThe vehicle capacity weight is indi-
cated on the tire placard. Do not load
your vehicle beyond this capacity.
Overloading your vehicle may result
in reduced tire life, unsafe operating
conditions due to premature tire fail-
ure, or unfavorable handling charac-
teristics and could also lead to a
serious accident. Loading beyond the
specified capacity may also result in
failure of other vehicle components.
IBefore taking a long trip, or when-
ever you have loaded your vehicle
heavily, use a tire pressure gauge to
ensure that the tire pressure is at the
specified level.
IDo not drive your vehicle over 85
MPH (140 km/h) unless it is equipped
with high speed capability tires. Driv-
ing faster than 85 MPH (140 km/h)
may result in tire failure, loss of con-
trol and possible injury.
IFor additional information regarding
tires, refer to ªImportant Tire Safety
Informationº (US) or ªTire Safety In-formationº (Canada) in the Warranty
Information booklet.
TYPES OF TIRES
WARNING
IWhen changing or replacing tires, be
sure all four tires are of the same
type (for example, summer, all sea-
son or snow) and construction. Your
NISSAN dealer may be able to help
you with information about tire type,
size, speed rating and availability.
Replacement tires may have a lower
speed rating than the factory
equipped tires, and may not match
the potential maximum vehicle
speed. Never exceed the maximum
speed rating of the tire.
IFor additional information regarding
tires, refer to ªImportant Tire Safety
Informationº (US) or ªTire Safety In-
formationº (Canada) in the Warranty
Information booklet.
8-30
Maintenance and do-it-yourself
Z
02.9.13/Z33-D/V5.0
X