2003 NISSAN 350Z reset
[x] Cancel search: resetPage 110 of 227

FM-AM RADIO WITH CASSETTE
PLAYER AND COMPACT DISC (CD)
CHANGER1. CD LOAD button
2. SEEK/APS REW, APS FF/TRACK
CHANGE button
3. DISP (Display) CHANGE (Clock, CD play
time) button
4. SCAN tuning button
5. CD PLAY button
6. TAPE PLAY button
7. FM/AM band select button
8. PTY (Program type) button
9. RPT (Repeat) play button
10. RADIO TUNE/FF×REW/AUDIO (Bass,
treble, fader, balance and NR (Dolby)) AD-
JUSTING button
11. CD EJECT button
12. ON×OFF/VOL (Volume) control knob
13. Audio/Clock display
14. Station and preset (FM/AM)/CD insert or
CD play select button
15. TAPE EJECT button
16. AUDIO (Bass, treble, fader, balance and NR
(Dolby)) button
SAA0604
Heater, air conditioner and audio systems
4-13
Z
02.9.13/Z33-D/V5.0
X
Page 112 of 227
change from stereo to monaural reception.
TUNE (Tuning):WARNING
The radio should not be tuned while
driving so full attention may be given to
vehicle operation.
Use the TUNE button
or
for manual
tuning. To move quickly through the channels,
hold either side of the TUNE button down for
more than 0.5 seconds.
SEEK tuning:
Push the SEEK button
or
to tune
from high to low or low to high frequencies and
stops at the next broadcasting station.
SCAN tuning:
Push the SCAN tuning button to tune from low
to high frequencies and stops at each broad-
casting station for 5 seconds. Pushing the but-
ton again during this 5 second period will stop
SCAN tuning and the radio will remain tuned to
that station.
If the SCAN tuning button is not pushed within 5seconds, SCAN tuning moves to the next sta-
tion.
Station memory operations:
Twelve stations can be set for the FM band (six
for FM1, six for FM2) and six stations can be set
for the AM band.
1. Tune to the desired station using the SEEK,
SCAN or TUNE button.
2. Select the desired station and keep pushing
any of the desired station and preset buttons
(1 to 6) until a beep sound is heard. (The
radio mutes when the station and preset
button is pushed.)
3. The channel indicator will then come on and
the sound will resume. Memorizing is now
complete.
4. Other buttons can be set in the same manner.
If the battery cable is disconnected, or if the fuse
blows, the radio memory will be cancelled. In
that case, reset the desired stations.
Program type:
When PTY button is pressed during FM mode,
the PTY name of the current tuned station is
displayed. During this time if the PTY data code
is zero, or the data is unreadable; the display will
show NONE.1. PTY selection mode
PTY name selection can be done by the
up/down TUNE button
or
in the
PTY selection mode.
It is possible to shift the PTY name by one
step, with one push of the up/down TUNE
button
or
.
PTY name selection can also be achieved by
pressing the preset buttons.
Initial PTY names are stored in the preset
buttons; but these can be changed by press-
ing the preset buttons for more than 1.5
seconds when the desired PTY name is in the
display.
Heater, air conditioner and audio systems
4-15
Z
02.9.13/Z33-D/V5.0
X
Page 121 of 227
ªWarning/indicator lights and audible remind-
ersº in the ª2. Instruments and controlsº section.
WARNING
IIf the low tire pressure warning light
in the meter panel comes on and/or
the PSI indicator on the trip computer
flashes while driving, avoid sudden
steering maneuvers or abrupt brak-
ing, reduce vehicle speed, pull off the
road to a safe location and stop the
vehicle as soon as possible. Serious
vehicle damage could occur and may
lead to an accident and could result
in serious personal injury. Check the
pressure for all four tires and adjust
the pressure to the COLD tire pres-
sure shown on the tire placard. If you
have a flat tire, replace it with a spare
tire as soon as possible. (See ªFlat
tireº in the ª6. In case of emergencyº
section for changing a flat tire.)
IWhen a spare tire is mounted or a
wheel is replaced, tire pressure will
not be indicated and the low tirepressure warning system will not
function. Contact your NISSAN
dealer as soon as possible for tire
replacement and/or system reset-
ting.
IDo not inject any tire liquid or aerosol
tire sealant into the tires, as this may
cause a malfunction of the tire pres-
sure sensors.
CAUTION
Do not place metalized film or any metal
parts (antenna, etc.) on the windows.
This may cause poor reception of the
signals from the tire pressure sensors,
and the low tire pressure warning sys-
tem will not function properly.
FCC Notice:
Changes or modifications not expressly
approved by the manufacturer compliance
could void the user's authority to operate
the equipment.This device complies with Part 15 of the
FCC Rules and RSS-210 of Industry
Canada.
Operation is subject to the following two
conditions: (1) This device may not cause
harmful interference, and (2) this device
must accept any interference received, in-
cluding interference that may cause undes-
ired operation of the device.
AVOIDING COLLISION AND
ROLLOVER
WARNING
Failure to operate this vehicle in a safe
and prudent manner may result in loss
of control or an accident.
Be alert and drive defensively at all times. Obey
all traffic regulations. Avoid excessive speed,
high speed cornering, or sudden steering ma-
neuvers, because these driving practices could
cause you to lose control of your vehicle.As
with any vehicle, a loss of control could
result in a collision with other vehicles or
objects, or cause the vehicle to rollover,
particularly if the loss of control causes the
vehicle to slide sideways.Be attentive at all
5-4
Starting and driving
Z
02.9.13/Z33-D/V5.0
X
Page 133 of 227

1. RESUME or ACCEL switch
2. COAST or SET switch
3. ON×OFF switch
4. CANCEL switchCRUISE CONTROL OPERATIONSThe cruise control allows driving at a speed
between 25 to 89 MPH (40 to 144 km/h)
without keeping your foot on the accelerator
pedal.
To turn on the cruise control,push the main
switch on. The CRUISE indicator light on the
meter panel will come on.To set at cruising speed,accelerate your
vehicle to the desired speed, push the
COAST/SET switch and release it. (The SET
indicator light will come on.) Take your foot off
the accelerator pedal. Your vehicle will maintain
the set speed.
ITo pass another vehicle,depress the ac-
celerator pedal. When you release the pedal,
the vehicle will return to the previously set
speed.
IThe vehicle may not maintain the set speed
when going up or down steep hills. If this
happens, drive without the cruise control.
To cancel the preset speed,follow either of
these three methods:
a) Push the cancel switch; The SET indicator
light will go out.
b) Tap the brake pedal; The SET indicator light
will go out.
c) Turn the main switch off. Both the CRUISE
indicator and SET indicator lights will go out.
IIf you depress the brake pedal while pushing
the RES/ACCEL set switch and reset at the
cruising speed, turn the main switch off once
and then turn it on again.
IThe cruise control will automatically be can-
celled if the vehicle slows down below ap-proximately 8 MPH (13 km/h).
IDepress the clutch pedal (manual transmis-
sion), or move the selector lever to N (Neu-
tral) position (automatic transmission). The
SET indicator light will go out.
To reset at a faster cruising speed,use one
of the following three methods:
a) Depress the accelerator pedal. When the
vehicle attains the desired speed, push and
release the COAST/SET switch.
b) Push and hold the RES/ACCEL set switch.
When the vehicle attains the speed you
desire, release the switch.
c) Push, then quickly release the RES/ACCEL
set switch. Each time you do this, the set
speed will increase by about 1 MPH (1.6
km/h).
To reset at a slower cruising speed,use one
of the following three methods:
a) Lightly tap the brake pedal. When the vehicle
attains the desired speed, push the
COAST/SET switch and release it.
b) Push and hold the COAST/SET switch. Re-
lease the switch when the vehicle slows
down to the desired speed.
c) Push, then quickly release the COAST/
SSD0279
5-16
Starting and driving
Z
02.9.13/Z33-D/V5.0
X
Page 134 of 227

SET switch. Each time you do this, the set
speed will decrease by about 1 MPH (1.6
km/h).
To resume the preset speed,push and re-
lease the RES/ACCEL set switch. The vehicle
will resume the last set cruising speed when the
vehicle speed is over 25 MPH (40 km/h).During the first 1,200 miles (2,000 km), follow
these recommendations to obtain maximum en-
gine performance and ensure the future reliability
and economy of your new vehicle. Failure to
follow these recommendations may result in
shortened engine life and reduced engine per-
formance.
IAvoid driving for long periods at constant
speed, either fast or slow. Do not run the
engine over 4,000 rpm.
IDo not accelerate at full throttle in any gear.
IAvoid quick starts.
IAvoid hard braking as much as possible.
IDo not tow a trailer for the first 500 miles
(800 km).IAccelerate slowly and smoothly. Maintain
cruising speeds with a constant accelerator
position.
IDrive at moderate speeds on the highway.
Driving at high speed will lower fuel economy.
IAvoid unnecessary stopping and braking.
Maintain a safe distance behind other ve-
hicles.
IUse a proper gear range which suits road
conditions. On level roads, shift into high gear
as soon as possible.
IAvoid unnecessary engine idling.
IKeep your engine tuned up.
SD1001M
BREAK-IN SCHEDULE INCREASING FUEL ECONOMY
Starting and driving
5-17
Z
02.9.13/Z33-D/V5.0
X
Page 145 of 227
LOW TIRE PRESSURE WARNING
SYSTEM (if so equipped)The low tire pressure warning system which
displays pressure of all tires (except the spare
tire) on the trip computer by sending a signal
from a sensor that is installed in each wheel. If
the vehicle is being driven with a flat tire or very
low tire pressure (lower than 28 psi), the low tire
pressure warning system will activate and warn
you of it by the low tire pressure warning light (in
the meter panel) or the PSI indicator (on the trip
computer). This system will activate only when
the vehicle is driven at speeds above 20 MPH
(32 km/h). For more details, refer to ªTrip com-
puterº and ªWarning/indicator lights and audible
remindersº in the ª2. Instruments and controlsº
section and ªLow tire pressure warning systemº
in the ª5. Starting and drivingº section.
WARNING
IIf the low tire pressure warning light
comes on and/or the PSI indicator
flashes while driving, avoid sudden
steering maneuvers or abrupt brak-
ing, reduce vehicle speed, pull off the
road to a safe location and stop thevehicle as soon as possible. Serious
vehicle damage could occur and may
lead to an accident and could result
in serious personal injury. Check the
pressure for all four tires and adjust
the pressure to the COLD tire pres-
sure shown on the tire placard. If you
have a flat tire, replace it with a spare
tire as soon as possible.
IWhen a spare tire is mounted or a
wheel is replaced, tire pressure will
not be indicated and the low tire
pressure warning system will not
function. Contact your NISSAN
dealer as soon as possible for tire
replacement and/or system reset-
ting.
IDo not inject any tire liquid or aerosol
tire sealant into the tires, as this may
cause a malfunction of the tire pres-
sure sensors.
CHANGING A FLAT TIREIf you have a flat tire, follow the instructions
below.Stopping the vehicle1. Safely move the vehicle off the road away
from traffic.
2. Turn on the hazard warning flashers.
3. Park on a level surface and apply the parking
brake. Shift the manual transmission into R
(Reverse) position (automatic transmission in
P (Park) position).
4. Turn off the engine.
5. Raise the hood to warn other traffic, and to
signal professional road assistance person-
nel that you need assistance.
6. Have all passengers get out of the vehicle
and stand in a safe place, away from traffic
and clear of the vehicle.
WARNING
IMake sure that the parking brake is
securely applied and the manual
transmission is shifted into R (Re-
FLAT TIRE6-2
In case of emergency
Z
02.9.13/Z33-D/V5.0
X
Page 146 of 227
verse), or the automatic transmission
into P (Park).
INever change tires when the vehicle
is on a slope, ice or slippery areas.
This is hazardous.
INever change tires if oncoming traffic
is close to your vehicle. Wait for pro-
fessional road assistance.
IWhen a spare tire is mounted or a
wheel is replaced, tire pressure will
not be indicated and the low tire
pressure warning system will not
function. Contact your NISSAN
dealer as soon as possible for tire
replacement and/or system reset-
ting. (For models with the low tire
pressure warning system)
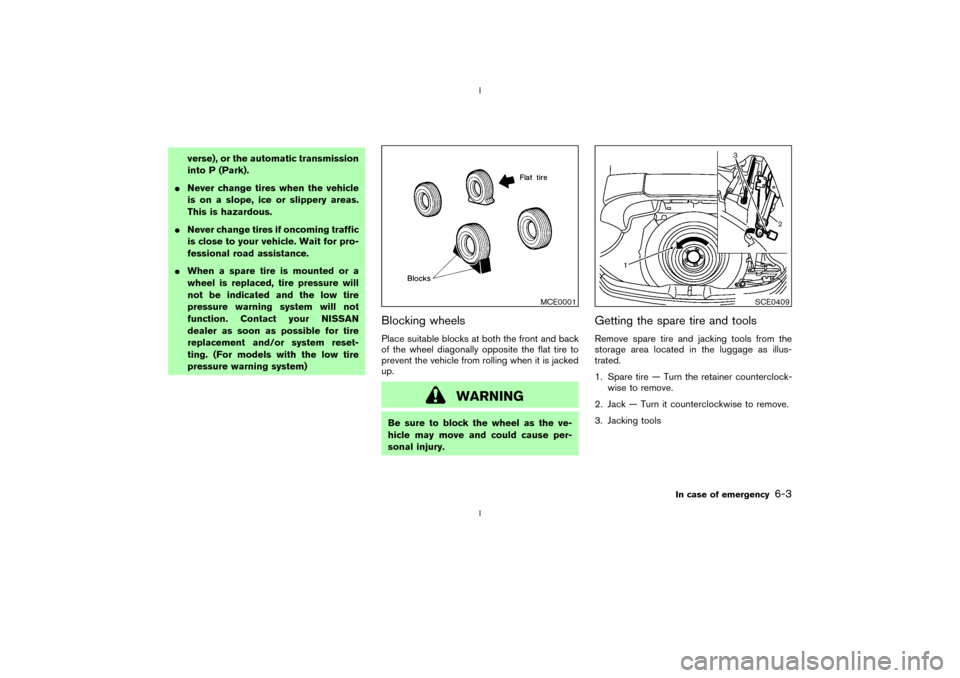
Blocking wheelsPlace suitable blocks at both the front and back
of the wheel diagonally opposite the flat tire to
prevent the vehicle from rolling when it is jacked
up.
WARNING
Be sure to block the wheel as the ve-
hicle may move and could cause per-
sonal injury.
Getting the spare tire and toolsRemove spare tire and jacking tools from the
storage area located in the luggage as illus-
trated.
1. Spare tire Ð Turn the retainer counterclock-
wise to remove.
2. Jack Ð Turn it counterclockwise to remove.
3. Jacking tools
MCE0001
SCE0409
In case of emergency
6-3
Z
02.9.13/Z33-D/V5.0
X
Page 194 of 227
replacement and/or system reset-
ting. (For models with the low tire
pressure warning system)
IDo not install a deformed wheel or
tire even if it has been repaired. Such
wheels or tires could have structural
damage and could fail without warn-
ing.
IThe use of retread tire is not recom-
mended.
IFor additional information regarding
tires, refer to ªImportant Tire Safety
Informationº (US) or ªTire Safety In-
formationº (Canada) in the Warranty
Information booklet.
Wheel balanceUnbalanced wheels may affect vehicle handling
and tire life. Even with regular use, wheels can
get out of balance. Therefore, they should be
balanced as required.
Wheel balance service should be performed
with the wheels off the vehicle. Spin balancing
the front wheels on the vehicle could lead to
transmission damage.For additional information regarding tires, refer to
ªImportant Tire Safety Informationº (US) or ªTire
Safety Informationº (Canada) in the Warranty
Information booklet.
Care of wheelsIWash the wheels when washing the vehicle
to maintain their appearance.
IClean the inner side of the wheels when the
wheel is changed or the underside of the
vehicle is washed.
IDo not use abrasive cleaners when washing
the wheels.
IInspect wheel rims regularly for dents or
corrosion. Such damage may cause loss of
pressure or poor seal at the tire bead.
INISSAN recommends that the road wheels
be waxed to protect against road salt in areas
where it is used during winter.Spare tire (T-type spare tire)Observe the following precautions if the T-type
spare tire must be used, otherwise your vehicle
could be damaged or involved in an accident.
CAUTION
IThe T-type spare tire should be used
only for emergency. It should be re-
placed by the standard tire at the first
opportunity.
IDrive carefully while the T-type spare
tire is installed.
Avoid sharp turns and abrupt braking
while driving.
IPeriodically check the T-type spare
tire inflation pressure, and always
keep it at 60 psi (420 kPa, 4.2 bar).
IAlways keep the pressure of the full
size spare tire (if so equipped) at the
recommended pressure for standard
tires, as indicated on the tire placard.
For tire placard location, see ªTire
placardº in the ª9. Technical and con-
sumer informationº.
IDo not drive your vehicle at speeds
faster than 50 MPH (80 km/h).
IDo not use tire chains on a T-type
Maintenance and do-it-yourself
8-33
Z
02.9.13/Z33-D/V5.0
X