2003 NISSAN 350Z check engine
[x] Cancel search: check enginePage 54 of 227
Malfunction indicator lamp
(MIL)
If the malfunction indicator lamp comes on
steady or blinks while the engine is running, it
may indicate a potential emission control mal-
function.
The malfunction indicator lamp may also come
on steady if the fuel filler cap is loose or missing,
or if the vehicle runs out of fuel. Check to make
sure the fuel filler cap is installed and closed
tightly, and that the vehicle has at least 3 US
gallons (14 liters) of fuel in the fuel tank.
After a few driving trips, the
lamp should
turn off if no other potential emission control
system malfunction exists.
Operation
The malfunction indicator lamp will come on in
one of two ways:
IMalfunction indicator lamp on steady Ð An
emission control system malfunction has
been detected. Check the fuel filler cap. If the
fuel filler cap is loose or missing, tighten or
install the cap and continue to drive the
vehicle. The
lamp should turn off after a
few driving trips. If the
lamp does not
turn off after a few driving trips, have the
vehicle inspected by a NISSAN dealer. Youdo not need to have your vehicle towed to the
retailer.
IMalfunction indicator lamp blinking Ð An
engine misfire has been detected which may
damage the emission control system. To re-
duce or avoid emission control system dam-
age:
a) Do not drive at speeds above 45 MPH
(72 km/h).
b) Avoid hard acceleration or deceleration.
c) Avoid steep uphill grades.
d) If possible, reduce the amount of cargo
being hauled or towed.
The malfunction indicator lamp may stop
blinking and come on steady.
Have the vehicle inspected by a NISSAN
dealer. You do not need to have your vehicle
towed to the retailer.
CAUTION
Continued vehicle operation without
having the emission control system
checked and repaired as necessary
could lead to poor driveability, reduced
fuel economy, and possible damage to
the emission control system.
Slip indicator light
The light will come on for about 1 second and go
off after the ignition switch is turned to the ON
position. This light will blink when the vehicle
dynamic control (VDC) system or the traction
control system (TCS) is operating, thus alerting
the driver to the fact that the road surface is
slippery and the vehicle is nearing its traction
limits.
Traction control system off
indicator light (if so equipped)
After turning the ignition key to the ON position,
the light will illuminate. The light will turn off in
about 1 second if the traction control system
(TCS) is operational.
The light comes on when the traction control
system (TCS) off switch is pushed to OFF. This
indicates the traction control system is not op-
erating. When the traction control system off
indicator light and slip indicator light come on
with the traction control system turned on, this
light alerts the driver to the fact that the traction
control system's fail-safe mode is operating, that
is the system may not be functioning properly.
Have the system checked by your NISSAN
dealer. If an abnormality occurs in the system,
the traction control function will be canceled but
the vehicle is still driveable. For additional infor-
Instruments and controls
2-15
Z
02.9.13/Z33-D/V5.0
X
Page 57 of 227

scribed above, have it checked by your
NISSAN dealer.NISSAN VEHICLE IMMOBILIZER
SYSTEM (NVIS)The Nissan Vehicle Immobilizer System will not
allow the engine to start without the use of the
registered Nissan Vehicle Immobilizer System
key.
If the engine fails to start using the registered
Nissan Vehicle Immobilizer System key, it may be
due to interference caused by another Nissan
Vehicle Immobilizer System key, an automated
toll road device or automated payment device on
the key ring. Restart the engine using the follow-
ing procedures:
1. Leave the ignition switch in the ON position
for approximately 5 seconds.
2. Turn the ignition switch to the OFF or LOCK
position and wait approximately 10 seconds.
3. Repeat step 1 and 2 again.
4. Restart the engine while holding the device
(which may have caused the interference)
separate from the registered Nissan Vehicle
Immobilizer System key.
If this procedure allows the engine to start,
NISSAN recommends placing the registeredNissan Vehicle Immobilizer System key on a
separate key ring to avoid interference from
other devices.
Statement related to section 15 of FCC
rules for Nissan Vehicle Immobilizer Sys-
tem (CONT ASSY-BCM, ANT ASSY-
IMMOBILIZER)
This device complies with part 15 of the
FCC Rules and RSS-210 of Industry
Canada. Operation is subject to the follow-
ing two conditions;
(1) This device may not cause harmful in-
terference, and (2) this device must accept
any interference received, including inter-
ference that may cause undesired opera-
tion of the device.
CHANGES OR MODIFICATIONS NOT EX-
PRESSLY APPROVED BY THE MANUFAC-
TURE RESPONSIBLE FOR COMPLIANCE
COULD VOID THE USER'S AUTHORITY TO
OPERATE THE EQUIPMENT.
Security indicator lightThis light blinks whenever the ignition switch is in
the LOCK, OFF or ACC position. This function
indicates the security system equipped on the
vehicle is operational.
If the Nissan Vehicle Immobilizer System is
malfunctioning, this light will remain on while the
ignition key is in the ON position.
If the light still remains on and/or the
engine will not start, see your NISSAN
dealer for Nissan Vehicle Immobilizer Sys-
tem service as soon as possible. Please
bring all Nissan Vehicle Immobilizer Sys-
SIC1699
2-18
Instruments and controls
Z
02.9.13/Z33-D/V5.0
X
Page 64 of 227
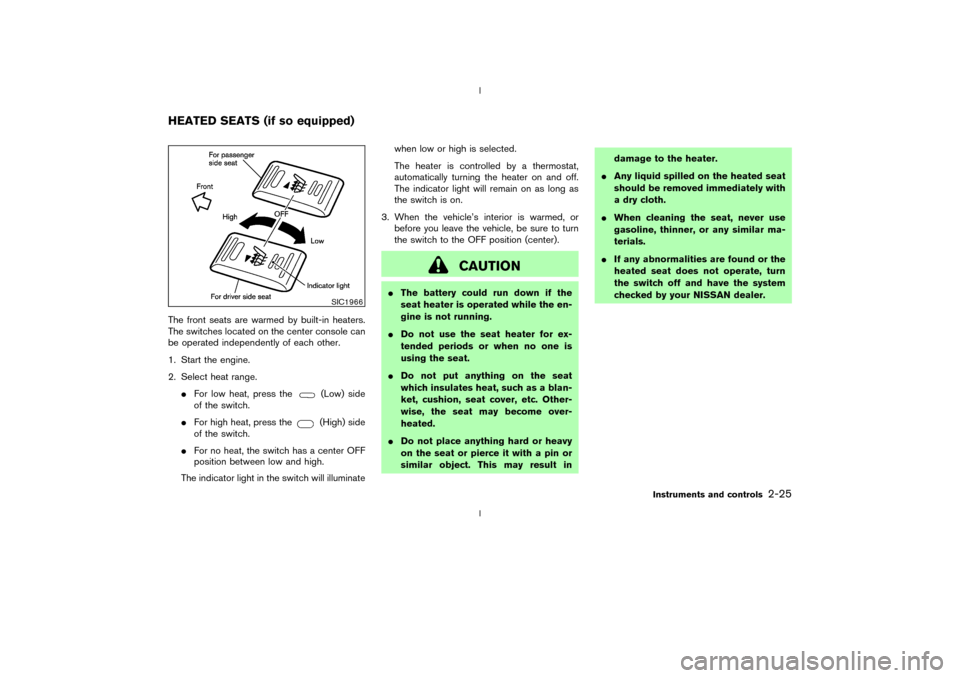
The front seats are warmed by built-in heaters.
The switches located on the center console can
be operated independently of each other.
1. Start the engine.
2. Select heat range.
IFor low heat, press the
(Low) side
of the switch.
IFor high heat, press the(High) side
of the switch.
IFor no heat, the switch has a center OFF
position between low and high.
The indicator light in the switch will illuminatewhen low or high is selected.
The heater is controlled by a thermostat,
automatically turning the heater on and off.
The indicator light will remain on as long as
the switch is on.
3. When the vehicle's interior is warmed, or
before you leave the vehicle, be sure to turn
the switch to the OFF position (center).
CAUTION
IThe battery could run down if the
seat heater is operated while the en-
gine is not running.
IDo not use the seat heater for ex-
tended periods or when no one is
using the seat.
IDo not put anything on the seat
which insulates heat, such as a blan-
ket, cushion, seat cover, etc. Other-
wise, the seat may become over-
heated.
IDo not place anything hard or heavy
on the seat or pierce it with a pin or
similar object. This may result indamage to the heater.
IAny liquid spilled on the heated seat
should be removed immediately with
a dry cloth.
IWhen cleaning the seat, never use
gasoline, thinner, or any similar ma-
terials.
IIf any abnormalities are found or the
heated seat does not operate, turn
the switch off and have the system
checked by your NISSAN dealer.
SIC1966
HEATED SEATS (if so equipped)
Instruments and controls
2-25
Z
02.9.13/Z33-D/V5.0
X
Page 89 of 227
could void the user's authority to operate
the equipment. This device complies with
Part 15 of the FCC Rules and RSS-210 of
Industry Canada. Operation is subject to
the following two conditions: (1) This de-
vice may not cause harmful interference,
and (2) this device must accept any inter-
ference received, including interference
that may cause undesired operation of the
device.
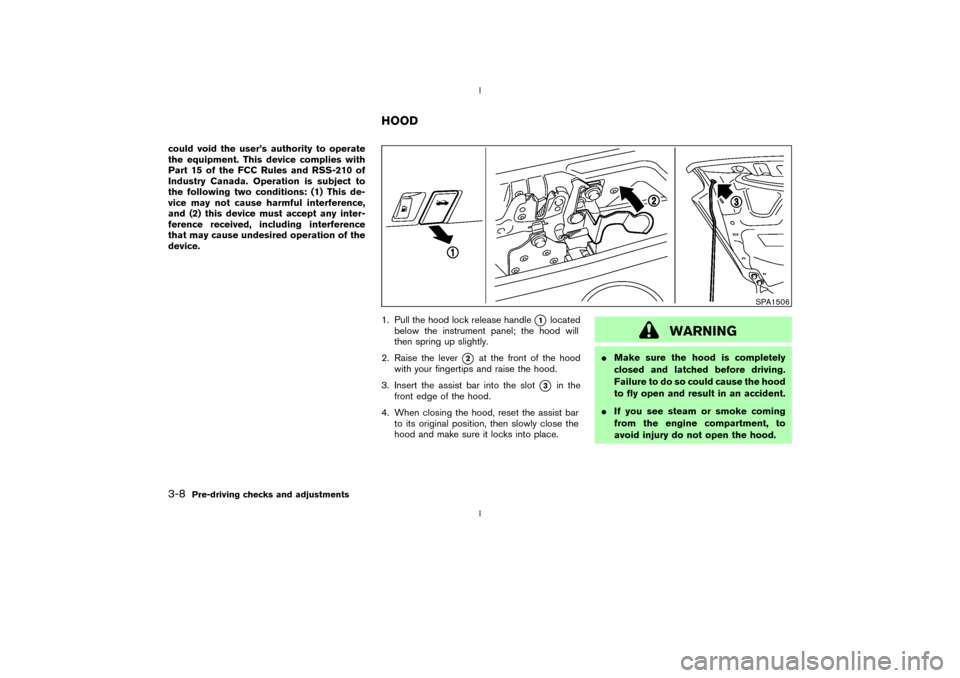
1. Pull the hood lock release handle
q1
located
below the instrument panel; the hood will
then spring up slightly.
2. Raise the lever
q2
at the front of the hood
with your fingertips and raise the hood.
3. Insert the assist bar into the slot
q3
in the
front edge of the hood.
4. When closing the hood, reset the assist bar
to its original position, then slowly close the
hood and make sure it locks into place.
WARNING
IMake sure the hood is completely
closed and latched before driving.
Failure to do so could cause the hood
to fly open and result in an accident.
IIf you see steam or smoke coming
from the engine compartment, to
avoid injury do not open the hood.
SPA1506
HOOD
3-8
Pre-driving checks and adjustments
Z
02.9.13/Z33-D/V5.0
X
Page 92 of 227
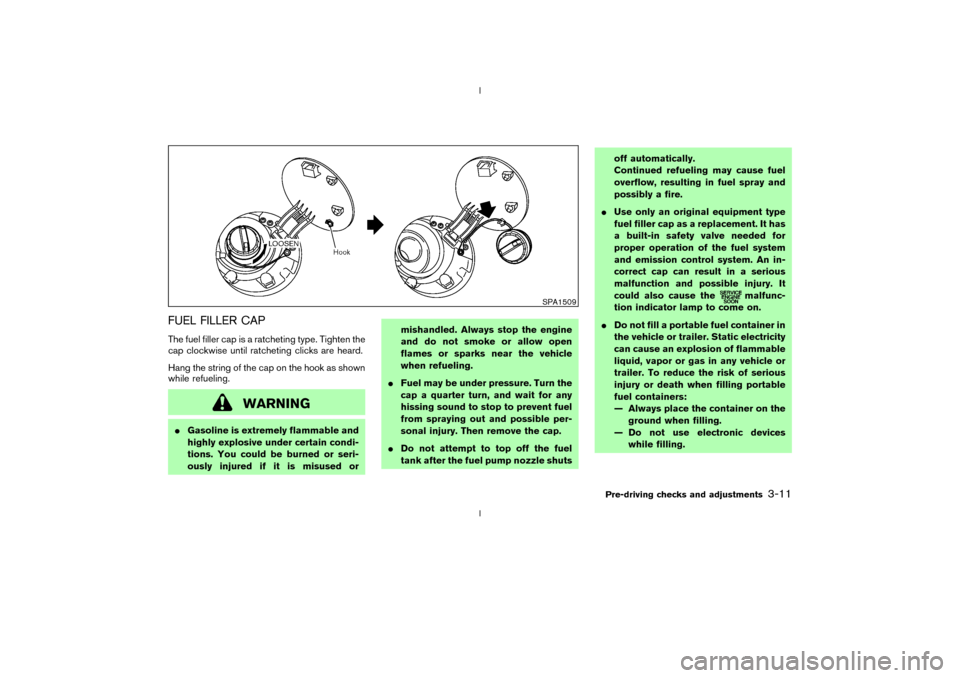
FUEL FILLER CAPThe fuel filler cap is a ratcheting type. Tighten the
cap clockwise until ratcheting clicks are heard.
Hang the string of the cap on the hook as shown
while refueling.
WARNING
IGasoline is extremely flammable and
highly explosive under certain condi-
tions. You could be burned or seri-
ously injured if it is misused ormishandled. Always stop the engine
and do not smoke or allow open
flames or sparks near the vehicle
when refueling.
IFuel may be under pressure. Turn the
cap a quarter turn, and wait for any
hissing sound to stop to prevent fuel
from spraying out and possible per-
sonal injury. Then remove the cap.
IDo not attempt to top off the fuel
tank after the fuel pump nozzle shutsoff automatically.
Continued refueling may cause fuel
overflow, resulting in fuel spray and
possibly a fire.
IUse only an original equipment type
fuel filler cap as a replacement. It has
a built-in safety valve needed for
proper operation of the fuel system
and emission control system. An in-
correct cap can result in a serious
malfunction and possible injury. It
could also cause the
malfunc-
tion indicator lamp to come on.
IDo not fill a portable fuel container in
the vehicle or trailer. Static electricity
can cause an explosion of flammable
liquid, vapor or gas in any vehicle or
trailer. To reduce the risk of serious
injury or death when filling portable
fuel containers:
Ð Always place the container on the
ground when filling.
Ð Do not use electronic devices
while filling.
SPA1509
Pre-driving checks and adjustments
3-11
Z
02.9.13/Z33-D/V5.0
X
Page 120 of 227
d. You have had an accident involv-
ing damage to the exhaust system,
underbody, or rear of the vehicle.
THREE WAY CATALYSTThe three way catalyst is an emission control
device installed in the exhaust system. Exhaust
gases in the converter are burned at high tem-
peratures to help reduce pollutants.
WARNING
IThe exhaust gas and the exhaust sys-
tem are very hot. Keep people, ani-
mals or flammable materials away
from the exhaust system compo-
nents.
IDo not stop or park the vehicle over
flammable materials such as dry
grass, waste paper or rags. They may
ignite and cause a fire.
CAUTION
IDo not use leaded gasoline. Deposits
from leaded gasoline seriously re-
duce the three way catalyst's ability
to help reduce exhaust pollutants.
IKeep your engine tuned up. Malfunc-
tions in the ignition, fuel injection, or
electrical systems can cause overrich
fuel flow into the three way catalyst,
causing it to overheat. Do not keep
driving if the engine misfires, or if
noticeable loss of performance or
other unusual operating conditions
are detected. Have the vehicle in-
spected promptly by a NISSAN
dealer.
IAvoid driving with an extremely low
fuel level. Running out of fuel could
cause the engine to misfire, damag-
ing the three way catalyst.
IDo not race the engine while warm-
ing it up.
IDo not push or tow your vehicle to
start the engine.
LOW TIRE PRESSURE WARNING
SYSTEM (if so equipped)The low tire pressure warning system displays
pressure of all tires (except the spare tire) on the
trip computer by sending a signal from a sensor
that is installed in each wheel.
The low tire pressure warning system will acti-
vate only when the vehicle is driven at speeds
above 20 MPH (32 km/h). Also, this system may
not detect a sudden drop in tire pressure (for
example, a flat tire by catching something while
driving).
Frequently check the tire pressure indicator on
the trip computer and adjust pressure of each
tire properly. See ªTrip computerº in the ª2.
Instruments and controlsº section for the tire
pressure indicator.Flat tire warningIf the vehicle is being driven with a flat tire or
extremely low tire pressure (lower than 28 psi),
the low tire pressure warning light comes on,
and the chime sounds for about 10 seconds. On
the trip computer, the PSI indicator starts flash-
ing and the current display switches to the tire
pressure indicator.
For additional information regarding the above
warning, see ªTrip computerº and
Starting and driving
5-3
Z
02.9.13/Z33-D/V5.0
X
Page 125 of 227
IMake sure the area around the vehicle is
clear.
IMaintenance items should be checked peri-
odically, for example, each time you check
engine oil.
ICheck that all windows and lights are clean.
IVisually inspect tires for their appearance and
condition. Also, check tires for proper infla-
tion.
ILock all doors.
IPosition seat and adjust head restraints.
IAdjust inside and outside mirrors.
IFasten seat belts and ask all passengers to
do likewise.
ICheck the operation of warning lights when
key is turned to the ON (3) position.1. Apply the parking brake.
2.Automatic transmission:
Move the selector lever to P (Park) or N
(Neutral). (P preferred.)
The starter is designed not to operate if the
selector lever is in one of the driving posi-
tions.
Manual transmission:
Move the shift lever to N (Neutral) position,
and depress the clutch pedal to the floor
while cranking the engine.
The starter is designed not to operate unless
the clutch pedal is fully depressed.
3. Crank the enginewith your foot off the
accelerator pedalby turning the ignition
key to START. Release the key when the
engine starts. If the engine starts, but fails to
run, repeat the above procedure.
IWhen the engine is very hard to start in
extremely cold weather or when restarting,
depress the accelerator pedal a little (ap-
proximately 1/5 to the floor) and hold it then
crank the engine. Release the key and the
accelerator pedal when the engine starts.
IWhen the engine is very hard to start be-
cause it is flooded, depress the acceleratorpedal all the way to the floor and hold it.
Crank the engine for 5 to 6 seconds. After
cranking the engine, release the accelerator
pedal. Crank the enginewith your foot off
the accelerator pedalby turning the igni-
tion key to START. Release the key when the
engine starts. If the engine starts, but fails to
run, repeat the above procedure.
CAUTION
Do not operate the starter for more than
15 seconds at a time. If the engine does
not start, turn the key off and wait 10
seconds before cranking again, other-
wise the starter could be damaged.
4.Warm-up
Allow the engine to idle for at least 30
seconds after starting. Drive at moderate
speed for a short distance first, especially in
cold weather.
BEFORE STARTING THE ENGINE STARTING THE ENGINE5-8
Starting and driving
Z
02.9.13/Z33-D/V5.0
X
Page 128 of 227

shift mode. Shift range can be selected manu-
ally.
In the manual shift mode, the shift range is
displayed on the position indicator in the meter.
Shift ranges up or down one by one as follows:M1®
¬
M2®
¬
M3®
¬
M4®
¬
M5
M5 (5th):
Use this position for all normal forward driving.M4 (4th):
For driving up or down long slopes where engine
braking would be advantageous.M3 (3rd) and
M2 (2nd):
Use for hill climbing or engine braking on down-
hill grades.
M1 (1st):
Use this position when climbing steep hills
slowly or driving slowly through deep snow,
sand or mud, or for maximum engine braking on
steep downhill grades.
IRemember not to drive at high speeds for
extended periods of time in lower than
M4
range. This reduces the fuel economy.
IWhen shifting up, move the selector lever to
the + (up) side. (Shifts to higher range.)IWhen shifting down, move the selector lever
to the þ (down) side. (Shifts to lower range.)
IMoving the selector lever to the same side
twice will shift the ranges in succession.
However, if this motion is rapidly done, the
second shifting may not be completed prop-
erly.
IIn the manual shift mode, the transmis-
sion automatically shifts down to 1st
gear before the vehicle comes to a stop.
When accelerating again, it is necessary
to shift up to the desired range.
IWhen canceling the manual shift mode, re-
turn the selector lever to the D position. The
transmission returns to the normal driving
mode.
IIn the manual shift mode, the transmis-
sion may not shift to the selected gear.
This helps maintain driving performance
and reduces the chance of vehicle dam-
age or loss of control.
Accelerator downshift
Ð In D position ÐFor passing or hill climbing, fully depress the
accelerator pedal to the floor. This shifts the
transmission down into the lower gear, depend-
ing on the vehicle speed.
Fail-safeWhen the fail-safe operation occurs, the next
time the key is turned to the ON position, the
warning light will blink for approximately 8
seconds after coming on for 2 seconds. While
the vehicle can be driven under these circum-
stances please note that the gears in the auto-
matic transmission will be locked in 4th gear.
If the vehicle is driven under extreme con-
ditions, such as excessive wheel spinning
and subsequent hard braking, the fail-safe
system may be activated. This will occur
even if all electrical circuits are functioning
properly. In this case, turn the ignition key
OFF and wait for 3 seconds. Then turn the
key back to the ON position. The vehicle
should return to its normal operating con-
dition. If it does not return to its normal
operating condition, have your NISSAN
dealer check the transmission and repair if
necessary.
Starting and driving
5-11
Z
02.9.13/Z33-D/V5.0
X