2003 MITSUBISHI SHOGUN remote control
[x] Cancel search: remote controlPage 2 of 392

Overview -
Instruments and Controls
EB21AOHc
B21A600T
LHD
1- Front fog lamp switch*→P.4-22
Rear fog lamp switch→P.4-22
2- Electric remote-controlled outside
rear-view mirror switch*→P.5-51
3- Combination headlamps,
dipper and turn signal switch→P.4-14
Headlamp washer switch*→P.4-19
4- Supplemental restraint system-air bag
(for driver’s seat)→P.3-42
Horn switch→P.4-24
5- Ignition switch→P.5-11
6- Auto-speed (cruise)
control lever*→P.5-53
7- Meter and gauges→P.4-2
8- Windscreen wiper and washer switch
→P.4-17
Rear window wiper and washer switch
→P.4-19
9- Headlamp levelling switch→P.4-16
10- Rheostat (meter illumination control)
→P.4-23
11- Fuse box lid→P.8-28
12- Bonnet release lever→P.2-9
13- Fuel tank filler door release lever→P.5-4Div:
Out put date:
Page 4 of 392

Instruments and Controls
EB21AOIc
B21A602T
RHD
1- Combination headlamps,
dipper and turn signal switch→P.4-14
Headlamp washer switch*→P.4-19
2- Meter and gauges→P.4-2
3- Ignition switch→P.5-11
4- Supplemental restraint system-air bag
(for driver’s seat)→P.3-42
Horn switch→P.4-24
5- Windscreen wiper and washer switch
→P.4-17
Rear window wiper and washer switch
→P.4-19
6- Electric remote-controlled outside
rear-view mirror switch→P.5-51
7- Front fog lamp switch*→P.4-22
Rear fog lamp switch→P.4-22
8- Fuel tank filler door release lever→P.5-4
9- Bonnet release lever→P.2-9
10- Headlamp levelling switch→P.4-16
11- Rheostat (meter illumination control)
→P.4-23
12- Fuse box lid→P.8-28
13- Auto-speed (cruise)
control lever*→P.5-53Div:
Out put date:
Page 19 of 392

F12A261A
To lock the rear doors
(5-door models)Set the inside lock knob (1) to the locked
position (so that the red mark cannot be
seen), and close the door (2).
CAUTION
(1) Make sure the doors are closed:
driving with doors incom-
pletely closed is very danger-
ous.
(2) Never leave children in the
vehicle unattended.
(3) Be careful not to lock the doors
while the key is inside the
vehicle.
F12D030A
Keyless entry system*
EF11B-Xa
Press the remote control switch, and all
doors (including the backdoor) will be
locked or unlocked as desired.Operation of all doors
(including the backdoor)To lock
Press the LOCK switch, and all doors
(including the backdoor) will be locked.
When they are locked with the room lamp
at the [•] position, the room lamp and the
turn-signal lamps blink twice.To unlock
Press the UNLOCK switch, and all doors
(including the backdoor) will be unlocked.
When unlocked with the room lamp at the
[•] position, the room lamp will be turned on
for approximately 15 seconds and
turn-signal lamps will blink 4 times.
Locking and unlocking
2-5
Div:
Out put date:
Page 20 of 392

NOTE
(1) The confirmation function (this indi-
cates locking or unlocking of the doors
and backdoor with the flash of the turn-
signal lamps) can be deactivated. For
further information, please contact your
authorized MITSUBISHI dealer.
(2) The keyless entry system does not
operate if the key is left in the key cyl-
inder, or any door (including the
backdoor) is open.
(3) If the UNLOCK switch is pressed and
no door is opened within approxi-
mately 30 seconds: relocking will auto-
matically occur.
(4) The remote control switch will oper-
ate within about 4 m from the vehicle.
However, the operating range of the
remote control switch may change if
the vehicle is located near a TV trans-
mitting tower, power station, or radio
broadcasting station.
(5) If the doors cannot be locked or
unlocked after pressing the remote
control switch, the battery inside the
switch may need to be replaced.
Replace the battery at your autho-
rized MITSUBISHI dealer.(6) If your remote control switch is lost,
please contact your authorized MIT-
SUBISHI dealer for a replacement
remote control switch.
(7) If you wish to add a remote control
switch, please contact your autho-
rized MITSUBISHI dealer. A maxi-
mum of 4 remote control switches are
available for your vehicle.
CAUTION
(1) Do not leave the remote con-
trol switch where it may be
exposed to heat caused by the
direct rays of the sun.
(2) The remote control switch is a
precision electronic device.
Therefore, pay attention to the
following:
•Avoid knocking the remote
control switch hard against
other objects or dropping it.
•Keep the remote control switch
dry.
•Do not disassemble the remote
control switch.
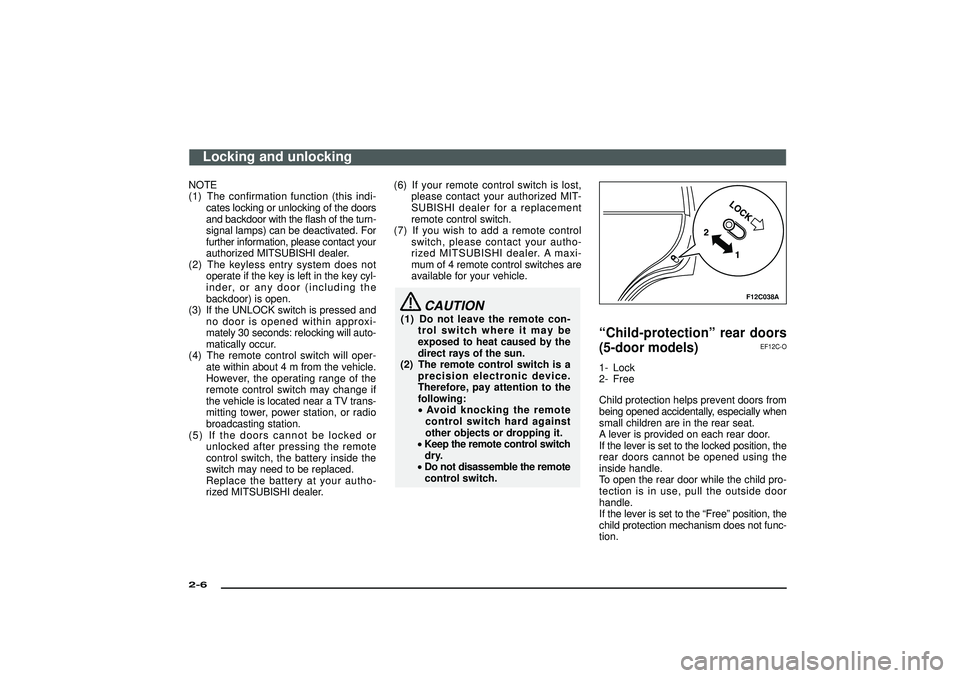
F12C038A
“Child-protection”rear doors
(5-door models)
EF12C-O
1- Lock
2- Free
Child protection helps prevent doors from
being opened accidentally, especially when
small children are in the rear seat.
A lever is provided on each rear door.
If the lever is set to the locked position, the
rear doors cannot be opened using the
inside handle.
To open the rear door while the child pro-
tection is in use, pull the outside door
handle.
If the lever is set to the“Free”position, the
child protection mechanism does not func-
tion.
Locking and unlocking
2-6Div:
Out put date:
Page 113 of 392

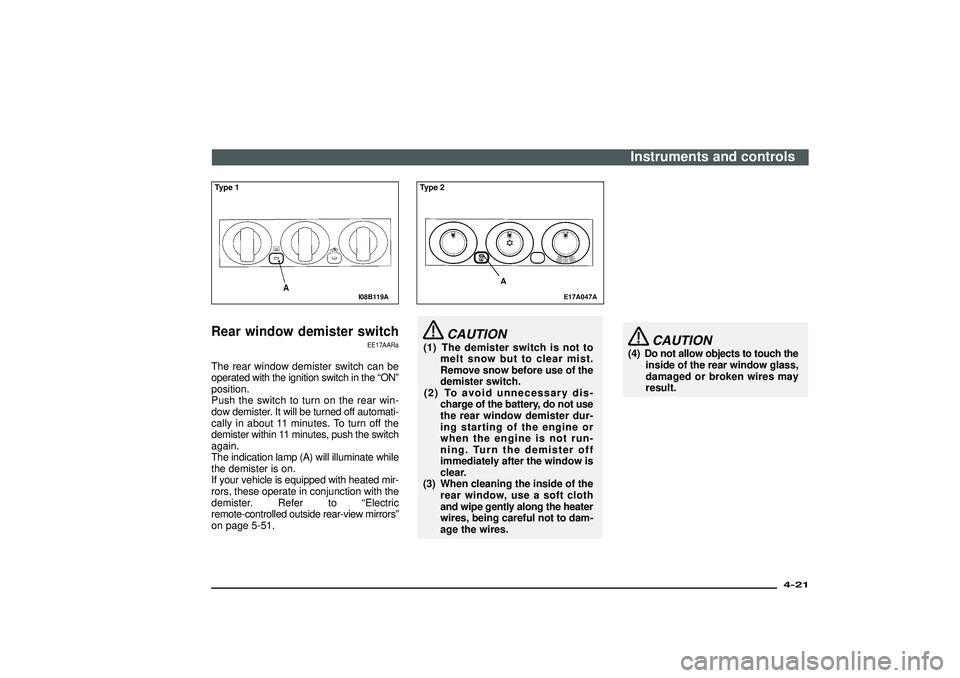
I08B119A
Type 1Rear window demister switch
EE17AARa
The rear window demister switch can be
operated with the ignition switch in the“ON”
position.
Push the switch to turn on the rear win-
dow demister. It will be turned off automati-
cally in about 11 minutes. To turn off the
demister within 11 minutes, push the switch
again.
The indication lamp (A) will illuminate while
the demister is on.
If your vehicle is equipped with heated mir-
rors, these operate in conjunction with the
demister. Refer to“Electric
remote-controlled outside rear-view mirrors”
on page 5-51.
E17A047A
Type 2
A
CAUTION
(1) The demister switch is not to
melt snow but to clear mist.
Remove snow before use of the
demister switch.
(2) To avoid unnecessary dis-
charge of the battery, do not use
the rear window demister dur-
ing starting of the engine or
when the engine is not run-
ning. Turn the demister off
immediately after the window is
clear.
(3) When cleaning the inside of the
rear window, use a soft cloth
and wipe gently along the heater
wires, being careful not to dam-
age the wires.
CAUTION
(4) Do not allow objects to touch the
inside of the rear window glass,
damaged or broken wires may
result.Instruments and controls
4-21
Div:
Out put date:
Page 117 of 392
![MITSUBISHI SHOGUN 2003 Owners Manual (in English) [Vehicles with
keyless entry system]
The room lamp goes on when a
door or the backdoor is opened.
When all doors are closed, the
room lamp is illuminated and
dimmed gradually for 30 sec-
onds and then MITSUBISHI SHOGUN 2003 Owners Manual (in English) [Vehicles with
keyless entry system]
The room lamp goes on when a
door or the backdoor is opened.
When all doors are closed, the
room lamp is illuminated and
dimmed gradually for 30 sec-
onds and then](/manual-img/19/34883/w960_34883-116.png)
[Vehicles with
keyless entry system]
The room lamp goes on when a
door or the backdoor is opened.
When all doors are closed, the
room lamp is illuminated and
dimmed gradually for 30 sec-
onds and then goes out.
However, the lamp goes out
immediately without being
dimmed in case of the
followings:
•The ignition switch is turned
“ON”.
•All doors are locked using the
key mechanism of the front
doors/backdoor, the lock knob
of the driver’s door, or the
remote control switch of the
keyless entry system.
NOTE
If the ignition key is removed
with the doors closed, the lamp
is dimmed gradually for 30 sec-
onds and then goes out.
3(ON) - The lamp illuminates.
E19A111A
Personal lampsPush the switch (A) to turn on the lamp.
Push it again to turn it off.
NOTE
If you leave the lamps on without running
the engine, you will run down the battery.
Before you leave the vehicle, make sure
that all the lamps are off.
E09D001A
Rear personal lamp
EE09D-L
Instruments and controls
4-25
Div:
Out put date:
Page 159 of 392

Starting and driving
Running-in recommendations ......................................... 5- 2
Fuel selection .................................................................... 5- 3
Filling the fuel tank ........................................................... 5- 4
Catalytic converter ............................................................ 5- 6
Economical driving ........................................................... 5- 7
Trailer towing ..................................................................... 5- 8
Ignition switch ................................................................... 5-11
Starting .............................................................................. 5-12
Manual transmission ........................................................ 5-15
Automatic transmission INVECS—II Sport
Mode 5A/T
(Intelligent & Innovative Vehicle
Electronic Control System II) ...................................... 5-17
Part time 4WD.................................................................... 5-24
Super select 4WD II (SS4 II) ............................................. 5-28
Rear differential lock ........................................................ 5-34
Correct 4-wheel drive operation ...................................... 5-38
Cautions on handling of 4WD vehicles .......................... 5-42
Parking brake .................................................................... 5-42
Parking .............................................................................. 5-43
Braking ............................................................................... 5-44
Anti - lock brake system (ABS) ....................................... 5-45
Limited-slip differential..................................................... 5-48
Steering wheel height adjustment................................... 5-49
Power steering system ..................................................... 5-49
Inside rear-view mirror ..................................................... 5-50
Outside rear-view mirror .................................................. 5-50
Manual outside rear-view mirrors ................................... 5-51
Electric remote-controlled outside
rear-view mirrors .......................................................... 5-51
Auto-speed (cruise) control ............................................. 5-53
MITSUBISHI active stability &
traction control system (M-ASTC) ............................... 5-57
Div:
Out put date:
Page 209 of 392

I08B162A
Manual outside rear-view
mirrors*
EI08BAT
Adjust the mirror surface by hands as indi-
cated by the arrows.
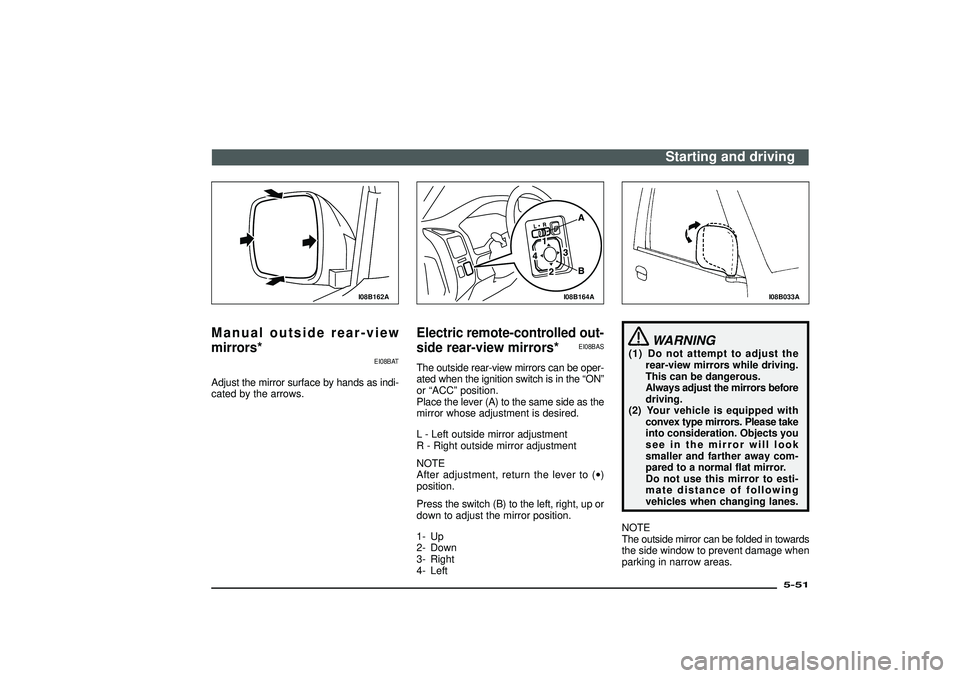
I08B164A
Electric remote-controlled out-
side rear-view mirrors*
EI08BAS
The outside rear-view mirrors can be oper-
ated when the ignition switch is in the“ON”
or“ACC”position.
Place the lever (A) to the same side as the
mirror whose adjustment is desired.
L - Left outside mirror adjustment
R - Right outside mirror adjustment
NOTE
After adjustment, return the lever to (•)
position.
Press the switch (B) to the left, right, up or
down to adjust the mirror position.
1- Up
2- Down
3- Right
4- Left
I08B033A
WARNING
(1) Do not attempt to adjust the
rear-view mirrors while driving.
This can be dangerous.
Always adjust the mirrors before
driving.
(2) Your vehicle is equipped with
convex type mirrors. Please take
into consideration. Objects you
see in the mirror will look
smaller and farther away com-
pared to a normal flat mirror.
Do not use this mirror to esti-
mate distance of following
vehicles when changing lanes.
NOTE
The outside mirror can be folded in towards
the side window to prevent damage when
parking in narrow areas.
Starting and driving
5-51
Div:
Out put date: