2003 MITSUBISHI SHOGUN window
[x] Cancel search: windowPage 93 of 392

Instruments and controls
Instruments ............................................................ 4- 2
Speedometer ......................................................... 4- 2
Tachometer ............................................................. 4- 3
Odometer/Tripmeter............................................... 4- 3
Fuel gauge .............................................................. 4- 4
Water temperature gauge...................................... 4- 5
Indication and warning lamps .............................. 4- 6
Combination headlamps,
dipper and turn signal switch ........................... 4-14
Headlamp levelling switch ................................... 4-16
Windscreen wiper and washer switch ................. 4-17
Rear window wiper and washer switch ............... 4-19
Headlamp washer switch ...................................... 4-19
Hazard warning flasher switch ............................. 4-20
Rear window demister switch .............................. 4-21
Front fog lamp switch ........................................... 4-22
Rear fog lamp switch............................................. 4-22
Rheostat (meter illumination control) .................. 4-23
Wiper deicer switch ............................................... 4-24
Horn switch ............................................................ 4-24
Room lamps ........................................................... 4-24
Rear personal lamp................................................ 4-25
Luggage compartment lamp ................................. 4-26
Multi centre display ............................................... 4-27
RV meter ................................................................. 4-40
Div:
Out put date:
Page 106 of 392

E11A039A
Combination headlamps, dip-
per and turn signal switch
EE11AHEe
HeadlampsRotate the switch to turn on the lamps.
All lamps offPosition, tail, number plate and
instrument panel lamps onHeadlamps and other lamps go
on
NOTE
(1) Do not leave the headlamps and other
lamps on for too long while the engine
is stationary. A run-down battery could
result.(2) When it rains, or when the vehicle has
been washed, the inside of the lens
sometimes becomes foggy. This is the
same phenomenon as when window
glass mists up on a humid day, and
does not indicate a functional prob-
lem. When the lamp is switched on, the
heat will remove the fog. However, if
water gathers inside the lamp, please
go to an authorized MITSUBISHI
dealer for a check.
[Vehicles with Daytime Running Lamp]
When the ignition switch is in the“ON”
position and the lamp switch is set to the
“
”(OFF) position, the low beam of the
headlamps, tail lamps, etc., will illumi-
nate.
Lamps (headlamps, fog lamps, etc.)
auto-cutout function
(1) If the key is turned to the“LOCK”or
“ACC”position and the lamps stay on
for about 3 minutes without opening the
driver’s door while the lamp switch is in
the“
”position, the lamps automati-
cally turn off.
(2) If the key is turned to the“LOCK”or
“ACC”position or removed from the
ignition switch and the driver’s door is
opened within 3 minutes while the lamp
switch is in the“
”position, a buzzer
will sound to warn the driver that the
lamps have not been turned off, and
these lamps will automatically turn off.NOTE
(1) The lamp auto-cutout will not function
when the lamp switch is in the“
”
position.
(2) When the ignition switch has been
turned to either the“LOCK”or“ACC”
position with the lamp switch in the
“
”position, and the lamp switch is
returned to the“
”(OFF) within
approximately 3 minutes, the
auto-cutout function will not be acti-
vated.
When you want to keep the lamps on:
1. Turn the switch in the“
”(OFF) posi-
tion to switch off all lamps while the key
is in the“LOCK”or“ACC”position or
remove it from the ignition switch.
2. Turn on the lamps with the switch in the
“
”position again, then the lamps will
remain on.
Lamp monitor buzzer
If the driver’s door is opened when the key
is in the“LOCK”or“ACC”position or
removed from the ignition switch while the
lamps are on, a buzzer will sound to remind
the driver to turn off the lamps. When the
lamp auto-cutout function acts, the buzzer
will stop automatically. When this func-
tion does not act, turn off the lamp switch
to stop the buzzer.
Instruments and controls
4-14Div:
Out put date:
Page 111 of 392

E13B055A
Rear window wiper and washer
switch
EE13BAQa
The rear window wiper and washer switch
can be operated with the ignition switch in
the“ON”or“ACC”position.
Turn the knob, and the rear window wiper
and washer will operate.
Operate about every 8 secondsOffThe washer fluid will be sprayed onto
the rear window when the knob is
turned fully in either direction.
The wipers operate automatically
several times while the washer fluid
is being sprayed.NOTE
To ensure a clear rearward view, the wiper
performs a number of continuous opera-
tions either when the switch is moved to the
“
”position or when the gearshift (or
selector) lever is moved to the“R”posi-
tion while the switch is in the“
”posi-
tion. Following this continuous operation,
the wiper will automatically switch to inter-
mittent operation.
E02A024A
Headlamp washer switch*
EE02A-Sb
The headlamp washer can be operated
when the headlamps go on.
Push the button once and the washer fluid
will be sprayed on to the headlamps for
about 1 second.
NOTE
(1) Check the headlamp washers periodi-
cally to confirm that the washer fluid is
being sprayed properly on to the head-
lamp lenses.
(2) If the low washer fluid warning lamp illu-
minates, fill the tank with washer fluid
at the earliest opportunity.Instruments and controls
4-19
Div:
Out put date:
Page 113 of 392

I08B119A
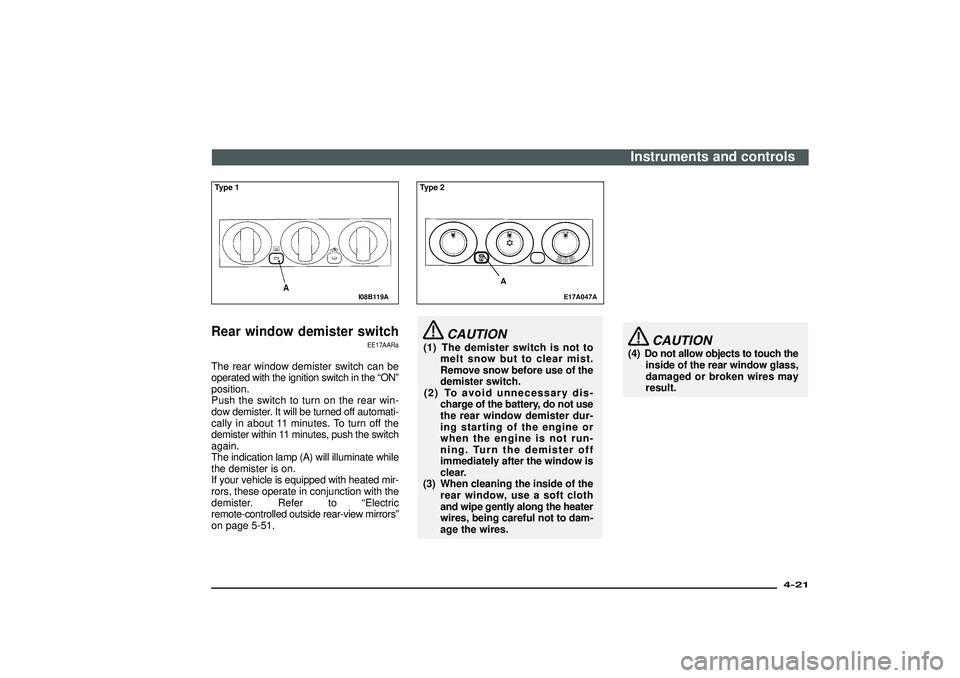
Type 1Rear window demister switch
EE17AARa
The rear window demister switch can be
operated with the ignition switch in the“ON”
position.
Push the switch to turn on the rear win-
dow demister. It will be turned off automati-
cally in about 11 minutes. To turn off the
demister within 11 minutes, push the switch
again.
The indication lamp (A) will illuminate while
the demister is on.
If your vehicle is equipped with heated mir-
rors, these operate in conjunction with the
demister. Refer to“Electric
remote-controlled outside rear-view mirrors”
on page 5-51.
E17A047A
Type 2
A
CAUTION
(1) The demister switch is not to
melt snow but to clear mist.
Remove snow before use of the
demister switch.
(2) To avoid unnecessary dis-
charge of the battery, do not use
the rear window demister dur-
ing starting of the engine or
when the engine is not run-
ning. Turn the demister off
immediately after the window is
clear.
(3) When cleaning the inside of the
rear window, use a soft cloth
and wipe gently along the heater
wires, being careful not to dam-
age the wires.
CAUTION
(4) Do not allow objects to touch the
inside of the rear window glass,
damaged or broken wires may
result.Instruments and controls
4-21
Div:
Out put date:
Page 152 of 392

D92K029A
Air flows to the leg area, and wind-
shield and door windows.
D92K030A
Air flows exclusively to the wind-
shield and door windows.
D92K031A
4. Set temperature display
This displays the desired set tempera-
ture.
5. Front demister indicator
This illuminates when the ventilator is
switched to“
”(demister).
6. Rear window demister indicator
This illuminates when the rear window
defogger switch is set to ON. For an expla-
nation of the rear window demister switch,
please read the explanation in the own-
er’s manual.
7. AUTO mode indicator
This illuminates when the air conditioning
is working in automatic mode (when both
the blower switch and the mode selection
dial are switched to“AUTO”).
Instruments and controls
4-60Div:
Out put date:
Page 209 of 392

I08B162A
Manual outside rear-view
mirrors*
EI08BAT
Adjust the mirror surface by hands as indi-
cated by the arrows.
I08B164A
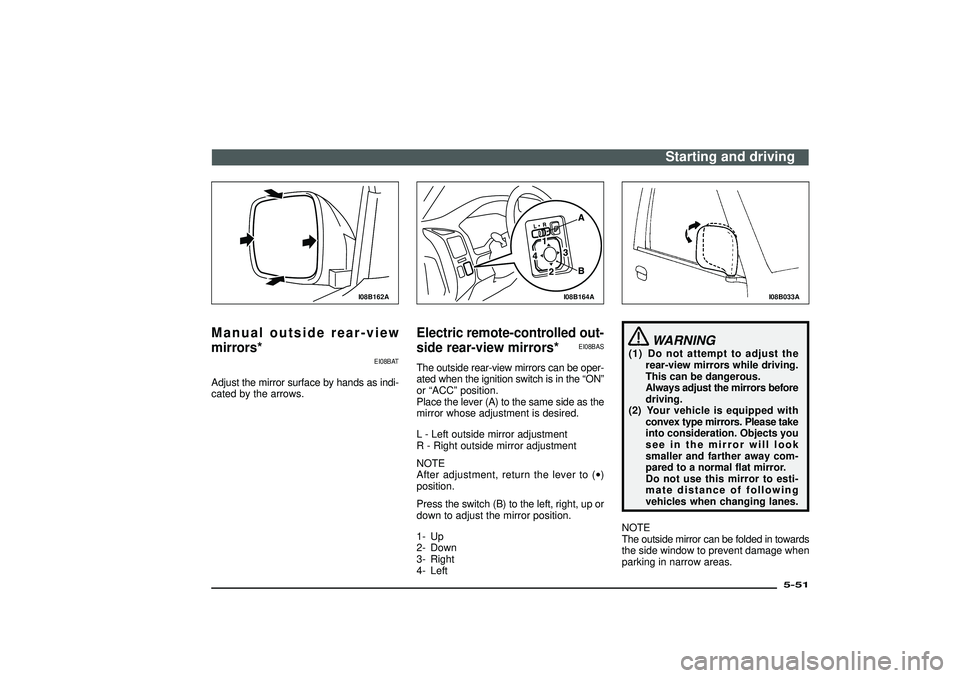
Electric remote-controlled out-
side rear-view mirrors*
EI08BAS
The outside rear-view mirrors can be oper-
ated when the ignition switch is in the“ON”
or“ACC”position.
Place the lever (A) to the same side as the
mirror whose adjustment is desired.
L - Left outside mirror adjustment
R - Right outside mirror adjustment
NOTE
After adjustment, return the lever to (•)
position.
Press the switch (B) to the left, right, up or
down to adjust the mirror position.
1- Up
2- Down
3- Right
4- Left
I08B033A
WARNING
(1) Do not attempt to adjust the
rear-view mirrors while driving.
This can be dangerous.
Always adjust the mirrors before
driving.
(2) Your vehicle is equipped with
convex type mirrors. Please take
into consideration. Objects you
see in the mirror will look
smaller and farther away com-
pared to a normal flat mirror.
Do not use this mirror to esti-
mate distance of following
vehicles when changing lanes.
NOTE
The outside mirror can be folded in towards
the side window to prevent damage when
parking in narrow areas.
Starting and driving
5-51
Div:
Out put date:
Page 210 of 392

I08B099A
Mirror retraction switchThe mirror retraction switch can be oper-
ated with the ignition switch in the“ON”or
“ACC”position.
Push the switch to fold the mirrors inward,
and push the switch again to return them
to extended position.
NOTE
(1) It is also possible to fold and return the
mirrors by hand.
(2) When freezing has occurred and mir-
rors fail to operate as intended, please
refrain from repeated pushing of the
retraction switch as this action can
result in burn-out of the mirror motor
circuits.
I08B118A
Type 1Mirror heaterWith the rear window demister switch in the
“ON”position, the outside rear-view mir-
rors are demisted or defrosted. Current will
flow through the heater elements inside the
mirrors, thus clearing away frost or con-
densation.
The indication lamp (C) will illuminate while
the demister is on.
The heater will be turned off automati-
cally in about 11 minutes.
E17A048A
Type 2
Starting and driving
5-52Div:
Out put date:
Page 222 of 392

H11A363D
UKW/MW/LW electronic tuning radio with tape
player*
EH30A-Pa
The audio system can be used when the ignition switch is in the
“ON” or “ACC” position.
A-Display window
B-Audio system
C-Multi centre display
D-RV meter
NOTE
(1) A CD player or a CD autochanger can be connected to this
audio system. The CD player or the CD autochanger can be
operated by the switch on the audio body. Refer to
“Connection of a CD player or a CD autochanger” on page
6-15.
(2) To listen to the audio system while the engine is stopped, turn
the ignition switch to the “ACC” position.(3) When a cellular phone is used inside the vehicle, noise may
be produced from the audio equipment. This does not mean
that something is wrong with the audio equipment. In such a
case, use the cellular phone at a place as far as possible from
the audio equipment.
(4) In case of misuse (entry of a foreign object or water, smoke
or odour, etc.), immediately turn off the audio system and have
it checked at an authorized MITSUBISHI dealer. Never try to
repair it by yourself. Avoid continuous usage without inspec-
tion by a qualified person.
(5) The audio system’s control panel can be removed to deter
thieves. For details, refer to section entitled “Audio system
anti-theft feature” on page 6-32.
For pleasant driving
6-2Div:
Out put date: