Page 275 of 376
275 Practical hints
What to do if …
Left display
Right display
Possible cause
Possible solution
.
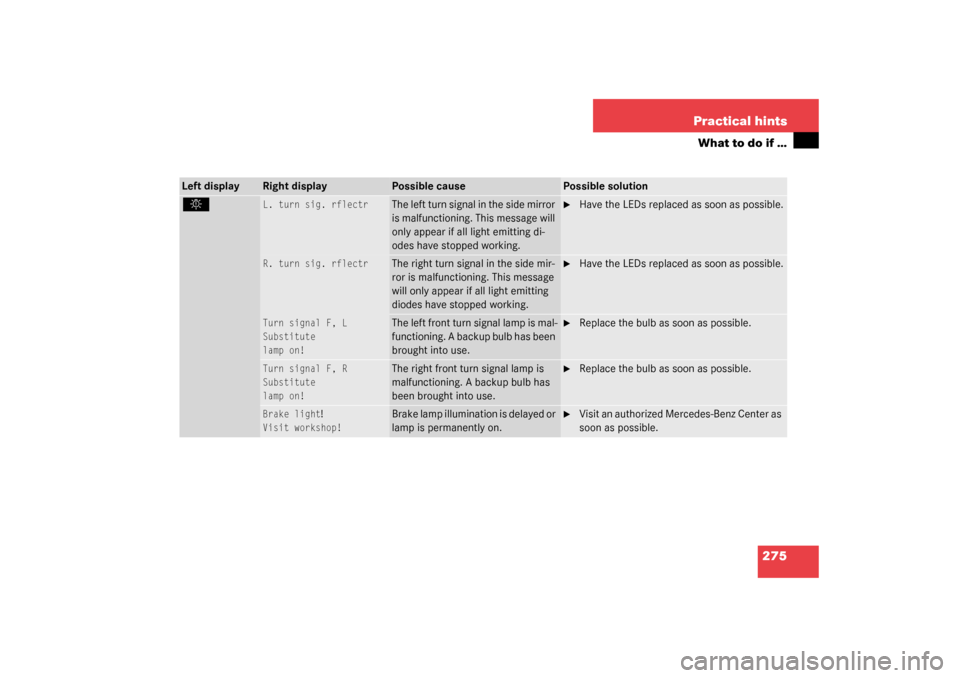
L. turn sig. rflectr
The left turn signal in the side mirror
is malfunctioning. This message will
only appear if all light emitting di-
odes have stopped working.
�
Have the LEDs replaced as soon as possible.
R. turn sig. rflectr
The right turn signal in the side mir-
ror is malfunctioning. This message
will only appear if all light emitting
diodes have stopped working.
�
Have the LEDs replaced as soon as possible.
Turn signal F, L
Substitute
lamp on!
The left front turn signal lamp is mal-
functioning. A backup bulb has been
brought into use.
�
Replace the bulb as soon as possible.
Turn signal F, R
Substitute
lamp on!
The right front turn signal lamp is
malfunctioning. A backup bulb has
been brought into use.
�
Replace the bulb as soon as possible.
Brake light
!
Visit workshop!
Brake lamp illumination is delayed or
lamp is permanently on.
�
Visit an authorized Mercedes-Benz Center as
soon as possible.
Page 279 of 376
279 Practical hints
What to do if …
Left display
Right display
Possible cause
Possible solution
.
Light sensor
Visit workshop!
The light sensor is malfunctioning.
The headlamps switch on automati-
cally.
�
In the control system, set lamp operation to
manual (
�page 124).
�
Switch on headlamps using the exterior lamp
switch.
?
Visit workshop!
There may be a malfunction in the �
fuel injection system
�
ignition system
�
exhaust system
�
fuel system
�
H a v e t h e e n g i n e c h e c k e d a s s o o n a s p o s s i b l e
by an authorized Mercedes-Benz Center
(�page 256).
O
Close hood!
You are driving with the hood open.
�
Close the hood (
�page 228).
:
Engine oil level
Stop, engine off!
There is no oil in the engine. There is
a danger of engine damage.
�
Carefully bring the vehicle to a halt as soon
as possible.
�
Turn off the engine.
�
Add engine oil.
Page 287 of 376
287 Practical hints
What to do if …
Left display
Right display
Possible cause
Possible solution
K
Visit workshop!
The retractable hardtop is mal-
functioning.
�
Have the retractable hardtop checked by an au-
thorized Mercedes-Benz Center.
Lock
hardtop
The roof is not properly locked.
�
Push or pull on the retractable hardtop switch
until the indicator lamp in the switch goes out
and the roof is completely open or closed
(�page 159).
±
Display defective
Visit workshop!
Certain electronic systems are un-
able to relay information to the
control system. The following sys-
tems may have failed:�
Coolant temperature gauge
�
Tachometer
�
Cruise control display
�
Have the electronic systems checked by an au-
thorized Mercedes-Benz Center (
�page 256).
W
Washer fluid
Check level!
The fluid level has dropped to
about 1/3 of total reservoir ca-
pacity.
�
Add washer fluid (
�page 233).
Page 290 of 376
290 Practical hintsLocking/unlocking in an emergency
Locking/unlocking in an emergencyUnlocking the vehicle
Unlocking the driver’s door
If you are unable to unlock the driver’s
door using the key, open the door using
the mechanical key.
1Mechanical key locking tab
2Mechanical key
�
Move locking tab 1 direction of arrow
and slide the mechanical key out of the
housing.
3Unlocking
4Locking
�
Unlock the door with the mechanical
key. To do so, push the mechanical key
in the lock until it stops and turn it to
the left.
iUnlocking your vehicle with the me-
chanical key will trigger the anti-theft
alarm system. To cancel the alarm, do
one of the following:�
Press button
Œ
or
‹
on the
key.
�
Insert the key in the starter switch.
�
Press the KEYLESS-GO* start/stop
button (
�page 30).
Page 292 of 376
292 Practical hintsLocking/unlocking in an emergencyLocking the vehicle
If you are unable to lock the vehicle with
the electronic key, lock it with the mechan-
ical key as follows:�
Close the passenger door and the
trunk.
�
Press the central locking switch in the
cockpit (
�page 91).
�
Check to see whether the locking knob
on the passenger door is still visible. If
necessary push it down manually.
�
Lock the driver’s door with the me-
chanical key.
�
Lock the trunk if necessary with the
mechanical key (
�page 83).Lowering the Easy Pack feature
manually
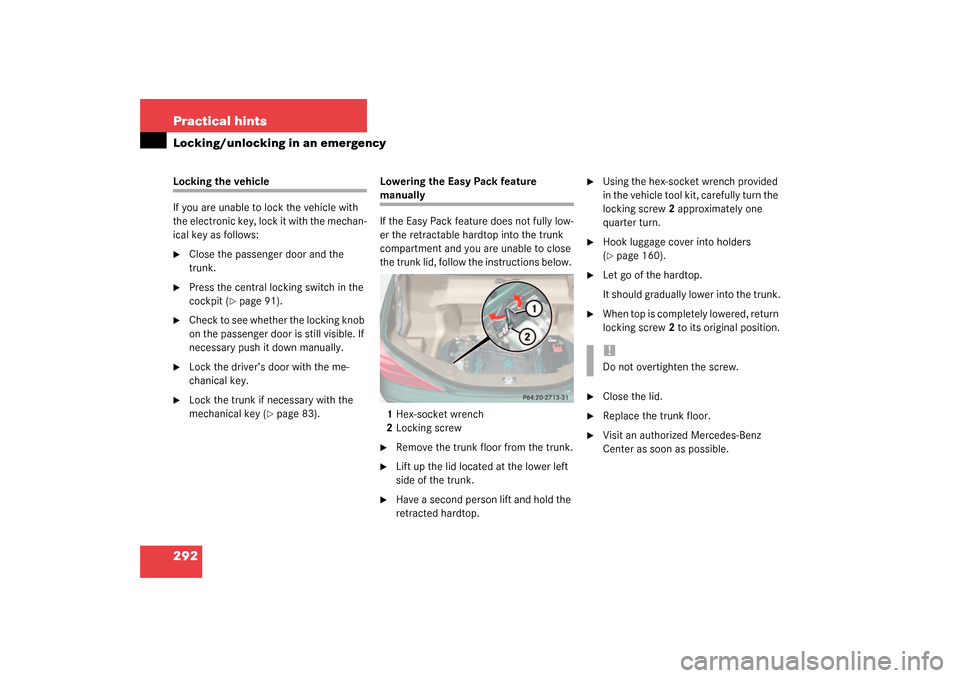
If the Easy Pack feature does not fully low-
er the retractable hardtop into the trunk
compartment and you are unable to close
the trunk lid, follow the instructions below.
1Hex-socket wrench
2Locking screw�
Remove the trunk floor from the trunk.
�
Lift up the lid located at the lower left
side of the trunk.
�
Have a second person lift and hold the
retracted hardtop.
�
Using the hex-socket wrench provided
in the vehicle tool kit, carefully turn the
locking screw 2 approximately one
quarter turn.
�
Hook luggage cover into holders
(�page 160).
�
Let go of the hardtop.
It should gradually lower into the trunk.
�
When top is completely lowered, return
locking screw 2 to its original position.
�
Close the lid.
�
Replace the trunk floor.
�
Visit an authorized Mercedes-Benz
Center as soon as possible.!Do not overtighten the screw.
Page 305 of 376
305 Practical hints
Flat tire
�
Drive the vehicle back and forth very
slowly approximately 30 ft (10 m).
This distributes the TIREFIT sealant ma-
terial inside the tire.
�
Take the electric air pump out of the
trunk.
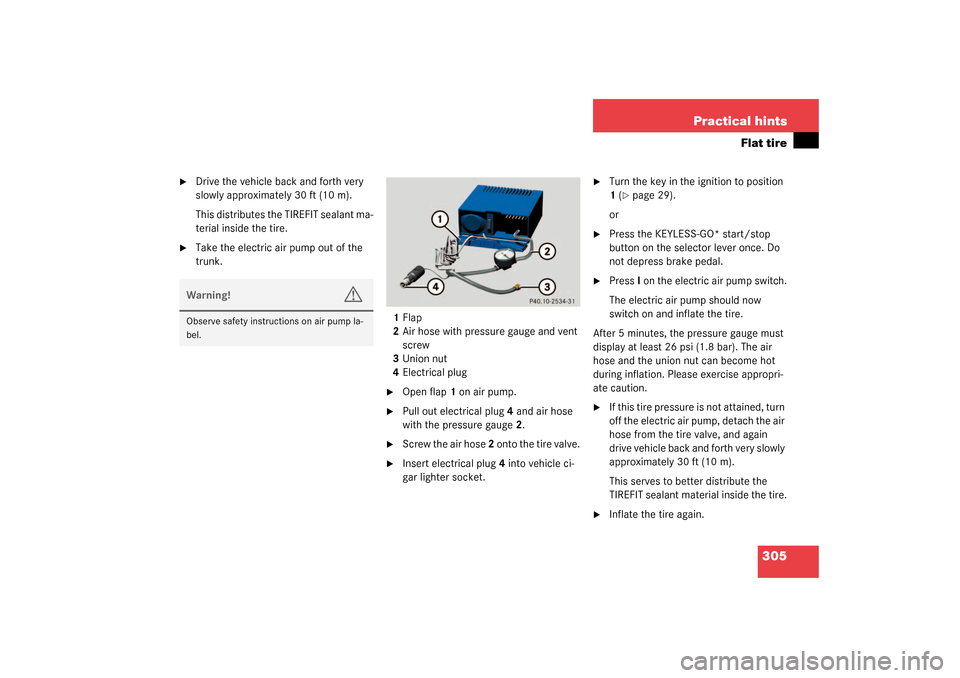
1Flap
2Air hose with pressure gauge and vent
screw
3Union nut
4Electrical plug
�
Open flap 1 on air pump.
�
Pull out electrical plug 4 and air hose
with the pressure gauge 2.
�
Screw the air hose 2 onto the tire valve.
�
Insert electrical plug 4 into vehicle ci-
gar lighter socket.
�
Turn the key in the ignition to position
1 (
�page 29).
or
�
Press the KEYLESS-GO* start/stop
button on the selector lever once. Do
not depress brake pedal.
�
Press I on the electric air pump switch.
The electric air pump should now
switch on and inflate the tire.
After 5 minutes, the pressure gauge must
display at least 26 psi (1.8 bar). The air
hose and the union nut can become hot
during inflation. Please exercise appropri-
ate caution.
�
If this tire pressure is not attained, turn
off the electric air pump, detach the air
hose from the tire valve, and again
drive vehicle back and forth very slowly
approximately 30 ft (10 m).
This serves to better distribute the
TIREFIT sealant material inside the tire.
�
Inflate the tire again.
Warning!
G
Observe safety instructions on air pump la-
bel.
Page 306 of 376
306 Practical hintsFlat tire�
Press 0 on the electric air pump switch.
�
Turn the key in the ignition to
position0.
or
�
Press KEYLESS-GO* start/stop button
on the selector lever twice. Do not de-
press brake pedal.
The electric air pump should now be
switched off.
�
Detach the electric air pump.
The air hose may still be hot. Please ex-
ercise appropriate caution.
�
Store the electrical plug and the air
hose behind the flap and place the air
pump back in the trunk.
�
Close the trunk lid.
�
Drive away immediately.
The TIREFIT sealant will distribute itself
evenly inside the tire.
�
After driving vehicle for an initial
10 minutes, check tire pressure using
the pressure gauge on the air pump.
!Do not operate the electric air pump
longer than eight minutes without in-
terruption. Otherwise it may overheat.
You may operate the air pump again af-
ter it has cooled off.
Warning!
G
If a tire pressure of 26 psi (1.8 bar) is not at-
tained, tire is too severely damaged for
TIREFIT to provide a reliable tire repair.
In this case, TIREFIT cannot properly seal
the tire.
Do not drive the vehicle.
Contact the nearest Mercedes-Benz Center
or call Roadside Assistance.
Warning!
G
Do not exceed vehicle speed of
50 mph (80 km / h). A TIREFIT repair is not
designed to operate at higher speeds.
The sticker must be attached on the instru-
ment cluster where it will be easily seen by
the driver.
Vehicle handling characteristics may
change. Adapt your driving accordingly.
Page 309 of 376
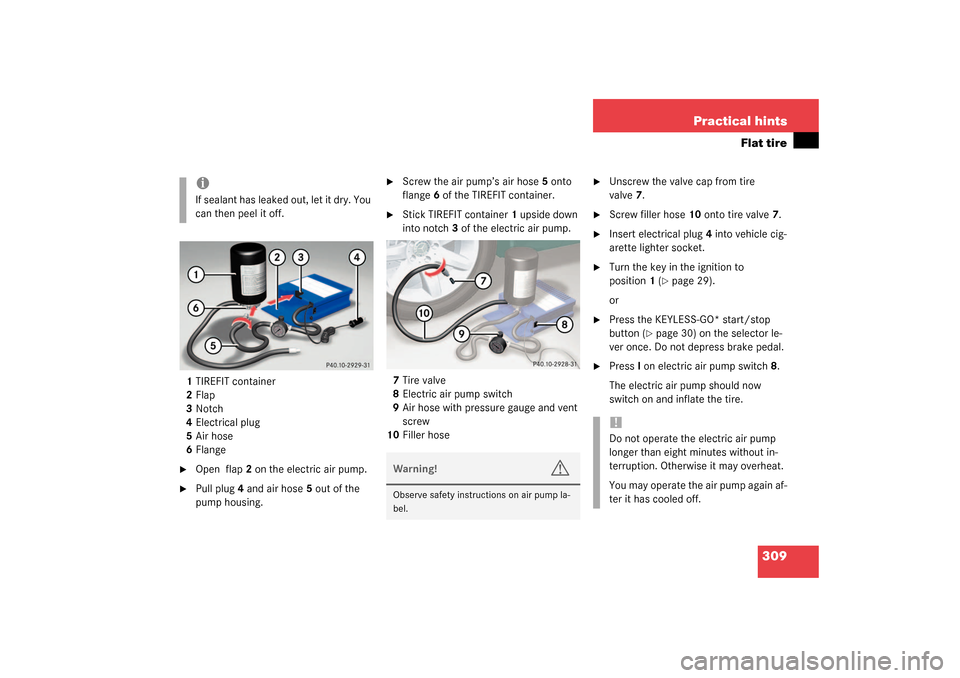
309 Practical hints
Flat tire
1TIREFIT container
2Flap
3Notch
4Electrical plug
5Air hose
6Flange�
Open flap2 on the electric air pump.
�
Pull plug4 and air hose5 out of the
pump housing.
�
Screw the air pump’s air hose5 onto
flange6 of the TIREFIT container.
�
Stick TIREFIT container1 upside down
into notch3 of the electric air pump.
7Tire valve
8Electric air pump switch
9Air hose with pressure gauge and vent
screw
10Filler hose
�
Unscrew the valve cap from tire
valve7.
�
Screw filler hose10 onto tire valve7.
�
Insert electrical plug4 into vehicle cig-
arette lighter socket.
�
Turn the key in the ignition to
position1 (
�page 29).
or
�
Press the KEYLESS-GO* start/stop
button (
�page 30) on the selector le-
ver once. Do not depress brake pedal.
�
PressI on electric air pump switch8.
The electric air pump should now
switch on and inflate the tire.
iIf sealant has leaked out, let it dry. You
can then peel it off.
Warning!
G
Observe safety instructions on air pump la-
bel.
!Do not operate the electric air pump
longer than eight minutes without in-
terruption. Otherwise it may overheat.
You may operate the air pump again af-
ter it has cooled off.