Page 100 of 226
92 TelephoneTelephone operationThe telephone is switched on.�
Press E or H repeatedly until the
corresponding telephone menu 1 ap-
pears in the display.
The telephone is ready for operation.
�
Press K.
The redial memory appears with the
last number dialed.
�
Press F or G.
This allows you to page forward or
backward through the redial memory.
The number selected will appear in the
display with the corresponding memo-
ry location.
�
Press K when the desired number
or name appears in the display 2.
Dialing will begin 3. When the dialing
has been completed, the name 4 is
displayed if the name has been stored
in the phone book, otherwise you will
continue to see the phone number.
The display is maintained for the dura-
tion of the call.
�
Press L to end the call.
The telephone display 1 appears.
iIf you do not wish to place a call, press
L. The telephone display 1 ap-
pears.
iPress E or H to display the next
or previous system.
Page 107 of 226

99 Telephone
Telephone operation
Changing a name
4Phone book entry selected
5Character list
6The character selected appears magni-
fied
7Confirms the changed entry
8Deletes the entry�
Turn the right-hand rotary/push-
button v to highlight the desired pho-
ne book entry and press to confirm.
An input menu appears.
�
Turn the right-hand rotary/push-
button v to highlight the desired let-
ters one by one and press to confirm.
The name will appear in the input line.
The input cursor indicates the current
input position.
Correcting an input
Deleting the last digit
�
Press r briefly.
Deleting the whole entry
�
Press r longer than 2 seconds.Input with number keys
�
Select a character by pressing the key
as listed below the corresponding num-
ber of times.
P82.85-9145-31
4
5
6
7
8
iYou can enter up to 20 characters.iYou can also select characters using the
number keys. Each number key has
more than one assignment. See table.
Key
Character
1
,
.
-
1
:
‘
/
2
A
B
C
2
3
D
E
F
3
4
G
H
I
4
5
J
K
L
5
6
M
N
O
6
7
P
Q
R
S
7
8
T
U
V
8
9
W
X
Y
Z
9
0
0
u
Blank
Page 114 of 226

106 TelephoneEmergency call
� Emergency callYou can use a mobile communications net-
work to make an emergency call to an
emergency rescue station.
The emergency call will be placed as long
as the corresponding mobile communicati-
on network is available. To do this, switch
the telephone on.
Emergency calls may not be possible with
all mobile phone networks or if certain net-
work services and/or telephone functions
are active. Check with your local network
operating company.
iThe emergency call will also be placed if
the phone is locked.iThis function places a call to local 9-1-1
provider. It does not initiate a Tele Aid
call.
Warning
G
The 9-1-1 emergency call system is a public
service. Using it without due cause is a cri-
minal offense.!If you enter “1” and press the right-
hand rotary/push-button v, the num-
ber stored in memory location “1” (de-
fault is 9-1-1) will be dialed.
Pressing or holding “1” longer than 2
seconds will also initiate the call.
!It will not be possible to complete the
emergency call if the cellular system is
busy. The message “System busy,
redial?” appears.
Take appropriate measures to alert an
emergency service as soon as possible.
Page 122 of 226
114 NavigationImportant notes
Travelling abroad
If you intend to travel through different re-
gions or abroad, you will need the respec-
tive navigation CD.
Contact your Mercedes-Benz Center or
the Customer Assistance Center at
1-800-FOR-MERCedes (1-800-367-6372)
for the available CDs.�
Change the navigation CD
(�page 119).
!GPS (G
lobal P
ositioning S
ystem) sig-
nals received make it possible to deter-
mine the current vehicle position.
Deviations from the actual position
may occur
�
if the reception of GPS signals is
disturbed e.g. in parking garages
and tunnels
�
if road conditions are bad
�
depending on the vehicle’s conditi-
on
If the reception of the GPS signal is un-
available, you will have to manually en-
ter the current vehicle position
(�page 180).
If your vehicle has been transported by
a car, train or ferry, COMAND needs
some time to find its exact position.
Moving the vehicle a few yards is typi-
cally enough to remedy this situation.
Page 139 of 226

131 Navigation
Destination input
Activating the map from the main des-
tination input menu“Destination via Map” menu
Setting the map center
1To the previous destination
2To the current vehicle location
3Activates the “City/Suburb Entry” in-
put menu and selects the correspon-
ding city center after input
4Activates the coordinate destination in-
put menu�
Turn the right-hand rotary/push-
button v to highlight “Destination via
Map...” (Destn via Map) in the main
destination input menu and press to
confirm.
The selection menu “Destination via
Map” will appear.
�
Turn the right-hand rotary/push-
button v to highlight 1, 2, 3 or 4
and press to confirm.
1 and 2 The map with the cross
hairs will appear
3The “City/Suburb
Entry” input menu will ap-
pear (
�page 124)
�
Enter the city in the input menu and
confirm it.
Then, the map with the crosshairs
will appear. The crosshairs are cen-
tered on the city center.
4The coordinate destination input
menu will appear (
�page 135).
Selecting a destination via the map
Page 141 of 226
133 Navigation
Destination input
Altering the map scale
9Current map scale
aScale selector
bNew map scale (filled arrow)
cSquare shows the map section which is
to be increasedActivating the scale selector a.
�
Press + or ,.
or
�
Press the right-hand rotary/push-
button v.
iAs you move the crosshairs towards the
edge of the screen using the number
keys, an adjacent section of the map is
activated. It may take a few seconds to
point to each new map.
Adjacent map sections overlap some-
what so that destinations on the edge of
the map can be marked as well.
iA division mark corresponds to an avai-
lable scale. You can select 13 different
scales ranging from 0.05 miles/inch to
500 miles/inch.
Page 146 of 226
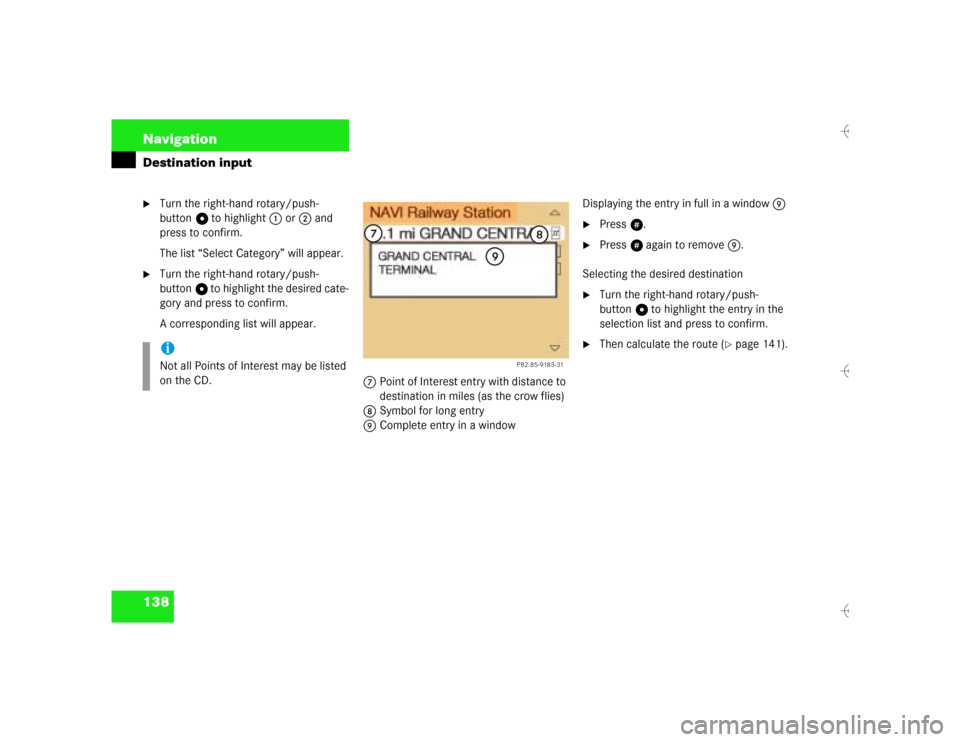
138 NavigationDestination input�
Turn the right-hand rotary/push-
button v to highlight 1 or 2 and
press to confirm.
The list “Select Category” will appear.
�
Turn the right-hand rotary/push-
button v to highlight the desired cate-
gory and press to confirm.
A corresponding list will appear.
7Point of Interest entry with distance to
destination in miles (as the crow flies)
8Symbol for long entry
9Complete entry in a windowDisplaying the entry in full in a window 9
�
Press u.
�
Press u again to remove 9.
Selecting the desired destination
�
Turn the right-hand rotary/push-
button v to highlight the entry in the
selection list and press to confirm.
�
Then calculate the route (
�page 141).
iNot all Points of Interest may be listed
on the CD.
P82.85-9183-31
7
8
9
Page 147 of 226

139 Navigation
Destination input
In the surrounding area of another city“City/Area” input menu�
Turn the right-hand rotary/push-
button v to highlight “Select City...” in
the Points of Interest menu and press
to confirm.
The input menu “City/Area” will ap-
pear.
�
Select the city and activate the city list
(�page 125).
�
Turn the right-hand rotary/push-
button v to highlight the desired des-
tination in the city list and press to con-
firm.
The list “Select Category” will appear.
�
Turn the right-hand rotary/push-
button v to highlight the desired cate-
gory and press to confirm.
A corresponding list will appear.
�
Select the desired destination.
�
Then calculate the route (
�page 141).Regional destinations
�
Turn the right-hand rotary/push-
button v to highlight “Regional...” in
the Points of Interest menu and press
to confirm.
The list “Select Category” will appear.
P82.85-9184-31
iIf several options of a city/suburb are
available, another menu will appear
where you must make and confirm your
desired selection. iNot all Points of Interest may be listed
on the CD.
iNot all Points of Interest may be listed
on the CD.
P82.85-9187-31


cSquare shows the map section which is
to be increasedActivating the scale sel")