Page 51 of 226

43 Audio
CD operation
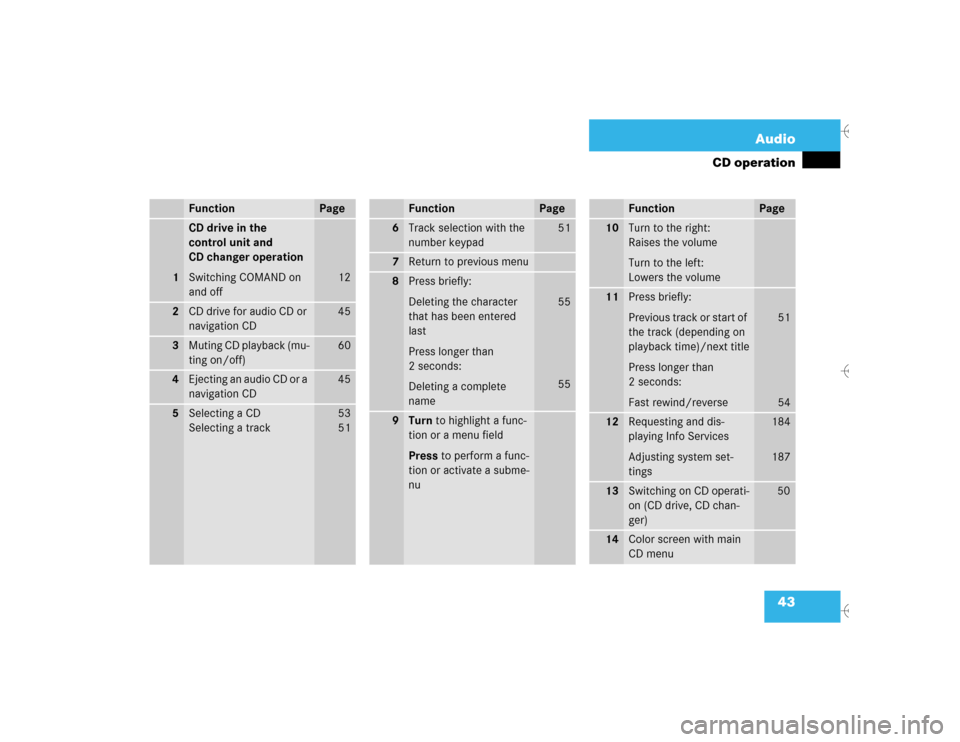
Function
Page
1
CD drive in the
control unit and
CD changer operation
Switching COMAND on
and off
12
2
CD drive for audio CD or
navigation CD
45
3
Muting CD playback (mu-
ting on/off)
60
4
Ejecting an audio CD or a
navigation CD
45
5
Selecting a CD
Selecting a track
53
5 1
6
Track selection with the
number keypad
51
7
Return to previous menu
8
Press briefly:
Deleting the character
that has been entered
last
Press longer than
2 seconds:
Deleting a complete
name
55
55
9
Turn to highlight a func-
tion or a menu field
Press to perform a func-
tion or activate a subme-
nuFunction
Page
10
Turn to the right:
Raises the volume
Turn to the left:
Lowers the volume
11
Press briefly:
Previous track or start of
the track (depending on
playback time)/next title
Press longer than
2 seconds:
Fast rewind/reverse
51
54
12
Requesting and dis-
playing Info Services
Adjusting system set-
tings
184
187
13
Switching on CD operati-
on (CD drive, CD chan-
ger)
50
14
Color screen with main
CD menuFunction
Page
Page 52 of 226

44 AudioCD operation
CD playback locations are�
the CD drive in the COMAND operating
unit
You can play audio CDs or read data
from the navigation CD.
�
the CD changer with 6 magazine slots.
The status line in the main CD menu
(
�page 50) indicates which component is
being used for CD playback.Tips on caring for your CDs
�
Only touch the CD on the sides.
�
Avoid touching the CD surface with
your fingers.
�
Clean the CD with a dry, lint-free cloth.
Wipe them from the inside to the outer
edge. Never wipe the CD in a circular
motion.
�
Do not use rubbing alcohol or solvents
to clean the CDs.
�
Do not expose the CDs to heat or direct
sunlight.
�
Do not write or put stickers on CD.
General information on CD operationWarning
G
The CD drive and CD changer are Class 1 la-
ser products. There is a danger of invisible
laser radiation when you open or damage
the cover.
Do not remove the cover. The CD drive and
the CD changer do not contain any parts
which can be serviced by the user. For safe-
ty reasons, have any necessary service work
performed by an authorized Mercedes-Benz
Center.
!Use only CDs with a diameter of 12 cm,
do not use 8-cm CDs.
An 8-cm CD adapter may cause damage
to the CD changer and should not be
used.
iYou can name a CD (
�page 55). This
name then will appear on the display du-
ring CD playback.
Page 71 of 226

63 Audio
Sound settings
� Sound settings
COMAND is equipped with a standard am-
plifier.
You can set �
the sound Bass/Treble individually
�
the sound-center
�
select predefined sound optimization.
See individual audio mode descriptions for
instructions on this feature.
Adjustments to the sound have a different
effect on the audio and service sources.
The predefined sound modes are available
for the audio sources only.Audio sources include:
�
Radio FM, AM, WB
�
CD (CD drive, CD changer)
�
auxiliary audio source, e.g. tape deck (if
connected)
You can activate the main Sound menu in
the audio sources through the menu field
“Sound”.
Service sources include:
�
Telephone*
�
Voice output in the navigation
�
Voice control system*
See separate operating instructions for te-
lephone and voice control system.
You can activate the main Sound menu in
the “NAVI Settings” menu (
�page 181),
through the menu field “Sound”. Activating the main sound menu
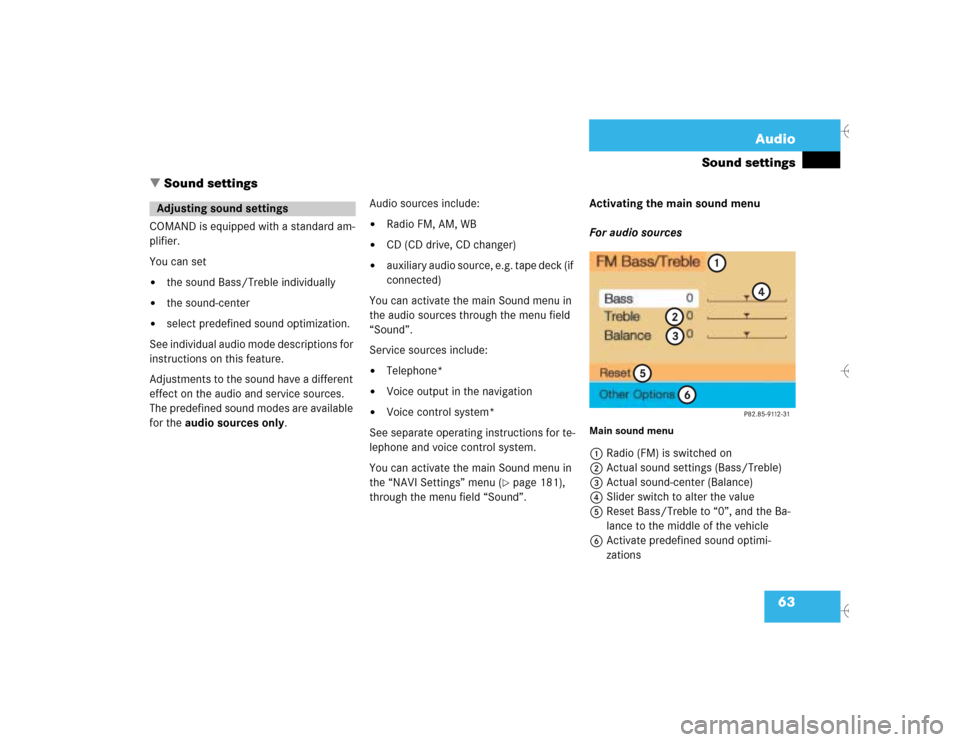
For audio sources
Main sound menu1Radio (FM) is switched on
2Actual sound settings (Bass/Treble)
3Actual sound-center (Balance)
4Slider switch to alter the value
5Reset Bass/Treble to “0”, and the Ba-
lance to the middle of the vehicle
6Activate predefined sound optimi-
zations
Adjusting sound settings
Page 72 of 226

64 AudioSound settings�
Turn the right-hand rotary/push-button
v to highlight “Sound“ in the main
menu for radio or CD operation and
press to confirm.
The main sound menu will appear dis-
playing the actual settings.For service sources
1Volume difference
Set the difference between voice out-
put during route guidance and an acti-
ve audio source
“0” The volume of the audio source
is not affected during voice out-
put.
“10” The audio source is set very low
during voice output.
�
Turn the right-hand rotary/push-button
v to highlight “Settings” in the main
destination input menu (
�page 122)
and press to confirm.
The “NAVI Settings” menu will appear
(
�page 181).
�
Turn the right-hand rotary/push-button
v to highlight “Sound” and press to
confirm.
The “Speech Bass/Treble” menu will
appear.
iIt is also possible that “AM Bass/Treb-
le”, “WB Bass/Treble”, “CD Bass/Treb-
le” or “AUX Bass/Treble” are indicated
in 1.
Balance defines sound-center left/
right
P82.85-9113-31
1
iNo sound impressions are provided for
service sources.
During adjustment in the “Speech
Bass/Treble” menu, COMAND will issue
a repetative voice output of “Sample” to
allow you to set the settings as you pre-
fer.
Page 74 of 226

66 AudioSound settingsActivating sound optimization�
Turn the right-hand rotary/push-button
v to highlight “Other Options” in the
main sound settings menu and press to
confirm.
The “Other Options” (FM/AM, WB or
CD) menu will appear.
P - actual sound optimization
�
Turn the right-hand rotary/push-
buttonv to highlight the desired
sound optimization and press to con-
firm.
The new sound optimization is active
P.Returning to the main sound menu:
�
Turn the right-hand rotary/push-button
v to highlight “Bass/Treble” and
press to confirm.
Returning to the main audio menu:
�
Press *.
Available sound optimizations:
�
Standard - COMAND set the sound li-
near for the center of the vehicle
�
Speech - the emphasis is on the spo-
ken word
�
Driver-optimized - COMAND optimizes
the sound for the driver’s seat position
�
Ambience
Small, medium and large rooms are si-
mulated
P82.85-9116-31
iYou can only select one sound optimiza-
tion at a time.
P82.85-9117-31
iCOMAND does not offer sound optimi-
zation for the service sources.
Page 75 of 226
67
Telephone
Important notes
Multifunction display
Telephone operation
SMS function
Emergency call
Service numbers
Page 76 of 226

68 TelephoneImportant notes
� Important notesIn chapter “Telephone”, you will find de-
tailed information regarding the telephone,
including emergency call, SMS function
and service numbers.
1 Observe all legal requirements�
Please read the chapter “Telephone”
first before attempting to operate your
telephone.
�
Always drive with extreme caution
when you operate the telephone
hands-free.
�
For safety reasons, you should not use
the mobile telephone handset to make
a call while driving the vehicle.
�
If the signal strength is very weak (dis-
play in the symbol field of all menus)
you should not make telephone calls.
Wait until reception improves.
Warning
G
Some jurisdictions prohibit the driver from
using a cellular telephone while driving a ve-
hicle. Whether or not prohibited by law, for
safety reasons, the driver should not use the
cellular telephone while the vehicle is in mo-
tion. Stop the vehicle in a safe location be-
fore answering or placing a call.
If you nonetheless choose to use the cellular
phone while driving, please use the hands-
free device and be sure to pay attention to
the traffic situation at all times. Use the cel-
lular phone
1 only when road, weather and
traffic conditions permit.
Never operate radio transmitters equipped
with a built-in or attached antenna (i.e.
without beeing connected to an external an-
tenna) from inside the vehicle while the en-
gine is running. Doing so could lead to
malfunction of the vehicle’s electronic sys-
tems, possibly resulting in an accident and
personal injury.
!Radio transmitters, such as a portable
telephone or a citizens band unit
should only be used inside the vehicle
if they are connected to a separate ex-
terior antenna that has been approved
by Mercedes-Benz.
Page 77 of 226

69 Telephone
Important notes
�
Close the windows and reduce all out-
side noise as much as possible when
you use hands-free operation.
�
A brief disconnection from the cellular
network is not a malfunction, as this
can occur when the network switches
areas. The phone will automatically try
to sign on to a network again.
�
If the message “Locked. Please enter
code” appears, enter the unlock code
to enable all telephone functions
(�page 78).
�
If a menu other than the telephone
menu is displayed on the COMAND
screen, the display will change if an
outgoing call is sent out via the multi-
function steering wheel.In the following situations, it is not possible
or not yet possible to use the telephone:
�
The telephone is already unlocked but
is not or not yet registered in the net-
work.
The message “No Service” appears.
The telephone will try to register into
an existing network. If the network is
available, the telephone will be ready
for use.
The above message also appears �
if the network is no longer available
due to weak signals
�
if you try to make a call (message
appears for 8 seconds)
�
The message “Telephone is being acti-
vated. Please wait.” appears.
COMAND prepares the telephone for
use. Select other system functions, e.g.
radio, by pressing the corresponding
button or wait until the telephone is ac-
tive.
�
One of the two messages “No telepho-
ne” or “Telephone not connected” ap-
pears.
Please connect the telephone.
�
The message “Telephone defective”
appears.
Please contact an authorized
Mercedes-Benz Center.