Page 152 of 416

152 Controls in detailControl system�
Press button
j
or
k
repeatedly
until you see this message in the dis-
play:
LOCATOR LIGHTING
.
The selection marker is on the current
setting.
�
Press
æ
or
ç
to select the de-
sired setting.
The locator lighting will be switched on
or off.Setting night security illumination (Exte-
rior lamps delayed shut-off)
Use the
HEADLIGHTS DELAYED SHUT-OFF
function to set whether and for how long
you would like the exterior lamps to illumi-
nate during darkness after all doors are
closed. When the delayed shut-off feature
is activated and the exterior lamp switch is
in position
U
, the following lamps will
remain lit after you remove the SmartKey
from the starter switch:
�
Parking lamps
�
Tail lamps
�
License plate lamps
�
Front fog lamps
�
Move the selection marker with
the
æ
or
ç
button to the
LIGHT-
ING
submenu.
�
Press button
j
or
k
repeatedly
until you see this message in the dis-
play:
HEADLIGHTS DELAYED SHUT-OFF
.
The selection marker is on the current
setting.
��
iYou can reactivate this function within
ten minutes by opening a door.
If you do not open a door after remov-
ing the SmartKey, the lamps will auto-
matically switch off after 60 seconds.
Page 153 of 416

153 Controls in detail
Control system
�
Press
æ
or
ç
to select the de-
sired lamp-on period.
You can select:
�
0 S
, the delayed shut-off feature is
deactivated
�
15 S
, 30 S
, 45 S
, or
60 S
, the de-
layed shut-off feature is activatedYou can temporarily deactivate the de-
layed shut-off feature:
�
Before leaving the vehicle, turn the
SmartKey in the starter switch to
position0.
�
Turn the SmartKey in the starter switch
to position2 and back to0.
The delayed shut-off feature is deacti-
vated. It will reactivate as soon as you
reinsert the SmartKey in the starter
switch.
Vehicles with KEYLESS-GO*:
�
Press the KEYLESS-GO start/stop
button on the gear selector lever
(�page 33).Interior lighting delayed shut-off
Use this function to set whether and for
how long you would like the interior light-
ing to remain lit during darkness after the
SmartKey is removed from the starter
switch.
�
Move the selection marker with
the
æ
or
ç
button to the
LIGHT-
ING
submenu.
�
Press button
j
or
k
repeatedly
until you see this message in the dis-
play:
INT. LIGHTING DELAYED
SHUT-OFF
.
The selection marker is on the current
setting.
��
Page 168 of 416
 and for setting the rear view
mirrors (
�page 38) is found in the “Get-
ting started” section")
168 Controls in detailGood visibility
Good visibilityInformation on the windshield wipers
(�page 47) and for setting the rear view
mirrors (
�page 38) is found in the “Get-
ting started” section.
Rear view mirror
Automatic antiglare rear view mirror
The reflection brightness of the exterior
rear view mirror on the driver’s side and
the inside rear view mirror will respond au-
tomatically to glare when�
the ignition is switched on, and
�
incoming light from headlamps falls on
the sensor in the inside rear view
mirror.
The rear view mirror will not react if
�
reverse gear is engaged
�
the interior lighting is turned on
Warning!
G
The automatic antiglare function does not
react if incoming light is not aimed directly
at sensors in the inside rear view mirror.
The inside rear view mirror and the exterior
rear view mirror on the driver’s side do not
react, for example, if the rear window sun
shade* is in raised position.
Glare can endanger you and others.Warning!
G
In the case of an accident liquid electrolyte
may escape from the mirror housing if the
mirror glass breaks.
Electrolyte has an irritating effect. Do not al-
low the liquid to come into contact with
eyes, skin, clothing, or respiratory system.
In case it does, immediately flush affected
area with water, and seek medical help if
necessary.
Warning!
G
Exercise care when using the passen-
ger-side exterior rear view mirror. The mirror
surface is convex (outwardly curved surface
for a wider field of view). Objects in mirror
are closer than they appear. Check your in-
side rear view mirror or glance over your
shoulder before changing lanes.!Electrolyte drops coming into contact
with the vehicle paint finish can be
completely removed only while in the
liquid state by applying plenty of water.
Page 170 of 416

170 Controls in detailGood visibilityElectrically folding exterior rear view mirrors
Folding the exterior mirrors in and out
automatically
When the corresponding function in the
control system is activated (
�page 158):
�
The exterior rear view mirrors automat-
ically fold in as soon as the vehicle is
locked from the outside.
�
The exterior rear view mirrors automat-
ically fold out as soon as the vehicle is
unlocked and the driver’s or front pas-
senger door are subsequently opened.Folding the exterior mirrors in and out
manually
The exterior rear view mirrors can vibrate if
they are not completely folded out.
The buttons are located on the door.
1Folds the exterior mirrors out
2Folds the exterior mirrors in
�
Make sure that the ignition is switched
on.All the lamps in the instrument cluster
light up.
Folding in
�
Press button2 briefly.
Both mirrors fold in.
Folding out
�
Press button1 briefly.
Both mirrors fold out.
!Before you drive the vehicle through an
automatic car wash, fold the exterior
mirrors in, otherwise they may get
damaged.
iIf you are driving at more than 9 mph
(15 km/h) you will not be able to fold
the exterior mirrors in.
!If an exterior rear view mirror housing
is forcibly pushed forward (hit from the
rear), reposition it manually by applying
firm pressure until it snaps back into
place.
If an exterior rear view mirror housing
is forcibly pushed rearward (hit from
the front), press button2 to fold mir-
rors in, then press button1 to fold mir-
rors out. Do not force mirrors by hand
as this may damage the adjustment
mechanism.
Page 172 of 416
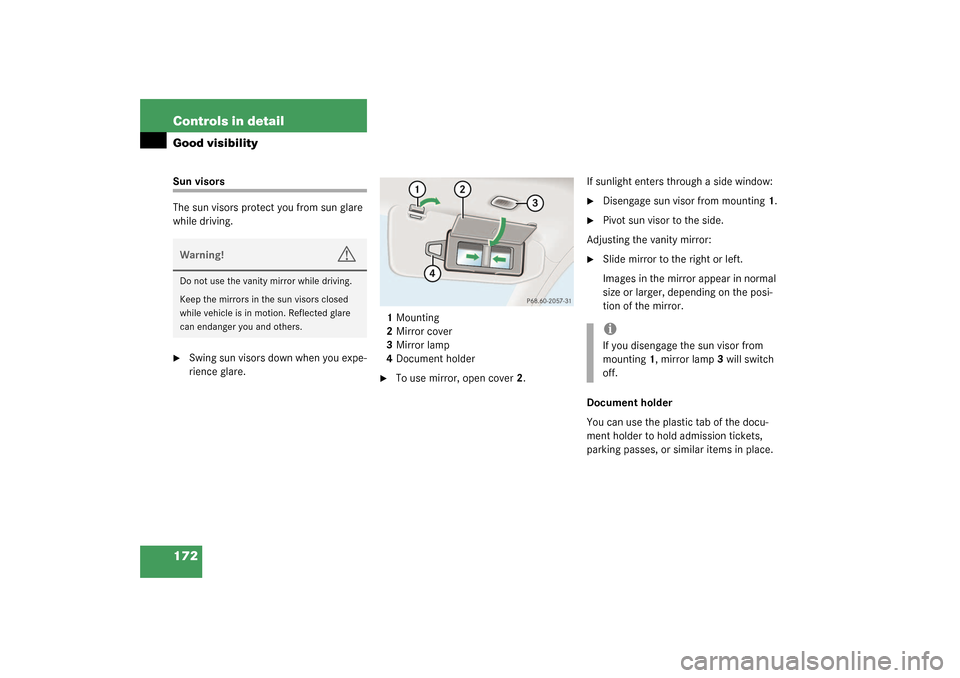
172 Controls in detailGood visibilitySun visors
The sun visors protect you from sun glare
while driving.�
Swing sun visors down when you expe-
rience glare.1Mounting
2Mirror cover
3Mirror lamp
4Document holder
�
To use mirror, open cover2.If sunlight enters through a side window:
�
Disengage sun visor from mounting1.
�
Pivot sun visor to the side.
Adjusting the vanity mirror:
�
Slide mirror to the right or left.
Images in the mirror appear in normal
size or larger, depending on the posi-
tion of the mirror.
Document holder
You can use the plastic tab of the docu-
ment holder to hold admission tickets,
parking passes, or similar items in place.
Warning!
G
Do not use the vanity mirror while driving.
Keep the mirrors in the sun visors closed
while vehicle is in motion. Reflected glare
can endanger you and others.
iIf you disengage the sun visor from
mounting1, mirror lamp3 will switch
off.
Page 177 of 416

10for the left side or8 for the right side to
separately adjust the air temperature on")
177 Controls in detail
Automatic climate control
Setting the temperature
Use temperature controls (
�page 175)
10for the left side or8 for the right side to
separately adjust the air temperature on
each side of the passenger compartment.
You should raise or lower the temperature
setting in small increments, preferably
starting at 72°F (22°C).
Increasing / decreasing
�
Press button 10 or 8 repeatedly until
the display shows the desired tempera-
ture.
The automatic climate control system
will correspondingly adjust the interior
air temperature.Adjusting the temperature for center
air vents
When outside temperatures are low, you
can manually raise the air temperature for
the center and side air vents.
Thumbwheel4 is located between the cen-
ter air vents (
�page 174).
Automatic temperature control
�
Turn thumbwheel 4 to A.
The indicator lamp above the thumb-
wheel lights up. The temperature is au-
tomatically adjusted to the set value.Turning on warm air
�
Turn thumbwheel 4 in the direction of
the white marking.
Warm air will enter from the center air
vent.
Turning on cooler air
�
Turn thumbwheel4 in the direction of
the blue marking.
Cooler air will enter from the center air
vent.
iWhen operating the climate control
system in automatic mode, you will
only rarely need to adjust the tempera-
ture, air volume and air distribution.
Page 180 of 416
.
The indicator lamp on the button lights
up.
�
Switch off air recirculation, if selected.
�
Press bu")
180 Controls in detailAutomatic climate controlDefrosting
Activating�
Press button
P
(�page 175).
The indicator lamp on the button lights
up.
�
Switch off air recirculation, if selected.
�
Press button
O
(�page 175).
The indicator lamp on the button goes
out.
�
Close center air vents.
�
Adjust side air vents upwards.
Deactivating
�
Press button
P
(�page 175).
The indicator lamp on the button goes
out. Defrosting is turned off.
Air recirculation mode
Switch to air recirculation mode to prevent
unpleasant odors from entering the vehicle
from the outside. This setting cuts off the
intake of outside air and recirculates the
air in the passenger compartment.
Activating�
Press button
O
(�page 175).
The indicator lamp on the button lights
up.
iThese settings should only be selected
for a short time.
Warning!
G
When the outside temperature is below
41°F (5°C), only switch to air recirculation
mode for short periods to prevent window
fogging.iIf you keep button
O
pressed, the
side windows and the sliding/pop-up
roof will be closed.
Warning!
G
Never operate the side windows and the
sliding pop/pop-up roof if there is the possi-
bility of anyone being harmed by the closing
procedure.
In the event that the procedure causes po-
tential danger, the closing of the side win-
dows can be immediately halted by pressing
the respective window switch. The closing of
the sliding/pop-up roof can be immediately
halted by moving the sliding/pop-up roof
switch in the overhead control panel in any
direction.
Page 182 of 416

182 Controls in detailAutomatic climate controlCharcoal filter
An activated charcoal filter markedly re-
duces bad odors and removes pollutants
from air entering the passenger compart-
ment.
Activating�
Press button
e
(�page 175).
The indicator lamp on the button lights
up.
Deactivating
�
Press button
e
(�page 175).
The indicator lamp on the button goes
out.The system automatically switches to the
air recirculation mode if the carbon
monoxide (CO) or nitrogen oxide (NO
X)
concentration of the outside air increases
beyond a predetermined level.
The automatic air recirculation mode does
not function if economy mode AC
OFF
is se-
lected or if the outside temperature has
fallen below 41°F (5°C).
The activated charcoal filter should be
switched off when windows fog up on the
inside, or if the passenger compartment
needs to be quickly heated or cooled
down.
iIf you keep button
e
pressed, the
side windows and the sliding/pop-up
roof will be closed.
Warning!
G
Never operate the side windows and the
sliding pop/pop-up roof if there is the possi-
bility of anyone being harmed by the closing
procedure.
In the event that the procedure causes po-
tential danger, the closing of the side win-
dows can be immediately halted by pressing
the respective window switch. The closing of
the sliding/pop-up roof can be immediately
halted by moving the sliding/pop-up roof
switch in the overhead control panel in any
direction.
iIf you keep button
e
pressed, the
side windows and the sliding/pop-up
roof will be returned to their previous
position.