Page 161 of 416

161 Controls in detail
Automatic transmission
One-touch gearshifting
Even with an automatic transmission you
can change the gears manually when the
selector lever is in positionD.
Downshifting�
Briefly press the selector lever to the
left in the D–direction.
The transmission will shift from the current
gear to the next lower gear. This action si-
multaneously limits the gear range of the
transmission (
�page 162).Upshifting
�
Briefly press the selector lever to the
right in the D+direction.
The transmission will shift from the current
gear to the next higher gear as permitted
by the shift program. This action simulta-
neously extends the gear range of the
transmission.Canceling gear range limit
�
Press and hold the selector lever in the
D+direction until
D reappears in the ta-
chometer display field.
The transmission will shift from the current
gear range directly to gear rangeD.
Shifting into optimal gear range
�
Press and hold the gear selector lever
in the D–direction.
The transmission will automatically select
the gear range suited for optimal accelera-
tion and deceleration. This will involve
shifting down one or more gears.
Warning!
G
On slippery road surfaces, never downshift
in order to obtain braking action. This could
result in drive wheel slip and reduced vehi-
cle control. Your vehicle’s ABS will not pre-
vent this type of loss of control.
iTo avoid overrevving the engine when
the selector lever is moved to the
D–direction, the transmission will not
shift to a lower gear if the engine's
max. speed would be exceeded.
Page 162 of 416
162 Controls in detailAutomatic transmissionGear ranges
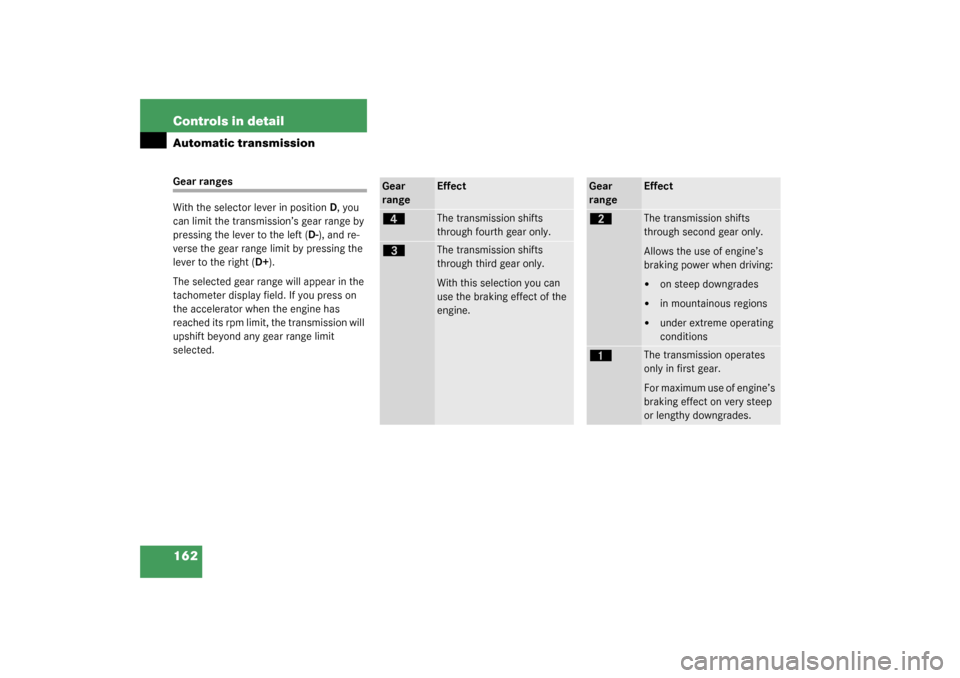
With the selector lever in positionD, you
can limit the transmission’s gear range by
pressing the lever to the left (D-), and re-
verse the gear range limit by pressing the
lever to the right (D+).
The selected gear range will appear in the
tachometer display field. If you press on
the accelerator when the engine has
reached its rpm limit, the transmission will
upshift beyond any gear range limit
selected.
Gear
range
Effect
é
The transmission shifts
through fourth gear only.
è
The transmission shifts
through third gear only.
With this selection you can
use the braking effect of the
engine.
Gear
range
Effect
ç
The transmission shifts
through second gear only.
Allows the use of engine’s
braking power when driving: �
on steep downgrades
�
in mountainous regions
�
under extreme operating
conditions
æ
The transmission operates
only in first gear.
For maximum use of engine’s
braking effect on very steep
or lengthy downgrades.
Page 164 of 416
164 Controls in detailAutomatic transmission
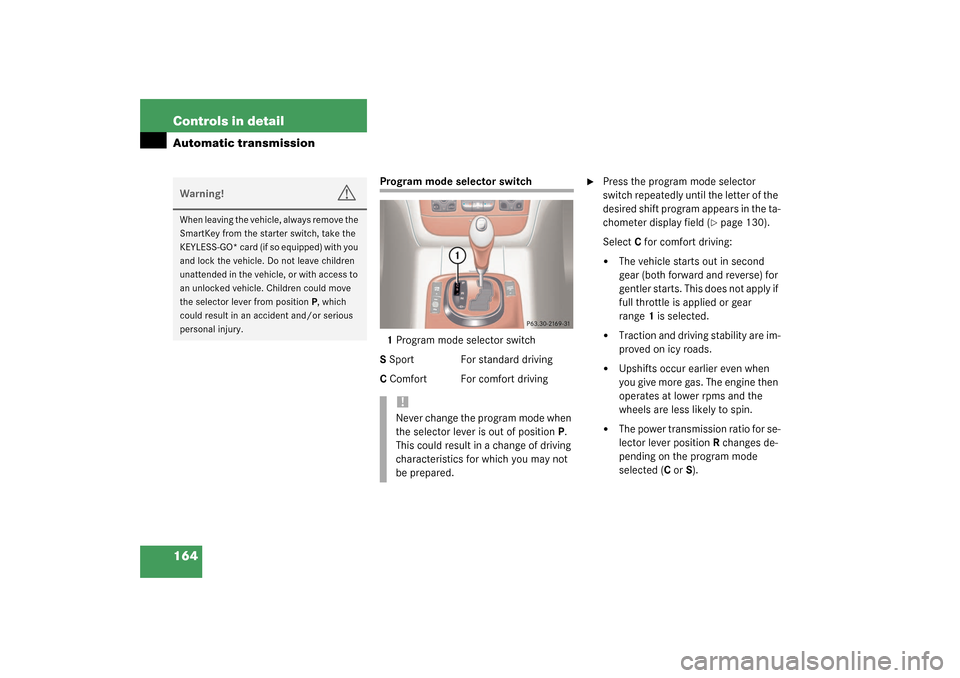
Program mode selector switch
1Program mode selector switch
S Sport For standard driving
C Comfort For comfort driving
�
Press the program mode selector
switch repeatedly until the letter of the
desired shift program appears in the ta-
chometer display field (
�page 130).
Select C for comfort driving:
�
The vehicle starts out in second
gear (both forward and reverse) for
gentler starts. This does not apply if
full throttle is applied or gear
range1 is selected.
�
Traction and driving stability are im-
proved on icy roads.
�
Upshifts occur earlier even when
you give more gas. The engine then
operates at lower rpms and the
wheels are less likely to spin.
�
The power transmission ratio for se-
lector lever positionR changes de-
pending on the program mode
selected (C or S).
Warning!
G
When leaving the vehicle, always remove the
SmartKey from the starter switch, take the
KEYLESS-GO* card (if so equipped) with you
and lock the vehicle. Do not leave children
unattended in the vehicle, or with access to
an unlocked vehicle. Children could move
the selector lever from positionP, which
could result in an accident and/or serious
personal injury.
!Never change the program mode when
the selector lever is out of positionP.
This could result in a change of driving
characteristics for which you may not
be prepared.
Page 166 of 416
166 Controls in detailAutomatic transmissionSteering wheel gearshift control
(Speedshift) and manual shift program S55AMG
The S 55 AMG can be driven in both, auto-
matic and manual shift program mode. In
manual shift program mode you can
change the gears yourself on the steering
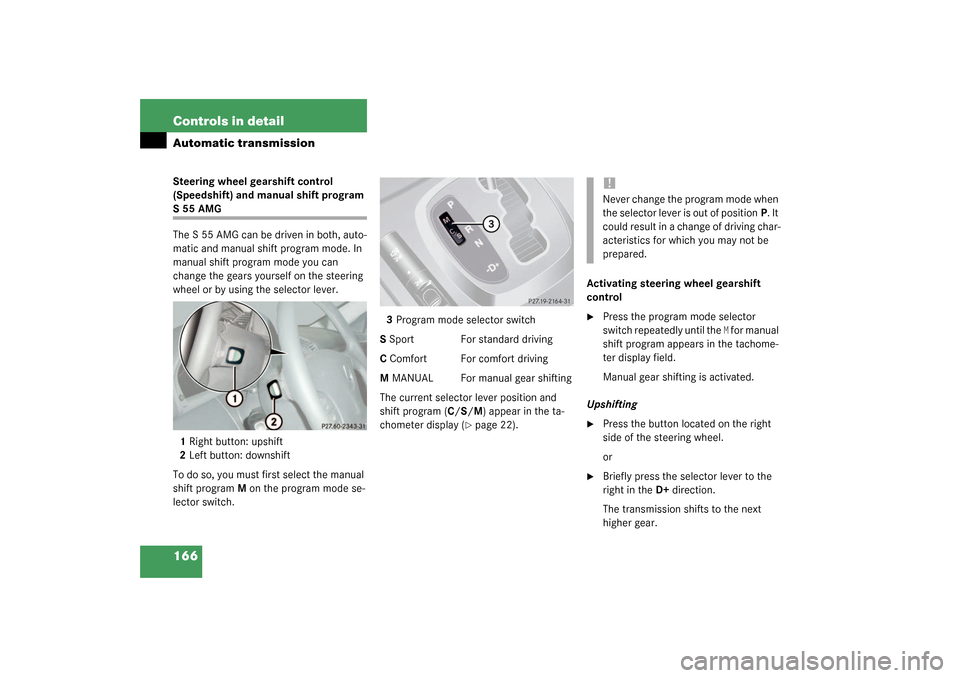
wheel or by using the selector lever.
1Right button: upshift
2Left button: downshift
To do so, you must first select the manual
shift program M on the program mode se-
lector switch.3Program mode selector switch
S Sport For standard driving
C Comfort For comfort driving
M MANUAL For manual gear shifting
The current selector lever position and
shift program (C/S/M) appear in the ta-
chometer display (
�page 22).Activating steering wheel gearshift
control
�
Press the program mode selector
switch repeatedly until the
M for manual
shift program appears in the tachome-
ter display field.
Manual gear shifting is activated.
Upshifting
�
Press the button located on the right
side of the steering wheel.
or
�
Briefly press the selector lever to the
right in the D+direction.
The transmission shifts to the next
higher gear.!Never change the program mode when
the selector lever is out of positionP. It
could result in a change of driving char-
acteristics for which you may not be
prepared.
Page 167 of 416
167 Controls in detail
Automatic transmission
Warm up the engine smoothly. Do not
place full load on the engine until the oper-
ating temperature has been reached. Shift
into reverse gear only when the vehicle is
stopped.Downshifting
�
Press the button located on the left
side of the steering wheel.
or
�
Briefly press the selector lever to the
right in the D-direction.
The transmission shifts to the next low-
er gear.
Warm up the engine smoothly. Do not
place full load on the engine until the oper-
ating temperature has been reached. Shift
into reverse gear only when the vehicle is
stopped.Deactivating steering wheel gearshift
control
�
Press the program mode selector
switch repeatedly until
S or
C for
automatic shift program appears in the
tachometer display field.
Manual gear shifting is deactivated.
!Avoid spinning of a drive wheel for an
extended period when driving off on
slippery surface. This may cause seri-
ous damage to the drivetrain which is
not covered by the Mercedes-Benz
Limited Warranty.
Warning!
G
On slippery road surfaces, never downshift
in order to obtain braking action. This could
result in drive wheel slip and reduced vehi-
cle control. Your vehicle’s ABS will not pre-
vent this type of loss of control.
iAt each engine start, the transmission
will go into the last shift program mode
selected (S or C). Program modeM is
not stored and will not be recalled
when engine is restarted.
Page 175 of 416
175 Controls in detail
Automatic climate control
Automatic climate control panel
Item
1
Swiveling left center air vent
2
Fixed air vent, left
3
Air volume control for left center air
vent
4
Air temperature control for center
air vents
5
Air volume control for right center
air vent
6
Fixed air vent, right
7
Swiveling right center air vent
8
Side defroster vent, left and right,
fixed
9
Swiveling side air vent, left and right
10
Air volume control for side air vents
11
Door air vent, left and right
12
Automatic climate control panel
iFor draft-free ventilation, move the slid-
ers for the center air vents to the mid-
dle position.
Item
1
Windshield defroster
2
Rear window defroster
3
Display
4
Residual engine heat utilization
5
Automatic climate control on/off
6
Air distribution, right
7
Economy mode (AC
OFF
)
8
Temperature control, right
9
Air volume (automatic, manual)
10
Temperature control, left
11
Air recirculation
12
Air distribution, left
13
Activated charcoal filter
Page 177 of 416
177 Controls in detail
Automatic climate control
Setting the temperature
Use temperature controls (
�page 175)
10for the left side or8 for the right side to
separately adjust the air temperature on
each side of the passenger compartment.
You should raise or lower the temperature
setting in small increments, preferably
starting at 72°F (22°C).
Increasing / decreasing
�
Press button 10 or 8 repeatedly until
the display shows the desired tempera-
ture.
The automatic climate control system
will correspondingly adjust the interior
air temperature.Adjusting the temperature for center
air vents
When outside temperatures are low, you
can manually raise the air temperature for
the center and side air vents.
Thumbwheel4 is located between the cen-
ter air vents (
�page 174).
Automatic temperature control
�
Turn thumbwheel 4 to A.
The indicator lamp above the thumb-
wheel lights up. The temperature is au-
tomatically adjusted to the set value.Turning on warm air
�
Turn thumbwheel 4 in the direction of
the white marking.
Warm air will enter from the center air
vent.
Turning on cooler air
�
Turn thumbwheel4 in the direction of
the blue marking.
Cooler air will enter from the center air
vent.
iWhen operating the climate control
system in automatic mode, you will
only rarely need to adjust the tempera-
ture, air volume and air distribution.
Page 179 of 416

179 Controls in detail
Automatic climate control
Windshield fogged on the outside�
Switch the windshield wipers on.
�
Press on both
U
buttons until they
click in.
The
h
, V
, j
and
k
sym-
bols are no longer visible.
�
Press button
O
to switch off the air
recirculation (
�page 175).
The indicator lamp on the button goes
out.
�
Set blower to the maximum blower
speed.
Adjusting air volume
Use air volume control9 (
�page 175) for
both automatic and manual air volume ad-
justment.
Adjusting automatically
�
Press theA on air volume switch9
(�page 175).
The display shows “AUTO.” The air vol-
ume is adjusted automatically.
Adjusting manually
Reducing air volume
�
Press switch9 down until the desired
air volume is reached. The display
shows the current level.
Increasing air volume
�
Press switch9 up until the desired air
volume is reached. The display shows
the current level.
Maximum cooling MAXCOOL
If the left and right air distribution controls
as well as the air volume control are set
to
U
and there is a high need for cool-
ing, the display “MAXCOOL” appears.
This provides the fastest possible cooling
of the vehicle interior (when windows and
sliding/pop-up roof are closed).