Page 147 of 416
147 Controls in detail
Control system
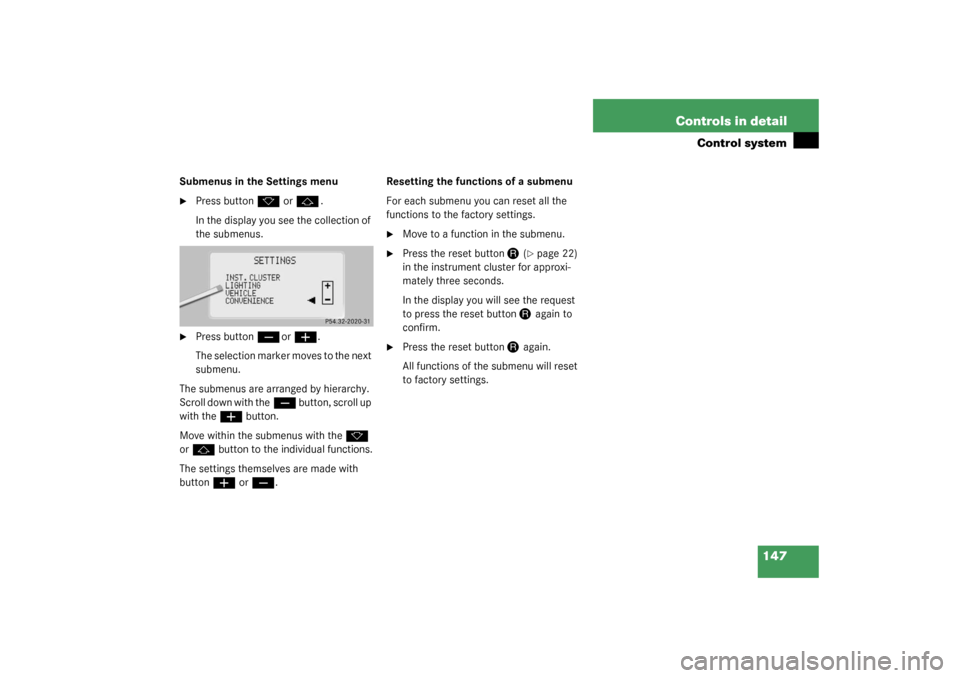
Submenus in the Settings menu�
Press button
k
or
j
.
In the display you see the collection of
the submenus.
�
Press button
ç
or
æ
.
The selection marker moves to the next
submenu.
The submenus are arranged by hierarchy.
Scroll down with the
ç
button, scroll up
with the
æ
button.
Move within the submenus with the
k
or
j
button to the individual functions.
The settings themselves are made with
buttonæ
or
ç
.Resetting the functions of a submenu
For each submenu you can reset all the
functions to the factory settings.
�
Move to a function in the submenu.
�
Press the reset button
J
(�page 22)
in the instrument cluster for approxi-
mately three seconds.
In the display you will see the request
to press the reset button
J
again to
confirm.
�
Press the reset button
J
again.
All functions of the submenu will reset
to factory settings.
Page 148 of 416
148 Controls in detailControl systemThe table below shows what settings can
be changed within the various menus. De-
tailed instructions on making individual
settings can be found on the following pag-
es.INSTRUMENT CLUSTER
LIGHTING
VEHICLE
CONVENIENCE
Select temperature display
mode
Set daytime running lamp mode
(USA only)
Set station selection mode (ra-
dio)
Set key dependency
Select multifunction display
mode
Set locator lighting
Set automatic locking
Activate easy-entry/exit feature
Select language
Exterior lamps delayed shut-off
Set parking position for exterior
rear view mirror
Interior lighting delayed shut-off
Set fold-in function for exterior
rear view mirrors
Page 149 of 416

149 Controls in detail
Control system
Instrument cluster submenu
Access the
INST. CLUSTER
submenu via
the
SETTINGS
menu. Use the
INST. CLUS-
TER
submenu to change the instrument
cluster display settings. The following
functions are available:Selecting temperature display mode
�
Move the selection marker with
the
æ
or
ç
button to the
INST.
CLUSTER
submenu.
�
Press button
j
or
k
repeatedly
until you see this message in the dis-
play:
TEMP. INDICATOR
.
The selection marker is on the current
setting.
�
Press
æ
or
ç
to set the temper-
ature unit to degrees Celsius (°C) or
degrees Fahrenheit (°F).Selecting multifunction display mode
�
Move the selection marker with
the
æ
or
ç
button to the
INST.
CLUSTER
submenu.
�
Press button
j
or
k
repeatedly
until you see this message in the dis-
play:
DISPLAY VALUES IN
.
The selection marker is on the current
setting.
�
Press
æ
or
ç
to set speedome-
ter unit to
MILES
or
KM.
Function
Page
Select temperature display
mode
150
Select multifunction display
mode
149
Select language
150
Page 150 of 416
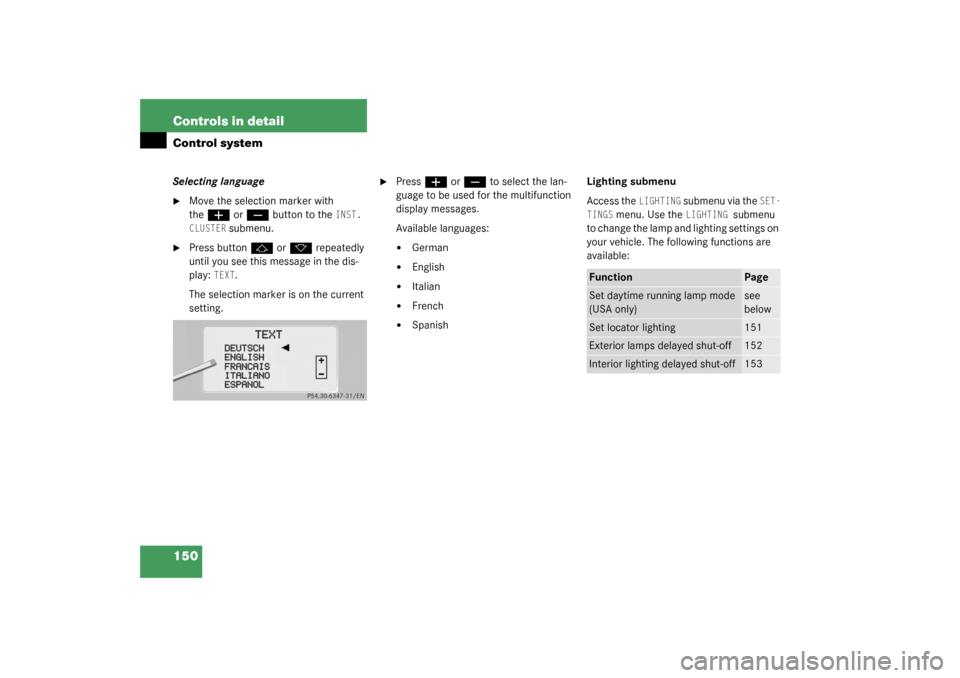
150 Controls in detailControl systemSelecting language�
Move the selection marker with
the
æ
or
ç
button to the
INST.
CLUSTER
submenu.
�
Press button
j
or
k
repeatedly
until you see this message in the dis-
play:
TEXT
.
The selection marker is on the current
setting.
�
Press
æ
or
ç
to select the lan-
guage to be used for the multifunction
display messages.
Available languages:
�
German
�
English
�
Italian
�
French
�
SpanishLighting submenu
Access the
LIGHTING
submenu via the
SET-
TINGS
menu. Use the
LIGHTING
submenu
to change the lamp and lighting settings on
your vehicle. The following functions are
available:
Function
Page
Set daytime running lamp mode
(USA only)
see
below
Set locator lighting
151
Exterior lamps delayed shut-off
152
Interior lighting delayed shut-off
153
Page 151 of 416
�
Move the selection marker with
the
æ
or
ç
button to the
LIGHT-
ING
submenu.
�
Press button
j
or
k
repeated")
151 Controls in detail
Control system
Setting daytime running lamp mode
(USA only)�
Move the selection marker with
the
æ
or
ç
button to the
LIGHT-
ING
submenu.
�
Press button
j
or
k
repeatedly
until you see this message in the dis-
play:
LAMP CIRCUIT HEADLAMP MODE
.
The selection marker is on the current
setting.
�
Press
æ
or
ç
to select manual
or daytime running lamp (constant)
mode. This function is not available in
countries where daytime running
lamps are mandatory.With daytime running lamp mode se-
lected and the exterior lamp switch at
position0, the following lamps will
come on automatically when the en-
gine is turned on:
�
Parking lamps and low beam head-
lamps
�
License plate lamps (in low ambient
light conditions) Setting locator lighting
During darkness, the following lamps will
come on when the exterior lamp switch is
in position
U
, the locator lighting fea-
ture is activated, and the vehicle is un-
locked by remote control:
�
Parking lamps
�
Tail lamps
�
License plate lamps
�
Front fog lamps
The locator lighting switches off when the
driver’s door is opened. It switches off au-
tomatically after a period of approximately
40 seconds.
�
Move the selection marker with
the
æ
or
ç
button to the
LIGHT-
ING
submenu.
iIf you turn the exterior lamp switch to
another position, the corresponding
lamp(s) will switch on.
For safety reasons, resetting the LIGHTING
submenu to factory settings
(
�page 147) while driving will not re-
set the daytime running lamp mode.
In the display you will then see the mes-
sage:
LIGHTING – CANNOT BE TOTALLY
RESET TO FACTORY SETTINGS WHILE
DRIVING.
��
Page 158 of 416

158 Controls in detailControl systemSetting parking position for exterior rear
view mirror
Use the
MIRROR SETTING WHEN PARKING
function to select whether the passen-
ger-side exterior rear view mirror should be
turned downward during parking maneu-
vers when reverse gearR is engaged. For
additional information see “Activating ex-
terior rear view mirror parking position”
(
�page 169).
�
Move the selection marker to the CONVENIENCE
submenu using the
æ
or
ç
button.
�
Press button
j
or
k
repeatedly
until you see this message in the dis-
play:
MIRROR SETTIMG WHEN PARKING
.The selection marker is on the current
setting.
�
Press
æ
or
ç
to switch function
ON or
OFF
.Setting fold-in function for exterior rear
view mirrors
Using this function, you can set the exteri-
or rear view mirrors to be automatically
folded in when you lock your vehicle
(
�page 170).
�
Move the selection marker to the
CON-
VENIENCE submenu
with the
æ
or
ç
button.
�
Press the
j
or
k
button repeat-
edly until the message FOLD MIRRORS
WHEN LOCKING
appears in the display.
Page 159 of 416

159 Controls in detail
Control system
The selection marker is on the current
setting.
�
Press the
æ
or
ç
button to
switch the automatic fold-in setting for
the mirrors
ON or
OFF
when the vehicle
is locked.
Adjusting drive-dynamic seats
Use this function to adjust the settings for
the drive-dynamic seats (�page 159).
�
Move the selection marker with
the
æ
or
ç
button to
the
CONVENIENCE
submenu.
�
To adjust the driver’s drive-dynamic
seat press button
j
or
k
re-
peatedly until you see this message in
the display:
DRIVING DYNAM. SEAT AD-
JUST., FR. DRIV
.
The selection marker is on the current
setting.
�
To adjust the passenger’s
drive-dynamic seat press button
j
or
k
repeatedly until you see this
message in the display:
DRIVING DY-
NAM. SEAT ADJUST., FR. PASS
.
The selection marker is on the current
setting.
�
Press
æ
or
ç
to select the de-
sired setting. The following settings are available:
Setting 1
(Sporty) Strong lat-
eral support and
fast air pressure
build-up in the air
chambers of the
backrest side bol-
sters
Setting 2
(Comfort) Less lat-
eral support and
slow air pressure
build-up in the air
chambers of the
backrest side bol-
sters
Page 160 of 416
.
Your vehicle’s")
160 Controls in detailAutomatic transmission
Automatic transmissionInformation for driving with an automatic
transmission is found in the “Getting start-
ed” section (
�page 43).
Your vehicle’s transmission adapts its gear
shifting process to your individual driving
style by continually adjusting the shift
points up or down. These shift point adjust-
ments are performed based on current op-
erating and driving conditions.
If the operating conditions change, the au-
tomatic transmission reacts by adjusting
its gear shift program.The automatic transmission selects indi-
vidual gears automatically, depending on:
�
the selector lever positionD with gear
ranges4, 3, 2, 1 (
�page 162)
�
the selected shift program (C/S)
(�page 164)
�
the position of the accelerator pedal
(�page 165)
�
the vehicle speed
The current selector lever position and
shift program (C/S) appear in the tachom-
eter display (
�page 22). When the selector lever is in positionD,
you can influence transmission shifting by:
�
limiting the gear range
�
changing gears manually
iDuring the brief warm-up, the transmis-
sion upshifting is delayed. This allows
the catalytic converter to heat up more
quickly to operating temperature.
Warning!
G
It is dangerous to shift the selector lever out
of P or N if the engine speed is higher than
idle speed. If your foot is not firmly on the
brake pedal, the vehicle could accelerate
quickly forward or reverse. You could lose
control of the vehicle and hit someone or
something. Only shift into gear when the en-
gine is idling normally and when your right
foot is firmly on the brake pedal.