Page 203 of 321
.
The hood will lock audibly.
�
Check to make sure that the hood is
fully closed.
If you can rai")
203 Operation
Engine compartment
Closing�
Let the hood drop from a height of ap-
proximately 1ft (30cm).
The hood will lock audibly.
�
Check to make sure that the hood is
fully closed.
If you can raise the hood at a point
above the headlamps, then it is not
properly closed. Open it again and let it
drop with somewhat greater force.
Engine oil
The amount of oil your engine needs will
depend on a number of factors, including
driving style. Higher oil consumption can
occur when �
the vehicle is new
�
the vehicle is driven frequently at high-
er engine speeds.
Engine oil consumption checks should only
be made after the vehicle break-in period.
Checking engine oil level
When checking the oil level the vehicle
must
�
be parked on level ground
�
be at normal operating temperature
�
have been stationary for at least five
minutes with the engine turned off
Warning!
G
If you see flames or smoke coming from the
engine compartment, or if the coolant tem-
perature gauge indicates that the engine is
overheated, do not open the hood. Move
away from vehicle and do not open the hood
until the engine has cooled. If necessary,
call the fire department.Warning!
G
The engine is equipped with a transistorized
ignition system. Because of the high voltage
it is dangerous to touch any components (ig-
nition coils, spark plug sockets, diagnostic
socket) of the ignition system�
with the engine running
�
while starting the engine
�
if ignition is “on” and the engine is
turned manually
Warning!
G
Be careful that you do not close the hood on
anyone.!Do not push the hood closed manually,
as this could damage it.
Page 208 of 321

208 OperationEngine compartmentWindshield washer system and headlamp cleaning system
The windshield washer reservoir is located
in the engine compartment.
1Cap
Fluid for the windshield washer system and
the headlamp cleaning system* is supplied
from the windshield washer reservoir. It
has a capacity of 8.0 US qt (7.6 l).
During all seasons, add MB Windshield
Washer Concentrate “S” to water. Premix
the windshield washer fluid in a suitable
container.
�
Use the tab to pull cap1 upwards (ar-
row).
�
Refill the reservoir with MB Windshield
Washer Concentrate and water (or
commercially available premixed wind-
shield washer solvent / antifreeze, de-
pending on ambient temperatures).
Always use washer solvent/antifreeze
where temperatures may fall below
freezing. Failure to do so could result in
damage to the washer system/reser-
voir.
More information can be found in the
“Technical data” section (
�page 290).
Warning!
G
Washer solvent/antifreeze is highly flamma-
ble. Do not spill washer solvent/antifreeze
on hot engine parts, because it may ignite.
You could be seriously burned.
!Only use washer fluid which is suitable
for plastic lenses. Improper washer flu-
id can damage the plastic lenses of the
headlamps.
Page 213 of 321

213 Operation
Winter driving
Winter driving
Before the onset of winter, have your vehi-
cle winterized at an authorized
Mercedes-Benz Light Truck Center. This
service includes:�
Check of anticorrosion and antifreeze
concentration.
�
Addition of cleaning concentrate to the
water of the windshield and headlamp
cleaning system. Add MB Concentrate
“S” to a premixed windshield washer
solvent/antifreeze which is formulated
for below freezing temperatures
(�page 290).
�
Battery test. Battery capacity drops
with decreasing ambient temperature.
A well charged battery helps to ensure
that the engine can be started even at
low ambient temperatures.
�
Tire change. We recommend M+S rat-
ed radial-ply tires on all four wheels for
the winter season.
Winter tires
Always use winter tires at temperatures
below 39°F (4°C) and whenever wintry
road conditions prevail. Use of winter tires
is the only way to achieve the maximum ef-
fectiveness of the ABS, ESP, 4-ETS and
EBP in winter operation.
For safe handling, ensure that all winter
tires mounted are of the same make and
have the same tread design.Always observe the speed rating of the
winter tires installed on your vehicle. If the
maximum speed for which your tires are
rated is below the speed rating of your ve-
hicle, you must place a notice to this effect
where it will be seen by the driver. Such no-
tices are available from your tire dealer or
from any authorized Mercedes-Benz Light
Truck Center.Warning!
G
Winter tires with a tread depth under 0.16 in
(4 mm) must be replaced. They are no long-
er suitable for winter operation.
Warning!
G
If you use your spare tire when winter tires
are fitted on the other wheels, be aware that
the difference in tire characteristics may
very well impair turning stability and that
overall driving stability may be reduced.
Adapt your driving style accordingly.
Have the spare tire replaced with a winter
tire at the nearest authorized
Mercedes-Benz Light Truck Center.
Page 220 of 321

220 OperationVehicle careOrnamental moldings
For regular cleaning and care of very dirty
chrome-plated parts, use a chrome clean-
er.
Headlamps, tail lamps, turn signal
lenses
Use a mild car wash detergent, such as
Mercedes-Benz approved Car Shampoo,
with plenty of water.
To prevent scratches, never apply strong
force and use only a soft, non-scratchy
cloth when cleaning the lenses. Do not at-
tempt to wipe dirty lenses with a dry cloth
or sponge.Cleaning the Parktronic* system
sensor
1Parktronic system sensor
Use a mild car wash detergent, such as
Mercedes-Benz approved Car Shampoo,
with plenty of water to clean the sensor1.
When using a steam cleaner or power
washer, aim nozzle only briefly from a min-
imum distance of 4 in. (10 cm) at
sensors1.
To prevent scratches, never apply strong
force and use only a soft, non-scratchy
cloth when cleaning the sensor. Do not at-
tempt to wipe dirty sensors with a dry cloth
or sponge.Wiper blades
Clean the wiper blade inserts with a clean
cloth and detergent solution.
Window cleaning
Use a window cleaning solution on all glass
surfaces. An automotive glass cleaner is
recommended.
iFor safety reasons, remove key from
steering lock before cleaning the wiper
blades, otherwise the wiper motor can
suddenly turn on and cause injury.iFor safety reasons, switch off wipers
and remove key from steering lock be-
fore cleaning the windshield, otherwise
the wiper motor can suddenly turn on
and cause injury.
Page 247 of 321
247 Practical hints
Replacing bulbs
Replacing bulbs
Safe vehicle operation depends on proper
exterior lighting and signaling. It is there-
fore essential that all bulbs and lamp as-
semblies are in good working order at all
times.
Correct headlamp adjustment is extremely
important. Have headlamps checked and
readjusted at regular intervals and when a
bulb has been replaced. See your autho-
rized Mercedes-Benz Light Truck Center
for headlamp adjustment.
Bulbs Front lamps
iIf the headlamps are fogged up on the
inside as a result of high humidity, driv-
ing the vehicle a distance should clear
out the fogging.
Lamp
Type
1
Fog lamp
H8 35 W
2
High beam
H7 (55 W)
3
Low beam
H7 (55 W)
Xenon* D2S-35 W
4
Turn signal,
parking, stand-
ing and side
marker lamp
1157 NA
(32/3 cp bulb)
5
Additional turn
signal
LED
Page 249 of 321
249 Practical hints
Replacing bulbs
Replacing bulbs for front lamps
Replacing low beam bulbs
1Low beam halogen or Bi-Xenon* head-
lamp cover with locking tab2Electrical connector
Bi-Xenon* headlampHalogen headlamp
�
Switch off the lights.
�
Open the hood (
�page 202).
�
Push down tab at top end of cover1
and remove.
�
Pull electrical connector2 off.
�
Unclip the retainer springs and take out
the bulb.
�
Insert the new bulb so that the base lo-
cates in the recess on the holder.
�
Clip the retainer springs.
�
Plug the connector2 onto the bulb.
�
Align headlamp cover and click into
place.
Warning!
G
Do not remove the cover1 for the Bi-Xenon
headlamp. Because of high voltage in xenon
lamps, it is dangerous to replace the bulb or
repair the lamp and its components. We rec-
o mme n d th at y o u h av e s uc h wo rk don e by a
qualified technician.
Page 250 of 321
250 Practical hintsReplacing bulbsHigh beam bulbs
1High beam headlamp cover with lock-
ing tab�
Switch off the lights.
�
Open the hood (
�page 202).
�
Twist cover1 counterclockwise and re-
move.2Electrical connector
�
Pull electrical connector2 off.
�
Unclip the retainer springs and take out
the bulb.
�
Insert the new bulb so that the base lo-
cates in the recess on the holder.
�
Clip the retainer springs.
�
Plug the connector2 onto the bulb.
�
Align headlamp cover and click into
place.Turn signal, parking, standing and side
marker lamp bulbs
1Bulb socket
�
Switch off the lights.
�
Open the hood (
�page 202).
�
Twist bulb socket1 counterclockwise
and pull out.
�
Push bulb into socket, turn counter-
clockwise and remove.
�
Insert new bulb in socket, push in and
twist clockwise.
�
Reinstall the bulb socket.
��
Page 251 of 321
251 Practical hints
Replacing bulbs
�
Align headlamp cover and click into
place.
Fog lamp bulbs
1Fog lamp
�
Switch off the lights.
�
Use a suitable object (e.g. screwdriver)
to press on the release lever behind the
front panel.
Front fog lamp1 releases.
�
Remove fog lamp out of bumper.2Bulb socket
3Tabs
�
Twist bulb socket2 counterclockwise
to its end stop and pull out.
�
Pull bulb out of the bulb socket.
�
Insert new bulb in socket.
�
Reinstall bulb socket2.
�
Twist bulb socket2 clockwise to its
end stop.
�
Reinstall fog lamp into the bumper.
Make sure that tabs3 firmly seat into
the slots of holder.
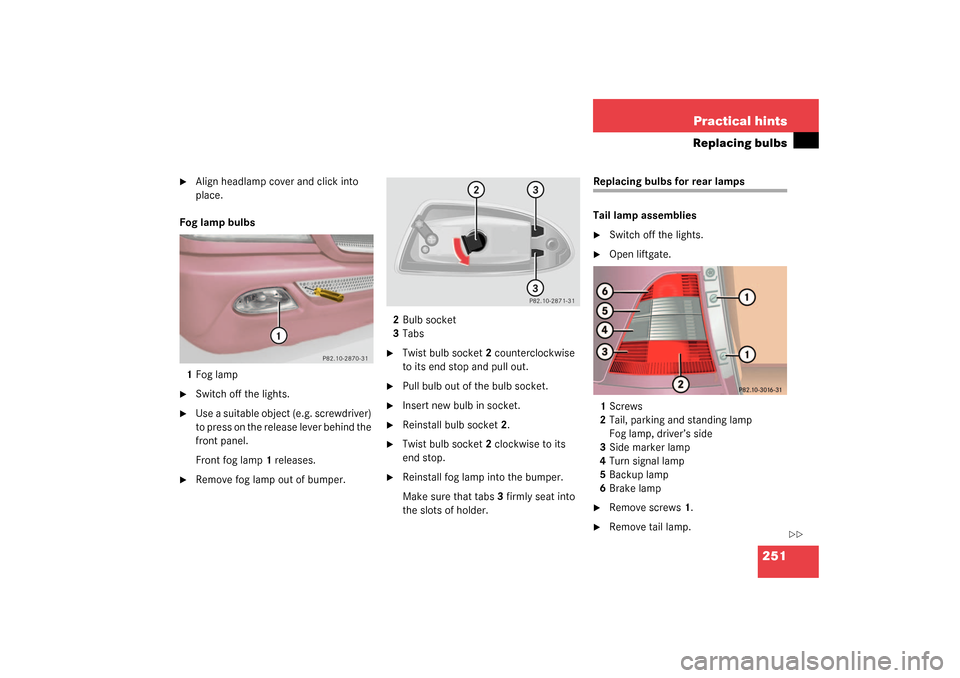
Replacing bulbs for rear lamps
Tail lamp assemblies�
Switch off the lights.
�
Open liftgate.
1Screws
2Tail, parking and standing lamp
Fog lamp, driver’s side
3Side marker lamp
4Turn signal lamp
5Backup lamp
6Brake lamp
�
Remove screws1.
�
Remove tail lamp.
��