Page 51 of 321
.
More information can be found in the
“Controls in detail” section (
�page 102).
Turnin")
51 Getting started
Parking and locking
Switching off headlamps�
Turn the combination switch to1
(�page 46).
More information can be found in the
“Controls in detail” section (
�page 102).
Turning off engine�
Place the gear selector lever inP.
�
Turn the key in the steering lock
(�page 33) to position0 and remove
it.
The immobilizer is activated.
Warning!
G
When leaving the vehicle always remove the
key from the steering lock and lock the vehi-
cle. Do not leave children unattended in the
vehicle, or with access to an unlocked vehi-
cle. Children could release the parking
brake and/or move the gear selector lever
from positionP, either of which could result
in an accident and/or serious personal
injury.
Warning!
G
Getting out of your vehicle with the selector
lever not fully engaged in positionP is dan-
gerous. Also, when parked on an incline,
positionP alone may not prevent your vehi-
cle from moving, possibly hitting people or
objects.
Always set the parking brake in addition to
shifting to positionP (
�page 50).
When parked on an incline, also turn front
wheel towards the road curb.
iAlways set the parking brake in addi-
tion to shifting to positionP.!To prevent accelerated battery dis-
charge and a possible dead battery, al-
ways remove the key from the steering
lock.
Page 102 of 321
102 Controls in detailLighting
LightingFor notes on how to switch on the head-
lamps (
�page 46) and use the turn signals
(
�page 47), see the “Getting started” sec-
tion.
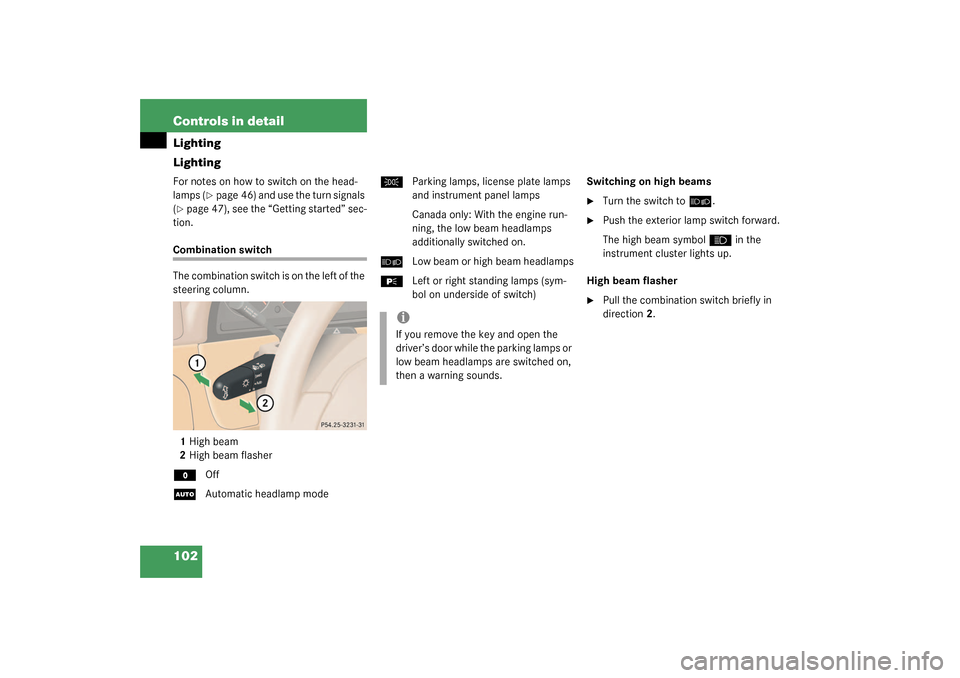
Combination switch
The combination switch is on the left of the
steering column.
1High beam
2High beam flasherM
Off
U
Automatic headlamp mode
C
Parking lamps, license plate lamps
and instrument panel lamps
Canada only: With the engine run-
ning, the low beam headlamps
additionally switched on.
õ
Low beam or high beam headlamps
ƒ
Left or right standing lamps (sym-
bol on underside of switch)Switching on high beams
�
Turn the switch to
õ
.
�
Push the exterior lamp switch forward.
The high beam symbol
A
in the
instrument cluster lights up.
High beam flasher
�
Pull the combination switch briefly in
direction2.
iIf you remove the key and open the
driver’s door while the parking lamps or
low beam headlamps are switched on,
then a warning sounds.
Page 103 of 321

103 Controls in detail
Lighting
Automatic headlamp mode
The parking lamps, low beam headlamps
and license plate lamps switch on and off
automatically depending on the brightness
of the ambient light.�
Turn the combination switch to
U
.Daytime running lamp mode
Canada only:
�
Turn combination switch to
position
M
or
U
.
When the engine is running, the low
beam headlamps are automatically
switched on. In low ambient light con-
ditions the parking lamps will also
switch on.
When you shift from a driving position to
positionN orP, the low beam switches off
(3 minutes delay).
For nighttime driving you should turn the
combination switch to position
õ
to
permit activation of the high beam head-
lamps.
Warning!
G
In automatic headlamp mode, the head-
lamps will not be automatically switched on
under foggy conditions. To minimize risk to
you and to others, activate headlamps by
turning combination switch to
õ
.
The driver is responsible for the operation of
the vehicle’s lights at all times. The automat-
ic headlamp feature is only an aid to the driv-
er. Switch on the vehicle lights manually
when driving or when traffic conditions re-
quire you to do so.
iIf the automatic headlamp mode is ac-
tivated, the fog lamps can also be
switched on (
�page 105). The low
beam headlamp and parking lamps are
activated simultaneously.
iIf you drive in countries where vehicles
drive on the other side of the road than
the country where the vehicle is regis-
tered, you must have the headlamps
modified for symmetrical low beams.
Relevant information can be obtained
at your authorized Mercedes-Benz
Light Truck Center.
iThe high beam flasher is always avail-
able.
Page 105 of 321

105 Controls in detail
Lighting
Locator lighting
During darkness, the following lamps will
come on when the vehicle is unlocked by
remote control:�
Parking lamps
�
Tail lamps
�
License plate lamps
�
Front fog lamps
The combination switch must be set to
position
U
(�page 102).
The locator lighting switches off when the
driver’s door is opened. It switches off au-
tomatically after a period of approximately
40 seconds.
Fog lamps
The switch is located on the upper center
console.
1Front fog lamps
2Indicator lamp
3Front fog lamps and rear fog lampSwitching on front fog lamps
�
Check that the low beam headlamps
are switched on.
�
Press upper part1 of switch.
The green indicator lamp
‡
in the
instrument cluster lights up.
Switching on front fog lamps and rear
fog lamp
�
Check that the low beam headlamps
are switched on.
�
Press lower part3 of switch.
The green indicator lamp
‡
in the
instrument cluster lights up in addition
to the yellow indicator lamp2 in the
switch.
Switching off front fog lamps and rear
fog lamp
�
Press lower part3 of switch.
The green indicator lamp
‡
in the
instrument cluster and the yellow indi-
cator lamp2 in the switch go out.
iThe fog lamps can be switched on with
combination switch in position
õ
or U. Consult your state Motor Regula-
tions regarding allowable lamp opera-
tion.
Page 110 of 321
110 Controls in detailInstrument cluster
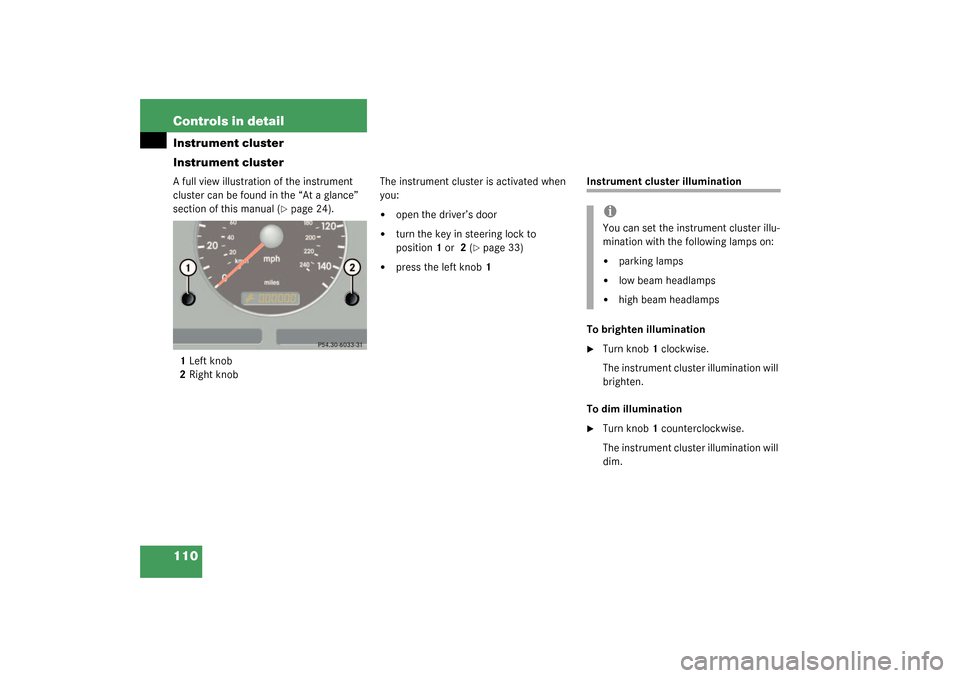
Instrument clusterA full view illustration of the instrument
cluster can be found in the “At a glance”
section of this manual (
�page 24).
1Left knob
2Right knobThe instrument cluster is activated when
you:
�
open the driver’s door
�
turn the key in steering lock to
position1 or 2 (
�page 33)
�
press the left knob1
Instrument cluster illumination
To brighten illumination�
Turn knob1 clockwise.
The instrument cluster illumination will
brighten.
To dim illumination
�
Turn knob1 counterclockwise.
The instrument cluster illumination will
dim.iYou can set the instrument cluster illu-
mination with the following lamps on:�
parking lamps
�
low beam headlamps
�
high beam headlamps
Page 119 of 321
 and for adjusting the rear view
mirrors (
�page 38) is found in the “Get-
ting started” sec")
119 Controls in detail
Good visibility
Good visibility
Information on the windshield wipers
(�page 47) and for adjusting the rear view
mirrors (
�page 38) is found in the “Get-
ting started” section.
Rear view mirror
Manually dimming inside rear view mir-
ror
1Lever�
Press lever1 backward.
The interior rear view mirror is dimmed.Automatic antiglare rear view mirror*
The reflection brightness of the exterior
rear view mirror on the driver’s side and
the inside rear view mirror will respond au-
tomatically to glare when:
�
the automatic antiglare function is acti-
vated (
�page 120)
�
the ignition is switched on
�
incoming light from headlamps falls on
the sensor in the inside rear view mir-
ror
The rear view mirror will not react if
�
reverse gear is engaged
�
the interior light is turned on
Warning!
G
The automatic antiglare function does not
react if incoming light is not aimed directly
at sensors in the inside rear view mirror.
The inside rear view mirror and the exterior
rear view mirror on the driver’s side do not
react, for example, if the cargo area is fully
loaded.
Glare can endanger you and others.Warning!
G
Exercise care when using the passenger
side exterior rear view mirror. The mirror
surface is convex (outwardly curved surface
for a wider field of view). Objects in mirror
are closer than they appear. Check your in-
side rear view mirror or glance over your
shoulder before changing lanes.
Page 121 of 321

121 Controls in detail
Good visibility
Folding in�
Briefly press button 1.
The mirrors fold in.Folding out
�
Briefly press button 2.
The mirrors fold out.
Headlamp cleaning system*
The switch is located on the right side of
the dashboard.Headlamp washer switch�
Switch on ignition.
�
Briefly press the upper part of switch.
iWith the front doors closed, the exteri-
or mirrors can still be folded in and out
approximately 30 minutes after the ig-
nition has been turned off.!Before you drive the vehicle through an
automatic car wash, fold the exterior
mirrors in, otherwise they may get
damaged.iIf you are driving at more than 9 mph
(15 km/h), you will not able to fold the
exterior mirrors in.
!If an exterior mirror housing is forcibly
pushed forward (hit from the rear), re-
position it manually by applying firm
pressure until it snaps back into place.
If an exterior mirror is forcibly pushed
rearward (hit from the front) press
button1 to fold mirrors in, then press
button2 to fold mirrors out. Do not
force mirror by hand.
The mirror housing is now properly po-
sitioned and you can adjust the mirror
normally.
Page 201 of 321

1Engine oil level
More information on engine oil can be
found in the “Operation” section
(
�pa")
201 Operation
At the gas station
Check regularly and before a long trip�
Open the hood (
�page 202)
1Engine oil level
More information on engine oil can be
found in the “Operation” section
(
�page 203).
2Coolant level
For normal replenishing, use water (po-
table water quality). More information
on the coolant level can be found in the
“Operation” section (
�page 206).
3Brake fluid
More information on brake fluid can be
found in the “Technical data” section
(
�page 284).4Windshield washer and headlamp
cleaning system
More information on filling the reser-
voir can be found in the “Operation”
section (
�page 208).
Vehicle lighting
Check function and cleanliness. More in-
formation on replacing light bulbs can be
found in the “Practical hints” section
(
�page 247).
Combination switch (
�page 102).
Tire inflation pressure
More information on tire inflation pressure
can be found in the “Operation” section
(
�page 211).
iLeaving the engine running and the fuel
cap open can cause the
?
lamp to
illuminate.
See also “Practical hints” section
(
�page 232).