Page 78 of 321

78 Safety and SecurityAnti-theft systems
Anti-theft systemsImmobilizer
The immobilizer prevents unauthorized
persons from starting your vehicle.
Activating
Removing the key from the steering lock
activates the immobilizer.
Deactivating
Switch on the ignition by turning the key in
the steering lock to position2.
Anti-theft alarm
Once the alarm system has been armed, a
visual and audible alarm is triggered when
someone:�
opens a door
�
opens the liftgate
�
opens the hood
The alarm will stay on even if the activating
element (a door, for example) is immedi-
ately closed.
The alarm system will also be triggered
when
�
someone attempts to raise the vehicle
�
unlocking and opening the driver’s
door with the mechanical key Arming the alarm system
The alarm system is armed after locking
the vehicle with the remote control. The
turn signal lamps blink three times to indi-
cate that the alarm system is activated. A
red lamp in the center console will blink af-
ter approximately 10 seconds when the
alarm system is completely armed
(
�page 27).
iIn case the engine cannot be started
(vehicle’s battery is in order), the sys-
tem is not operational. Contact an au-
thorized Mercedes-Benz Light Truck
Center or call 1-800-FOR-MERCedes
(in the USA), or 1-800-387-0100 (in
Canada).
iIf the alarm stays on for more than
20 seconds, an emergency call is initi-
ated automatically by the Tele Aid sys-
tem (
�page 159) provided Tele Aid
service was subscribed to and properly
activated.
Page 79 of 321

79 Safety and Security
Anti-theft systems
Disarming the alarm system
The alarm system is disarmed when you
unlock your vehicle with the remote con-
trol. The turn signal lamps blink once to in-
dicate that the alarm system is
deactivated.
Canceling the alarm
To cancel the alarm:�
Switch on the ignition by turning the
key in the steering lock to position2.
or
�
Press the
Œ
or
‹
button on the
remote control.
The alarm is cancelled.Tow-away alarm, glass breakage
sensor
The tow-away alarm and the glass break-
age sensor are part of the anti-theft alarm
system.
Once the tow-away alarm is armed, a visual
and audible alarm will be triggered when
someone:�
attempts to raise the vehicle
�
breaks a window and reaches into the
passenger compartment
iIf the turn signal lamps do not blink
three times, the tow-away - glass-
breackage sensor is malfunctioning or
one of the following elements may not
be properly closed:�
a door
�
the liftgate
�
the hood
Close the respective element and lock
the vehicle again.
iThe alarm system will rearm automati-
cally again after approximately 40 sec-
onds if one of the doors or the liftgate
is not opened.
iThe tow-away protection alarm is trig-
gered, for example, if the vehicle is lift-
ed on one side.
If the alarm stays on for more than
20 seconds, an emergency call is initi-
ated automatically by the Tele Aid sys-
tem (
�page 159) provided Tele Aid
service was subscribed to and properly
activated.
Page 83 of 321
83 Controls in detail
Locking and unlocking
Seats
Memory function*
Lighting
Instrument cluster
Automatic transmission
Transmission control – LOW RANGE mode
Good visibility
Automatic climate control
Power windows
Sliding/pop-up roof*
Loading
Driving systems
Useful features
Page 85 of 321

85 Controls in detail
Locking and unlocking
Unlocking
Unlocking the driver’s door and fuel
filler flap�
Press button
Œ
once.
All turn signal lamps blink once to indi-
cate that the driver’s door and the fuel
filler flap are unlocked.Global unlocking
�
Press button
Œ
twice.
All turn signal lamps blink once to indi-
cate that all doors, fuel filler flap and
liftgate are unlocked.
Unlocking the liftgate
�
Press button
Š
.
Only the liftgate unlocks.
Locking
�
Press button
‹
once
All turn signal lamps blink three times
to indicate that all doors, the liftgate
and the fuel filler flap are unlocked.
iUnlocking the vehicle with the remote
control deactivates the anti-theft
alarm.
The vehicle will lock again automatical-
ly and reactivate the anti-theft system
within approximately 40 seconds of un-
locking if neither door nor liftgate is
opened.
iLocking the vehicle with the remote
control activates the anti-theft alarm.
iIf the turn signal lamps do not blink
three times, one of the following ele-
ments may not be properly closed:�
a door
�
the liftgate
�
the hood
Close the respective element and lock
the vehicle again.
Warning!
G
When leaving the vehicle, always remove the
key from the steering lock, and lock your ve-
hicle. Do not leave children unattended in
the vehicle, or with access to an unlocked
vehicle. Unsupervised use of vehicle equip-
ment may cause an accident and/or serious
personal injury.
Page 89 of 321

89 Controls in detail
Locking and unlocking
Automatic central locking
The doors and the liftgate automatically
lock when the ignition is switched on and
the left front wheel turns at vehicle speeds
of approximately 9 mph (15 km/h) or
more.
If one of the front doors is then opened
from the inside, the vehicle is unlocked
centrally unless only the driver's door was
previously unlocked. The central locking button is located on
the lower center console.
Central locking button1Locking
2UnlockingActivating
�
Check that the ignition is switched on.
All the lamps in the instrument cluster
light up.
�
Press and hold upper part1 of the cen-
tral locking button for approximately
six seconds.
The automatic central locking is acti-
vated.
Deactivating
�
Check that the ignition is switched on.
All the lamps in the instrument cluster
light up.
�
Press and hold lower part2 of the cen-
tral locking button for approximately
six seconds.
The automatic central locking is deacti-
vated.
iThe doors unlock automatically after an
accident if the force of the impact ex-
ceeds a preset threshold.
To prevent the vehicle door locks from
locking, deactivate the automatic cen-
tral locking when the vehicle�
is pushed or
�
is on a test stand
Page 91 of 321
.
Seat heater*
The seat heaters can only be switched on
with the engine")
91 Controls in detail
Seats
Seats
Information on seat adjustment can be
found in the “Getting started” section
(�page 34).
Seat heater*
The seat heaters can only be switched on
with the engine running.
The switches are located on the upper cen-
ter console.
1Normal heating
2Rapid heatingSwitching on normal seat heating mode
�
Press upper part1 of switch.
One indicator lamp in the switch lights
up.
Switching off normal seat heating
mode
�
Press upper part1 of switch again.
The indicator lamp in the switch goes
out.
Switching on rapid seat heating mode
�
Press lower part2 of switch.
Both indicator lamps in the switch light
up.Switching off rapid seat heating mode
�
Press lower part2 of switch again.
Both indicator lamps in the switch go
out.
iThe seat heater will be automatically
switched off after approximately
20 minutes.
iThe system switches over to normal
heating mode after approximately five
minutes. Only one indicator lamp re-
mains lit.!If one or both of the lamps on the seat
heater switch are blinking, there is in-
sufficient voltage available since too
many electrical consumers are turned
on. The seat heater switches off auto-
matically.
The seat heater will switch back on
again automatically as soon as suffi-
cient voltage is available.
Page 101 of 321

101 Controls in detail
Memory function*
Activating parking position
The buttons are on the lower part of the
center console.
1Deactivating parking position
2Activating parking position
3Adjustment button�
Switch ignition on (if not already on).
�
Press button2.
The passenger side exterior rear view
mirror is selected.
�
Engage reverse gearR.
The passenger side exterior rear view
mirror moves automatically to the
stored parking position. The exterior rear view mirror returns to its
stored driving position:
�
10 seconds after you put the gear se-
lector lever in positionD
�
immediately once you exceed a speed
of approx. 6 mph (10 km/h)
�
immediately when you press the
button1 for driver’s side mirrorStoring parking position
�
Stop the vehicle.
�
Switch ignition on (if not already on).
�
Press button2.
The passenger side exterior rear view
mirror is selected.
�
Adjust the exterior rear view mirror
with button3 so that you see the rear
wheel and the curb.
�
Press memory button2 (
�page 99).
�
Within three seconds, press bottom of
adjustment button3.
The parking position is stored if the
mirror does not move.
iIf the button1 is pressed, the automat-
ic passenger side exterior rear view
parking position is deactivated.
iIf the mirror does move, repeat the
above steps. After the setting is stored
you can move the mirror again.
The selected position will be stored rel-
ative to the position button1
(�page 99) pressed.
Page 102 of 321
102 Controls in detailLighting
LightingFor notes on how to switch on the head-
lamps (
�page 46) and use the turn signals
(
�page 47), see the “Getting started” sec-
tion.
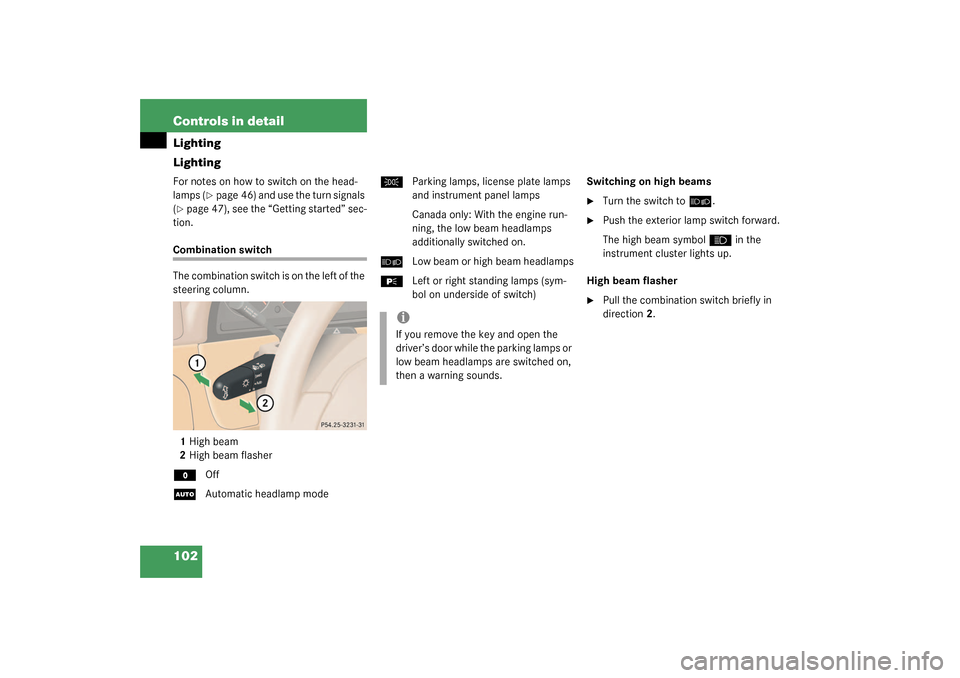
Combination switch
The combination switch is on the left of the
steering column.
1High beam
2High beam flasherM
Off
U
Automatic headlamp mode
C
Parking lamps, license plate lamps
and instrument panel lamps
Canada only: With the engine run-
ning, the low beam headlamps
additionally switched on.
õ
Low beam or high beam headlamps
ƒ
Left or right standing lamps (sym-
bol on underside of switch)Switching on high beams
�
Turn the switch to
õ
.
�
Push the exterior lamp switch forward.
The high beam symbol
A
in the
instrument cluster lights up.
High beam flasher
�
Pull the combination switch briefly in
direction2.
iIf you remove the key and open the
driver’s door while the parking lamps or
low beam headlamps are switched on,
then a warning sounds.