Page 156 of 321

156 Controls in detailUseful featuresAshtrays and cigarette lighter Ashtray and cigarette lighter in the
front center console
1Ashtray
2Cigarette lighter
3Cover plate
Opening the ashtray
�
Briefly touch cover plate3.
The ashtray opens automatically.Removing ashtray insert
�
Secure vehicle from movement by set-
ting the parking brake. Move the selec-
tor lever to positionN.
Now you have more room to take out
the insert.
�
Grip the insert on the sides and pull it
out upwards.
Reinstalling ashtray insert
�
Install ashtray insert.
�
Close the ashtray.
Warning!
G
Never touch the heating element or sides of
the cigarette lighter; they are extremely hot.
Hold the knob only.
When leaving the vehicle always remove the
key from the steering lock. Do not leave chil-
dren unattended in the vehicle, or with ac-
cess to an unlocked vehicle. Unsupervised
use of vehicle equipment may cause an ac-
cident and/or serious personal injury.iThe cigarette lighter socket can be
used to accommodate electrical acces-
sories up to a maximum of 50 W.
If the engine is off, the battery may be-
come discharged when used for long
periods of time.
Warning!
G
Remove ashtray only with vehicle standing
still. Set the parking brake to secure vehicle
from movement. Move gear selector lever to
positionN. With gear selector lever in
positionN, turn off the engine.
Page 186 of 321

186 OperationDriving instructionsOff-road driving
Read this chapter carefully before you be-
gin off-road travel.
Familiarize yourself with the vehicle char-
acteristics and gear changing before you
attempt any difficult terrain off-road driv-
ing. We recommend that you start out with
easy off-road travel.Special driving features for off-road
driving
The following driving features are available
for specific kind of operation:
�
LOW RANGE mode (
�page 118)
�
LOW RANGE – ABS (
�page 72)
�
LOW RANGE – 4-ETS (
�page 74)
�
LOW RANGE – ESP (
�page 76)
Off-road driving rules
Engage the LOW RANGE mode before driv-
ing under off-road conditions
(
�page 118).
Fasten items being carried as securely as
possible (
�page 139).
Warning!
G
Drive slowly in unknown terrain. This will
make it easier to recognize unexpected ob-
stacles and avoid damage to the vehicle.
To help avoid the vehicle rolling over, never
turn it around on steep inclines. If the vehi-
cle cannot complete the attempted climb,
back it down in reverse gear.
Do not drive along the side of a slope (dan-
ger of vehicle rollover). The vehicle might
otherwise rollover. If in doing so the vehicle
begins to show a tendency to roll, immedi-
ately steer into a line of gravity (straight up
or downhill).
Never let the vehicle roll backwards in idle
or when the clutch is disengaged. You may
lose control of the vehicle if you use only the
service brake.
Warning!
G
Sand, dirt, mud and other material having
friction property can cause exceptional wear
and tear as well as brake failure.
Have the brakes checked for dirt build-up
and cleaned. There is otherwise a risk that
full braking power may not be available in an
emergency.
iWe recommend keeping doors, liftgate,
windows, and sliding/pop-up roof*
closed whenever driving in off-road
mode.
Page 195 of 321

195 Operation
Driving instructions
Adjust the mirrors to permit unobstructed
view beyond rear of trailer.�
If the trailer has electric brakes, start
your vehicle and trailer moving slowly,
and then apply only the trailer brake
controller by hand to be sure the
brakes are working properly.
�
Always secure items in the trailer to
prevent load shifts while driving.
�
When towing a trailer, check occasion-
ally to be sure that the load is secure,
and that lighting and trailer brakes (if
so equipped) are functioning properly.
�
Take into consideration that when tow-
ing a trailer, the handling characteris-
tics are different and less stable from
those when operating the vehicle with-
out a trailer.
It is important to avoid sudden maneu-
vers.
�
The vehicle and trailer combination is
heavier, and therefore is limited in ac-
celeration and climbing ability, and re-
quires longer stopping distances.
I t i s m o r e p r o n e t o r e a c t i n g t o s i d e w i n d
gusts, and requires more sensitive
steering input.
�
If possible, do not brake abruptly, but
rather engage the brake slightly at first
to permit the trailer to activate its
brake. Then increase the braking force.
�
If the transmission hunts between
gears on inclines, manually shift to a
lower gear (select 4, 3, 2 or 1).
A lower gear and reduction of speed re-
duces the chance of engine overload-
ing and / or overheating.
�
On very steep inclines, not manageable
with selector lever in position1, switch
transfer case to LOW RANGE mode
(�page 118).
�
When going down a long hill, shift into
a lower gear and use the engine’s brak-
ing effect.
Avoid riding the brakes, thus overheat-
ing the vehicle and trailer brakes.
!If the trailer should begin to sway, re-
duce the vehicle’s speed and use the
brake controller by hand to straighten
out the vehicle and trailer.
In no case should you attempt to
straighten out the tow vehicle and trail-
er by increasing the speed or over-
steering and stepping on the brakes.
Page 196 of 321
 when the air conditioning is on,
turn off th")
196 OperationDriving instructions�
If the engine coolant rises to an ex-
tremely high temperature (coolant tem-
perature needle approaching the red
zone) when the air conditioning is on,
turn off the air conditioning system.
Engine coolant heat can be additionally
vented by opening the windows,
switching the climate control fan speed
to high and setting the temperature
control to the maximum hot position.
�
Extreme care must be exercised since
your vehicle with a trailer will require
additional passing distance ahead than
when driving without a trailer.
Because your vehicle and trailer is
longer than your vehicle alone, you will
also need to go much farther ahead of
the passed vehicle before you can re-
turn to your lane.Parking
Passenger compartment
Warning!
G
To reduce the risk of personal injury, or
damage to the vehicle powertrain, as a re-
sult of vehicle/trailer movement, always:�
Keep right foot on brake pedal.
�
Shift gear selector lever to positionN.
�
Have a second person place wheel
chocks on downhill side of left and right
trailer wheels.
�
Slowly release brake pedal and let vehi-
cle and trailer roll into chocks until
stopped.
�
Firmly depress parking brake pedal.
�
Move gear selector lever to position P.
�
When parked on an incline, turn front
wheel towards the road curb.
Warning!
G
Always fasten items being carried as secure-
ly as possible.
In an accident, during hard braking or sud-
den maneuvers, loose items will be thrown
around inside the vehicle, and cause injury
to vehicle occupants unless the items are
securely fastened in the vehicle.
The trunk is the preferred place to carry ob-
jects. Always use partition net when trans-
porting cargo. Partition net cannot secure
hard or heavy objects.
Page 240 of 321
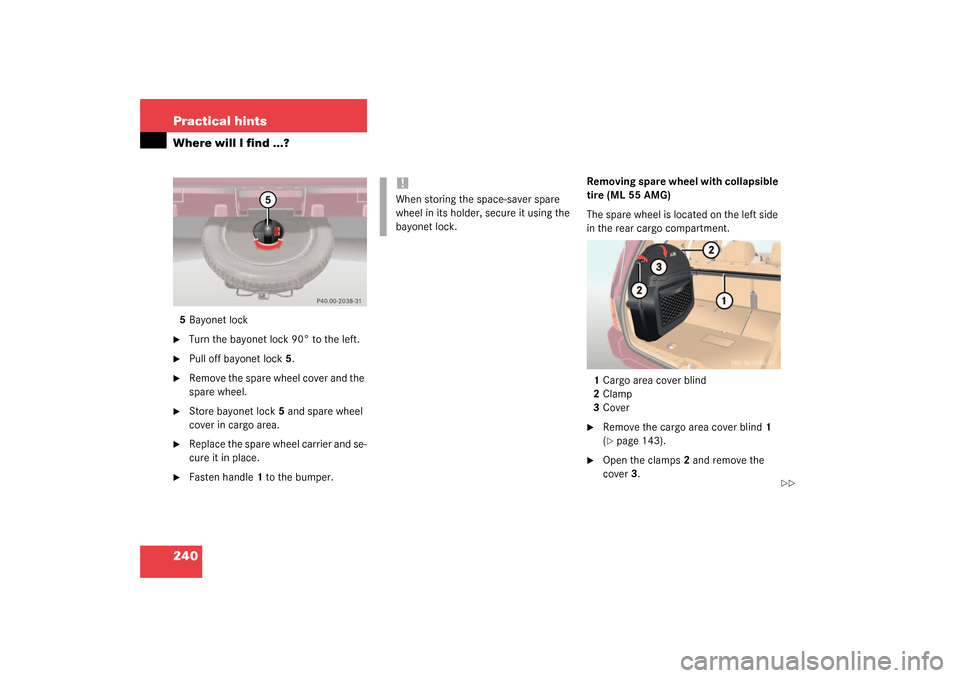
240 Practical hintsWhere will I find ...?5Bayonet lock�
Turn the bayonet lock 90° to the left.
�
Pull off bayonet lock5.
�
Remove the spare wheel cover and the
spare wheel.
�
Store bayonet lock5 and spare wheel
cover in cargo area.
�
Replace the spare wheel carrier and se-
cure it in place.
�
Fasten handle1 to the bumper.Removing spare wheel with collapsible
tire (ML 55 AMG)
The spare wheel is located on the left side
in the rear cargo compartment.
1Cargo area cover blind
2Clamp
3Cover
�
Remove the cargo area cover blind1
(�page 143).
�
Open the clamps2 and remove the
cover3.
!When storing the space-saver spare
wheel in its holder, secure it using the
bayonet lock.
��
Page 262 of 321

262 Practical hintsBatteryRemoving the batteries�
Remove the screw securing the bat-
tery.
�
Remove the battery support and brack-
et. Take out the battery.
Charging and reinstalling batteries�
Charge battery in accordance with the
instructions of the battery charger
manufacturer.
�
Reinstall the charged battery. Follow
the previously described steps in re-
verse order.
Reconnecting the batteries�
Turn off all electrical consumers.
�
Connect the positive lead and fasten its
cover.
�
Connect the negative lead.
Warning!
G
Never charge a battery while still installed in
the vehicle. Gases may escape during charg-
ing and cause explosions that may result in
paint damage, corrosion or personal injury.
!Never invert the terminal connections!!The battery, its filler caps and the vent
tube must always be securely installed
when the vehicle is in operation.
iThe following procedures must be car-
ried out following any interruption of
battery power (e.g. due to reconnec-
tion):�
Set the clock (
�page 112).
�
Set the date in trip computer
(�page 172).
�
Calibrate the compass
(�page 174).
�
Resynchronize the ESP
(�page 225).
�
Resynchronize side windows
(�page 136).
�
Resynchronize sliding/pop-up
roof*(
�page 138).
Page 269 of 321
269 Practical hints
Towing the vehicle
Front towing eye
The front towing eye is located on the pas-
senger side below the bumper.
1Towing eyeRear towing eye The rear towing eye is located behind the
right side cover in the bumper panel.
ML 320, ML 350, ML 5001Cover
2Towing eye
To remove cover:�
Pry out the cover1 using a flat blade
screwdriver (
�page 237).
To reinstall cover:
�
Engage cover at bottom and press in
top securely.
iThe selector lever will remain locked in
positionP and the key will not turn in
the steering lock if the battery is dis-
connected or discharged. See notes on
the battery (
�page 261) or on jump
starting (
�page 264).
Manual unlocking of transmission se-
lector lever (�page 245)
Warning!
G
In order to avoid possible serious burns or
injury, use extreme caution when removing
the cover, because the rear exhaust pipe is
extremely hot.
Page 270 of 321
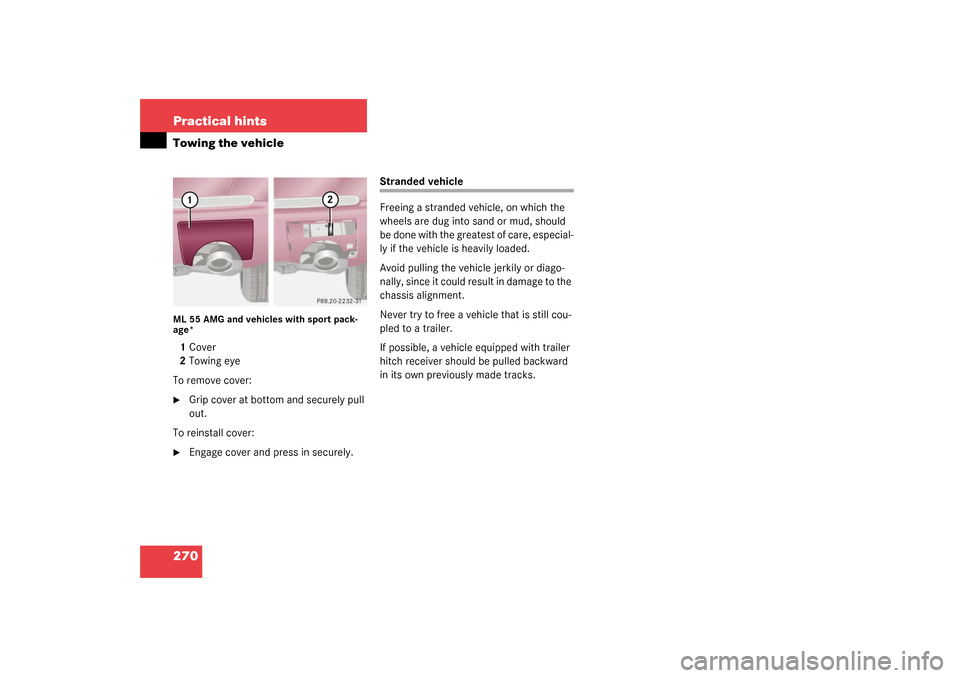
270 Practical hintsTowing the vehicleML 55 AMG and vehicles with sport pack-
age*1Cover
2Towing eye
To remove cover:�
Grip cover at bottom and securely pull
out.
To reinstall cover:
�
Engage cover and press in securely.
Stranded vehicle
Freeing a stranded vehicle, on which the
wheels are dug into sand or mud, should
be done with the greatest of care, especial-
ly if the vehicle is heavily loaded.
Avoid pulling the vehicle jerkily or diago-
nally, since it could result in damage to the
chassis alignment.
Never try to free a vehicle that is still cou-
pled to a trailer.
If possible, a vehicle equipped with trailer
hitch receiver should be pulled backward
in its own previously made tracks.