Page 26 of 360
26 At a glanceMultifunction steering wheel
Multifunction steering wheel
Item
Page
1
Multifunction display in
speedometer
111
Operating control sys-
tem:
112
2
Selecting the submenu or
setting the volumeç
down/ to decrease
æ
up / to increase
3
Telephone*: Press buttoní
to take a call
ì
to end a call
Item
Page
4
Menu systems: Press but-
tonè
for next system
ÿ
for previous system
5
Moving within a menu:
Press buttonj
for next display
k
for previous display
Page 30 of 360
30 At a glanceDoor control panel
Door control panel
Item
Page
1
Switches for opening/clos-
ing power window
158
Switch for rear door win-
dow override
69
2
Seat adjustment
34,
91
3
Door handle
87
4
Memory function (for stor-
ing seat, mirror and steer-
ing wheel settings)
97
Page 33 of 360

33 Getting started
Unlocking
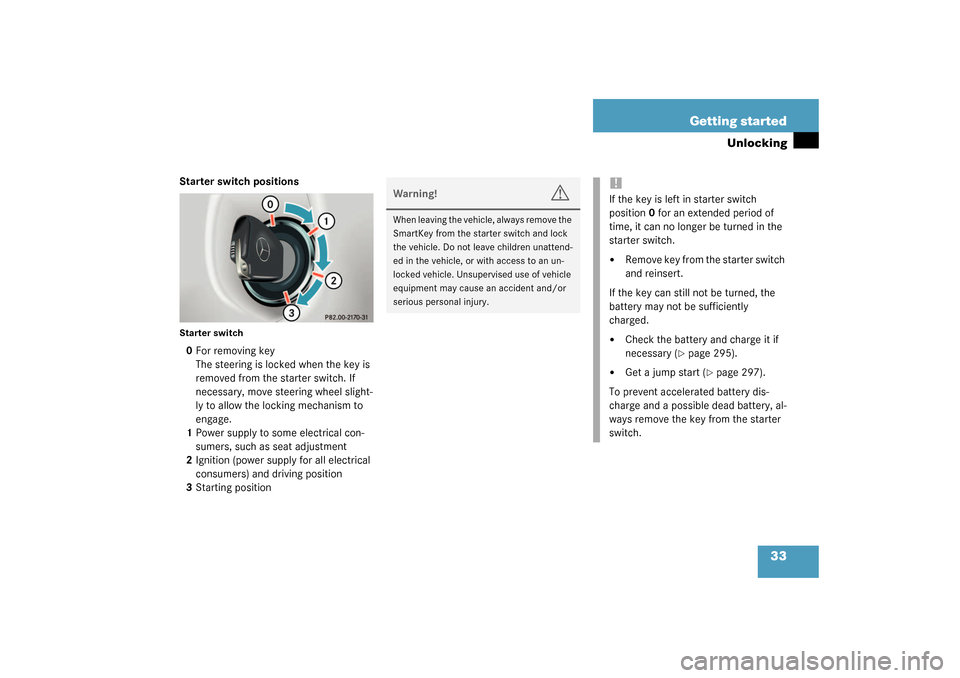
Starter switch positionsStarter switch0For removing key
The steering is locked when the key is
removed from the starter switch. If
necessary, move steering wheel slight-
ly to allow the locking mechanism to
engage.
1Power supply to some electrical con-
sumers, such as seat adjustment
2Ignition (power supply for all electrical
consumers) and driving position
3Starting position
Warning!
G
When leaving the vehicle, always remove the
SmartKey from the starter switch and lock
the vehicle. Do not leave children unattend-
ed in the vehicle, or with access to an un-
locked vehicle. Unsupervised use of vehicle
equipment may cause an accident and/or
serious personal injury.
!If the key is left in starter switch
position0 for an extended period of
time, it can no longer be turned in the
starter switch.�
Remove key from the starter switch
and reinsert.
If the key can still not be turned, the
battery may not be sufficiently
charged.
�
Check the battery and charge it if
necessary (
�page 295).
�
Get a jump start (
�page 297).
To prevent accelerated battery dis-
charge and a possible dead battery, al-
ways remove the key from the starter
switch.
Page 34 of 360

34 Getting startedAdjusting
AdjustingSeatsWarning!
G
All seat, head restraint, steering wheel, and
rear view mirror adjustments, as well as fas-
tening of seat belts, must be done before
the vehicle is put into motion.Warning!
G
Do not adjust the driver’s seat while driving.
Adjusting the seat while driving could cause
the driver to lose control of the vehicle.
Never ride in a moving vehicle with the seat
back reclined. Sitting in an excessively re-
clined position can be dangerous. You could
slide under the seat belt in a collision. If you
slide under it, the belt would apply force at
the abdomen or neck. That could cause se-
rious or fatal injuries.
The seat back and seat belts provide the
best restraint when the wearer is in an up-
right position and belts are properly posi-
tioned on the body. Your seat must be
adjusted so that you can correctly fasten
your seat belt (
�page 40).
Never place hands under the seat or near
any moving parts while a seat is being ad-
justed.
Warning!
G
When leaving the vehicle, always remove the
key from the starter switch, and lock your
vehicle.
The power seats can also be operated with
the driver’s or front passenger door open.
Do not leave children unattended in the ve-
hicle, or with access to an unlocked vehicle.
Unsupervised use of vehicle equipment may
cause an accident and/or serious personal
injury.
Warning!
G
Children 12 years old and under must never
ride in the front seat, except in a
Mercedes-Benz authorized BabySmart
TM
compatible child seat, which operates with
the BabySmart
TM system installed in the ve-
hicle to deactivate the passenger side front
airbag when it is properly installed. Other-
wise they will be struck by the airbag when
it inflates in a crash. If this happens, serious
or fatal injury will result.
According to accident statistics, children
are safer when properly restrained in the
rear seating positions than in the front seat-
ing positions. Infants and small children
must be seated in an appropriate infant or
child restraint system, which is properly se-
cured with the vehicle's seat belt and top
tether strap, or secured via lower anchors
and top tether strap, fully in accordance
with the child seat manufacturer's instruc-
tions.
Page 36 of 360

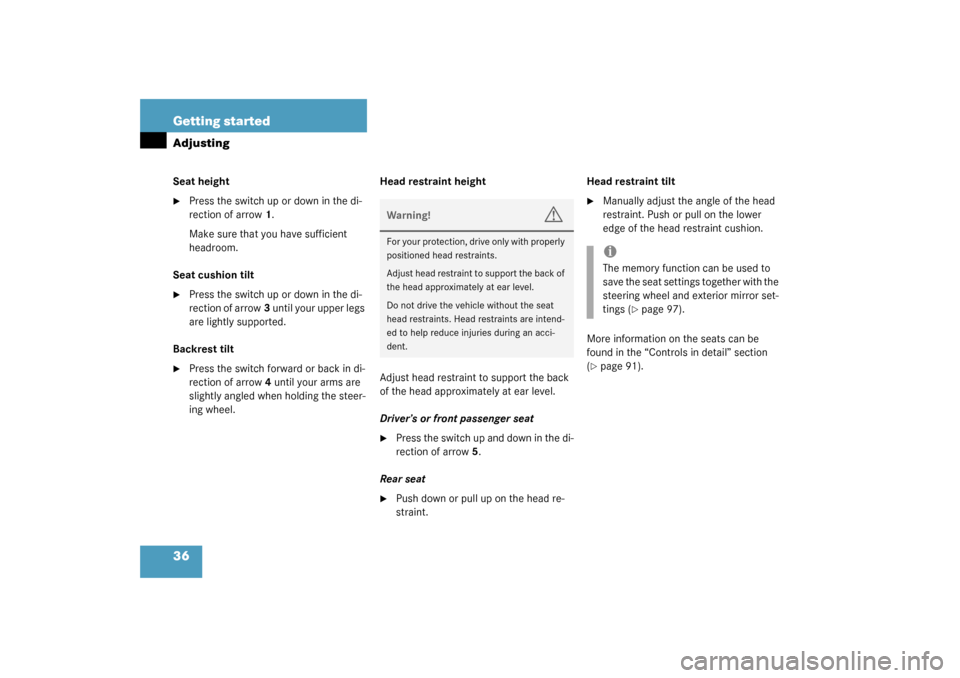
36 Getting startedAdjustingSeat height�
Press the switch up or down in the di-
rection of arrow1.
Make sure that you have sufficient
headroom.
Seat cushion tilt
�
Press the switch up or down in the di-
rection of arrow3 until your upper legs
are lightly supported.
Backrest tilt
�
Press the switch forward or back in di-
rection of arrow4 until your arms are
slightly angled when holding the steer-
ing wheel.Head restraint height
Adjust head restraint to support the back
of the head approximately at ear level.
Driver’s or front passenger seat
�
Press the switch up and down in the di-
rection of arrow5.
Rear seat
�
Push down or pull up on the head re-
straint.Head restraint tilt
�
Manually adjust the angle of the head
restraint. Push or pull on the lower
edge of the head restraint cushion.
More information on the seats can be
found in the “Controls in detail” section
(
�page 91).
Warning!
G
For your protection, drive only with properly
positioned head restraints.
Adjust head restraint to support the back of
the head approximately at ear level.
Do not drive the vehicle without the seat
head restraints. Head restraints are intend-
ed to help reduce injuries during an acci-
dent.
iThe memory function can be used to
save the seat settings together with the
steering wheel and exterior mirror set-
tings (
�page 97).
Page 37 of 360

37 Getting started
Adjusting
Steering wheelThe stalk is located on the steering column
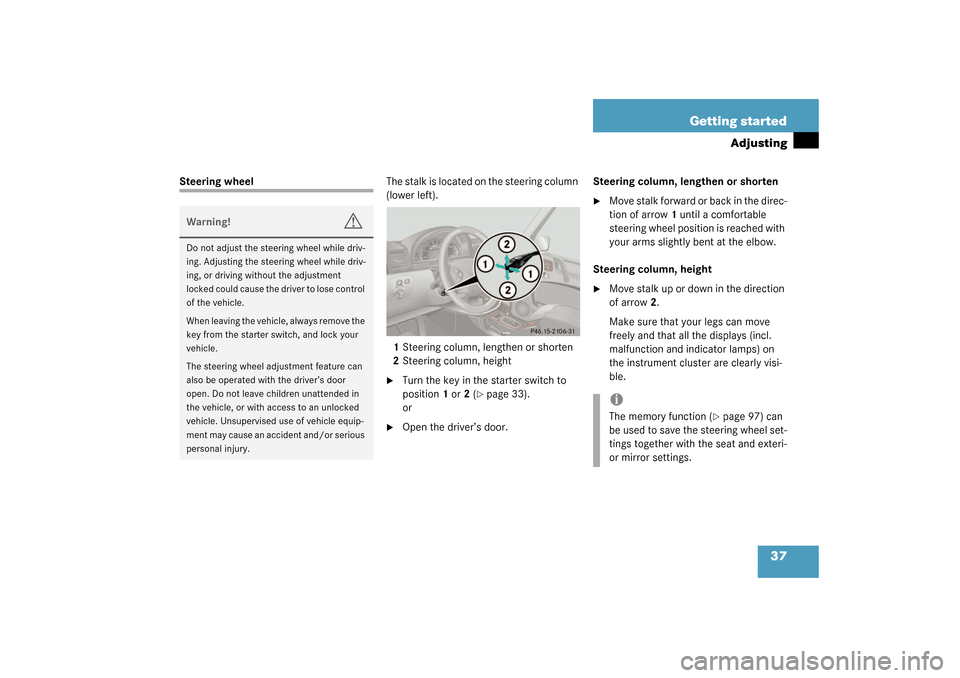
(lower left).
1Steering column, lengthen or shorten
2Steering column, height
�
Turn the key in the starter switch to
position1 or2 (
�page 33).
or
�
Open the driver’s door.Steering column, lengthen or shorten
�
Move stalk forward or back in the direc-
tion of arrow1 until a comfortable
steering wheel position is reached with
your arms slightly bent at the elbow.
Steering column, height
�
Move stalk up or down in the direction
of arrow2.
Make sure that your legs can move
freely and that all the displays (incl.
malfunction and indicator lamps) on
the instrument cluster are clearly visi-
ble.
Warning!
G
Do not adjust the steering wheel while driv-
ing. Adjusting the steering wheel while driv-
ing, or driving without the adjustment
locked could cause the driver to lose control
of the vehicle.
When leaving the vehicle, always remove the
key from the starter switch, and lock your
vehicle.
The steering wheel adjustment feature can
also be operated with the driver’s door
open. Do not leave children unattended in
the vehicle, or with access to an unlocked
vehicle. Unsupervised use of vehicle equip-
ment may cause an accident and/or serious
personal injury.
iThe memory function (
�page 97) can
be used to save the steering wheel set-
tings together with the seat and exteri-
or mirror settings.
Page 39 of 360
39 Getting started
Adjusting
�
Make sure that the ignition is switched
on.
All the lights in the instrument cluster
light up.
�
Press button2 for left mirror or
button3 for right mirror.
�
Push adjustment button1 up, down,
left or right according to the setting de-
sired.
More information can be found in the
“Controls in detail” section (
�page 99).
iThe memory function (
�page 97) can
be used to save the exterior mirror set-
tings together with the seat and steer-
ing wheel settings.
!If an exterior rear view mirror housing
is forcibly pushed forward or rearward,
reposition it by applying firm pressure
until it snaps into place. The mirror
housing is now properly positioned and
you can adjust the mirror normally.
Page 45 of 360

45 Getting started
Driving
�
Release the parking brake by lifting
lever1 up slightly, pressing button2
on the lever and moving lever1 down
to the stop.
The indicator lamp
;
(USA only) or
3
(Canada only) in the instrument
cluster goes out.
Driving
�
Depress the brake pedal.
The selector lever lock is released.
�
Move selector lever to positionD orR.
�
Release the brake pedal.
�
Carefully depress the accelerator.
Once the vehicle is in motion, the auto-
matic central locking system engages
and the locking knobs drop down.After a cold start, the automatic transmis-
sion engages at a higher revolution. This al-
lows the catalytic converter to reach its
operating temperature earlier.
More information on driving can be found
in “Operation” section (
�page 197).
For information on off-road driving, see
“Driving instructions” (
�page 203).
iWait for the gear selection process to
complete before setting the vehicle in
motion.
iYou can open the doors from inside at
any time. Open doors only when the
conditions are safe to do so.!If you hear a warning signal when driv-
ing off, you have forgotten to release
the parking brake.
Release the parking brake.
Warning!
G
It is dangerous to shift the selector lever out
ofP or N if the engine speed is higher than
idle speed. If your foot is not firmly on the
brake pedal, the vehicle could accelerate
quickly forward or in reverse. You could lose
control of the vehicle and hit someone or
something. Only shift into gear when the en-
gine is idling normally and when your right
foot is firmly on the brake pedal.Warning!
G
On slippery road surfaces, never downshift
in order to obtain braking action. This could
result in drive wheel slip and reduced vehi-
cle control. Your vehicle’s ABS will not pre-
vent this type of loss of control.