Page 297 of 354

294 Towing the vehicle
Te ch n i c a l
data Instruments
and controlsOperation DrivingInstrument
cluster displayPractical hintsCar care Index
Tow i n g t h e ve h i c l e
Mercedes-Benz recommends that the vehicle be
transported with all wheels off the ground using flatbed
or appropriate wheel lift/ dolly equipment. This method
is preferable to other types of towing.
Caution!
Use flatbed or wheel lift/ dolly equipment with key in
steering lock turned to position 0.
Do not tow with sling- type equipment. Towing with
sling- type equipment over bumpy roads will damage
radiator and supports.
To prevent damage during transport, do not tie down
vehicle by its chassis or suspension parts.
Switch off the tow-away alarm (see page 41) as well as
the ESP (see page 232).
When circumstances do not permit the recommended
towing methods, the vehicle may be towed with all
wheels on the ground or front wheels raised only so far
as necessary to have the vehicle moved to a safe location
where the recommended towing methods can be
employed.Caution!
Ve h i c l e s w i t h 4 M AT I C :
Do not tow with one axle raised. Doing so could damage
the transfer case, which is not covered by the Mercedes-
Benz Limited Warranty.
Caution!
If the vehicle is towed with the front axle raised (not
permissible for vehicles with 4MATIC), the engine must
be shut off (electronic key in steering lock in position 0
or 1). Otherwise, the EPS will immediately be engaged
and will apply the rear wheel brakes.
When towing the vehicle with all wheels on the ground,
the selector lever must be in position “N” and the key
must be in steering lock po sition 2.
When towing the vehicle with all wheels on the ground
or the front axle raised, the vehicle may be towed only
for distances up to 30 miles (50 km) and at a speed not
to exceed 30 mph (50 km/h).
To be certain to avoid a possibility of damage to the
drivetrain, however, we recommend the drive shaft be
disconnected at the rear axle drive flange (vehicles with
Page 298 of 354

295 Towing the vehicle
Te ch n i c a l
data Instruments
and controlsOperation DrivingInstrument
cluster displayPractical hintsCar care Index 4MATIC: disconnected at the front and rear axle drive
flanges) for any towing beyond a short tow to a nearby
garage.
Important!
When towing the vehicle with all wheels on the ground,
please note the following:
With the automatic central locking activated and the
electronic key in steering lock position 2, the vehicle
doors lock if the left front wheel as well as the right rear
wheel are turning at vehicle speeds of approx. 9 mph
(15 km/h) or more. To prevent the vehicle doors from
locking, deactivate the automatic central locking, see
page 35.
Note:
To signal turns while being towed with hazard warning
flasher in use, turn electronic key in steering lock to
position 2 and activate combination switch for left or
right turn signal in usual manner – only the selected
turn signal will operate.
Upon canceling the turn signal, the hazard warning
flasher will operate again.
Wa r n i n g !
If circumstances require towing the vehicle with
all wheels on the ground, always tow with a tow bar
if:
• the engine will not run
• there is malfunction in the power supply or in
the vehicle’s electrical system
as that will be necessary to adequately control the
towed vehicle.
Prior to towing the vehicle with all wheels on the
ground, make certain that the electronic key is in
steering lock position 2.If the key is left in the steering lock position 0 for
an extended period of time, it can no longer be
turned in the lock. In this case, the steering is
locked. To unlock, remove electronic key from
steering lock and reinsert.Wa r n i n g !
With the engine not running, there is no power
assistance for the braking and steering systems. In
this case, it is important to keep in mind that a
considerably higher degree of effort is necessary to
brake and steer the vehicle.
Page 299 of 354

296 Towing the vehicle
Te ch n i c a l
data Instruments
and controlsOperation DrivingInstrument
cluster displayPractical hintsCar care Index
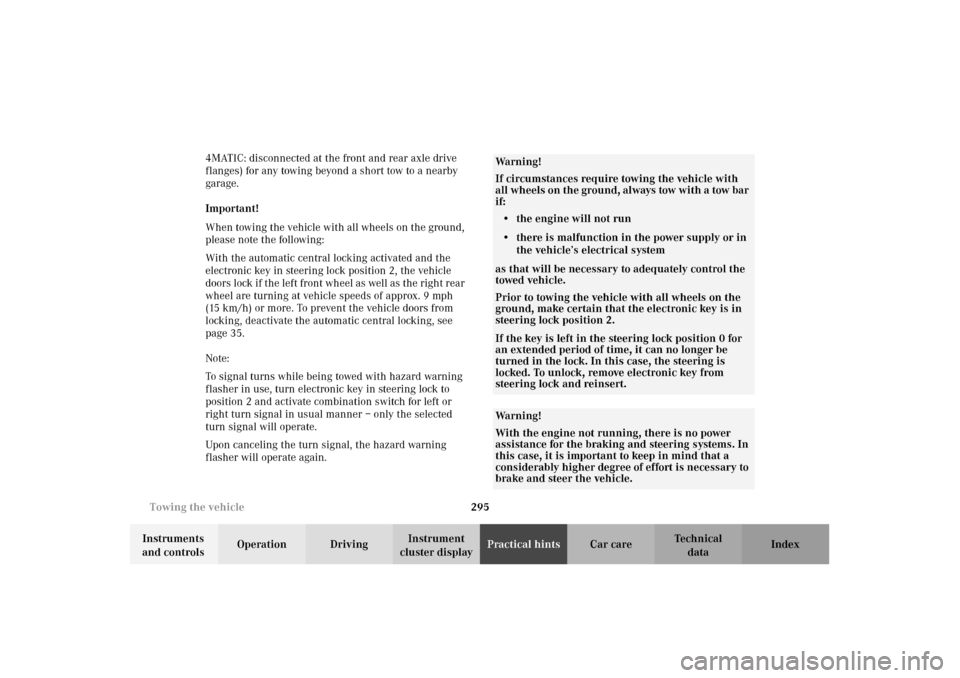
1Cover on right side of front bumper
To remove cover:
Press mark on cover in direction of arrow and lift cover
off to reveal threaded hole for towing eye bolt. The
towing eye bolt is supplied with the vehicle tools. Screw
towing eye bolt in to its stop and tighten with lug
wrench.
To reinstall cover:
Engage cover (1) at bottom and press in top securely.
The rear towing eye is located at the right, below the
bumper.Transmission selector lever, manually unlocking
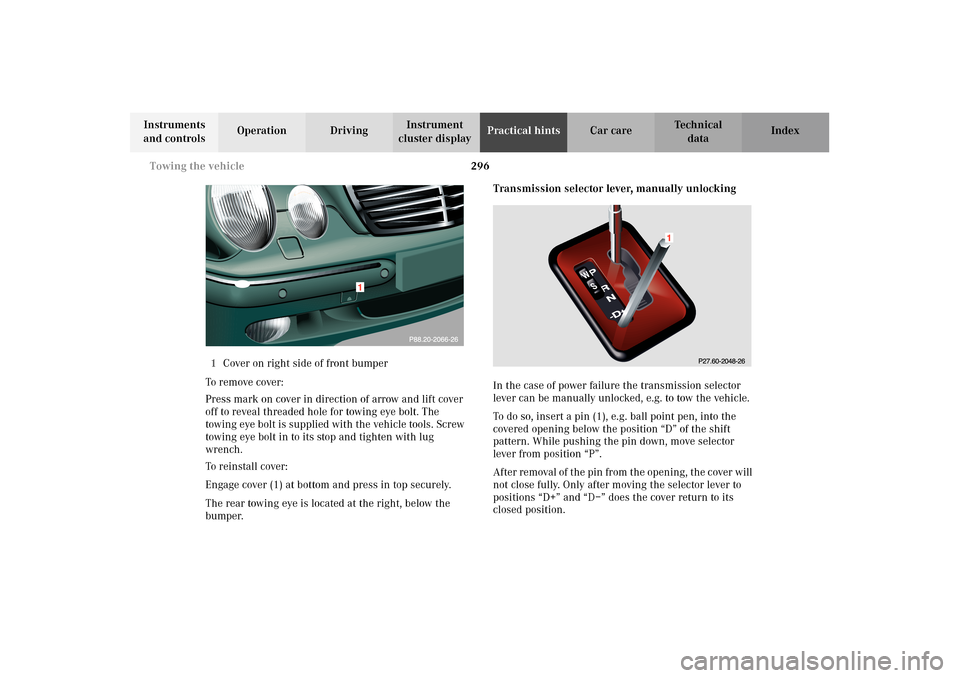
In the case of power failure the transmission selector
lever can be manually unlocked, e.g. to tow the vehicle.
To do so, insert a pin (1), e.g. ball point pen, into the
covered opening below the position “D” of the shift
pattern. While pushing the pin down, move selector
lever from position “P”.
After removal of the pin from the opening, the cover will
not close fully. Only after moving the selector lever to
positions “D+” and “D–” does the cover return to its
closed position.
Page 300 of 354

297 Exterior lamps
Te ch n i c a l
data Instruments
and controlsOperation DrivingInstrument
cluster displayPractical hintsCar care Index Exterior lamps
Replacing bulbs
Correct headlamp adjustment is extremely important.
Have headlamps checked and readjusted at regular
intervals and when a bulb has been replaced. See your
authorized Mercedes-Benz Center for headlamp
adjustment. Notes:
To prevent a possible electrical short circuit, switch off
lamp prior to replacing a bulb.
When replacing bulbs, install only 12 volt bulbs with
the specified watt rating.
When replacing halogen bulbs do not touch glass
portion of bulb with bare hands. Use plain paper or a
clean cloth.
Wa r n i n g !
Bulbs and bulb holder can be very hot. Allow the
lamp to cool down before changing a bulb.
Halogen lamps contain pressurized gas. A bulb can
explode if you:
• touch or move it when hot,
•drop the bulb,
•scratch the bulb.Wear eye and hand protection.
Wa r n i n g !
Because of high voltage in Xenon lamps, it is
dangerous to replace the bulb or repair the lamp
and its components. We recommend that you have
such work done by a qualified technician.
Page 301 of 354
298 Exterior lamps
Te ch n i c a l
data Instruments
and controlsOperation DrivingInstrument
cluster displayPractical hintsCar care Index
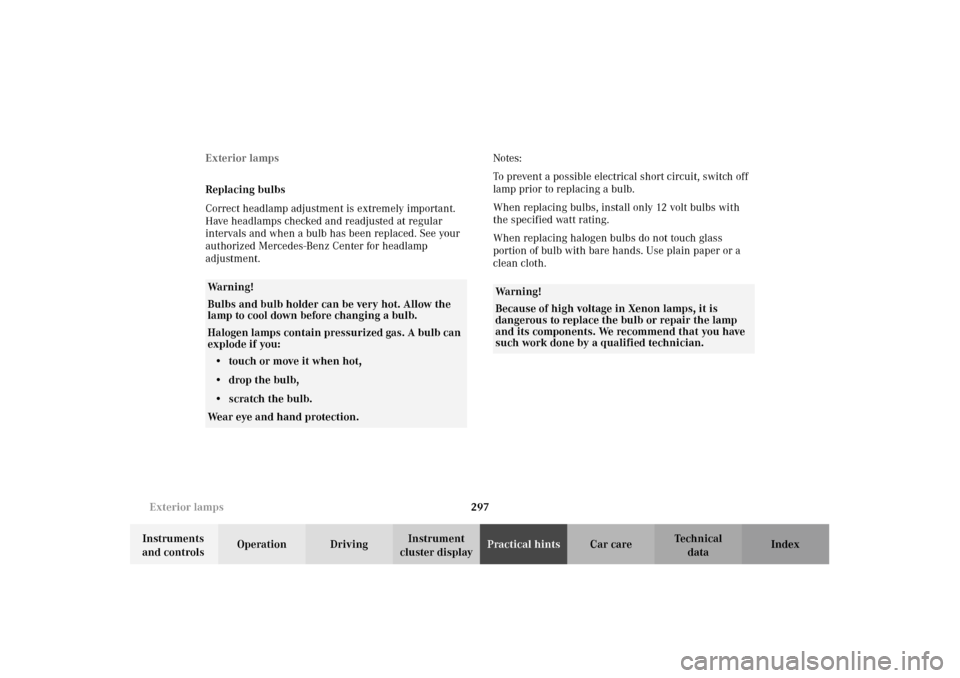
Headlamp assembly
1Headlamp cover for low beam headlamp
2Headlamp cover for high beam headlamp, parking
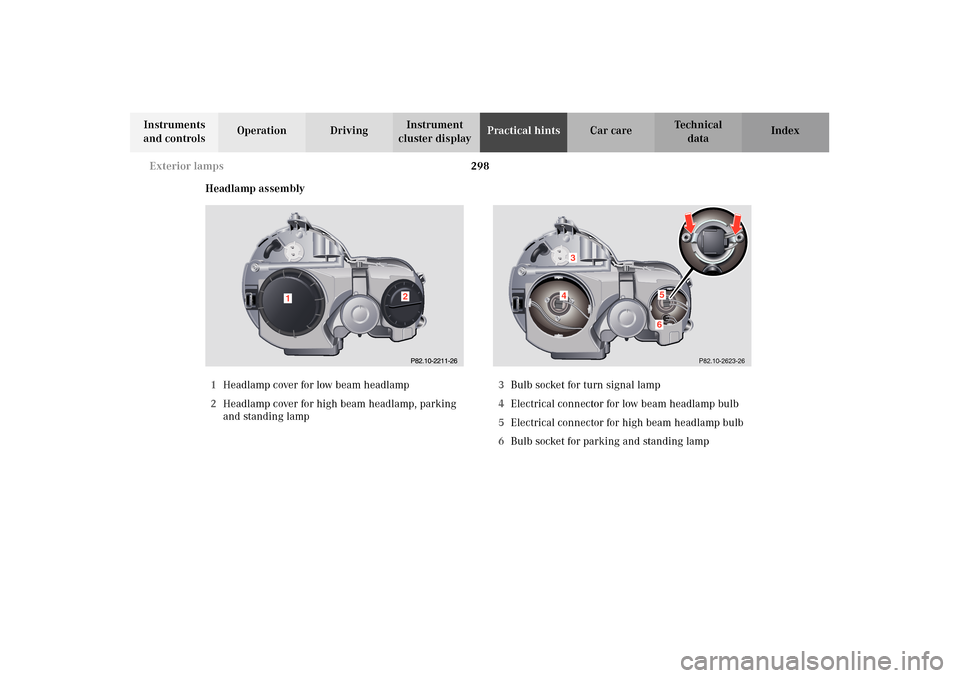
and standing lamp3Bulb socket for turn signal lamp
4Electrical connector for low beam headlamp bulb
5Electrical connector for high beam headlamp bulb
6Bulb socket for parking and standing lamp
1
2
P82.10-2623-26
143
1156
Page 302 of 354

299 Exterior lamps
Te ch n i c a l
data Instruments
and controlsOperation DrivingInstrument
cluster displayPractical hintsCar care Index Bulbs for low beam
H7 (55 W)
Open hood.
Twist cover (1) counterclockwise and remove.
Pull off electrical connector (4).
Twist bulb holder counterclockwise and remove bulb
from it.
Insert the new bulb so that the base locates in the
recess on the holder.
Install bulb holder and twist clockwise to its stop, and
reinstall electrical connector.
Reinstall cover (1), twist it clockwise until seated
securely.
Xenon (optional)
Bulb for low beamBulbs for high beam
H7 (55 W)
Open hood.
Twist cover (2) counterclockwise and remove.
Pull off electrical connector.
Twist bulb holder counterclockwise and remove bulb
from it.
Insert the new bulb so that its base fits in recess of the
holder.
Install bulb holder and twist clockwise to its stop, and
reinstall electrical connector.Ensure that base is
secured on both sides (arrows)
Reinstall cover (2), twist it clockwise until seated
securely.
Wa r n i n g !
Do not remove the cover for the Xenon headlamp.
Because of high voltage in Xenon lamps, it is
dangerous to replace the bulb or repair the lamp
and its components. We recommend that you have
such work done by a qualified technician.
Page 303 of 354
300 Exterior lamps
Te ch n i c a l
data Instruments
and controlsOperation DrivingInstrument
cluster displayPractical hintsCar care Index
Turn signal lamp
1156 NA (26.9 / 5 W / 32 / 4 cp bulb)
Open hood.
Twist bulb socket (3) counterclockwise and pull out.
Push bulb into socket, turn counterclockwise and
remove.
Insert new bulb in socket, push in and twist clockwise.
Reinstall bulb socket. Reinstall lamp assembly until
properly seated.Parking and standing lamp
H 6W (6 W bulb)
Open hood.
Twist cover (2) counterclockwise and remove.
Pull off electrical connector (6).
Twist bulb socket (6) counterclockwise and pull out.
Push bulb into socket, turn counterclockwise and
remove.
Insert new bulb in socket, push in and twist clockwise.
Reinstall bulb socket. Reinstall lamp assembly until
properly seated.
Page 304 of 354
301 Exterior lamps
Te ch n i c a l
data Instruments
and controlsOperation DrivingInstrument
cluster displayPractical hintsCar care Index Taillamp assemblies
1Turn signal lamp (21 W / 24 cp bulb)
2Stop, tail, parking and side marker lamp
(21 / 4 W bulb)3Backup lamp (21 W / 32 cp bulb)
4Driver’s side:
Rear fog lamp (21 W / 32 cp bulb)
12
34
P82.10-2620-26
12
P82.10-2621-26