Page 282 of 399

282 OperationVehicle careEngine cleaning
Prior to cleaning the engine compartment,
make sure to protect electrical compo-
nents and connectors from contact with
water and cleaning agents.
Corrosion protection, such as MB Anticor-
rosion Wax should be applied to the engine
compartment after every engine cleaning.
Before applying, all control linkage bush-
ings and joints should be lubricated. The
poly-V-belt and all pulleys should be pro-
tected from any wax.
Vehicle washing
Do not use hot water or wash your vehicle
in direct sunlight. Use only a mild car wash
detergent, such as Mercedes-Benz ap-
proved Car Shampoo.
Thoroughly spray the vehicle with a dif-
fused jet of water. Direct only a very weak
spray towards the ventilation intake. Use
plenty of water and rinse the sponge and
chamois frequently. Rinse with clear water and thoroughly wipe
dry with a chamois. Do not allow cleaning
agents to dry on the finish.
Due to the width of the vehicle, fold in out-
side mirrors prior to running the vehicle
through an automatic car wash to prevent
damage to the mirrors.
In the winter, thoroughly remove all traces
of road salt as soon as possible.
When washing the undercarriage, do not
forget to clean the inner sides of the
wheels.Ornamental moldings
For regular cleaning and care of very dirty
chrome-plated parts, use a chrome clean-
er.
Headlamps, tail lamps, turn signal
lenses
Use a mild car wash detergent, such as
Mercedes-Benz approved Car Shampoo,
with plenty of water.
To prevent scratches, never apply strong
force and use only a soft, non-scratchy
cloth when cleaning the lenses. Do not at-
tempt to wipe dirty lenses with a dry cloth
or sponge.
iVehicles with KEYLESS-GO*:
If a door handle is hit by a strong jet of
water, and a SmartKey with KEY-
LESS-GO* is in close proximity, i.e.
within approx. 3 ft. (approx. 1 m), the
vehicle could be inadvertently locked
or unlocked.
ProCarManuals.com
Page 301 of 399

301 Practical hints
What to do if …
P
Gear selector lever in P
You have turned off the engine with the
KEYLESS-GO* start/stop button* and
opened the driver’s door.
�
Place the selector lever in position P.
Cruise control
Visit workshop!
Cruise control or Distronic* is malfunction-
ing.
�
Have the cruise control or Distronic*
checked by an authorized
Mercedes-Benz Center.
1
Restraint system
malfunction
Visit workshop!
The system is malfunctioning.
�
Drive with added caution to the near-
est authorized Mercedes-Benz Cen-
ter.
@
Vehicle rising!
Your vehicle is adjusting to your level selec-
tion.
Level selec. canceled
The "Raised" level setting is canceled at ve-
hicle speeds of over 75 mph (120 km/h).
�
Reactivate the "Raised" level setting.
Display
Possible cause
Suggested solution
Warning!
G
In the event a malfunction of the SRS is indi-
cated as outlined above, the SRS may not be
operational. For your safety, we strongly
recommend that you visit an authorized
Mercedes-Benz Center immediately to have
the system checked; otherwise the
SRS may not be activated when needed in
an accident, which could result in serious or
fatal injury, or it might deploy unexpectedly
and unnecessarily which could also result in
injury.
ProCarManuals.com
Page 309 of 399
309 Practical hints
What to do if …
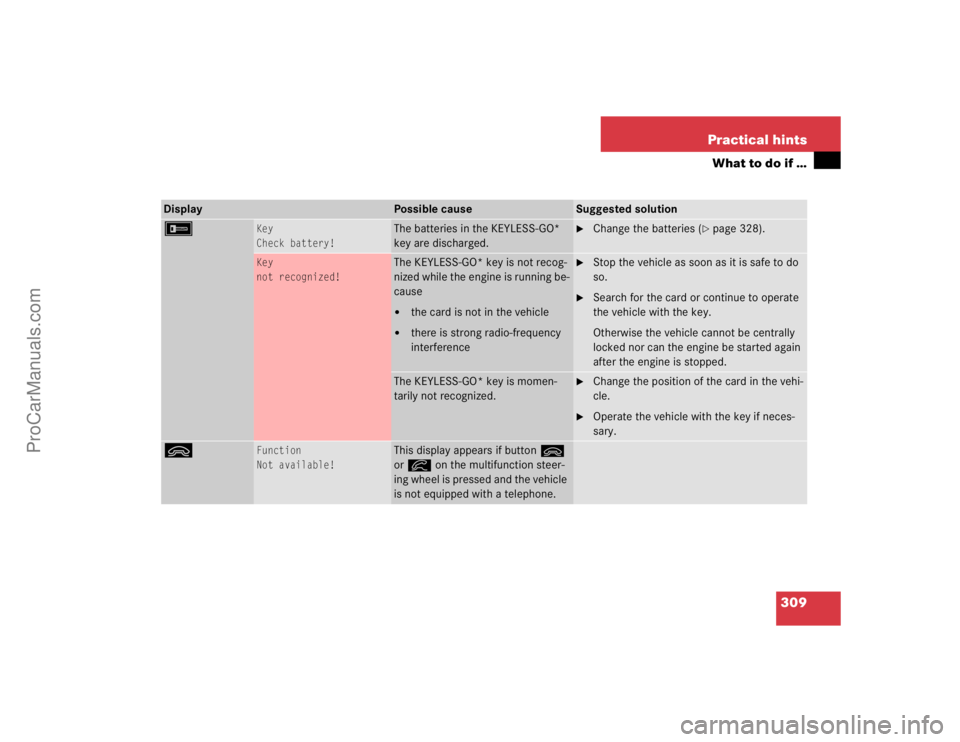
Display
Possible cause
Suggested solution
F
Key
Check battery!
The batteries in the KEYLESS-GO*
key are discharged.
�
Change the batteries (
�page 328).
Key
not recognized!
The KEYLESS-GO* key is not recog-
nized while the engine is running be-
cause�
the card is not in the vehicle
�
there is strong radio-frequency
interference
�
Stop the vehicle as soon as it is safe to do
so.
�
Search for the card or continue to operate
the vehicle with the key.
Otherwise the vehicle cannot be centrally
locked nor can the engine be started again
after the engine is stopped.
The KEYLESS-GO* key is momen-
tarily not recognized.
�
Change the position of the card in the vehi-
cle.
�
Operate the vehicle with the key if neces-
sary.
ì
Function
Not available!
This display appears if button ì
or í on the multifunction steer-
ing wheel is pressed and the vehicle
is not equipped with a telephone.
ProCarManuals.com
Page 310 of 399

310 Practical hintsWhat to do if …F
Key recognized
in vehicle!
A KEYLESS-GO* key left in the vehi-
cle was recognized while locking the
vehicle from the outside.
�
Take the key out of the vehicle.
Key
Visit workshop!
The KEYLESS-GO* system is mal-
functioning.
�
Visit an authorized Mercedes-Benz Center
as soon as possible.
Key
do not forget key
This display appears (for a maximum
of 60 seconds) if the driver’s door is
opened with the engine shut off and
no key in the starter switch.
This message is only a reminder.
�
Insert key in the starter switch.
_
Entry position
Do not drive!
Seat, mirrors and steering wheel
have not yet moved to their preset
driving positions.
�
Wait until the seat, mirrors and steering
wheel have moved to their driving positions.
The message disappears.
Except Canada:;Canada only:!
Release park. brake!
You are driving with the parking
brake set.
�
Release the parking brake (
�page 45).
<
Visit workshop!
The seat belt system is malfunction-
ing.
�
Visit an authorized Mercedes-Benz Center
as soon as possible.
Ê
Trunk open!
This message will appear whenever
the trunk lid is open.
�
Close the trunk lid.
Display
Possible cause
Suggested solution
ProCarManuals.com
Page 313 of 399
.
Y
Hoo")
313 Practical hints
What to do if …
Display
Possible cause
Suggested solution
A
Reserve fuel
The fuel level has dropped below the
reserve mark.
�
Refuel at the next gas station (
�page 259).
Y
Hood open!
You are driving with the hood open.
�
Close the hood (
�page 261).
I
Remove key
!
You have forgotten to remove the
key.
�
Remove the key from the starter switch.
Replace key
There is no additional code available
for SmartKey or SmartKey with
KEYLESS-GO*.
�
Visit an authorized Mercedes-Benz Center
as soon as possible.
.
Lamp sensor
Visit workshop!
The lamp sensor is malfunctioning.
The headlamps switch on automati-
cally.
�
In the control system, set lamp operation to
manual mode (
�page 130).
�
Switch on headlamps using the exterior
lamp switch.
Low beam, left
The left low beam lamp is malfunc-
tioning.
�
Visit an authorized Mercedes-Benz Center
as soon as possible.
Low beam, right
The right low beam lamp is malfunc-
tioning.
�
Visit an authorized Mercedes-Benz Center
as soon as possible.
ProCarManuals.com
Page 344 of 399
.
�
Disconnect battery negative le")
344 Practical hintsBatteries
Disconnecting the battery�
Depress the parking brake firmly or
move the gear selector lever to
positionP.
�
Open the trunk (
�page 261).
�
Disconnect battery negative lead1.
�
Remove cover2 from the positive ter-
minal.
�
Disconnect the battery positive lead.
Removing the battery�
Remove the screw-nuts securing the
battery.
�
Remove the battery bracket.
�
Take out the battery.
Charging and reinstalling the battery�
Charge battery in accordance with the
instructions of the battery charger
manufacturer.
�
Reinstall the charged battery. Follow
the previously described steps in re-
verse order.
!Never loosen or detach battery termi-
nal clamps while the engine is running
or the key is in the starter switch. Oth-
erwise the alternator and other elec-
tronic components could be severely
damaged.
Have the battery checked regularly by
an authorized Mercedes-Benz Center.
Contact your authorized
Mercedes-Benz Center for further infor-
mation.Warning!
G
Do not place metal objects on the battery as
this could result in a short circuit.
Use leak-proof battery only to avoid the risk
of acid burns in the event of an accident.
Warning!
G
With a disconnected battery�
the brake boosting effect is not avail-
able.
You need more power to brake and
brake pedal travel is increased. If neces-
sary, you must depress the brake pedal
with full power.
�
you can no longer turn the ignition key
or, in cars with KEYLESS-GO*, pressing
the KEY-LESS-GO button* on the gear
selector lever has no effect.
�
the gear selector lever is locked in
position P.
ProCarManuals.com
Page 350 of 399

350 Practical hintsTowing the vehicle
Installing towing eye bolt
Front of vehicle
1Cover on right side of front bumperTo remove cover:
�
Press mark on cover in direction of ar-
row.
�
Lift cover off to reveal threaded hole for
towing eye bolt.
The towing eye bolt is supplied with the
tool kit (located in the storage compart-
ment under the trunk floor).
�
Screw towing eye bolt in to its stop and
tighten with lug wrench.
To reinstall cover:
�
Fit cover and snap into place.
!When towing the vehicle with all wheels
on the ground, please note the follow-
ing:
With the automatic central locking acti-
vated and the key in starter switch
position2, or KEYLESS-GO* start/stop
button (if so equipped) in position2,
the vehicle doors lock if the left front
wheel as well as the right rear wheel
are turning at vehicle speeds of approx.
9 mph (15 km / h) or more.
To prevent the vehicle door locks from
locking, deactivate the automatic cen-
tral locking (
�page 99).
Towing of the vehicle should only be
done using the properly installed tow-
ing eye bolt. Never attach tow cable,
tow rope or tow rod to the vehicle chas-
sis, frame or suspension parts.
iThe selector lever will remain locked in
positionP and the key will not turn in
the starter switch if the battery is dis-
connected or discharged. See notes on
the battery (
�page 343) or on jump
starting (
�page 346).
ProCarManuals.com
Page 381 of 399

381 Index
A
ABS 73, 375
Malfunction indicator lamp 289
Messages in display 296
Warning lamp 289
Accelerator position, automatic
transmission 156
Accident
In case of 49
Activating
Air conditioning (cooling) 170, 181
Air recirculation mode 168, 178
Anti-theft alarm system 82
Automatic climate control 174
Central locking (control system) 142
Charcoal filter 180
Climate control 164
Defrost 167
Distance warning function* 206
Distronic* 202
Easy-entry/exit feature* 143
ESP 77
Exterior headlamps 46
Exterior lamps 113
Hazard warning flasher 115
Headlamps 46High beams 115
Ignition 31
Ignition with KEYLESS-GO* start/stop
button 33
Immobilizer 52, 81
Rear fog lamp 113
Rear window defroster 169, 180
Residual heat 171, 182
Tow-away alarm 83
Windshield wipers 47
Adjustable air outlets, rear passenger
compartment 182
Adjusting 34
Air distribution 166, 177
Air volume 166, 177
Backrest tilt 36
Exterior rear view mirror 39
Head restraint height 36
Head restraint tilt 36
Inside rear view mirror 38
Instrument cluster illumination 118
Mirrors 38
Multicontour seat* 104
Seat cushion depth 105
Seat cushion tilt 36
Seat fore and aft adjustment 35Seat height 35
Seats 34
Steering column height 38
Steering column length 38
Steering wheel 37
Air conditioner (cooling)
Turning off 170, 181
Turning on 170, 181
Air distribution
Adjusting 166, 177
Air outlets, rear passenger compartment
Adjustable 182
Air recirculation mode 167, 178
Activating 168, 178
Deactivating 168, 179
Air volume
Adjusting 166, 177
Airbags 57
BabySmart
TM airbag deactivation
system 67, 375
Children 58
Front 60
Passenger 60
Safety guidelines 59
Side impact 61
Window curtain 61
ProCarManuals.com