Page 23 of 399

warning lamp
288
3
Speedometer
4
Multifunction display
with:Basic display with")
23 At a glance
Instrument cluster
Item
Page
1
LLeft turn signal indi-
cator lamp
2
vElectronic Stability
Program (ESP)
warning lamp
288
3
Speedometer
4
Multifunction display
with:Basic display with outside
temperature display
126
Status indicator with mal-
function warning messageTrip odometer
119
5
lDistance warning
lamp
1
1Vehicles without Distronic*: Warning lamp without
function. It illuminates with key in starter switch
position 2. It should go out when the engine is run-
ning.
289
6
KRight turn signal in-
dicator lamp
Item
Page
7
Coolant temperature dis-
play with:•Coolant tempera-
ture warning lamp
292
8
Tachometer with:1Supplemental
restraint system
indicator lamp
290
-Antilock Brake Sys-
tem (ABS) malfunc-
tion indicator lamp
289
warning lamp
293
AHigh beam head-
lamp indicator
115
9
Main odometer with:�
Selector lever position
43
�
Program mode
155
Item
Page
10
Clock with:;Brake warning
lamp, except
Canada
291
3Brake warning
lamp, Canada only
291
?Engine malfunction
indicator lamp
293
11
Fuel display with:AFuel reserve warn-
ing lamp
293
12
Reset knob for:�
Resetting trip
odometer
119
�
Adjusting instrument
cluster illumination
118
�
Confirming new time
settings
136
ProCarManuals.com
Page 45 of 399
.
If the engine does not start after several
starting attempts, there could be a mal-
function in the engine electronics or in the
fuel supp")
45 Getting started
Driving
�
Get a jump start (
�page 346).
If the engine does not start after several
starting attempts, there could be a mal-
function in the engine electronics or in the
fuel supply system.
�
Notify an authorized Mercedes-Benz
Center.
Parking brake
1Parking brake pedal
2Parking brake release handle
�
Release the parking brake by pulling on
handle2.
The indicator lamp ; (USA only) or
3 (Canada only) in the clock goes
out.
Driving
�
Depress the brake pedal.
�
Move selector lever to positionDorR.
�
Release the brake pedal.
�
Carefully depress the accelerator
pedal.
Once the vehicle is in motion, the automat-
ic central locking system engages and the
locking knobs drop down.
Warning!
G
When leaving the vehicle always remove the
key from the starter switch, take the Smart-
Key with KEYLESS-GO* (if so equipped) with
you and lock the vehicle. Do not leave chil-
dren unattended in the vehicle, or with ac-
cess to an unlocked vehicle. Children could
release the parking brake, which could re-
sult in an accident or serious injury.
iWait for the gear selection process to
complete before setting the vehicle in
motion.iYou can open a locked door from the
inside. Open door only when conditions
are safe to do so.!If you hear a warning signal when driv-
ing off, you have forgotten to release
the parking brake.
Release the parking brake.
ProCarManuals.com
Page 118 of 399
.
The instru")
118 Controls in detailInstrument cluster
Instrument clusterA full view illustration of the instrument
cluster can be found in the "At a glance"
section of this manual (
�page 22).
The instrument cluster is activated when
you
�
open a door
�
turn on the ignition
�
press the reset knob (
�page 22)
�
switch on the exterior lamps
You can change the instrument cluster set-
tings in the instrument cluster submenu of
the control system (
�page 134).
Instrument cluster illumination
Use the reset knob (
�page 22) to adjust
the illumination brightness for the instru-
ment cluster.To brighten illumination
�
Turn the reset knob in the instrument
cluster clockwise (
�page 22).
The instrument cluster illumination will
brighten.
To dim illumination
�
Turn the reset knob in the instrument
cluster counterclockwise (
�page 22).
The instrument cluster illumination will
dim.
iThe instrument cluster illumination is
dimmed or brightened automatically to
suit ambient light conditions.
The instrument cluster illumination will
also be adjusted automatically when
you switch on the vehicle’s exterior
lamps.
ProCarManuals.com
Page 137 of 399
137 Controls in detail
Control system
Set time (hours)�
Move the selection marker with
theæ orç button to the Time/Date
submenu.
�
Press buttonj ork repeatedly
until you see this message in the dis-
play:
Clock, hours
.
The selection marker is on the hour set-
ting.
�
Pressæ orç to set the hour.
�
Confirm by pressing reset knob.Set time (minutes)
�
Move the selection marker with
theæ orç button to the Time/Date
submenu.
�
Press buttonj ork repeatedly
until you see this message in the dis-
play:
Clock, minutes
.
The selection marker is on the minute
setting.
�
Pressæ orç to set the minutes.
�
Confirm by pressing reset knob.Set date (month)
�
Move the selection marker with
theæ orç button to the Time/Date
submenu.
�
Press buttonj ork repeatedly
until you see this message in the dis-
play:
Set date month
.
The selection marker is on the month
setting.
�
Pressæ orç to set the month.
ProCarManuals.com
Page 324 of 399
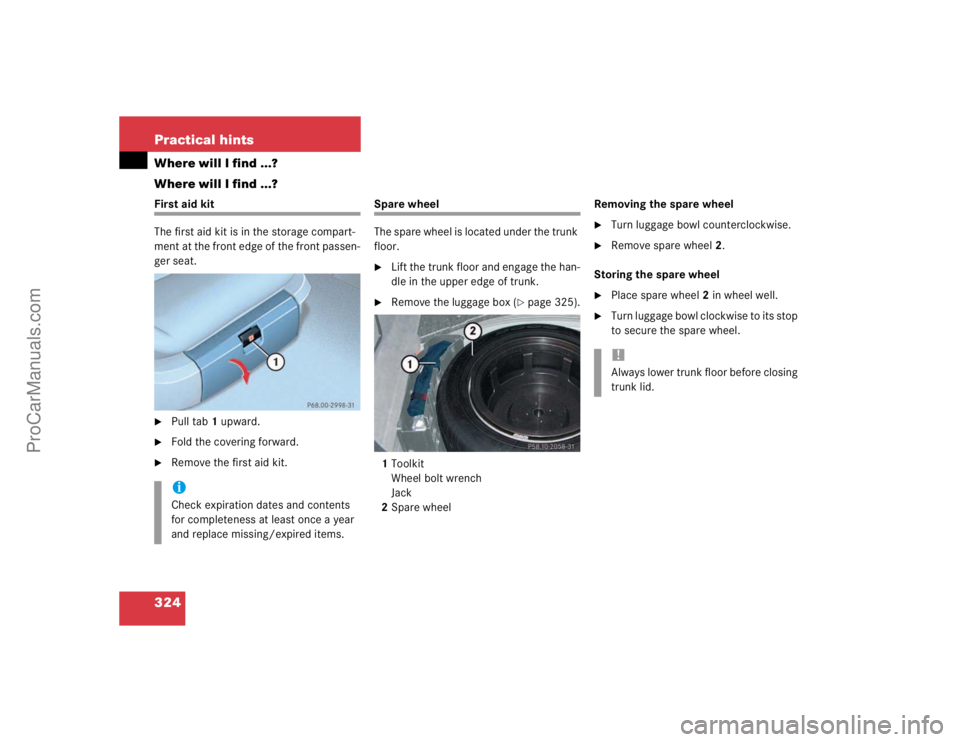
324 Practical hintsWhere will I find ...?
Where will I find ...?First aid kit
The first aid kit is in the storage compart-
ment at the front edge of the front passen-
ger seat.�
Pull tab1 upward.
�
Fold the covering forward.
�
Remove the first aid kit.
Spare wheel
The spare wheel is located under the trunk
floor.�
Lift the trunk floor and engage the han-
dle in the upper edge of trunk.
�
Remove the luggage box (
�page 325).
1Toolkit
Wheel bolt wrench
Jack
2Spare wheelRemoving the spare wheel
�
Turn luggage bowl counterclockwise.
�
Remove spare wheel2.
Storing the spare wheel
�
Place spare wheel2 in wheel well.
�
Turn luggage bowl clockwise to its stop
to secure the spare wheel.
iCheck expiration dates and contents
for completeness at least once a year
and replace missing/expired items.
!Always lower trunk floor before closing
trunk lid.
ProCarManuals.com
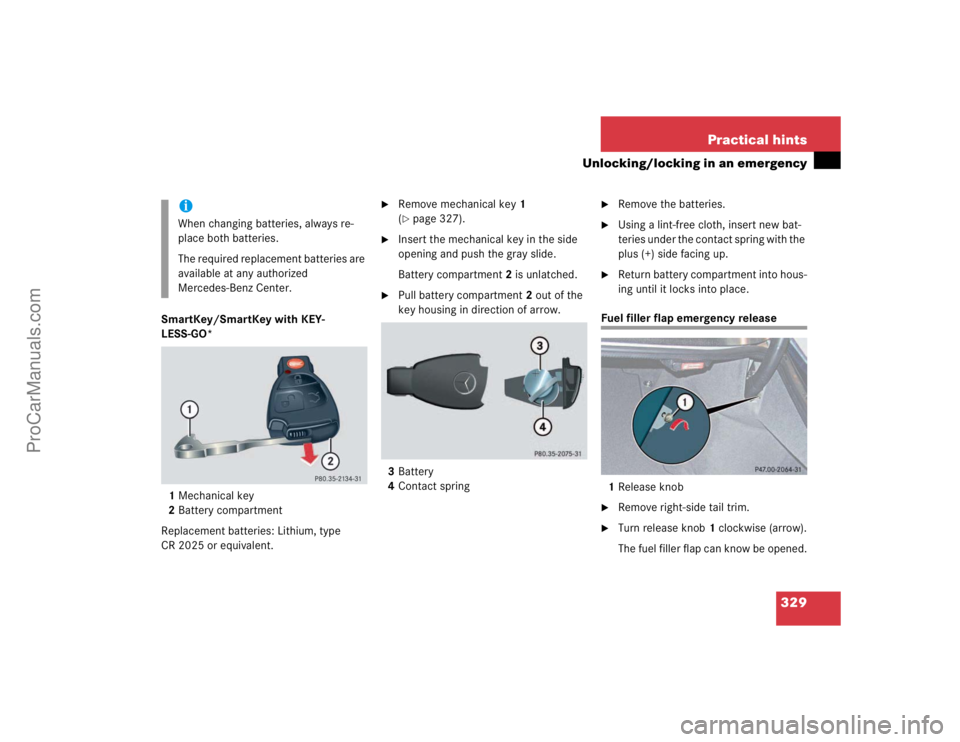
Page 329 of 399
329 Practical hints
Unlocking/locking in an emergency
SmartKey/SmartKey with KEY-
LESS-GO*
1Mechanical key
2Battery compartment
Replacement batteries: Lithium, type
CR 2025 or equivalent.
�
Remove mechanical key1
(�page 327).
�
Insert the mechanical key in the side
opening and push the gray slide.
Battery compartment2 is unlatched.
�
Pull battery compartment2 out of the
key housing in direction of arrow.
3Battery
4Contact spring
�
Remove the batteries.
�
Using a lint-free cloth, insert new bat-
teries under the contact spring with the
plus (+) side facing up.
�
Return battery compartment into hous-
ing until it locks into place.
Fuel filler flap emergency release
1Release knob�
Remove right-side tail trim.
�
Turn release knob1 clockwise (arrow).
The fuel filler flap can know be opened.
iWhen changing batteries, always re-
place both batteries.
The required replacement batteries are
available at any authorized
Mercedes-Benz Center.
ProCarManuals.com
Page 331 of 399
331 Practical hints
Opening/closing in an emergency
Opening/closing in an emergency
Sliding/pop-up roof* or panorama sliding/pop-up roof*
You can open or close the sliding/pop-up
roof manually should an electrical malfunc-
tion occur.
The sliding/pop-up roof drive is located
behind lens1 of the interior overhead
light.
1Screen�
Fold screen1 down.
�
Obtain crank2.
�
Insert crank2 through hole1.
�
Turn crank2 clockwise to:�
Slide roof closed
�
Raise roof at the rear
�
Turn crank2 counterclockwise to:�
slide roof open
�
lower roof at the rearThe sliding/pop-up roof must be resyn-
chronized after being operated manually
(
�page 189).
iDo not disconnect the electrical con-
nectors.
ProCarManuals.com
Page 334 of 399

334 Practical hintsReplacing bulbsReplacing bulbs for front lamps
1Bulb socket for turn signal lamp
2High beam bulb
3Bulb socket for parking and standing
lamp
High beam bulb (Halogen headlamps
only)�
Switch off the lights.
�
Open the hood (
�page 261).
�
Press the clamp and remove headlamp
cover.
�
Pull electrical connector off.
�
Turn the locking mechanism counter-
clockwise and take out the high beam
bulb2.
�
Insert the new high beam bulb so that
the base is in the recess of the holder.
�
Turn the locking mechanism clockwise.
�
Plug the connector onto the high beam
bulb.
�
Align headlamp cover and click into
place.
High beam bulb (Bi-Xenon* headlamps
only)
�
Switch off the lights.
�
Open the hood (
�page 261).
�
Press the clamp and remove headlamp
cover.
�
Pull electrical connector off.
�
Turn the locking mechanism counter-
clockwise and take out the high beam
bulb2.
�
Insert the new high beam bulb so that
the base is in the recess of the holder.
�
Turn the locking mechanism clockwise.
�
Plug the connector onto the high beam
bulb.
�
Align headlamp cover and click into
place.
Warning!
G
Because of high voltage in Bi-Xenon lamps,
it is dangerous to replace the bulb or repair
the lamp and its components. We recom-
mend that you have such work done by a
qualified technician.
ProCarManuals.com