Page 82 of 399

82 Safety and SecurityAnti-theft systemsAnti-theft alarm system
Once the alarm system has been armed, a
visual and audible alarm is triggered when
someone opens�
a door
�
the trunk
�
the hood.
The alarm system will also be triggered
when
�
someone attempts to raise the vehicle
�
the vehicle is opened with the mechan-
ical keyArming the alarm system
The alarm system is armed within approx.
10 seconds after locking the vehicle. The
indicator lamp in the button for the
tow-away alarm will then blink.
Disarming the alarm system
The alarm system is disarmed when you
unlock your vehicle with the remote con-
trol or KEYLESS-GO*.
Canceling the alarm
With the key
�
Insert the key in the starter switch.
or
�
Press the Œ or ‹ button on the
key.With KEYLESS-GO*
�
Grasp the outside door handle.
or
�
Press the KEYLESS-GO* start/stop
button.
Tow-away alarm
Once the tow-away alarm is armed, a visual
and audible alarm will be triggered when
someone attempts to raise the vehicle.
iIf the alarm stays on for more than
20 seconds, an emergency call is initi-
ated automatically by the Tele Aid sys-
tem* (
�page 234), provided that the
Tele Aid service was subscribed to and
properly activated.
iThe tow-away protection alarm is trig-
gered, for example, if the vehicle is lift-
ed on one side.
If the alarm stays on for more than
20 seconds, an emergency call is initi-
ated automatically by the Tele Aid sys-
tem* (
�page 234), provided that the
Tele Aid service was subscribed to and
properly activated, and that necessary
cellular service and GPS coverage are
available.
ProCarManuals.com
Page 83 of 399

83 Safety and Security
Anti-theft systems
Arming the tow-away alarm
When you lock your vehicle, the tow-away
alarm is automatically armed after about
30 seconds.
When you unlock your vehicle, the
tow-away protection disarms automatical-
ly.
Disarming the tow-away alarm
To prevent triggering the tow-away alarm
feature, switch off the tow-away alarm be-
fore towing the vehicle, or when parking on
a surface subject to movement, such as a
ferry or auto train.The button is located on the overhead con-
trol panel.
1Tow-away alarm off button
�
Turn off the ignition and remove the
key.
�
Press button1.
The indicator lamp in the button lights
up briefly.
�
Lock your vehicle with the key or (vehi-
cles with KEYLESS-GO*) the lock but-
ton at each door handle.
The tow-away alarm remains disarmed un-
til you lock your vehicle again.
Canceling the alarm
�
Insert the key in the starter switch.
or
�
Press the Œ or ‹ button on the
key.
iYou cannot disarm the tow-away alarm
if the ignition is turned on.
ProCarManuals.com
Page 109 of 399

109 Controls in detail
Memory function
Memory function
You can store up to three different settings
per key.
The following settings are saved for each
stored position:�
Driver’s seat and backrest position
�
Steering wheel position
�
Driver’s side exterior rear view mirror
position
�
Passenger side exterior rear view mir-
ror position
�
Front passenger seat position
These key-dependent memory settings
can be deactivated if desired
(
�page 110).
!Prior to operating the vehicle, the driv-
er should check and adjust the seat
height, seat position fore and aft, and
backrest angle if necessary, to ensure
adequate control, reach and comfort.
The head restraint should also be ad-
justed for proper height. Also see the
section on airbags (
�page 57) for
more information on proper seat posi-
tioning.
In addition, adjust the steering wheel to
ensure adequate control, reach, opera-
tion and comfort. Both the inside and
outside rear view mirrors should be ad-
justed for adequate rear vision.
Fasten seat belts. Infants and small
children should be seated in a properly
secured restraint system that complies
with U.S. Federal Motor Vehicle Safety
Standard 213 and Canadian Motor Ve-
hicle Safety Standard 213.
Warning!
G
Do not activate the memory function while
driving. Activating the memory function
while driving could cause the driver to lose
control of the vehicle.
ProCarManuals.com
Page 114 of 399

114 Controls in detailLightingDaytime running lamp mode�
Turn exterior lamp switch to
positionM orU.
When the engine is running, the low beam
headlamps are automatically switched on.
In low ambient light conditions the parking
lamps will also switch on.
Canada only
When you shift from a driving position to
positionN orP, the low beam switches off
(with a three-minute delay).
For nighttime driving you should turn the
exterior lamp switch to positionB to
permit activation of the high beam head-
lamps.
USA only
The high beam headlamps can also be ac-
tivated when driving with the daytime run-
ning lamp mode activated and exterior
lamp switch in positionM.To activate the daytime running lamp
mode, see "Setting daytime running lamp
mode" (
�page 139).
Locator lighting and night security illu-
mination
Locator lighting and night security illumi-
nation are described in the control system
section under "Setting locator lighting"
(
�page 139) and "Setting night security il-
lumination" (
�page 140).
Switching on front fog lamps
�
Check that the low beam headlamps
are switched on.
�
Pull out exterior lamp switch to first
stop.
The green indicator lamp‡ in the
lamp switch lights up.Switching on rear fog lamp
�
Check that the low beam headlamps
are switched on.
�
Pull out e xt eri or la m p swi tc h to s ec ond
stop.
The yellow indicator lamp† in the
lamp switch lights up.
iSee notes on the exterior lamp switch
(�page 112).
iFog lamps will operate with the parking
lamps and/or the low beam headlamps
on. Fog lamps should only be used in
conjunction with low beam headlamps.
Consult your State or Province Motor
Vehicle Regulations regarding allow-
able lamp operation.
ProCarManuals.com
Page 140 of 399

140 Controls in detailControl system
The selection marker is on the current
setting.
�
Pressæ orç to select the de-
sired setting.
�
Turn the exterior lamp switch to posi-
tion U.
The locator lighting will be switched on
or off.
Ambient light level
Using this function, you can adjust the
brightness of the ambient lighting.
�
Move the selection marker with the
æ orç button to the
Lighting
submenu.
�
Press button j ork, repeatedly
until you see the message
Ambient
light Level
in the display
.
The selection marker is on the current
setting.
�
Press æ orç to select the
brightness of the lighting.
1 represents
the darkest setting and
5 represents
the brightest setting.
The ambient light is switched off below
setting
1 or above setting
5. The selec-
tion marker points to
off
.Setting night security illumination (Exte-
rior lamps delayed switch-off)
Use the
Headlamps delayed shut-off
function to set whether and for how long
you would like the exterior lamps to illumi-
nate during darkness after all doors are
closed. When the delayed switch-off fea-
ture is activated, the following lamps will
remain lit after you remove the key from
the starter switch:
�
Parking lamps
�
Tail lamps
�
License plate lamps
�
Front fog lamps
The exterior lamp switch must be set to po-
sition U (
�page 112).
iYou can reactivate this function within
ten minutes by opening a door.
If you do not open a door after remov-
ing the key, the lamps will automatical-
ly switch off after 60 seconds.
ProCarManuals.com
Page 216 of 399
216 Controls in detailLoading
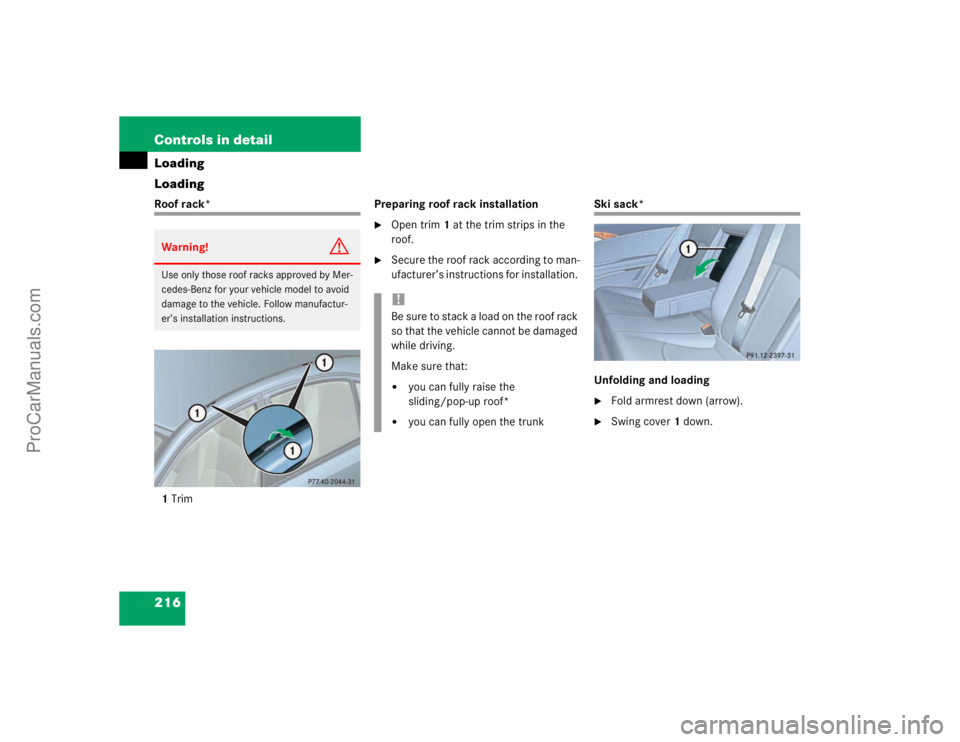
LoadingRoof rack*
1TrimPreparing roof rack installation
�
Open trim1 at the trim strips in the
roof.
�
Secure the roof rack according to man-
ufacturer’s instructions for installation.
Ski sack*
Unfolding and loading�
Fold armrest down (arrow).
�
Swing cover1 down.
Warning!
G
Use only those roof racks approved by Mer-
cedes-Benz for your vehicle model to avoid
damage to the vehicle. Follow manufactur-
er’s installation instructions.
!Be sure to stack a load on the roof rack
so that the vehicle cannot be damaged
while driving.
Make sure that:�
you can fully raise the
sliding/pop-up roof*
�
you can fully open the trunk
ProCarManuals.com
Page 217 of 399
217 Controls in detail
Loading
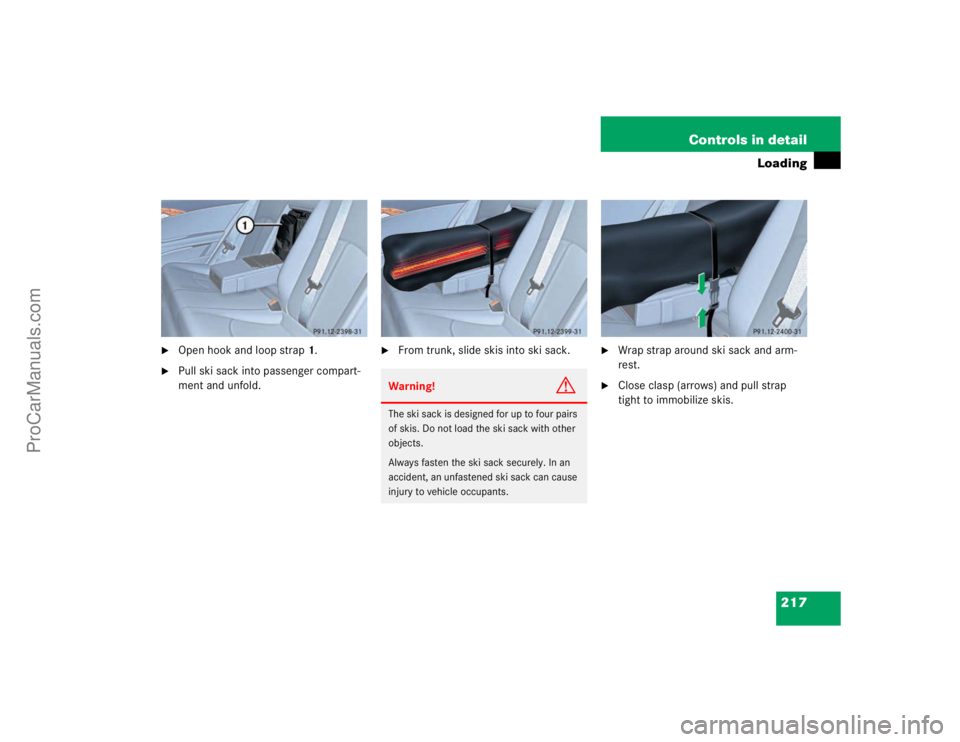
�
Open hook and loop strap1.
�
Pull ski sack into passenger compart-
ment and unfold.
�
From trunk, slide skis into ski sack.
�
Wrap strap around ski sack and arm-
rest.
�
Close clasp (arrows) and pull strap
tight to immobilize skis.
Warning!
G
The ski sack is designed for up to four pairs
of skis. Do not load the ski sack with other
objects.
Always fasten the ski sack securely. In an
accident, an unfastened ski sack can cause
injury to vehicle occupants.
ProCarManuals.com
Page 219 of 399

219 Controls in detail
Loading
Removal of ski sack
For removal of the ski sack we recommend
that you contact an authorized Mer-
cedes-Benz Center.
Split rear bench seat*
To expand the trunk, you can fold down the
left and right rear seat backrests.
The two sections can be folded down sep-
arately to enlarge the trunk.
When transporting long items, the folding
front passenger seat* can be folded for-
ward, and you can remove the rear seat
cushions.
Warning!
G
Never drive vehicle with trunk open while
the ski sack is removed. Deadly carbon
monoxide (CO) gases may enter vehicle in-
terior, resulting in unconsciousness and
death.iTo prevent unauthorized persons from
access to the trunk, always close the
cover.
Warning!
G
When expanding the luggage compartment,
always fold the seat cushions fully forward.
Unless you are transporting cargo, the back-
rests must remain properly locked in the up-
right position.
In an accident, during hard braking or sud-
den maneuvers, loose items will be thrown
around inside the vehicle, and cause injury
to vehicle occupants unless the items are
securely fastened in the vehicle.
Always use the cargo tie down rings
(�page 225).
ProCarManuals.com