Page 221 of 399
221 Controls in detail
Loading
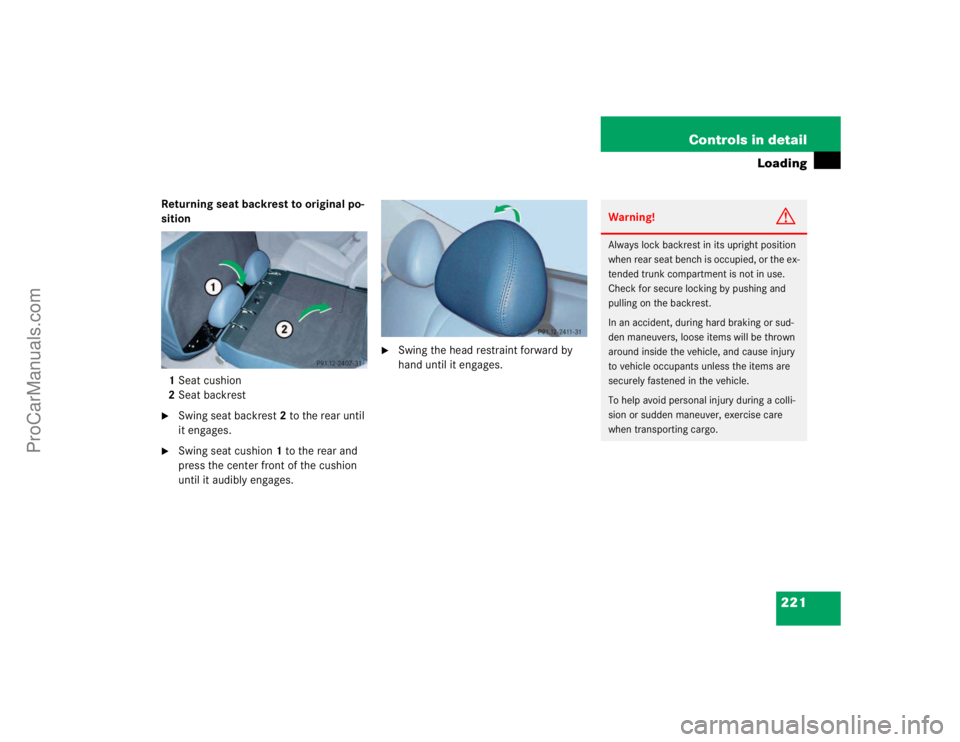
Returning seat backrest to original po-
sition
1Seat cushion
2Seat backrest�
Swing seat backrest2 to the rear until
it engages.
�
Swing seat cushion1 to the rear and
press the center front of the cushion
until it audibly engages.
�
Swing the head restraint forward by
hand until it engages.
Warning!
G
Always lock backrest in its upright position
when rear seat bench is occupied, or the ex-
tended trunk compartment is not in use.
Check for secure locking by pushing and
pulling on the backrest.
In an accident, during hard braking or sud-
den maneuvers, loose items will be thrown
around inside the vehicle, and cause injury
to vehicle occupants unless the items are
securely fastened in the vehicle.
To help avoid personal injury during a colli-
sion or sudden maneuver, exercise care
when transporting cargo.
ProCarManuals.com
Page 224 of 399

224 Controls in detailLoadingLoading instructions
The total load weight including vehicle oc-
cupants and luggage/cargo should not ex-
ceed the vehicle capacity weight indicated
on the certification tag which can be found
on the left door pillar.The handling characteristics of a fully load-
ed vehicle depend greatly on the load dis-
tribution. It is therefore recommended to
load the vehicle according to the illustra-
tions shown, with the heaviest items being
placed towards the front of the vehicle.
Always place items being carried against
front or rear seat backrests, and fasten
them as securely as possible.
The heaviest portion of the cargo should al-
ways be kept as low as possible since it in-
fluences the handling characteristics of
the vehicle.
Warning!
G
Always fasten items being carried as secure-
ly as possible.
In an accident, during hard braking or sud-
den maneuvers, loose items will be thrown
around inside the vehicle and can cause in-
jury to vehicle occupants unless the items
are securely fastened in the vehicle.
To help avoid personal injury during a colli-
sion or sudden maneuver, exercise care
when transporting cargo. Put luggage or car-
go in the trunk if possible. Do not pile lug-
gage or cargo higher than the seat backs.
Do not place anything on the shelf below the
rear windows.
Never drive vehicle with trunk open. Deadly
carbon monoxide (CO) gases may enter ve-
hicle interior resulting in unconsciousness
and death.
ProCarManuals.com
Page 225 of 399
225 Controls in detail
Loading
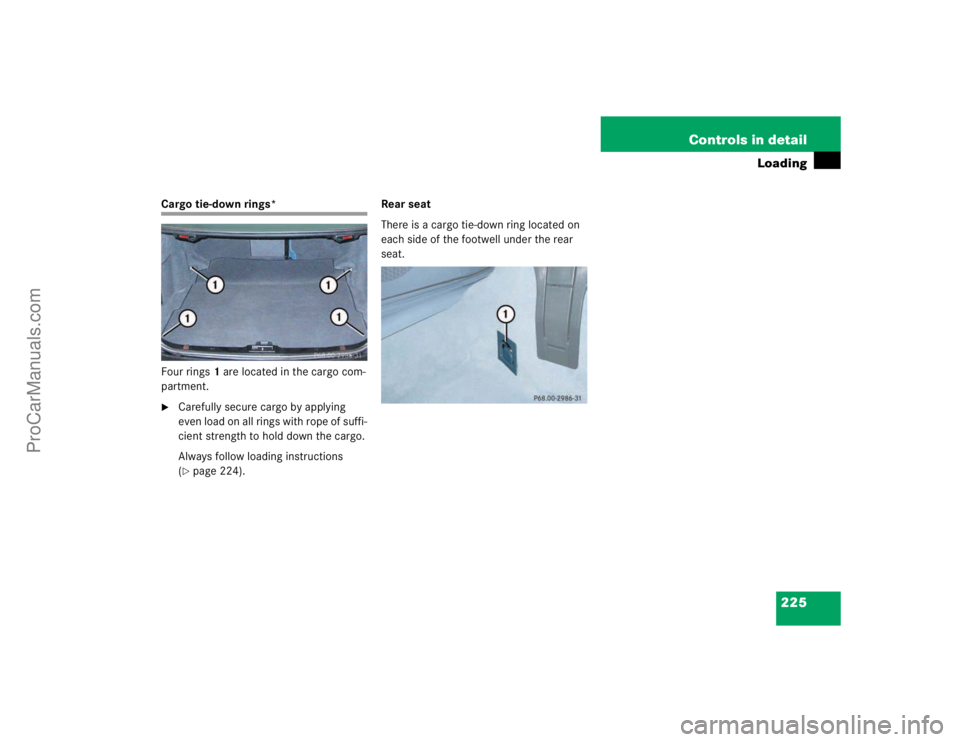
Cargo tie-down rings*
Four rings1 are located in the cargo com-
partment.�
Carefully secure cargo by applying
even load on all rings with rope of suffi-
cient strength to hold down the cargo.
Always follow loading instructions
(�page 224).Rear seat
There is a cargo tie-down ring located on
each side of the footwell under the rear
seat.
ProCarManuals.com
Page 226 of 399

226 Controls in detailUseful features
Useful featuresInterior storage spaces Parcel net in front passenger footwell
A small convenience parcel net is located
in the front passenger footwell. It is for
small and light items, such as road maps,
mail, etc.Glove box
1Glove box lid release
2Compartment for mobile phone/glass-
es
Opening the glove box
�
Push lid release1.
The glove box lid opens downward.
Closing the glove box
�
Push lid up to close.
Warning!
G
To help avoid personal injury during a colli-
sion or sudden maneuver, exercise care
when stowing objects in the vehicle. Put lug-
gage or cargo in the trunk if possible. Do not
pile luggage or cargo higher than the seat
backs. Do not place anything on the shelf
below the rear window.
Luggage nets cannot secure hard or heavy
objects.
Keep compartment lids closed. This will help
to prevent stored objects from being thrown
about and injuring vehicle occupants during
an accident.
Warning!
G
The parcel net is intended for storing
light-weight items only.
Heavy objects, objects with sharp edges or
fragile objects may not be transported in the
parcel net.
The parcel net cannot protect transported
goods in the event of an accident.
ProCarManuals.com
Page 231 of 399
231 Controls in detail
Useful features
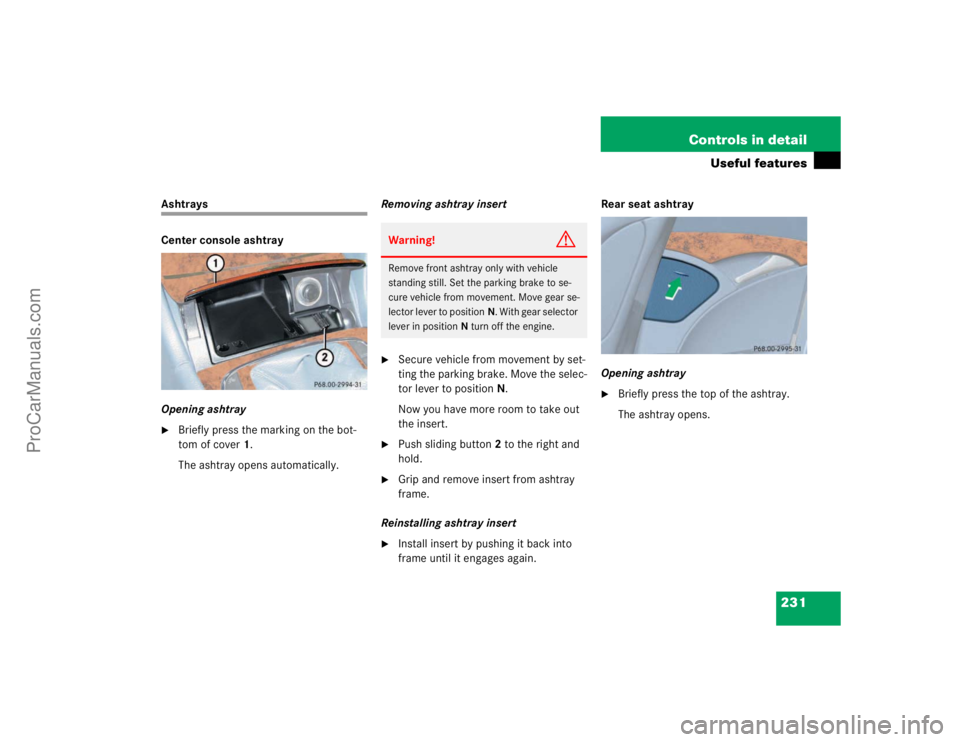
Ashtrays
Center console ashtray
Opening ashtray�
Briefly press the marking on the bot-
tom of cover1.
The ashtray opens automatically.Removing ashtray insert
�
Secure vehicle from movement by set-
ting the parking brake. Move the selec-
tor lever to positionN.
Now you have more room to take out
the insert.
�
Push sliding button2 to the right and
hold.
�
Grip and remove insert from ashtray
frame.
Reinstalling ashtray insert
�
Install insert by pushing it back into
frame until it engages again.Rear seat ashtray
Opening ashtray
�
Briefly press the top of the ashtray.
The ashtray opens.
Warning!
G
Remove front ashtray only with vehicle
standing still. Set the parking brake to se-
cure vehicle from movement. Move gear se-
lector lever to positionN. With gear selector
lever in positionN turn off the engine.
ProCarManuals.com
Page 255 of 399

Standing water
Passenger compartmentTraveling abroad
Abroad, there is a widely-spr")
255 Operation
Driving instructions
For more information on winter driving, see
"Winter driving" (
�page 273)
Standing water
Passenger compartmentTraveling abroad
Abroad, there is a widely-spread
Mercedes-Benz service network at your
disposal. If you plan to travel into areas
which are not listed in the index of your
Mercedes-Benz Center directory, you
should request pertinent information from
your authorized Mercedes-Benz Center.
Warning!
G
If the vehicle becomes stuck in snow, make
sure that snow is kept clear of the exhaust
pipe and from around the vehicle with the
engine running. Otherwise, deadly carbon
monoxide (CO) gases may enter vehicle in-
terior resulting in unconsciousness and
death.
To assure sufficient fresh air ventilation,
open a window slightly on the side of the ve-
hicle not facing the windWarning!
G
The outside temperature indicator is not de-
signed to serve as an ice-warning device and
is therefore unsuitable for that purpose. In-
dicated temperatures just above the freez-
ing point do not guarantee that the road
surface is free of ice.
!Do not drive through flooded areas or
water of unknown depth.
If you must drive through standing wa-
ter, drive slowly to prevent water from
entering the passenger compartment
or the engine compartment. Water in
these areas could cause damage to
electrical components or wiring of the
engine or transmission, or could result
in water being ingested by the engine
through the air intake causing severe
internal engine damage. Any such dam-
age is not covered by the
Mercedes-Benz Limited Warranty.
Warning!
G
Always fasten items being carried as secure-
ly as possible.
In an accident, during hard braking or sud-
den maneuvers, loose items will be thrown
around inside the vehicle, and cause injury
to vehicle occupants unless the items are
securely fastened in the vehicle.
The trunk is the preferred place to carry ob-
jects.
ProCarManuals.com
Page 324 of 399
324 Practical hintsWhere will I find ...?
Where will I find ...?First aid kit
The first aid kit is in the storage compart-
ment at the front edge of the front passen-
ger seat.�
Pull tab1 upward.
�
Fold the covering forward.
�
Remove the first aid kit.
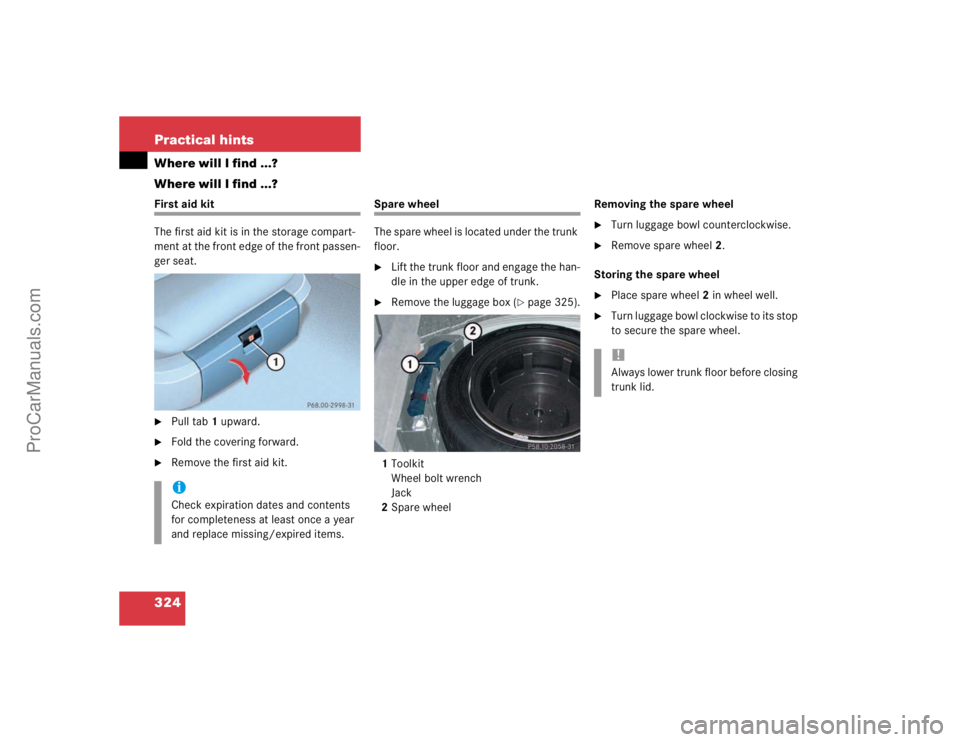
Spare wheel
The spare wheel is located under the trunk
floor.�
Lift the trunk floor and engage the han-
dle in the upper edge of trunk.
�
Remove the luggage box (
�page 325).
1Toolkit
Wheel bolt wrench
Jack
2Spare wheelRemoving the spare wheel
�
Turn luggage bowl counterclockwise.
�
Remove spare wheel2.
Storing the spare wheel
�
Place spare wheel2 in wheel well.
�
Turn luggage bowl clockwise to its stop
to secure the spare wheel.
iCheck expiration dates and contents
for completeness at least once a year
and replace missing/expired items.
!Always lower trunk floor before closing
trunk lid.
ProCarManuals.com
Page 344 of 399
.
�
Disconnect battery negative le")
344 Practical hintsBatteries
Disconnecting the battery�
Depress the parking brake firmly or
move the gear selector lever to
positionP.
�
Open the trunk (
�page 261).
�
Disconnect battery negative lead1.
�
Remove cover2 from the positive ter-
minal.
�
Disconnect the battery positive lead.
Removing the battery�
Remove the screw-nuts securing the
battery.
�
Remove the battery bracket.
�
Take out the battery.
Charging and reinstalling the battery�
Charge battery in accordance with the
instructions of the battery charger
manufacturer.
�
Reinstall the charged battery. Follow
the previously described steps in re-
verse order.
!Never loosen or detach battery termi-
nal clamps while the engine is running
or the key is in the starter switch. Oth-
erwise the alternator and other elec-
tronic components could be severely
damaged.
Have the battery checked regularly by
an authorized Mercedes-Benz Center.
Contact your authorized
Mercedes-Benz Center for further infor-
mation.Warning!
G
Do not place metal objects on the battery as
this could result in a short circuit.
Use leak-proof battery only to avoid the risk
of acid burns in the event of an accident.
Warning!
G
With a disconnected battery�
the brake boosting effect is not avail-
able.
You need more power to brake and
brake pedal travel is increased. If neces-
sary, you must depress the brake pedal
with full power.
�
you can no longer turn the ignition key
or, in cars with KEYLESS-GO*, pressing
the KEY-LESS-GO button* on the gear
selector lever has no effect.
�
the gear selector lever is locked in
position P.
ProCarManuals.com