Page 173 of 384

173 Controls in detail
Sliding / pop-up roof
Sliding / pop-up roof
Opening and closing the sliding / pop-up roof
1Push up to raise roof at rear
2Pull down to lower roof at rear
3Push forward to slide roof closed
4Push back to slide roof openWith the roof closed or tilted open, a
screen can be slid into the roof opening to
guard against sun rays. When sliding the
roof open, the screen will also retract.Opening and closing the sliding /
pop-up roof
�
Turn the key in the starter switch to
position1 or2 or press the
KEYLESS-GO* start / stop button.
�
To open, close, raise or lower the
sliding / pop-up roof, move the switch
to resistance point in the required di-
rection.
Release the switch when the roof has
reached the required position.
Warning!
G
When closing the sliding / pop-up roof, make
sure that there is no danger of anyone being
harmed by the closing procedure.
The closing procedure of the sliding / pop-up
roof can be immediately halted by releasing
the switch or, if the switch was moved past
the resistance point and released, by mov-
ing the switch in any direction.
When leaving the vehicle, always remove the
key from starter switch, take the
KEYLESS-GO* card with you, and lock your
vehicle. Do not leave children unattended in
the vehicle, or with access to an unlocked
vehicle. Unsupervised use of vehicle equip-
ment may cause an accident and / or seri-
ous personal injury.
Page 174 of 384

174 Controls in detailSliding / pop-up roofOpening the sliding / pop-up roof auto-
matically�
To select a sunroof opening position,
press the switch to the resistance point
and release it when the sunroof has
reached the required position.
The sliding / pop-up roof now opens to
the position set if the switch is pressed
past the resistance point in the “open”
direction.
Closing the sliding / pop-up roof auto-
matically
�
Press the switch past the resistance
point in the “close” direction and re-
lease.
The sliding / pop-up roof closes com-
pletely.
Stopping the sliding / pop-up roof
�
Move the switch in any direction.If the movement of the sliding / pop-up
roof is blocked during the closing pro-
cedure, the roof will stop and reopen
slightly.Opening and closing the sliding /
pop-up roof with the SmartKey
The power windows will also be opened or
closed when you operate the sliding /
pop-up roof with the key.
�
Aim transmitter eye at the front door
handle.
iYou can also open or close the sliding /
pop-up roof using the:�
SmartKey (
�page 171)
�
button
O
in the control panel of
the automatic climate control
(
�page 159)
�
button
e
in the control panel of
the automatic climate control
(
�page 159)
!To avoid damaging the seals, do not
transport any objects with sharp edges
which can stick out of the sliding /
pop-up roof.
The sliding / pop-up roof can be opened
or closed manually should an electrical
malfunction occur (
�page 301).
Warning!
G
Never operate the windows or sliding /
pop-up roof if there is the possibility of any-
one being harmed by the opening or closing
procedure.
In case the procedure causes potential dan-
ger, the procedure can be stopped immedi-
ately by releasing the remote control button.
To reverse direction of movement,
press
Œ
for opening or
‹
for closing
Page 175 of 384
�
Press and hold button
Œ
after un-
locking the vehicle.
The windows and sliding / pop-up roof
begin to open after appr")
175 Controls in detail
Sliding / pop-up roof
Opening (Summer opening feature)�
Press and hold button
Œ
after un-
locking the vehicle.
The windows and sliding / pop-up roof
begin to open after approximately one
second.
�
Release the
‹
button to stop proce-
dure.
Closing (Convenience feature)
�
Press and hold button
‹
after lock-
ing the vehicle.
The windows and sliding / pop-up roof
begin to close after approximately one
second.
�
Release the
‹
button to stop proce-
dure.
Make sure that all side windows and the
sliding / pop-up roof are properly closed
before leaving the vehicle.Closing the side windows and sliding /
pop-up roof with KEYLESS-GO*
(Convenience feature)
�
Press and hold lock button at door
(�page 52) until the side windows and
the sliding / pop-up roof are closed.
Synchronizing the sliding / pop-up roof
The power sliding / pop-up roof must be re-
synchronized each time after:�
the battery has been disconnected
�
the sliding / pop-up roof has been
closed manually
�
the sliding / pop-up roof does not open
smoothly
�
a malfunction
�
Press the switch in direction1
(�page 173).
�
Wait until the sliding / pop-up roof is
raised and hold the switch down for
approx. one second.
Warning!
G
When closing the windows and the sliding /
pop-up roof, make sure that there is no dan-
ger of anyone being harmed by the closing
procedure.
If potential danger exists, proceed as fol-
lows:�
Release the lock button.
�
Pull on the door handle and hold firmly.
The side windows and the
sliding / pop-up roof will open for as long
as the door handle is held but the door
not opened.
Page 199 of 384
199 Controls in detail
Useful features
Useful features
Interior storage spaces Glove box
1Unlocked position
2Locked position
3Glove box lid releaseOpening the glove box
�
Press button3.
The glove box lid opens downward.
Closing the glove box
�
Push lid up to close.
Warning!
G
To help avoid personal injury during a colli-
sion or sudden maneuver, exercise care
when stowing objects in the vehicle. Put lug-
g a g e o r c a r g o i n t h e t r u n k i f p o s s i b l e . D o n o t
pile luggage or cargo higher than the seat
backs.
Luggage nets cannot secure hard or heavy
objects.
Keep compartment lids closed. This will help
to prevent stored objects from being thrown
about and injuring vehicle occupants during
an accident.
iThe glove box can be locked and un-
locked with the mechanical key.
Page 200 of 384
200 Controls in detailUseful featuresStorage compartment in the glove box
A storage compartment is located in the
cover of the glove box. It can be used to
store check cards, pens, a flashlight, etc.
1Storage compartment in glove box�
Lightly press the marking on the lid of
storage compartment1.
The lid opens upward.
An AUX socket is located in the glove box.
Portable audio devices can be plugged in
here. Storage compartment in front of arm-
rest
Opening
The compartment contains a cup holder
(
�page 202).
�
Lightly touch cover plate1.
The cover opens automatically.
Closing
�
Lightly push the cover plate1 up until it
engages in lock.Storage compartment below the front
armrest
The buttons are located under the cushion
of the armrest.
The storage compartment below the front
armrest is illuminated with the exterior
lamps switched on.
1Button to open storage compartment
2Button to open storage tray
Page 201 of 384
201 Controls in detail
Useful features
Opening storage compartment
The compartment contains a coin holder.�
Press button1 and lift the armrest.
Opening storage tray
�
Press button2 and lift up the armrest.Storage compartment between rear
seats
1Cover
Opening
�
Slide cover1 rearward.Closing
�
Slide cover1 forward.
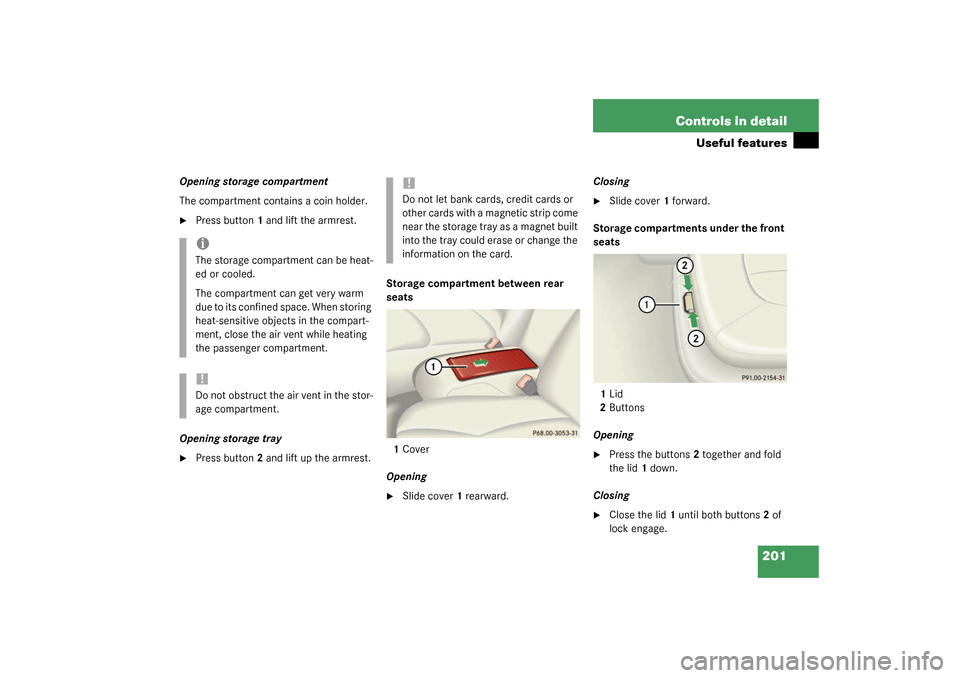
Storage compartments under the front
seats
1Lid
2Buttons
Opening
�
Press the buttons2 together and fold
the lid1 down.
Closing
�
Close the lid1 until both buttons2 of
lock engage.
iThe storage compartment can be heat-
ed or cooled.
The compartment can get very warm
due to its confined space. When storing
heat-sensitive objects in the compart-
ment, close the air vent while heating
the passenger compartment.!Do not obstruct the air vent in the stor-
age compartment.
!Do not let bank cards, credit cards or
other cards with a magnetic strip come
near the storage tray as a magnet built
into the tray could erase or change the
information on the card.
Page 207 of 384

207 Controls in detail
Useful features
Rear seat ashtray
Opening ashtray�
Pull at top of cover to open ashtray.
Removing ashtray insert
�
Press latch1 to disengage ashtray in-
sert and remove it.
Reinstalling the ashtray insert
�
Install ashtray insert.
�
Close the ashtray.
Cigarette lighter
1Cigarette lighter�
Make sure the ignition is switched on.
All the lamps in the instrument cluster
should light up.
�
Push in cigarette lighter1.
The lighter will pop out automatically
when hot.
Warning!
G
Never touch the heating element or sides of
the lighter; they are extremely hot. Hold the
knob only.
When leaving the vehicle, always remove the
key from the starter switch, take the
KEYLESS-GO* card with you and lock the ve-
hicle. Do not leave children unattended in
the vehicle, or with access to an unlocked
vehicle. Unsupervised use of vehicle equip-
ment may cause an accident and / or seri-
ous personal injury.iThe lighter socket can be used to ac-
commodate electrical accessories up
to a maximum 85 W.
Page 210 of 384

The Tele Aid system consists of three types
of response:
�
Automatic and manual emergency
�
Ro")
210 Controls in detailUseful featuresThe Tele Aid system
(Telematic A
larm I
dentification on D
e-
mand)
The Tele Aid system consists of three types
of response:
�
Automatic and manual emergency
�
Roadside Assistance and
�
Information
The Tele Aid system is operational provid-
ing that the vehicle’s battery is charged,
properly connected, not damaged and cel-
lular and GPS coverage is available.
The speaker volume of a Tele Aid call can
be adjusted using the volume control on
the multifunction steering wheel. To raise,
press button
æ
and to lower, press
button
ç
.
�
To activate, press the SOS button, the
Roadside Assistance button
•
or
the Information button
¡
, depend-
ing on the type of response required.Shortly after the completion of your Ac-
quaintance Call, you will receive a user ID
and password via first call mail. By visiting
www.mbusa.com and selecting “Tele Aid”
( U S A o n l y ) , y o u w i l l h a v e a c c e s s t o a c c o u n t
information, remote door unlock, profile
and more.System self-check
Initially, after turning the key in starter
switch to position2, malfunctions are de-
tected and indicated (the indicator lamps
in the SOS button, the Roadside Assis-
tance button
•
and the Information
button
¡
stay on longer than
10 seconds or do not come on). The mes-
sage
TELE AID – VISIT WORKSHOP!
ap-
pears for approx. 10 seconds in the
multifunction display.
iThe SOS button is located above the in-
terior rear view mirror.
The Roadside Assistance button
•
and the Information button
¡
are
located below the center armrest cov-
er.
!The Tele Aid system utilizes the cellular
network for communication and the
GPS (Global Positioning System) satel-
lites for vehicle location. If either of
these signals are unavailable, the
Tele Aid system may not function and if
this occurs, assistance must be sum-
moned by other means.