Page 185 of 225
177 Navigation
Destination memory
�
Turn the right-hand rotary/push-button
v to highlight “Sort destinations...” in
the main destination memory menu
and press to confirm.
After the message “Compiling sorted
destination list”, the destination me-
mory will appear.
�
Turn the right-hand rotary/push-button
v to highlight the desired entry and
press to confirm.
The sorting function is active R.
�
Turn the right-hand rotary/push-button
v to move the entry to the desired po-
sition and press to confirm.
The entry is saved at that location, sym-
bol V highlights the entry.
Activating the main destination memory
menu
�
Press *.
Sorting destination memory
P82.85-9494-31US
NAVI Sort
HOME
OFFICE, QUEENS, NY, WE
TRIP1, BOSTON, BOSTON
FERRY
MAX SMART
Page 186 of 225

178 NavigationDestination memory�
Turn the right-hand rotary/push-button
v to highlight “Delete Destination in
Memory” in the main destination me-
mory menu and press to confirm.
After the message “Compiling sorted
destination list”, the destination me-
mory will appear.
�
Turn the right-hand rotary/push-button
v to highlight the entry you wish to de-
lete and press to confirm.
The inquiry “Do you really want to dele-
te the destination?” will appear.
�
Turn the right-hand rotary/push-button
v to highlight “Yes” and press to con-
firm.
The entry has been deleted from the
list. The following entries will each
move up one position. The delete func-
tion is still active.If you do not want to delete the destination
�
Turn the right-hand rotary/push-button
v to highlight “No” and press to con-
firm.
The destination memory will appear.
Activating the main destination memory
menu
�
Press *.
Deleting a destination
P82.85-9495-31US
NAVI Delete Destination
HOME
OFFICE, QUEENS, NY, WE
TRIP1, BOSTON, BOSTON
FERRY
Page 187 of 225

179 Navigation
Settings
� Settings
COMAND normally determines the vehicle
location automatically with the GPS. In ex-
ceptional cases, this may not be possible.
You can then enter the current vehicle lo-
cation manually in connection with an in-
tersection.�
Turn the right-hand rotary/push-button
v to highlight “Settings” in the main
destination input menu and press to
confirm.
�
Turn the right-hand rotary/push-button
v to highlight “Location...” and press
to confirm.
The input menu to enter the city will ap-
pear.
�
Enter the city/suburb and then the
street and select the required entries
from the corresponding list. See ente-
ring destination address (
�page 123).
After you have selected the street, you will
see a prompt for the intersection.
�
Turn the right-hand rotary/push-button
v to highlight the appropriate cross
street and press to confirm.
The input menu “Location/Intersec-
tion” will appear.
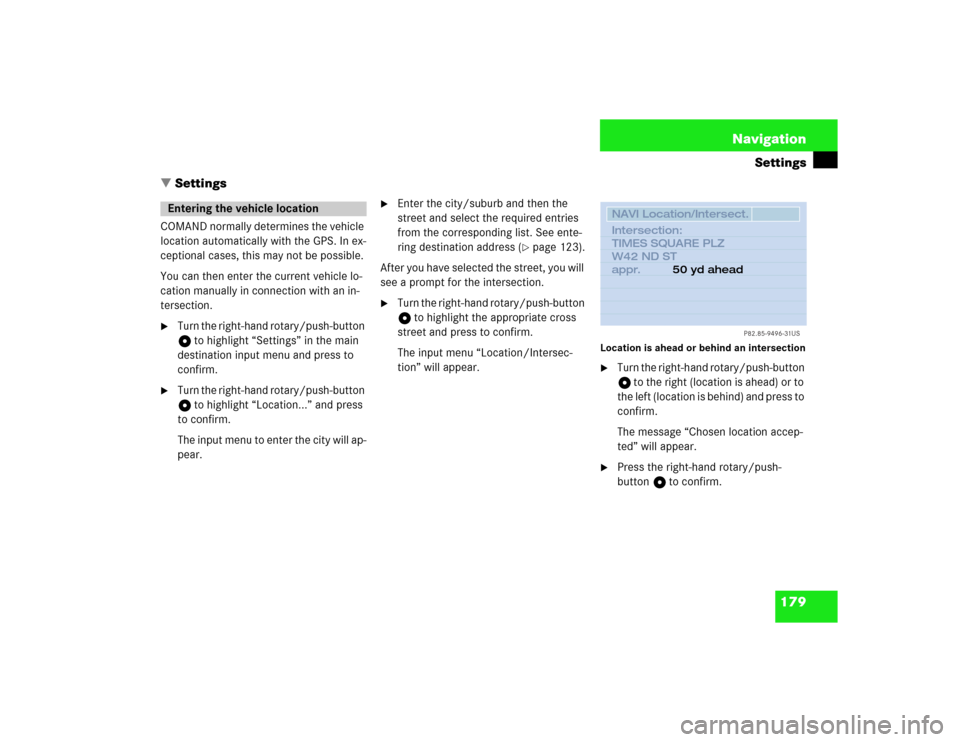
Location is ahead or behind an intersection�
Turn the right-hand rotary/push-button
v to the right (location is ahead) or to
the left (location is behind) and press to
confirm.
The message “Chosen location accep-
ted” will appear.
�
Press the right-hand rotary/push-
button v to confirm.
Entering the vehicle location
P82.85-9496-31US
NAVI Location/Intersect.Intersection:
TIMES SQUARE PLZ
W42 ND ST
appr.50 yd ahead
Page 188 of 225
180 NavigationSettingsIn order to ensure an exact fix on position,
you have to calibrate COMAND by entering
the correct tire information whenever tires
are changed. �
Turn the right-hand rotary/push-button
v to highlight “Settings” in the main
destination input menu and press to
confirm.
A list of options will appear.
Menu “Settings”1Activate menu “Calibration”�
Turn the right-hand rotary/push-button
v to highlight 1 and press to con-
firm.
The menu “Calibration” will appear.2Enter the tread depth and the tire type
3Return to the main destination input
menu
�
Press the right-hand rotary/push-
button v to start calibration.
A list of options will appear.
CalibrationiMercedes-Benz recommends that you
have tires changed by an authorized
Mercedes-Benz Center.
P82.85-9497-31US
NAVI SettingsLocation...
Calibration...Sound
1
P82.85-9498-31US
NAVI CalibrationCalibration changes important
parameters. Please observe
operating instructions.
Start
Cancel
2
3
Page 189 of 225
181 Navigation
Settings
4Tread depth ≥
4 mm (3/16 in.)
5Tread depth < 4 mm (3/16 in.)
�
Turn the right-hand rotary/push-button
v to highlight the desired menu field
and press to confirm.
An input menu will appear.Enter the new tire type
�
Turn the right-hand rotary/push-button
v to highlight the apropriate digits
one by one and press to confirm.
�
Press the right-hand rotary/push-
button v longer than 2 seconds to
confirm the entry.
The main destination input menu will
appear.
P82.85-9499-31US
NAVI CalibrationTread Depth
Used Tires New Tires
45
iEnter the front axle tire parameters.
P82.85-9500-31US
NAVI Calibration225/60R16
1234 67890 Tire Type
5
Page 193 of 225
185 Info Services/System settings
Info Services*
�
Press ( in any menu.
The main service menu will appear.
�
Press the right-hand rotary/push-
button v to confirm 1.
New information service is requested
from the Response Center.4This message appears
5Cancels the requestYou will hear a beep tone if there is a new
incoming message.
There are three ways to cancel the request
and switch to a main menu, e.g. radio main
menu:
�
Press the right-hand rotary/push-
button v and confirm “Cancel”.
�
Press *.
or
�
Automatically after 15 seconds.
iThe characters are displayed in light
grey
In 1 During an active request trans-
mission
In 2 If no information is available
P82.85-9514-31US
SVCConnect. counter since
01. 01. 02 reset?
037 Connections
New Info Service
Request Transmitted
Cancel
4
5
Page 195 of 225

187 Info Services/System settings
System settings
� System settings
6Displays the new message
7Switches back to the main menu
There is more than one message�
Press the right-hand rotary/push-
button v to move to the next page.
Activating the main service menu
�
Press *.
Switching back to e.g. radio main menu
�
Turn the right-hand rotary/push-button
v to highlight “No” and press to con-
firm.
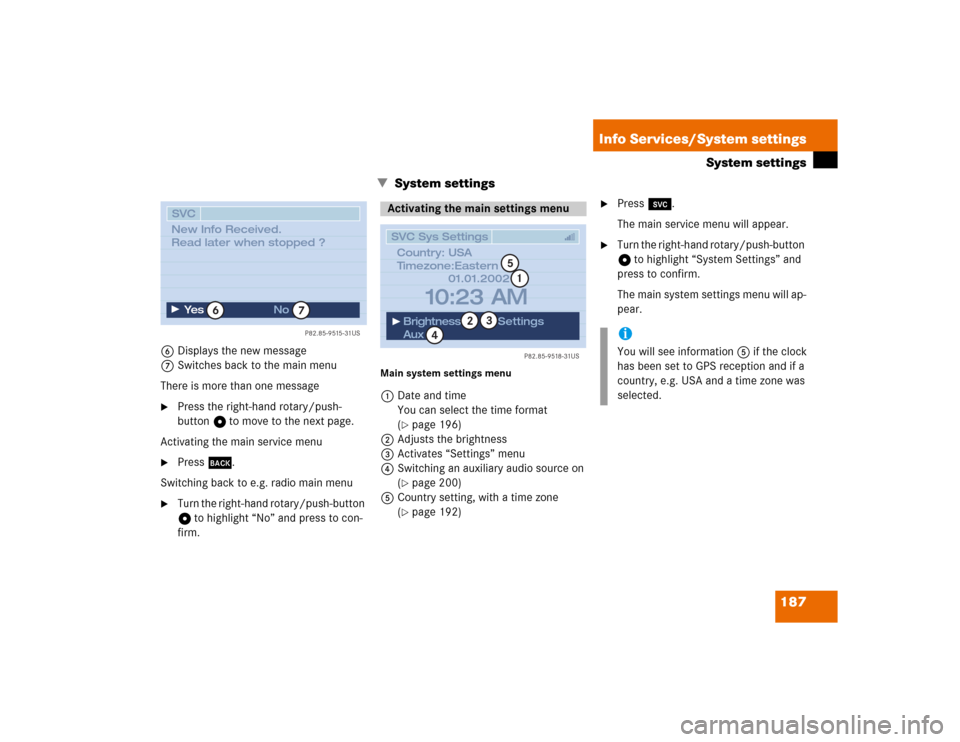
Main system settings menu1Date and time
You can select the time format
(
�page 196)
2Adjusts the brightness
3Activates “Settings” menu
4Switching an auxiliary audio source on
(�page 200)
5Country setting, with a time zone
(�page 192)
�
Press (.
The main service menu will appear.
�
Turn the right-hand rotary/push-button
v to highlight “System Settings” and
press to confirm.
The main system settings menu will ap-
pear.
P82.85-9515-31US
SVC
Ye s
No
6
7
New Info Received.
Read later when stopped ?
Activating the main settings menu
P82.85-9518-31US
SVC Sys Settings
01.01.2002
Brightness
AuxSettings
10:23 AM
1
2
4
3
Country: USA
Timezone:Eastern
5
iYou will see information 5 if the clock
has been set to GPS reception and if a
country, e.g. USA and a time zone was
selected.
Page 196 of 225

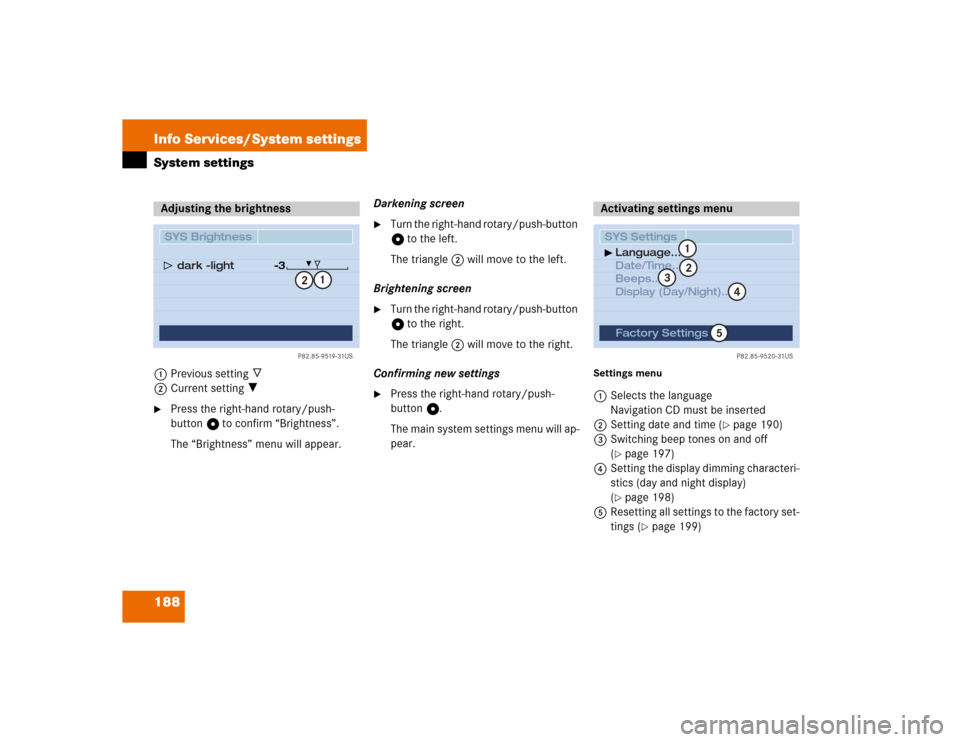
188 Info Services/System settingsSystem settings1Previous setting _
2Current setting ?�
Press the right-hand rotary/push-
button v to confirm “Brightness”.
The “Brightness” menu will appear.Darkening screen
�
Turn the right-hand rotary/push-button
v to the left.
The triangle 2 will move to the left.
Brightening screen
�
Turn the right-hand rotary/push-button
v to the right.
The triangle 2 will move to the right.
Confirming new settings
�
Press the right-hand rotary/push-
button v.
The main system settings menu will ap-
pear.
Settings menu 1Selects the language
Navigation CD must be inserted
2Setting date and time (
�page 190)
3Switching beep tones on and off
(
�page 197)
4Setting the display dimming characteri-
stics (day and night display)
(�page 198)
5Resetting all settings to the factory set-
tings (
�page 199)
Adjusting the brightness
P82.85-9519-31US
SYS Brightness
dark �light
�3
1
2
Activating settings menu SYS SettingsLanguage...
Date/Time...
Beeps...
Display (Day/Night)...
P82.85-9520-31US
Factory Settings
12
4
3
5