Page 71 of 370

77 Safety and Security
Driving safety systems
Switching off the ESP
To improve the vehicle’s traction, turn off
the ESP in driving situations where it would
be advantageous to have the drive wheels
spin and thus cut into surfaces for better
grip such as:�
starting out on slippery surfaces and in
deep snow in conjunction with snow
chains
�
sand or gravel
The switch is located on the center con-
sole.1ESP off
2ESP on
�
Press upper half1 of the switch.
The ESP warning lamp
v
in the
speedometer dial comes on. ESP is de-
activated.
If one or more drive wheels are spinning,
the ESP warning lamp
v
, located in the
speedometer flashes, regardless of the
speed.
Traction control brakes a spinning wheel
even when ESP is deactivated.
ESP always operates when you are brak-
ing, even when it has been deactivated.Switching on the ESP
�
Press lower half2 of the switch.
The ESP warning lamp
v
in the
speedometer goes out. You are now
again in normal driving mode.
Warning!
G
ESP should not be switched off during nor-
mal driving other than in the circumstances
described below. Disabling of the system
will reduce vehicle stability in standard driv-
ing maneuvers.
!Avoid spinning of a drive wheel for an
extended period with the ESP switched
off. This may cause serious damage to
the drivetrain which is not covered by
the Mercedes-Benz Limited Warranty.Warning!
G
When the ESP warning lamp
v
is
illuminated continuously, the ESP is
switched off.
Adapt your speed and driving to the prevail-
ing road conditions and to the non-operating
status of the ESP.
S203 MY03_A.book Page 77 Tuesday, January 28, 2003 2:22 PM
Page 72 of 370
 with ESP
Only models with all-wheel-drive*
(4MATIC).
The 4MATIC improves vehicle’s ability to
use availa")
78 Safety and SecurityDriving safety systemsFour wheel electronic traction system (4MATIC*) with ESP
Only models with all-wheel-drive*
(4MATIC).
The 4MATIC improves vehicle’s ability to
use available traction, e.g. during winter
operation in mountains under snowy con-
ditions, by applying power to all four
wheels.
Warning!
G
If you see the ESP warning lamp
v
flash-
ing in the speedometer dial, proceed as fol-
lows:
�
While driving off, apply as little throttle
as possible
�
While driving ease up on the accelerator
�
Adapt your speed and driving style to
the prevailing road conditions
Failure to observe these guidelines could
cause the vehicle to skid.
The ESP cannot prevent accidents resulting
from excessive speed.!Do not tow with one axle raised.
Otherwise the transfer case can be
damaged, which is not covered by the
Mercedes-Benz Limited Warranty.
!Performance testing must only be con-
ducted on a 2-axle dynamometer.
Otherwise the transfer case can be
damaged, which is not covered by the
Mercedes-Benz Limited Warranty.!Because of the ESP’s automatic opera-
t i o n , t h e e n g i n e m u s t b e s h u t o f f ( k e y i n
starter switch position0 or1) when
the parking brake is being tested on a
brake test dynamometer
Active braking action through ESP may
otherwise seriously damage the front
or rear axle brake system.
Operational tests with the engine run-
ning can only be conducted on a 2-axle
dynamometer.
S203 MY03_A.book Page 78 Tuesday, January 28, 2003 2:22 PM
Page 79 of 370

85 Controls in detail
Locking and unlocking
Factory setting
Global unlocking�
Press button
Œ
.
All turn signal lamps blink once. The
locking knobs in the doors move up.
The vehicle will lock again automatically
within approximately 40 seconds of un-
locking if neither door nor tailgate is
opened, the SmartKey is not inserted in
the starter switch, or the central locking
switch is not activated.Global locking
�
Press button
‹
.
All turn signal lamps blink three times.
The locking knobs in the doors move
down.
Selective setting
If you frequently travel alone, you may wish
to reprogram the key so that
pressing
Œ
only unlocks the driver’s
door and the fuel filler flap.
�
Press and hold buttons
Œ
and
‹
simultaneously for about five seconds
until battery check lamp4 blinks twice.
The key will then function as follows:
Unlocking driver’s door and fuel filler
flap
�
Press button
Œ
once.
Global unlocking
�
Press button
Œ
twice.
Global locking
�
Press button
‹
.Restoring to factory setting
�
Press and hold buttons
Œ
and
‹
simultaneously for about six seconds
until battery check lamp4 blinks twice.
iYou can also open and close the power
windows (
�page 186) and slid-
ing/pop-up roof (
�page 188) using
the SmartKey.
!To prevent possible malfunction, avoid
exposing the key to high levels of elec-
tromagnetic radiation.
Warning!
G
When leaving the vehicle, always remove the
key from the starter switch, and lock the ve-
hicle. Do not leave children unattended in
the vehicle, or with access to an unlocked
vehicle. It is possible for children to open a
locked door from the inside, which could re-
sult in an accident and/or serious injury.
S203 MY03_A.book Page 85 Tuesday, January 28, 2003 2:22 PM
Page 81 of 370
87 Controls in detail
Locking and unlocking
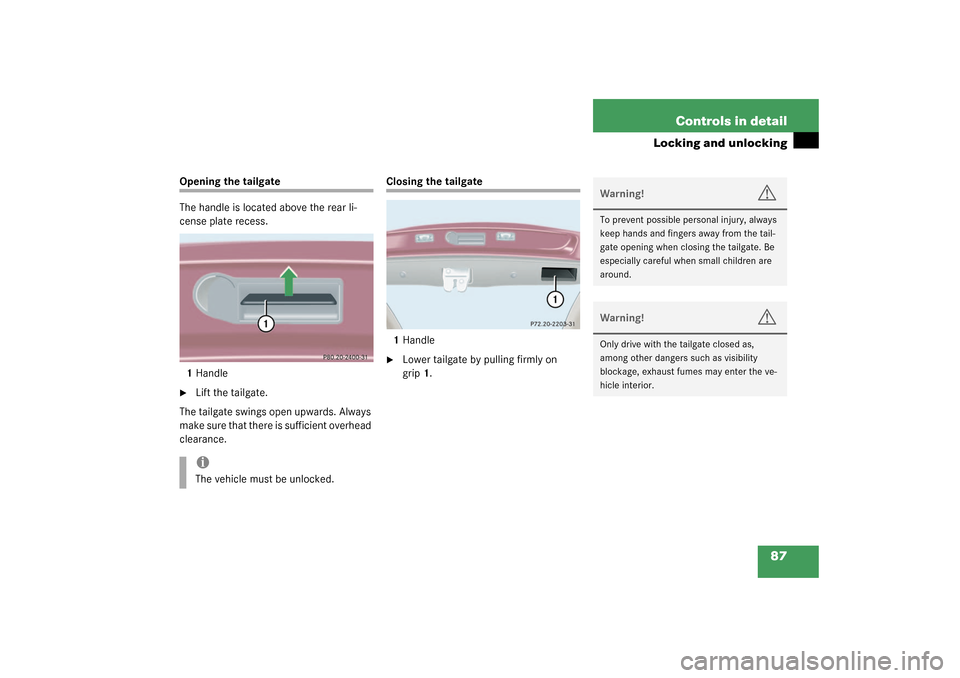
Opening the tailgate
The handle is located above the rear li-
cense plate recess.
1Handle�
Lift the tailgate.
The tailgate swings open upwards. Always
make sure that there is sufficient overhead
clearance.
Closing the tailgate
1Handle�
Lower tailgate by pulling firmly on
grip1.
iThe vehicle must be unlocked.
Warning!
G
To prevent possible personal injury, always
keep hands and fingers away from the tail-
gate opening when closing the tailgate. Be
especially careful when small children are
around.Warning!
G
Only drive with the tailgate closed as,
among other dangers such as visibility
blockage, exhaust fumes may enter the ve-
hicle interior.
S203 MY03_A.book Page 87 Tuesday, January 28, 2003 2:22 PM
Page 83 of 370

89 Controls in detail
Locking and unlocking
Locking and unlocking from the inside
You can lock or unlock the doors and the
tailgate from inside using the central lock-
ing switch. This can be useful, for example,
if you want to lock the vehicle before start-
ing to drive.
The fuel filler flap cannot be locked or un-
locked with the central locking switch.The switch is located in the center console.
Central locking switch1Locking
2Unlocking
Locking�
Press upper half1 of the central lock-
ing switch.
If both front doors are closed, the vehi-
cle locks.Unlocking
�
Press lower half2 of the central lock-
ing switch.
The vehicle unlocks.
Warning!
G
When leaving the vehicle, always remove the
key from the starter switch, and lock the ve-
hicle. Do not leave children unattended in
the vehicle, or with access to an unlocked
vehicle. Unsupervised use of vehicle equip-
ment may cause an accident and/or serious
personal injury.
iYou can open a locked door from the
inside. Open door only when conditions
are safe to do so.
If the vehicle was previously centrally
locked using the SmartKey, it will not
unlock using the central locking switch.
If the vehicle was previously locked
with the central locking switch�
while in the selective remote con-
trol mode, only the door opened
from the inside is unlocked.
�
while in the global remote control
mode, the complete vehicle is un-
locked when a door is opened from
the inside.
S203 MY03_A.book Page 89 Tuesday, January 28, 2003 2:22 PM
Page 84 of 370
.
Easy-entry/exit feature*
With the easy-entry/exit feature activated,
the")
90 Controls in detailSeats
SeatsInformation on seat adjustment can be
found in the “Getting started” section
(�page 32).
Easy-entry/exit feature*
With the easy-entry/exit feature activated,
the steering wheel tilts upwards and the
driver’s seat moves to the rear.
This allows easier entry into and exit from
the vehicle when the driver’s door is
opened. However, the engine must be
turned off.
When the SmartKey is inserted in the start-
er switch and the driver’s door is closed,
the steering wheel and the driver’s seat re-
turn to their last set positions.You can activate the following functions:
�
Steering column:
Only the steering column is adjusted.
�
Steering column and seat:
The steering column and the seat are
adjusted.
The easy-entry/exit feature can be
switched on or off in the individual setting
menu of the control system (
�page 126).
Warning!
G
You must make sure that no one can be-
come trapped or injured by the moving
steering wheel and the driver’s seat when
the easy-entry / exit feature* is activated,
the driver’s door is being opened and the en-
gine is turned off or the SmartKey is re-
moved from the starter switch. Do not leave
children unattended in the vehicle, or with
access to an unlocked vehicle. Unsuper-
vised use of vehicle equipment may cause
an accident and/or serious personal injury.
Do not leave children unattended in the ve-
hicle, or with access to an unlocked vehicle.
Children could open the driver’s door and
unintentionally activate the easy-entry/exit
feature*, which could result in an accident
and/or serious personal injury.
S203 MY03_A.book Page 90 Tuesday, January 28, 2003 2:22 PM
Page 85 of 370
.Front seat head restraints, manual seat
Removing f")
91 Controls in detail
Seats
Head restraints
Information on head restraint adjustment
can be found in the “Getting started” sec-
tion (
�page 32).Front seat head restraints, manual seat
Removing front head restraints
�
Pull head restraint to its highest posi-
tion.
�
Push button1 and pull out head re-
straint.
Installing front head restraints
�
Insert head restraint and push it down
to the stop.
�
Push button1 and adjust head re-
straint to desired position.Front seat head restraints, power seat*
Removing front head restraints
�
Press switch1 upwards and hold until
the head restraint is fully extended.
�
Pull out head restraint.
Installing front head restraints
�
Press switch1 upwards and hold for
about five seconds.
�
Push the head restraint down until it
engages.
�
Adjust head restraint to desired posi-
tion.
Warning!
G
For your protection, drive only with properly
positioned head restraints.
Adjust head restraint to support the back of
the head approximately at ear level.
Do not drive the vehicle without the seat
head restraints. Head restraints are intend-
ed to help reduce injuries during an acci-
dent.iTilt the backrest to the rear for easier
removal and installation of the head re-
straints.
S203 MY03_A.book Page 91 Tuesday, January 28, 2003 2:22 PM
Page 86 of 370
92 Controls in detailSeatsRear seat head restraints (outer seats)Removing rear head restraints
�
Pull head restraint to its highest posi-
tion.
�
Push button1 and pull out head re-
straint.
Installing rear head restraints
�
Insert head restraint and push it down
until it engages.
�
Push button1 and adjust head re-
straint to desired position.
Warning!
G
For safety reasons, always drive with the
rear head restraints in the upright position
when the rear seats are occupied.
Keep the area around head restraints clear
of articles (e.g. clothing) to not obstruct the
folding operation of the head restraints.iThe center rear seat head restraint can-
not be removed.
S203 MY03_A.book Page 92 Tuesday, January 28, 2003 2:22 PM