Page 272 of 356
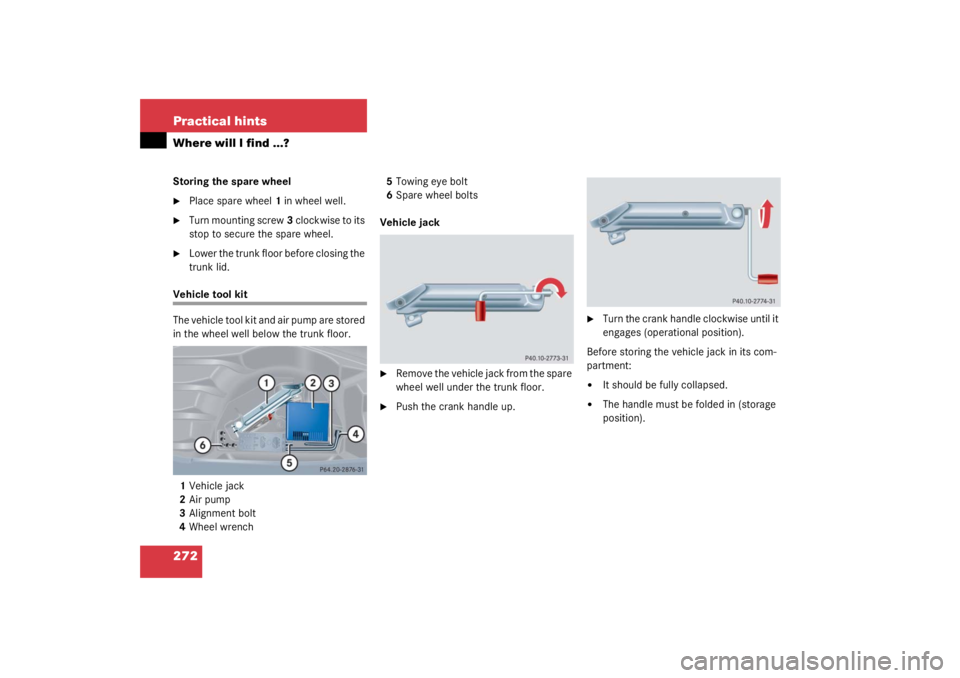
272 Practical hintsWhere will I find ...?Storing the spare wheel�
Place spare wheel1 in wheel well.
�
Turn mounting screw 3 clockwise to its
stop to secure the spare wheel.
�
Lower the trunk floor before closing the
trunk lid.
Vehicle tool kit
The vehicle tool kit and air pump are stored
in the wheel well below the trunk floor.
1 Vehicle jack
2 Air pump
3 Alignment bolt
4 Wheel wrench 5
Towing eye bolt
6 Spare wheel bolts
Vehicle jack
�
Remove the vehicle jack from the spare
wheel well under the trunk floor.
�
Push the crank handle up.
�
Turn the crank handle clockwise until it
engages (operational position).
Before storing the vehicle jack in its com-
partment:
�
It should be fully collapsed.
�
The handle must be folded in (storage
position).
Page 275 of 356
275
Practical hints
Unlocking/locking in an emergency
Unlocking the trunk lid
If you are unable to unlock the trunk lid
with the SmartKey, you can use the emer-
gency release on the inside of the trunk lid
to unlock it.
1 Cover
2 Release lever
3 Rear bench seat backrest
�
Fold backrest 3 forward.
�
Remove cover 1 from the trim on the
trunk lid.
�
Push release lever 2 all the way to the
right.
�
Open the trunk lid.
Locking the vehicle
If you are unable to lock the vehicle with
the SmartKey, lock it with the mechanical
key as follows:�
Close the passenger door and the trunk
lid.
�
Press the central locking switch in the
cockpit (
�page 87).
�
Check to see whether the locking knob
on the passenger door is still visible. If
necessary push it down manually.
�
Lock the driver’s door with the me-
chanical key.
iThe trunk lid swings open upwards. Al-
ways make sure that there is sufficient
overhead clearance.
Page 277 of 356
277
Practical hints
Unlocking/locking in an emergency
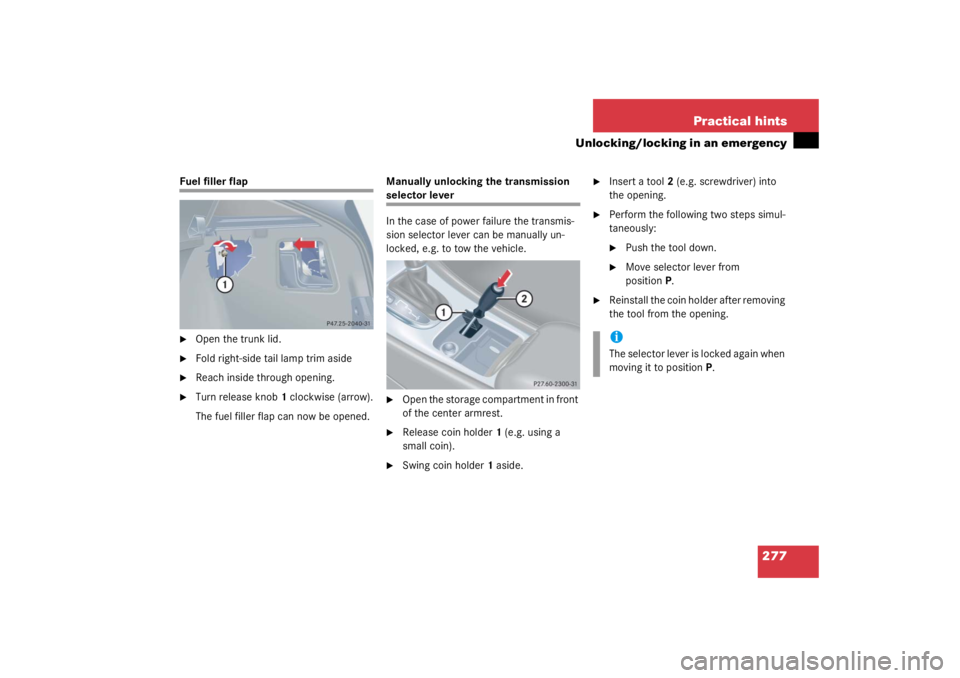
Fuel filler flap�
Open the trunk lid.
�
Fold right-side tail lamp trim aside
�
Reach inside through opening.
�
Turn release knob
1 clockwise (arrow).
The fuel filler flap can now be opened. Manually unlocking the transmission
selector lever
In the case of power failure the transmis-
sion selector lever can be manually un-
locked, e.g. to tow the vehicle.�
Open the storage compartment in front
of the center armrest.
�
Release coin holder
1 (e.g. using a
small coin).
�
Swing coin holder 1 aside.
�
Insert a tool 2 (e.g. screwdriver) into
the opening.
�
Perform the following two steps simul-
taneously:�
Push the tool down.
�
Move selector lever from
position P.
�
Reinstall the coin holder after removing
the tool from the opening.iThe selector lever is locked again when
moving it to position P.
Page 285 of 356
285
Practical hints
Replacing bulbs
Side marker lamp bulb�
Switch off the lights.
�
Carefully slide lamp towards rear.
�
Remove front end first.
�
Twist bulb socket counterclockwise
and pull out.
�
Pull bulb out of the bulb socket.
�
Insert new bulb in socket.
�
Reinstall bulb socket, push in and twist
clockwise.
�
To reinstall lamp, set rear end in
bumper and let front end snap into
place.
Replacing bulbs for rear lamps
Tail lamp assemblies�
Switch off the lights.
�
Open the trunk lid (
�page 85).
�
Turn handles
2.
�
Remove the trim panel 1.
�
Press together the latches 1.
�
Remove bulb holder.
�
Gently push bulb into socket, turn
counterclockwise and remove.
�
Insert new bulb and reinstall bulb sock-
et.
�
Reinstall trim panel.
Page 288 of 356

288 Practical hintsFlat tire
Flat tirePreparing the vehicle�
Park the vehicle as far as possible from
moving traffic on a hard surface.
�
Turn on the hazard warning flashers.
�
Engage the steering wheel lock in the
straight ahead position and set the
parking brake.
�
Move the selector lever toP (manual
transmission to 1st or reverse gear).
�
Have any passenger exit the vehicle at
a safe distance from the roadway.
Mounting the spare wheel Preparing the vehicle
Prepare the vehicle as described under
“Preparing the vehicle” on this page.
�
Take the spare wheel out of the trunk
(�page 271).
Lifting the vehicle
�
Prevent the vehicle from rolling away
by blocking wheels with wheel chocks
(not included) or other sizable objects.
When changing wheel on a level surface:
�
Place one chock in front of and one be-
hind the wheel that is diagonally oppo-
site to the wheel being changed.
Warning!
G
The dimensions of the spare wheel are dif-
ferent from those of the road wheels. As a
result, the vehicle handling characteristics
change when driving with a spare wheel
mounted. Adapt your driving style accord-
ingly.
The spare wheel is for temporary use only.
When driving with spare wheel mounted, en-
sure proper tire pressure and do not exceed
vehicle speed of 50 mph (80 km/h).
Drive to the nearest Mercedes-Benz Center
as soon as possible to have the spare wheel
replaced with a regular road wheel.
Never operate the vehicle with more than
one spare wheel mounted.
��
Page 290 of 356

290 Practical hintsFlat tireRemoving the wheel1 Alignment bolt�
Unscrew upper-most wheel bolt and re-
move.
�
Replace this wheel bolt with the align-
ment bolt 1 supplied in the tool kit.
�
Remove the remaining bolts.
�
Remove the wheel.
�
Take the spare tire out of the trunk.
Mounting the new wheel
1 Wheel bolt for light alloy rims
2 Wheel bolt for light alloy spare wheel
rim size 4
1/2B x15 H2
�
Clean contact surfaces of wheel and
wheel hub.
�
Guide the spare wheel onto the align-
ment bolt and push it on.
�
Insert wheel bolts and tighten them
slightly.
�
Inflate the spare tire using the electric
pump (
�page 292).
!Do not place wheel bolts in sand or dirt.
This could result in damage to the bolt
and wheel hub threads.
!Wheel bolts 2 must be used when
mounting spare wheel rim
size 4
1/2B x 15 H2 (
�page 313).
The use of any wheel bolts other than
wheel bolts 2 for spare wheel rim
size 4
1/2B x15 H2 can cause physical
damage to the vehicle.
Warning!
G
Be sure to use original lenght wheel bolts
when remounting the original wheel after it
has been repaired.Warning!
G
Inflate spare wheel with collapsible tire only
after the wheel is properly mounted.
Inflate the spare wheel tire using the electric
air pump before lowering the vehicle.
��
Page 292 of 356

292 Practical hintsFlat tire�
Before storing the jack in the trunk, it
should be fully collapsed, with handle
folded in.Inflating the spare tire
�
Take the electric air pump out of the
trunk.
1 Flap
2 Air hose with pressure gauge and vent
screw
3 Union nut
4 Electrical plug
Please exercise appropriate caution
�
Open flap 1 on air pump.
�
Pull out electrical plug 4 and air hose
with the pressure gauge 2.
Observe instructions on air pump label.
�
Remove the valve cap from valve.
�
Screw the air hose 2 on to the tire
valve.
�
Insert electrical plug 4 into vehicle cig-
arette lighter socket.
�
To switch on the air pump turn the key
in the starter switch to position 1
(�page 31).
�
Operate air pump until the pressure
gauge displays 36 psi (2.5 bar)
This takes about five minutes for the
space tire. The air hose 2 and the union
nut 3 can become hot during inflation.
Warning!
G
Have the tightening torque checked after
changing a wheel. The wheels could come
loose if they are not tightened to a torque of
80 ft lb (110 Nm).
Warning!
G
Observe instructions on air pump label.
��
Page 293 of 356
.
�
If the tire pressure is above 36 psi (2.5
bar), release excess tire pressur")
293
Practical hints
Flat tire
�
To switch off the air pump turn the key
in the starter switch to position
0
(�page 31).
�
If the tire pressure is above 36 psi (2.5
bar), release excess tire pressure using
the vent screw.
�
Detach the electric air pump.
�
Store the electrical plug and the air
hose behind the flap and place the air
pump back in the trunk.
!Do not operate the electric air pump
longer than six minutes without inter-
ruption. Otherwise it may overheat.
You may operate the air pump again af-
ter it has cooled off.
Warning!
G
Follow recommended inflation pressures.
Do not overinflate tires. Overinflated tires
can result in sudden deflation (blowout) be-
cause they are more likely to become punc-
tured or damaged by road debris, potholes
etc.
Do not underinflate tires. Underinfalted tires
wear unevenly, adversely affect handling
and fuel economy, and are more likely to fail
from being overheated.
Do not overload the tires by exceeding the
specified vehicle capacity weight (as indicat-
ed by the label on the driver’s door latch
post). Overloading the tires can overheat
them, possibly causing a blowout.