Page 87 of 356

87
Controls in detail
Locking and unlocking
Automatic central locking
The doors and the trunk lid automatically
lock when the ignition is switched on and
the wheels are turning at vehicle speeds of
approximately 9 mph (15 km/h) or more.
You can open a locked door from the in-
side. Open door only when conditions are
safe to do so.
You can deactivate the automatic locking
using the control system (
�page 122).
Locking and unlocking from the inside
You can lock or unlock the doors and the
trunk lid from inside using the central lock-
ing switch. This can be useful, for example,
if you want to lock the vehicle before start-
ing to drive.
The fuel filler flap cannot be locked or un-
locked with the central locking switch.
iThe doors unlock automatically after an
accident if the force of the impact ex-
ceeds a preset threshold.
The vehicle automatically locks when
the ignition is switched on and the
wheels are turning at vehicle speeds of
approximately 9 mph (15 km/h) or
more. You could therefore lock yourself
out when the vehicle�
is pushed
�
is on a test stand
Warning!
G
When leaving the vehicle, always remove the
key from the starter switch and lock the ve-
hicle. Do not leave children unattended in
the vehicle, or with access to an unlocked
vehicle. Unsupervised use of vehicle equip-
ment may cause an accident and/or serious
personal injury.
Page 101 of 356
101
Controls in detail
Lighting
Switching right front reading lamp on
and off�
Press button
2.
The right reading lamp goes on.
�
Press button 2 again.
The right reading lamp goes off.
Switching left front reading lamp on and
off
�
Press button 6.
The left reading lamp goes on.
�
Press button 6 again.
The left reading lamp goes off. Switching all front interior lights on
�
Press rocker switch to position
5.
The front interior lamps go on.
Switching all front interior lights off
�
Press rocker switch to position 3 or 4.
The front interior lamps go out.iThe setting selected for the interior
lighting is used for the trunk lighting as
well.
If you leave the trunk lid open for an ex-
tended period of time, the trunk light-
ing will switch off automatically after
approximately ten minutes
Page 192 of 356

192 Controls in detailLoading
LoadingRoof rack*
Mount the roof rack only between the fas-
tening points1 and in the recess of the
rubber strip 2.
Luggage cover
Removal�
Take off securing straps 1.
�
Pull cover towards rear 2.
Installation
�
Place cover into holder.
�
Attach securing straps to trunk lid.
Split folding rear bench seat
The two sections can be folded down sep-
arately to enlarge the trunk.
Warning!
G
Use only those roof racks approved by
Mercedes-Benz for your vehicle model to
avoid damage to the vehicle. Follow manu-
facturer’s installation instructions.
!Do not place anything on the luggage
cover below the rear window.
Warning!
G
When expanding the luggage compartment,
always fold the seat cushions fully forward.
Unless you are transporting cargo, the back-
rests must remain properly locked in the up-
right position.
In an accident, during hard braking or sud-
den maneuvers, loose items will be thrown
around inside the vehicle, and cause injury
to vehicle occupants unless the items are
securely fastened in the vehicle.
Page 194 of 356

194 Controls in detailLoadingLoading instructions
The total load weight including vehicle oc-
cupants and luggage/cargo should not ex-
ceed the vehicle capacity weight indicated
on the certification tag which can be found
on the left door pillar.
The handling characteristics of a fully load-
ed vehicle depend greatly on the load dis-
tribution. It is therefore recommended to
load the vehicle according to the illustra-
tions shown, with the heaviest items being
placed towards the front of the vehicle.
Always place items being carried against
front or rear seat backrests, and fasten
them as securely as possible. The heaviest portion of the cargo should al-
ways be kept as low as possible since it in-
fluences the handling characteristics of
the vehicle.
Warning!
G
Always fasten items being carried as secure-
ly as possible.
In an accident, during hard braking or sud-
den maneuvers, loose items will be thrown
around inside the vehicle and can cause in-
jury to vehicle occupants unless the items
are securely fastened in the vehicle.
To help avoid personal injury during a colli-
sion or sudden maneuver, exercise care
when transporting cargo.
Never drive vehicle with trunk lid open.
Deadly carbon monoxide (CO) gases may
enter vehicle interior resulting in uncon-
sciousness and death.
Page 208 of 356
, and the
reserve key is not handy:�
Contact the Mercedes-Benz")
208 Controls in detailUseful features
Remote door unlock
In case you have locked your vehicle unin-
tentionally (e.g. key inside vehicle), and the
reserve key is not handy:�
Contact the Mercedes-Benz Response
Center at 1-800-756-9018 (in the USA)
or 1-888-923-8367 (in Canada).
You will be asked to provide your pass-
word which you provided when you
completed the subscriber agreement.
�
Then return to your vehicle and pull the
trunk lid recessed handle for minimum
of 20 seconds until the “SOS” button is
flashing.
The message
EMERGENCY CALL –
CALL CONNECTED appears in the multi-
function display.
As an alternative, you may unlock the vehi-
cle via Internet using the ID and password
sent to you shortly after the completion of
your acquaintance call. T h e R e s p o n s e C e n t e r w i l l t h e n u nl o c k y o u r
vehicle with the remo
te door unlocking
feature.
iWhen a Tele Aid call has been initiated,
the audio system or the COMAND* sys-
tem audio is muted and the selected
mode (radio, tape or CD) pauses. The
optional cellular phone (if installed)
switches off. If you must use this
phone, the vehicle must be parked. Dis-
connect the coiled cord and place the
call. The COMAND* navigation system
(if engaged) will continue to run. The
display in the instrument cluster is
available for use and spoken com-
mands are only available by pressing
the RPT button on the COMAND* unit.
A pop-up window will appear in the CO-
MAND* display to indicate that a
Tele Aid call is in progress.
iThe remote door unlock feature is avail-
able if the relevant cellular phone net-
work is available.
The “SOS” button will flash and the
message
EMERGENCY CALL –
CALL CONNECTED
will appear in the mul-
tifunction display to indicate receipt of
the door unlock command.
Once the vehicle is unlocked, a Re-
sponse Center specialist will attempt
to establish voice contact with the ve-
hicle occupants.
If the trunk lid recessed handle was
pulled for more than 20 seconds be-
fore door unlock authorization was re-
ceived by the Response Center, you
must wait 15 minutes before pulling
the trunk lid recessed handle again.
Page 221 of 356
.
Standing water
Passenger compartmentDriving abroad
Abroad, there is a widely-spread
Mercedes-Benz service netwo")
221
Operation
Driving instructions
For more information on winter driving
(�page 236).
Standing water
Passenger compartmentDriving abroad
Abroad, there is a widely-spread
Mercedes-Benz service network at your
disposal. If you plan to drive into areas
which are not listed in the index of your
Mercedes-Benz Center directory, you
should request pertinent information from
your authorized Mercedes-Benz Center.
Warning!
G
If the vehicle becomes stuck in snow, make
sure that snow is kept clear of the exhaust
pipe and from around the vehicle with the
engine running. Otherwise, deadly carbon
monoxide (CO) gases may enter vehicle in-
terior resulting in unconsciousness and
death.
To assure sufficient fresh air ventilation,
open a window slightly on the side of the ve-
hicle not facing the windWarning!
G
The outside temperature indicator is not de-
signed to serve as an ice-warning device and
is therefore unsuitable for that purpose. In-
dicated temperatures just above the freez-
ing point do not guarantee that the road
surface is free of ice.
!Do not drive through flooded areas or
water of unknown depth.
If you must drive through standing wa-
ter, drive slowly to prevent water from
entering the passenger compartment
or the engine compartment. Water in
these areas could cause damage to
electrical components or wiring of the
engine or transmission, or could result
in water being ingested by the engine
through the air intake causing severe
internal engine damage. Any such dam-
age is not covered by the
Mercedes-Benz Limited Warranty.
Warning!
G
Always fasten items being carried as secure-
ly as possible.
In an accident, during hard braking or sud-
den maneuvers, loose items will be thrown
around inside the vehicle, and cause injury
to vehicle occupants unless the items are
securely fastened in the vehicle.
The trunk is the preferred place to carry ob-
jects.
Page 269 of 356

269
Practical hints
What to do if …
Display
Possible cause
Suggested solution
L
TELE AID
VISIT WORKSHOP!
One or more main functions of the Tele Aid
system are malfunctioning.
�
Have the Tele Aid system checked by
an authorized Mercedes-Benz Cen-
ter.
ì
FUNCTION
NOT AVAILABLE
This display appears if button
ì
or
í
on the multifunction steering wheel
is pressed and the vehicle is not equipped
with a telephone.
Ê
TRUNK OPEN!
This message will appear whenever the
trunk lid is open.
�
Close the trunk lid.
1
RESTRAINT SYSTEM
VISIT WORKSHOP!
The system is malfunctioning.
�
Drive with added caution to the near-
est authorized Mercedes-Benz Cen-
ter.
Warning!
G
In the event a malfunction of the SRS is indi-
cated as outlined above, the SRS may not be
operational. For your safety, we strongly
recommend that you visit an authorized
Mercedes-Benz Center immediately to have
the system checked; otherwise the
SRS may not be activated when needed in
an accident, which could result in serious or
fatal injury, or it might deploy unexpectedly
and unnecessarily which could also result in
injury.
Page 271 of 356
271
Practical hints
Where will I find ...?
Where will I find ...?
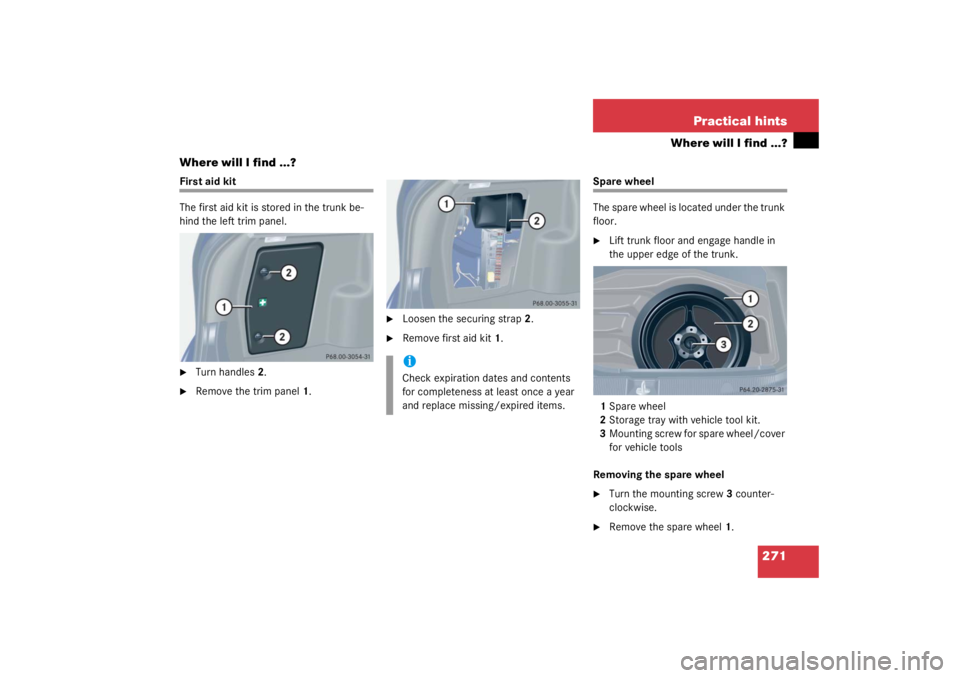
First aid kit
The first aid kit is stored in the trunk be-
hind the left trim panel.�
Turn handles 2.
�
Remove the trim panel 1.
�
Loosen the securing strap 2.
�
Remove first aid kit 1.
Spare wheel
The spare wheel is located under the trunk
floor.�
Lift trunk floor and engage handle in
the upper edge of the trunk.
1 Spare wheel
2 Storage tray with vehicle tool kit.
3 Mounting screw for spare wheel/cover
for vehicle tools
Removing the spare wheel
�
Turn the mounting screw 3 counter-
clockwise.
�
Remove the spare wheel 1.
iCheck expiration dates and contents
for completeness at least once a year
and replace missing/expired items.