2003 INFINITI G35 window
[x] Cancel search: windowPage 20 of 256

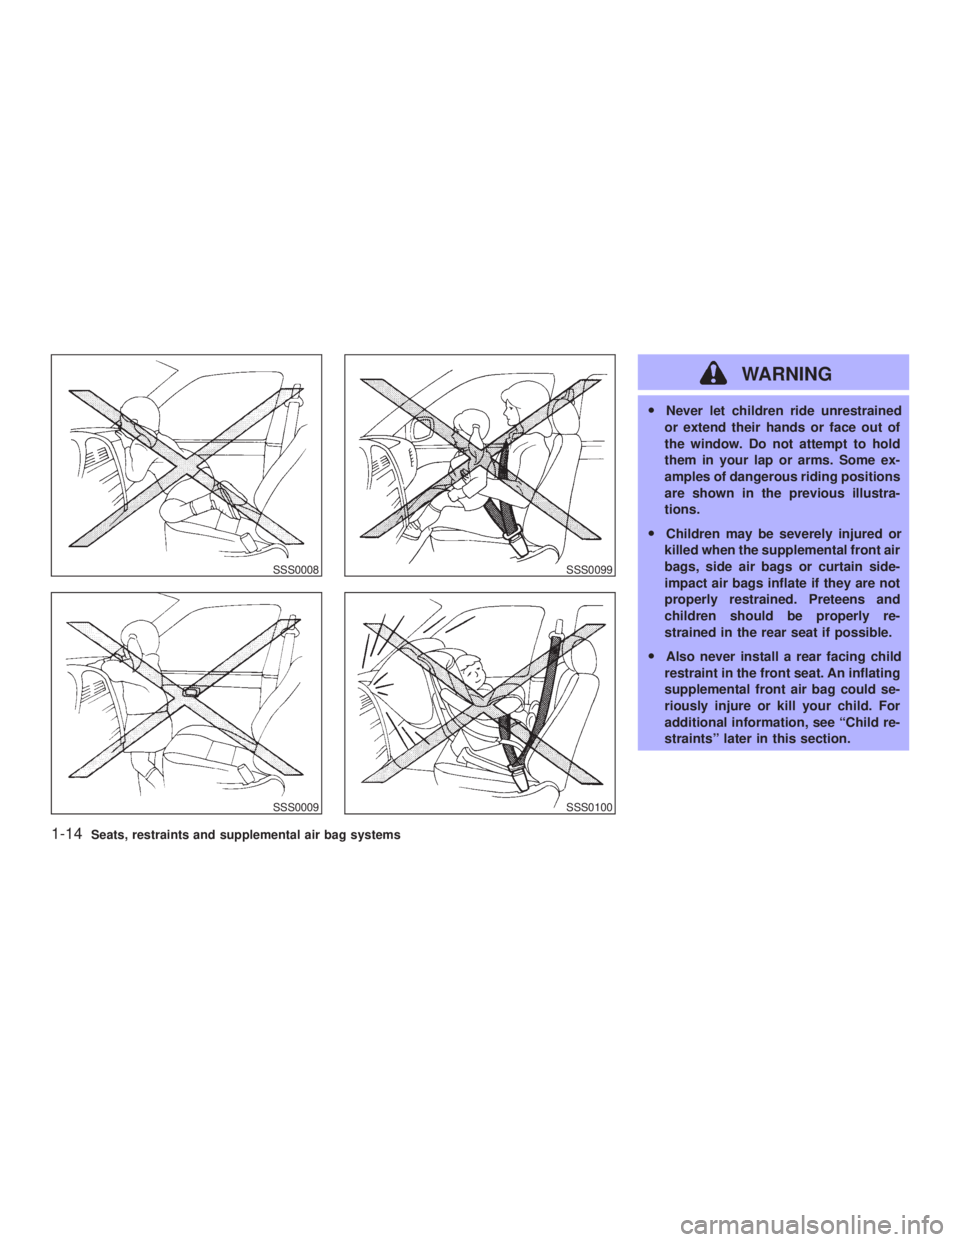
WARNING O Never let children ride unrestrained
or extend their hands or face out of
the window. Do not attempt to hold
them in your lap or arms. Some ex-
amples of dangerous riding positions
are shown in the previous illustra-
tions.
O Children may be severely injured or
killed when the supplemental front air
bags, side air bags or curtain side-
impact air bags inflate if they are not
properly restrained. Preteens and
children should be properly re-
strained in the rear seat if possible.
O Also never install a rear facing child
restraint in the front seat. An inflating
supplemental front air bag could se-
riously injure or kill your child. For
additional information, see ªChild re-
straintsº later in this section.SSS0008
SSS0009 SSS0099
SSS0100
1-14 Seats, restraints and supplemental air bag systems
Z 02.7.29/V35-D/V5.0
X
Page 54 of 256

2 Instruments and controls Instrument panel ....................................................... 2-2
Meters and gauges ................................................... 2-3
Speedometer and odometer ................................ 2-4
Tachometer .......................................................... 2-4
Engine coolant temperature gauge ...................... 2-5
Fuel gauge ........................................................... 2-5
Compass display ...................................................... 2-6
Warning/indicator lights and audible reminders ........ 2-9
Checking bulbs ..................................................... 2-9
Warning lights....................................................... 2-9
Indicator lights .................................................... 2-11
Audible reminders .............................................. 2-13
Security systems ..................................................... 2-13
Vehicle security system ...................................... 2-13
Infiniti Vehicle Immobilizer System ................... 2-14
Windshield wiper and washer switch ...................... 2-16
Rear window and outside mirror (if so equipped)
defroster switch ....................................................... 2-16
Headlight and turn signal switch ............................. 2-17
Xenon headlights (if so equipped) ..................... 2-17
Headlight switch ................................................. 2-17
Turn signal switch .............................................. 2-19
Fog light switch ....................................................... 2-20
Hazard warning flasher switch ................................ 2-20 Horn......................................................................... 2-21
Heated seats (if so equipped) ................................. 2-21
Vehicle dynamics control (VDC) off switch ............ 2-22
Clock ....................................................................... 2-23
Adjusting the time............................................... 2-23
Power outlet ............................................................ 2-23
Cigarette lighter and ashtray (accessory) ............... 2-24
Storage .................................................................... 2-25
Instrument pocket (Except for Navigation system
equipped models) ............................................... 2-25
Pocket (Manual transmission model) ................. 2-25
Glasses case ...................................................... 2-26
Cup holder .......................................................... 2-26
Glove box ........................................................... 2-27
Upper glove box (Except for Navigation system
equipped models) ............................................... 2-28
Console box ....................................................... 2-28
Rear armrest pocket ........................................... 2-29
Cargo net............................................................ 2-29
Coat hook (Coupe) ............................................. 2-30
Stowing golf bags ............................................... 2-30
Windows .................................................................. 2-31
Power windows .................................................. 2-31
Automatic adjusting function (Coupe) ................ 2-33
Z 02.7.29/V35-D/V5.0
X
Page 56 of 256

1. Headlight, fog light and turn signal switch
(P.2-17)
2. Steering switch for audio control (P.4-16)
3. Driver supplemental air bag (P.1-8)/Horn
(P.2-21)
4. Meters/gauges (P.2-3) 5. Cruise control main/set switch (P.5-11)
6. Windshield wiper/washer switch (P.2-16)
7. Center ventilator (P.4-2)
8. Center display - Compass (P.2-6), Air con-
ditioner (P.2-6), Ambient temperature
(P.2-6) 9. Rear window and outside mirror (if so
equipped) defogger switch (P.2-16)
10. Heater/air conditioner control (P.4-3)
11. Clock (P.2-23)
12. Navigation system* (if so equipped)
13. Security indicator light (P.2-14)
14. Passenger supplemental air bag (P.1-8)
15. Upper glove box (Except for Navigation
system equipped models) (P.2-26)
16. Side window defroster
17. Side ventilator (P.4-2)
18. Hood lock release handle (P.3-9)
19. Instrument brightness control switch
(P.2-19)
20. Trunk lid release switch (P.3-11)
21. VDC (Vehicle Dynamics Control) OFF
switch (P.2-22)
22. Outside mirror remote control (P.3-15)
23. Fuse box (P.8-20)
24. Tilting steering wheel lock lever (P.3-14)
25. Ignition switch/steering lock (P.5-4)
26. Cigarette lighter (P.2-24)
27. Ashtray (P.2-24)/Pocket
28. Radio/cassette player (P.4-8)/CD player
(P.4-8)
29. Hazard warning flasher switch (P.2-20)
30. Heated seat switch (P.2-21)
31. Power outlet
32. Glove box (P.2-26) SIC2023INSTRUMENT PANEL
2-2 Instruments and controls
Z 02.7.29/V35-D/V5.0
X
Page 65 of 256

CAUTIONRunning the engine with the engine oil
pressure warning light on could cause
serious damage to the engine almost
immediately. Turn off the engine as soon
as it is safe to do so.
Low washer fluid warning
lightThis light comes on when the washer tank fluid
is at a low level. Add washer fluid as neces-
sary. See ªWindow washer fluidº in the ª8.
Do-it-yourselfº section.
Seat belt warning light and
chimeThe light and chime remind you to fasten seat
belts. The light illuminates whenever the igni-
tion key is turned to ON, and will remain
illuminated until the driver's seat belt is fas-
tened.
See ªSeat beltsº in the ª1. Seats, restraints and
supplemental air bag systemsº section for pre-
cautions on seat belt usage. Supplemental air bag warning
light After turning the ignition key to the ON posi-
tion, the supplemental air bag warning light will
illuminate. The supplemental air bag warning
light will turn off after about 7 seconds if the
system is operational.
If any of the following conditions occur, the
supplemental front air bag, supplemental side
air bag and curtain side-impact air bag sys-
tems, and pre-tensioner seat belt need servic-
ing and your vehicle must be taken to your
nearest authorized INFINITI retailer.
O The supplemental air bag warning light
remains on after approximately 7 seconds.
O The supplemental air bag warning light
flashes intermittently.
O The supplemental air bag warning light
does not come on at all.
Unless checked and repaired, the Supplemen-
tal Restraint System and/or the pre-tensioner
seat belt may not function properly. For addi-
tional information, see ªSupplemental restraint
systemº in the ª1. Seats, restraints and supple-
mental air bag systemsº section. WARNING If the supplemental air bag warning light
is on, it could mean that the supplemen-
tal front air bag, supplemental side air
bag and curtain side-impact air bag sys-
tems and/or pre-tensioner seat belt sys-
tem will not operate in an accident.
INDICATOR LIGHTS
or Automatic
transmission
position indicator
light When the ignition key is turned to the ON
position, the indicator in the tachometer shows
the automatic transmission selector lever po-
sition. See ªDriving with automatic transmis-
sionº in the ª5. Starting and drivingº section.
Cruise main switch indicator
light The light comes on when the cruise control
main switch is pushed. The light goes out
when the main switch is pushed again. When
the cruise main switch indicator light comes Instruments and controls
2-11
Z 02.7.29/V35-D/V5.0
X
Page 68 of 256

How to activate the vehicle security
system 1. Close all windows.
The system can be activated even if the
windows are open.
2. Remove the key from the ignition switch.
3. Close and lock all doors, hood and trunk lid.
Lock all doors by pressing the LOCK button
on the keyfob. When using the keyfob, the
hazard indicators flash twice to indicate all
doors are locked. 4. Confirm that the SECURITY indicator light
comes on. The SECURITY indicator light
glows for about 30 seconds and then blinks.
The system is now activated. If, during this
30 second time period, the door is unlocked
by the key or the keyfob, or the ignition key
is turned to ACC or ON, the system will not
activate.
Even when the driver and/or passengers
are in the vehicle, the system will activate
with all doors, hood and trunk lid locked
and ignition key off. Turn the ignition key to
ACC to turn off the system.
Vehicle security system operation The security system will give the following
alarm:
O The headlights blink and the horn sounds
intermittently.
O The alarm automatically turns off after ap-
proximately 1 minute. However, the alarm
reactivates if the vehicle is tampered with
again. The alarm can be shut off by unlock-
ing a door with the key, or by pressing the
UNLOCK button on the keyfob.
The alarm is activated by:
O Opening the door without using the key or
keyfob. O Opening the trunk lid without using the key
or keyfob.
O Opening the hood.
How to stop alarm The alarm will stop only by unlocking a door
with the key, or by pressing the UNLOCK
button on keyfob. The alarm will not stop if the
ignition switch is turned to ACC or ON.
If the system does not operate as de-
scribed above, have it checked by your
INFINITI retailer.
INFINITI VEHICLE IMMOBILIZER
SYSTEM The Infiniti Vehicle Immobilizer System will not
allow the engine to start without the use of the
registered Infiniti Vehicle Immobilizer System
key.
If the engine fails to start using the registered
Infiniti Vehicle Immobilizer System key, it may
be due to interference caused by another
Infiniti Vehicle Immobilizer System key, an
automated toll road device or automated pay-
ment device on the key ring. Restart the en-
gine using the following procedures:
1. Leave the ignition switch in the ON position
for approximately 5 seconds.SIC1442
2-14 Instruments and controls
Z 02.7.29/V35-D/V5.0
X
Page 70 of 256

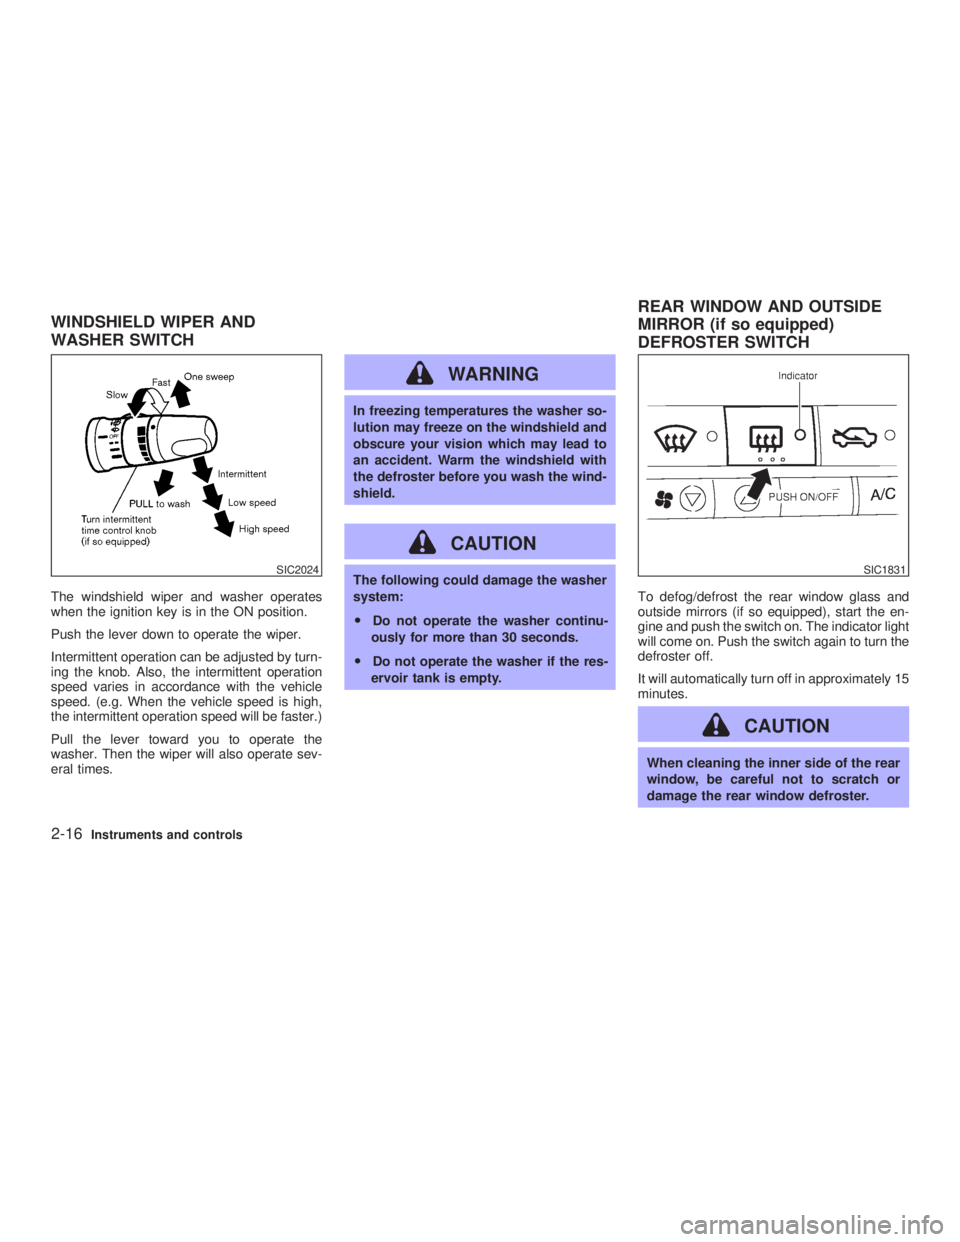
The windshield wiper and washer operates
when the ignition key is in the ON position.
Push the lever down to operate the wiper.
Intermittent operation can be adjusted by turn-
ing the knob. Also, the intermittent operation
speed varies in accordance with the vehicle
speed. (e.g. When the vehicle speed is high,
the intermittent operation speed will be faster.)
Pull the lever toward you to operate the
washer. Then the wiper will also operate sev-
eral times. WARNING In freezing temperatures the washer so-
lution may freeze on the windshield and
obscure your vision which may lead to
an accident. Warm the windshield with
the defroster before you wash the wind-
shield.
CAUTION The following could damage the washer
system:
O Do not operate the washer continu-
ously for more than 30 seconds.
O Do not operate the washer if the res-
ervoir tank is empty. To defog/defrost the rear window glass and
outside mirrors (if so equipped), start the en-
gine and push the switch on. The indicator light
will come on. Push the switch again to turn the
defroster off.
It will automatically turn off in approximately 15
minutes.
CAUTION When cleaning the inner side of the rear
window, be careful not to scratch or
damage the rear window defroster.SIC2024 SIC1831
WINDSHIELD WIPER AND
WASHER SWITCH REAR WINDOW AND OUTSIDE
MIRROR (if so equipped)
DEFROSTER SWITCH
2-16 Instruments and controls
Z 02.7.29/V35-D/V5.0
X
Page 73 of 256

Instrument brightness control The instrument brightness control operates
when the light switch is in the or
position.
Turn the control to adjust the brightness of
instrument panel lights and clock (except
power window switch lights).
When the control is turned upward until it
stops, the light intensity will be at maximum.
When the control is turned downward until it
stops, the light will be turned off. Headlight beam select To select the high beam, push the lever for-
ward. Pull it back to select the low beam.
Flashing signal Pulling the lever toward you will flash the
headlight high beam.
Daytime running light system
(Canada only) The headlights automatically illuminate at a
reduced intensity when the engine is started
with the parking brake released. The daytime
running lights operate with the headlight switch
in the OFF position or in the position.
Turn the headlight switch to the position
for full illumination when driving at night.
If the parking brake is applied before the
engine is started, the daytime running lights do
not illuminate. The daytime running lights illu-
minate once the parking brake is released.
The daytime running lights will remain on until
the ignition switch is turned off. WARNING When the daytime running light system
is active, tail lights on your vehicle are
not on. It is necessary at dusk to turn on
your headlights. Failure to do so could
cause an accident injuring yourself and
others.
TURN SIGNAL SWITCH
Turn signal Move the lever up or down to signal the turning
direction. When the turn is completed, the turn
signals cancel automatically.
Lane change signal To indicate a lane change, move the lever up
or down to the point where lights begin flash-
ing.SIC0922
Instruments and controls
2-19
Z 02.7.29/V35-D/V5.0
X
Page 77 of 256

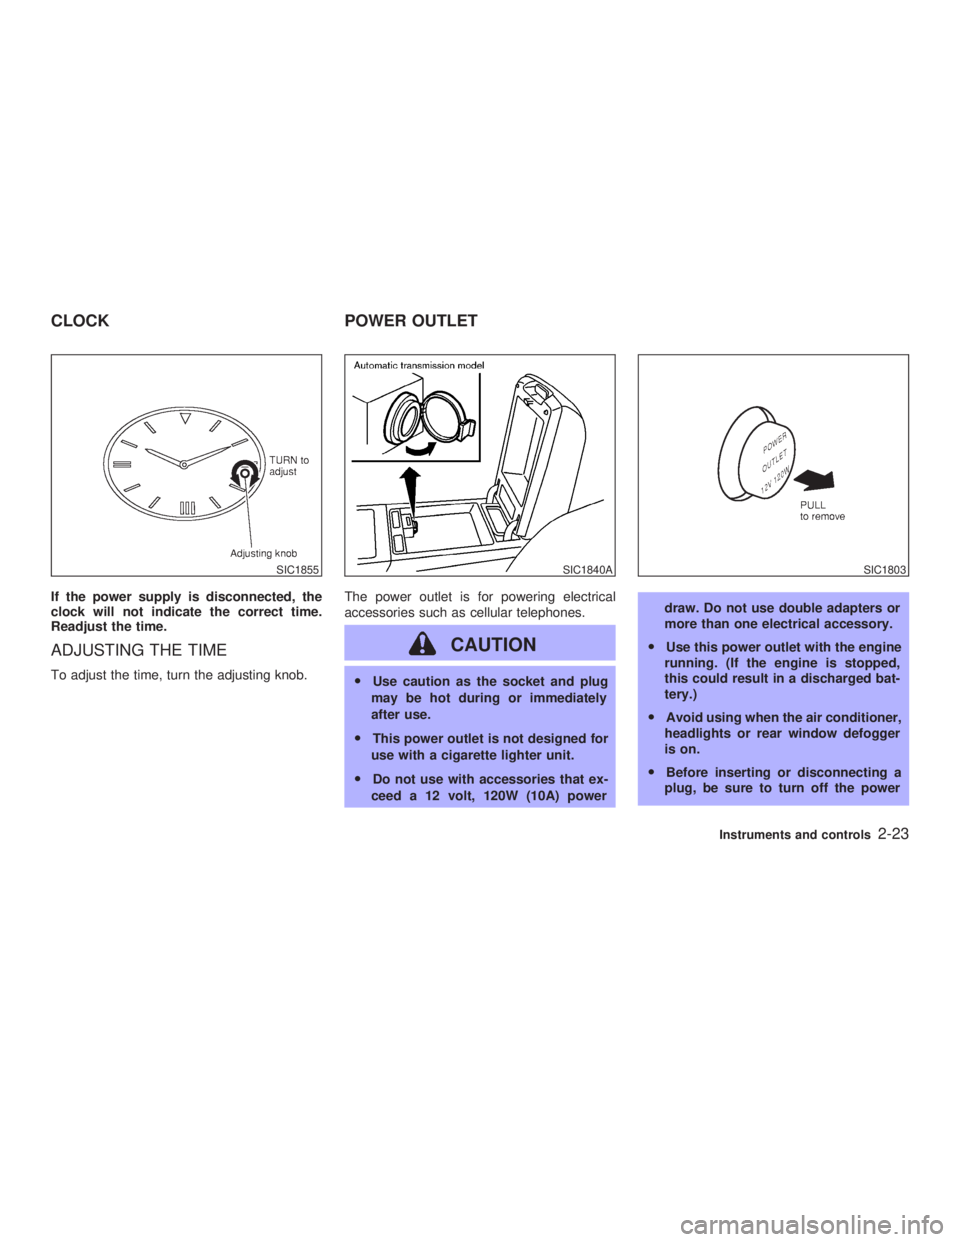
If the power supply is disconnected, the
clock will not indicate the correct time.
Readjust the time.
ADJUSTING THE TIME To adjust the time, turn the adjusting knob. The power outlet is for powering electrical
accessories such as cellular telephones.
CAUTION O Use caution as the socket and plug
may be hot during or immediately
after use.
O This power outlet is not designed for
use with a cigarette lighter unit.
O Do not use with accessories that ex-
ceed a 12 volt, 120W (10A) power draw. Do not use double adapters or
more than one electrical accessory.
O Use this power outlet with the engine
running. (If the engine is stopped,
this could result in a discharged bat-
tery.)
O Avoid using when the air conditioner,
headlights or rear window defogger
is on.
O Before inserting or disconnecting a
plug, be sure to turn off the powerSIC1855 SIC1840A SIC1803
CLOCK POWER OUTLET
Instruments and controls
2-23
Z 02.7.29/V35-D/V5.0
X